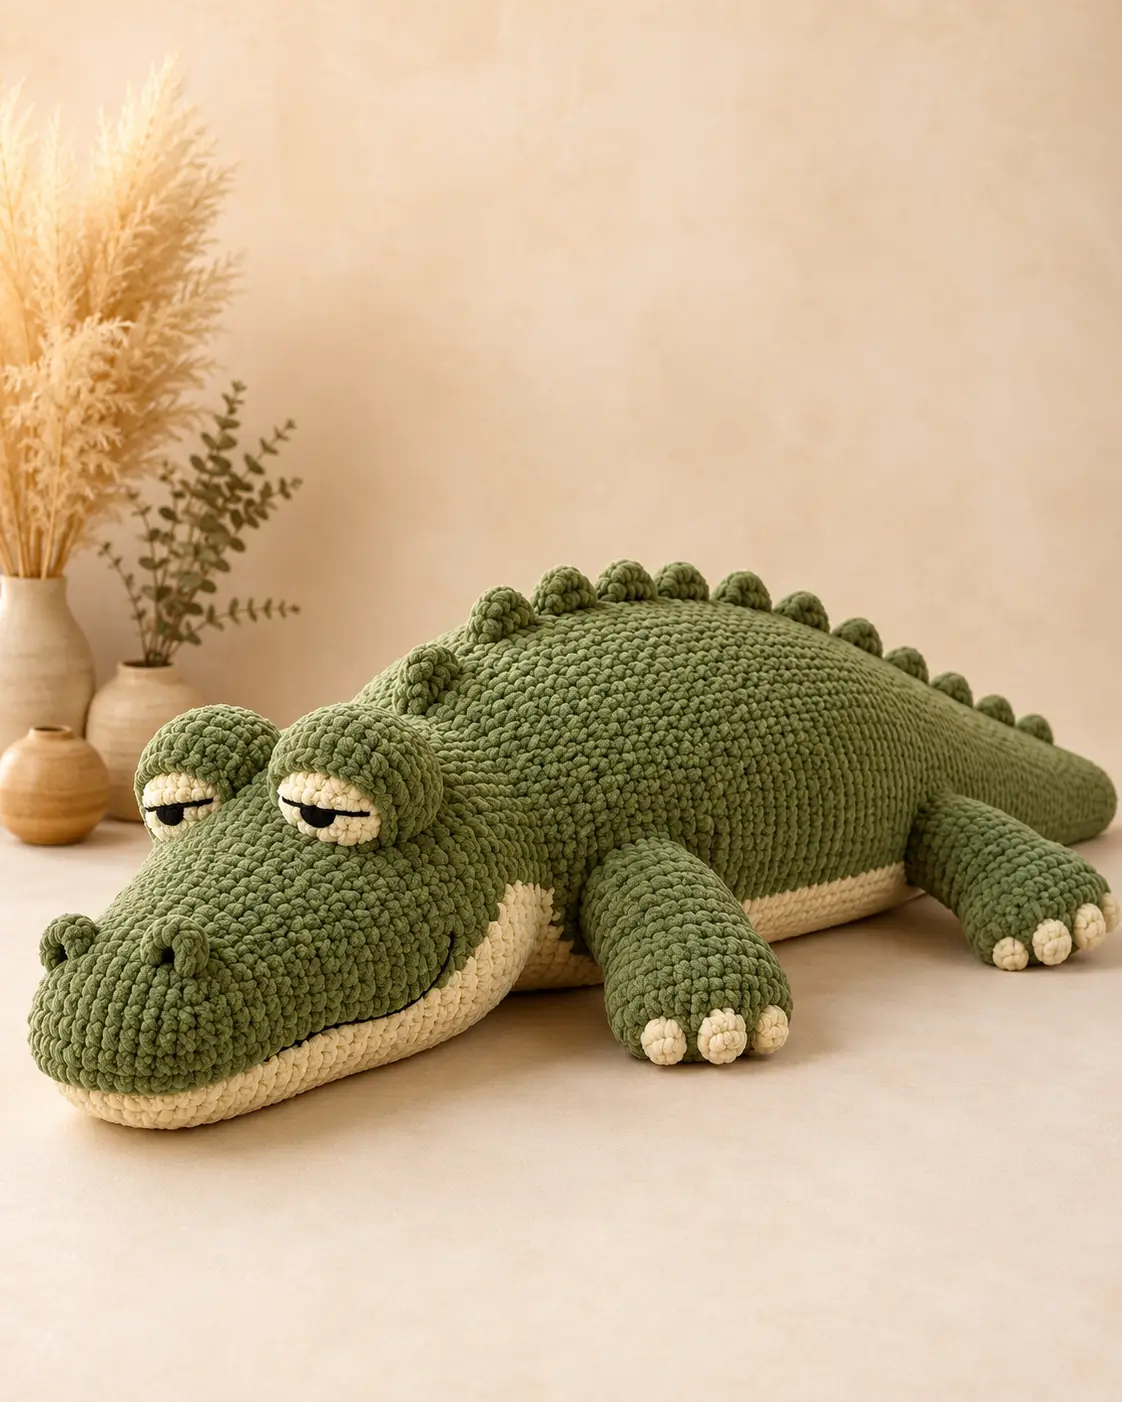
Crocodile eyes sit high on the skull, so this crocodile amigurumi crochet pattern starts by building raised eyelids before the smile line. Use olive chenille, cream accent yarn, black embroidery, a 5 mm hook, stuffing, and markers. The finished plush targets an intermediate maker and a low, long reptile shape for nursery shelving, market tables, or reptile-themed decor.
The Design: What Makes This Crocodile Different
This crocodile crochet pattern is built horizontally, not upright, because the animal reads correctly only when the belly stays low and the tail pulls the body backward. Flat. Stable. Low to the table. The head uses a 42-stitch plateau, then closes like a long oval so the snout does not become a ball. Raised eye bumps are sewn on top rather than embedded into the head; that keeps the sleepy expression visible from the front. The cream belly panel is added after stuffing, which helps the maker hide color joins and shape the underside. Many alligator amigurumi pattern attempts fail at the jaw line: the smile is stitched too high, and the toy starts looking like a dinosaur. This plush crocodile crochet toy keeps the black line below the eye bumps and above the cream jaw.
Project Info at a Glance
| Skill Level | Time | Finished Size | Hook | Best For |
|---|---|---|---|---|
| Intermediate | 5–7 hours | 30–35 cm benchmark in plush yarn; larger with heavier chenille | 5 mm | Low crocodile plush, reptile nursery decor, market display |
Materials and Tools
Yarn
- Olive green — plush chenille, #5 or #6 — 250–350 g — YarnArt Dolce, Himalaya Dolphin Baby, or similar 100 g chenille.
- Cream — plush chenille, #5 or #6 — 60–90 g — use for lower jaw, belly panel, eyelid strips, cheek patches, and toe claws.
- Black — embroidery floss or thin cotton — small amount — use for slit eyes, nostrils, and smile line.
- Optional dark olive — plush chenille, #5 or #6 — 20–30 g — use only if you want darker back spikes.
Tools
- Hook 5 mm for chenille body fabric
- Hook 4 mm for tighter toe claws and nostril bobbles
- Optional 10–12 mm safety eyes only if replacing the embroidered slit eyes
- Polyester stuffing
- Tapestry needle
- Long pins
- Stitch markers
- Scissors
- Black sewing thread for a sharper smile line
Abbreviations
MR = magic ring; sc = single crochet; inc = 2 sc in one stitch; dec = single crochet decrease; sl st = slip stitch; ch = chain; BLO = back loop only; FLO = front loop only; hdc = half double crochet.
Invisible decrease places the hook through the front loops of the next two stitches so the paired stitch closes without a ridge.
Pattern — Step by Step
Continuous spiral unless noted. The pattern below uses standard 6-stitch amigurumi shaping: increase rounds add 6 stitches, decrease rounds subtract 6 stitches, and the large sections plateau at 42 stitches.
Head and Snout Make 1
Yarn: olive green
R1: 6 sc in MR (6)
R2: inc ×6 (12)
R3: (sc, inc) ×6 (18)
R4: (2 sc, inc) ×6 (24)
R5: (3 sc, inc) ×6 (30)
R6: (4 sc, inc) ×6 (36)
R7: (5 sc, inc) ×6 (42)
R8–R15: sc around (42)
R16: (5 sc, dec) ×6 (36)
R17: sc around (36)
R18: (4 sc, dec) ×6 (30)
R19: (3 sc, dec) ×6 (24)
R20: (2 sc, dec) ×6 (18)
R21: (sc, dec) ×6 (12)
R22: dec ×6 (6)
Stuff firmly through R18, then reduce stuffing near the closure so the snout keeps a flattened oval profile. Sew the final 6 stitches closed.
Fasten off. Leave a 30 cm tail.
Body and Tail Make 1
Yarn: olive green
R1: 6 sc in MR (6)
R2: inc ×6 (12)
R3: (sc, inc) ×6 (18)
R4: (2 sc, inc) ×6 (24)
R5: (3 sc, inc) ×6 (30)
R6: (4 sc, inc) ×6 (36)
R7: (5 sc, inc) ×6 (42)
R8–R22: sc around (42)
R23: (5 sc, dec) ×6 (36)
R24–R28: sc around (36)
R29: (4 sc, dec) ×6 (30)
R30–R34: sc around (30)
R35: (3 sc, dec) ×6 (24)
R36–R40: sc around (24)
R41: (2 sc, dec) ×6 (18)
R42–R45: sc around (18)
R46: (sc, dec) ×6 (12)
R47–R49: sc around (12)
R50: dec ×6 (6)
Stuff the body firmly from R8 through R28. Use lighter stuffing from R35 onward so the tail tapers instead of bulging.
Fasten off. Leave a 35 cm tail.
Front Legs Make 2
Yarn: olive green
R1: 6 sc in MR (6)
R2: inc ×6 (12)
R3: (sc, inc) ×6 (18)
R4–R10: sc around (18)
R11: (sc, dec) ×6 (12)
R12–R13: sc around (12)
Stuff the paw end only. Flatten the open edge so the leg angles outward from the body.
Fasten off. Leave a 25 cm tail.
Back Legs Make 2
Yarn: olive green
R1: 6 sc in MR (6)
R2: inc ×6 (12)
R3: (sc, inc) ×6 (18)
R4: (2 sc, inc) ×6 (24)
R5–R8: sc around (24)
R9: (2 sc, dec) ×6 (18)
R10–R12: sc around (18)
Stuff the first half only. The hip end should stay soft enough to sew flat against the body.
Fasten off. Leave a 30 cm tail.
Eye Bumps Make 2
Yarn: olive green
R1: 6 sc in MR (6)
R2: inc ×6 (12)
R3: (sc, inc) ×6 (18)
R4–R5: sc around (18)
R6: (sc, dec) ×6 (12)
Stuff lightly. Shape each bump into a half-dome before pinning.
Fasten off. Leave a 25 cm tail.
Cream Eyelid Strips Make 2
Yarn: cream
Row 1: ch 9, sc in 2nd ch from hook and across (8)
Row 2: ch 1, turn, sc across (8)
Row 3: ch 1, turn, dec, 4 sc, dec (6)
Place each strip across the lower front of an eye bump. Embroider a black slit eye under the green upper lid.
Fasten off. Leave a 15 cm tail.
Lower Jaw and Belly Panel Make 1
Yarn: cream
Row 1: ch 25, sc in 2nd ch from hook and across (24)
Row 2–Row 5: ch 1, turn, sc across (24)
Row 6: ch 1, turn, dec, 20 sc, dec (22)
Row 7–Row 10: ch 1, turn, sc across (22)
Row 11: ch 1, turn, dec, 18 sc, dec (20)
Row 12–Row 15: ch 1, turn, sc across (20)
Row 16: ch 1, turn, dec, 16 sc, dec (18)
Row 17–Row 20: ch 1, turn, sc across (18)
Row 21: ch 1, turn, dec, 14 sc, dec (16)
Row 22–Row 24: ch 1, turn, sc across (16)
Pin the widest end under the snout. The narrower end runs under the body and stops before the tail taper.
Fasten off. Leave a 60 cm sewing tail.
Back Spikes / Rounded Dorsal Bumps Make 13
Yarn: olive green or dark olive
R1: 6 sc in MR (6)
R2: sc around (6)
R3: inc ×6 (12)
R4: sc around (12)
R5: dec ×6 (6)
Do not overstuff. A small pinch of fiberfill is enough, or the bumps will lean sideways.
Fasten off. Leave a 20 cm tail on each bump.
Nostrils Make 2
Yarn: olive green with black embroidery
R1: 6 sc in MR (6)
R2: sc around (6)
Flatten each bobble. Add one black stitch across the front before sewing to the snout.
Fasten off. Leave a 15 cm tail.
Toe Claws Make 12
Yarn: cream
R1: 6 sc in MR (6)
R2: sc around (6)
Close each small claw flat. Make three claws for each leg.
Fasten off. Leave a 10 cm tail.
Cheek Patches Make 2
Yarn: cream
R1: 6 sc in MR (6)
R2: inc ×6 (12)
R3: (sc, inc) ×6 (18)
Flatten into shallow circles. These sit at the side of the lower jaw, not high on the face.
Fasten off. Leave a 20 cm tail.
Smile Line and Eye Slits
Yarn/thread: black
Use black thread to stitch a shallow smile from one cheek patch edge to the other. Keep the line one round above the cream jaw panel. Add a second pass only if chenille hides the first line. Embroider each eye as a short horizontal slit under the green eyelid, then tack the cream strip down at both ends.
Assembly
- Pin the head to the wider body end with the snout angled slightly downward.
- Sew the head to the body with two passes, one around the neck seam and one 1 cm inside the first seam.
- Pin the cream jaw and belly panel from the snout underside to the body underside.
- Sew the cream panel down with small whipstitches, easing the edges around the chest curve.
- Attach the eye bumps on top of the head, spaced 4–5 cm apart for chenille scale.
- Sew the cream eyelid strips to the front of the eye bumps and embroider black slit eyes.
- Attach cheek patches to the lower sides of the snout, then embroider the smile line.
- Sew front legs at the shoulder line and back legs at the widest body section.
- Add three cream claws to each leg and place the nostrils near the snout tip.
- Sew 13 back bumps from behind the eye line down the spine and onto the tail.
The crocodile is complete when the belly sits flat and the tail touches the surface without twisting.
7 Technical Tips
- Stitch marker drift: Chenille hides the first stitch, so marker drift can move the back bumps off center by 2–3 stitches. Reset the marker at the top center every five body rounds.
- Stuffing firmness: A loose snout collapses under the eye bumps, while overstuffing makes the head round. Stop adding fiberfill when the head springs back but still presses flat under your palm.
- Invisible decrease gaps: Standard decreases leave holes in velvet yarn because the pile separates. Use front-loop invisible decreases on R16 through R22 of the head and R23 onward on the body.
- Eye placement timing: Do not sew the eyelids before the head is attached. Pin the head first, then set the eyes 4–5 cm apart so both slits face forward.
- Velvet tension failure: Chenille stitches stretch if pulled hard, making one side of the snout longer. Keep each sc about 5–6 mm tall with a 5 mm hook and relax the working yarn after every increase round.
- Pinning error: The belly panel can skew left if only the ends are pinned. Add pins every 3 cm along both edges before sewing the cream panel to the body.
- Tail weaving weakness: Short chenille tails shed out after handling. Weave each finishing tail through at least 6 stitches, reverse direction once, then bury the end inside the stuffed section.
Conclusion
This build works because the crocodile shape is kept long, low, and weighted through the belly. Finish one test eye bump before sewing both to the head; that single check controls the whole expression. The next practical step is to pin the cream jaw panel and back bumps at the same time, then photograph the side profile before stitching. Save the crocodile amigurumi crochet pattern to Pinterest, post the finished plush on Instagram, and tag the project with #RaisedEyeCrocodile. Which detail changed the crocodile most in your version: the sleepy eyelids, the cream jaw, or the row of rounded back bumps?









