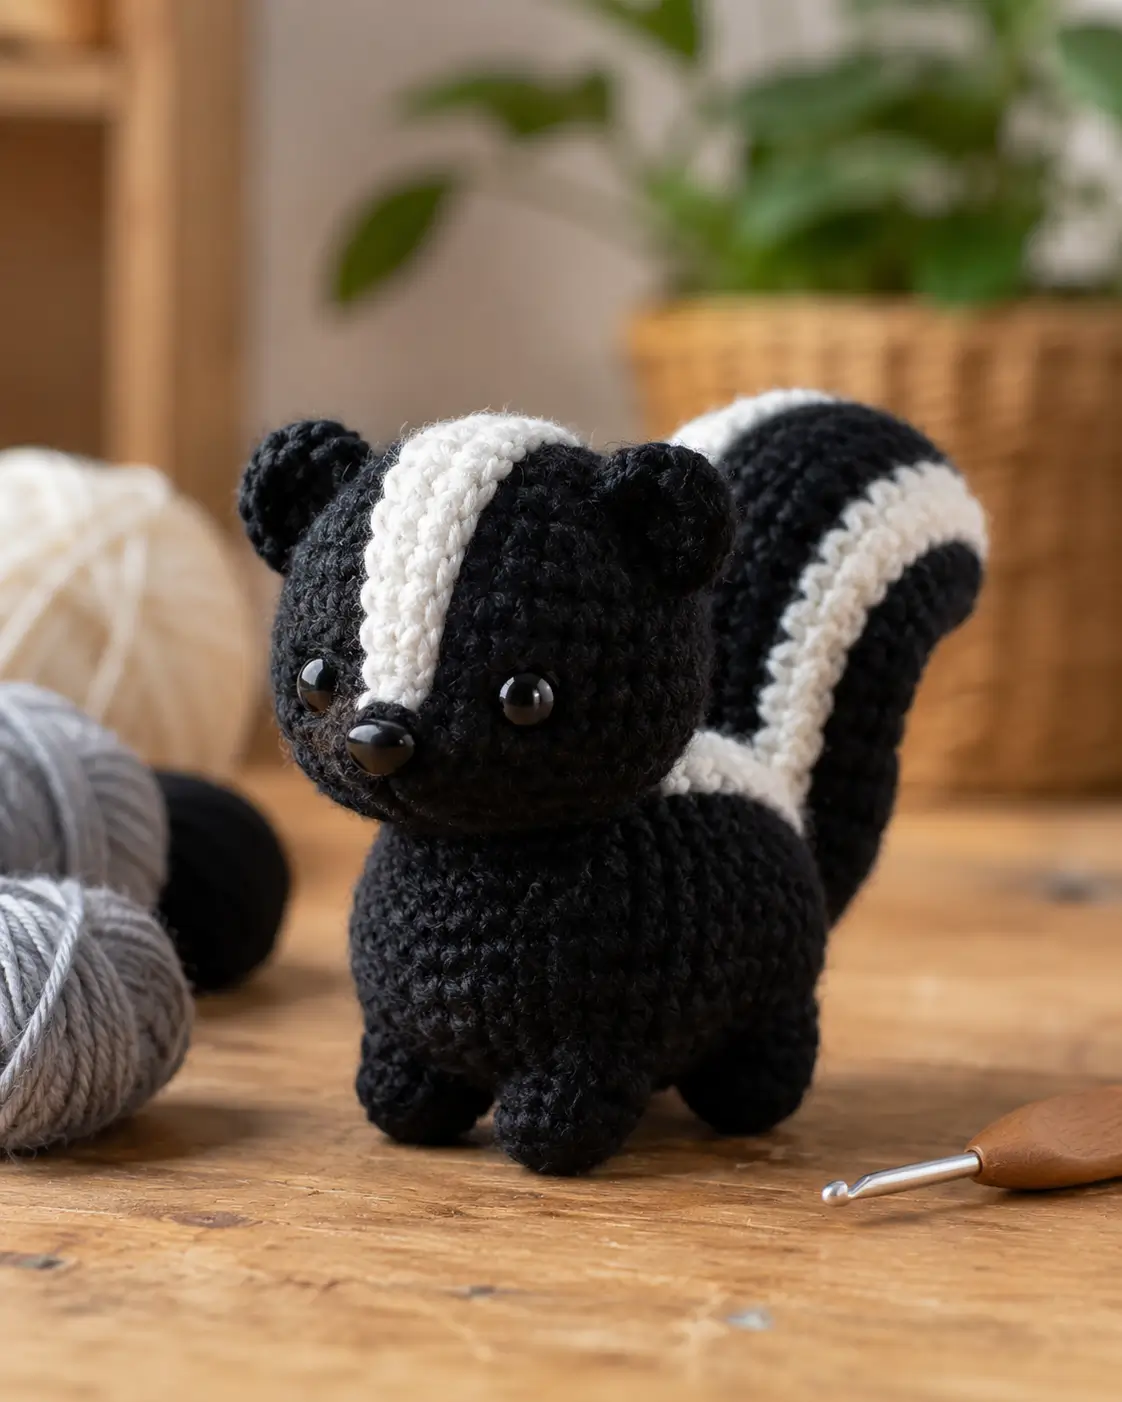
A skunk fails when the white stripe stops looking like a warning label. This skunk amigurumi crochet pattern uses worsted black and white yarn, a 3.75 mm hook, 12 mm safety eyes, and medium shaping for an about 15 cm sitting plush. Treat it as an intermediate build: separate head, oval body, four legs, small ears, raised tail, and sewn stripe placement for clear side-view photos.
The Design: What Makes This Skunk Different
Skunk anatomy depends on one graphic line, so this crochet skunk pattern treats white as a sewn surface band instead of color changes inside every round. That choice keeps the head round and makes stripe width adjustable after stuffing. The tail is built as a separate tapered tube with a broad strip sewn over it; this adds height without pulling the body backward. Ears stay small and low because oversized ears turn a skunk into a bear silhouette. For a striped skunk amigurumi pattern, the common maker mistake is centering the face stripe before the eyes are locked. Place the eyes first, then pin the stripe between them and over the crown. The pattern below follows the photo: compact body, short legs, glossy black features, and a high tail.
Project Info at a Glance
| Skill Level | Time | Finished Size | Hook | Best For |
|---|---|---|---|---|
| Intermediate | Few hours to one day | About 15 cm | 3.75 mm | Woodland display, market sample, photo prop |
The size, hook, yarn weight, and eye data follow verified skunk pattern listings using #4 yarn, 3.75 mm hook, and 12 mm safety eyes. Safety eyes are small parts, so use embroidery instead for toys meant for children under 3.
Materials and Tools
Yarn
- Black — #4 worsted/aran — about 56 g — Red Heart Super Saver, Loops & Threads Impeccable, or similar acrylic
- White — #4 worsted/aran — about 7–10 g — same yarn family for matching stitch height
- Black scrap — #4 worsted/aran — 1 g — for nose anchoring or embroidery backup
- Optional dark charcoal — #4 worsted/aran — 2 g — for subtle cheek patches if black-on-black detail disappears
Tools
- Hook 3.75 mm
- 12 mm black safety eyes
- 10–12 mm black safety nose, or black embroidery thread
- Polyester fiberfill
- Tapestry needle
- Stitch markers
- Straight pins
- Scissors
- Optional pipe cleaner, only for display pieces
Abbreviations
- MR = magic ring
- sc = single crochet
- inc = 2 sc in same stitch
- dec = invisible decrease
- sl st = slip stitch
- ch = chain
- BLO = back loop only
- FO = fasten off
- st = stitch
- sts = stitches
Invisible decrease: work through the front loops of the next two stitches, yarn over, pull through both front loops, yarn over again, and complete one sc to reduce bulk at closure.
Pattern — Step by Step
Continuous spiral unless noted. Place a stitch marker in the first stitch of every round.
Head — Make 1
Yarn: black
R1: 6 sc in MR (6)
R2: inc ×6 (12)
R3: [sc, inc] ×6 (18)
R4: [2 sc, inc] ×6 (24)
R5: [3 sc, inc] ×6 (30)
R6: [4 sc, inc] ×6 (36)
R7: sc around (36)
R8: sc around (36)
R9: sc around (36)
R10: sc around (36)
R11: sc around (36)
R12: sc around (36)
R13: [4 sc, dec] ×6 (30)
R14: [3 sc, dec] ×6 (24)
Insert eyes between R8 and R9, about 8 sts apart. Center the future white stripe between them before fixing washers.
R15: [2 sc, dec] ×6 (18)
R16: [sc, dec] ×6 (12)
Stuff firmly, shaping the cheeks round rather than flat.
R17: dec ×6 (6)
Fasten off. Leave 20 cm tail and close the hole.
Body — Make 1
Yarn: black
R1: 6 sc in MR (6)
R2: inc ×6 (12)
R3: [sc, inc] ×6 (18)
R4: [2 sc, inc] ×6 (24)
R5: [3 sc, inc] ×6 (30)
R6: [4 sc, inc] ×6 (36)
R7: sc around (36)
R8: sc around (36)
R9: sc around (36)
R10: sc around (36)
R11: sc around (36)
R12: sc around (36)
R13: sc around (36)
R14: [4 sc, dec] ×6 (30)
R15: sc around (30)
R16: [3 sc, dec] ×6 (24)
R17: [2 sc, dec] ×6 (18)
Stuff the lower half firmly so the skunk sits without rocking.
R18: [sc, dec] ×6 (12)
R19: dec ×6 (6)
Fasten off. Leave 25 cm tail.
Front Legs — Make 2
Yarn: black
R1: 6 sc in MR (6)
R2: inc ×6 (12)
R3: sc around (12)
R4: sc around (12)
R5: sc around (12)
Stuff only the lower half.
R6: dec ×6 (6)
Fasten off. Leave 18 cm tail.
Back Legs — Make 2
Yarn: black
R1: 6 sc in MR (6)
R2: inc ×6 (12)
R3: [sc, inc] ×6 (18)
R4: sc around (18)
R5: sc around (18)
R6: [sc, dec] ×6 (12)
R7: sc around (12)
Flatten the top edge before sewing so each foot points forward.
Fasten off. Leave 20 cm tail.
Ears — Make 2
Yarn: black
R1: 6 sc in MR (6)
R2: inc ×6 (12)
R3: [sc, inc] ×6 (18)
R4: sc around (18)
R5: sc around (18)
Do not stuff. Fold each ear into a shallow dome.
Fasten off. Leave 18 cm tail.
Snout and Nose Base — Make 1
Yarn: black
R1: 6 sc in MR (6)
R2: inc ×6 (12)
R3: sc around (12)
Add a safety nose to the center before sewing, or embroider a satin oval after assembly.
Fasten off. Leave 20 cm tail.
Raised Tail — Make 1
Yarn: black
R1: 6 sc in MR (6)
R2: inc ×6 (12)
R3: [sc, inc] ×6 (18)
R4: [2 sc, inc] ×6 (24)
R5: [3 sc, inc] ×6 (30)
R6: sc around (30)
R7: sc around (30)
R8: sc around (30)
R9: sc around (30)
R10: sc around (30)
R11: sc around (30)
R12: [3 sc, dec] ×6 (24)
R13: sc around (24)
R14: [2 sc, dec] ×6 (18)
R15: sc around (18)
R16: sc around (18)
R17: [sc, dec] ×6 (12)
R18: sc around (12)
Stuff gradually. For display only, insert a folded pipe cleaner after R16 to hold the tail curve.
R19: dec ×6 (6)
Fasten off. Leave 35 cm tail.
Head-to-Back Stripe — Make 1
Yarn: white
Ch 21.
Row 1: starting in second ch from hook, sc 20 (20)
Row 2: ch 1, turn, sc 20 (20)
This strip should run from the forehead, over the crown, and down the upper back. Add or remove 2 ch if your head is taller or shorter.
Fasten off. Leave 45 cm tail.
Tail Stripe — Make 1
Yarn: white
Ch 25.
Row 1: starting in second ch from hook, sc 24 (24)
Row 2: ch 1, turn, sc 24 (24)
Row 3: ch 1, turn, sc 24 (24)
Pin this strip from the tail tip toward the tail base. Trim length by folding the lower end under, not by cutting stitches.
Fasten off. Leave 50 cm tail.
Cheek Patches — Make 2
Yarn: black or dark charcoal
R1: 6 sc in MR (6)
R2: inc ×6 (12)
Keep these flat. They add cheek width beside the snout; black patches will read as shape more than color.
Fasten off. Leave 15 cm tail.
Assembly
- Sew the head to the body with the face angled slightly downward, matching the center back of both pieces.
- Sew the body closed first if any stuffing shifted during head attachment.
- Pin the snout between the eyes, centered below the white stripe path, then sew around the edge.
- Add the cheek patches to both sides of the snout, keeping their lower edges level.
- Pin the head-to-back stripe between the eyes, over the crown, and down the back; sew both long edges.
- Sew the ears from head rounds 5–8, one on each side, low enough to keep the skunk silhouette round.
- Sew front legs to the upper body, slightly forward of the side seam.
- Sew back legs to the lower body so the feet touch the table at the same time.
- Attach the tail to the back of the body at a 45-degree angle, then add extra stitches at the base for lift.
- Sew the tail stripe from tip to base, weave all tails through black stitches, and trim only after checking balance.
The finished skunk stands about 15 cm tall when made with #4 yarn and a 3.75 mm hook.
7 Technical Tips
- Stitch marker drift: If the marker moves more than 2 sts away from center back, the stripe will lean. Reset the marker at the back center before sewing the body stripe.
- Stuffing firmness: Under-stuffed heads collapse beside the snout and create a flat face. Add fiberfill until the head rebounds under light pressure without showing gaps.
- Invisible dec failure: A visible ladder forms when decreases are pulled too loose. Tighten the first loop of every dec before completing the sc.
- Eye placement timing: The eye washers become hard to reach after R14 of the head. Test the white stripe between the eyes before locking them at about 8 sts apart.
- Velvet tension: If substituting velvet or chenille, drop the hook by 0.5 mm from your usual size. Loose velvet stitches will stretch the tail base and make the 45-degree tail angle sag.
- Pinning error: Sewing the tail from one side first twists the stripe off center. Pin the tail at four points — top, bottom, left, right — before the first stitch.
- Tail weaving: Short woven ends can pop out through the white stripe. Weave each yarn tail at least 15 cm through black stitches, then reverse direction once before trimming.
Conclusion
This build depends on alignment more than stitch variety. Make the black body first, lock the eyes before closing the head, then pin every white stripe before sewing. The next step is to crochet a small test strip in your chosen white yarn and check whether it spans the forehead cleanly between the eyes. For posting, photograph the skunk from the side so the tail height and stripe path are visible. Share the finished skunk on Pinterest and Instagram with #StripedSkunkAmigurumi. Final keyword note: this skunk amigurumi crochet pattern works best when the tail stripe stays centered from tip to back. Will you keep the face stripe narrow, or widen it at the crown?









