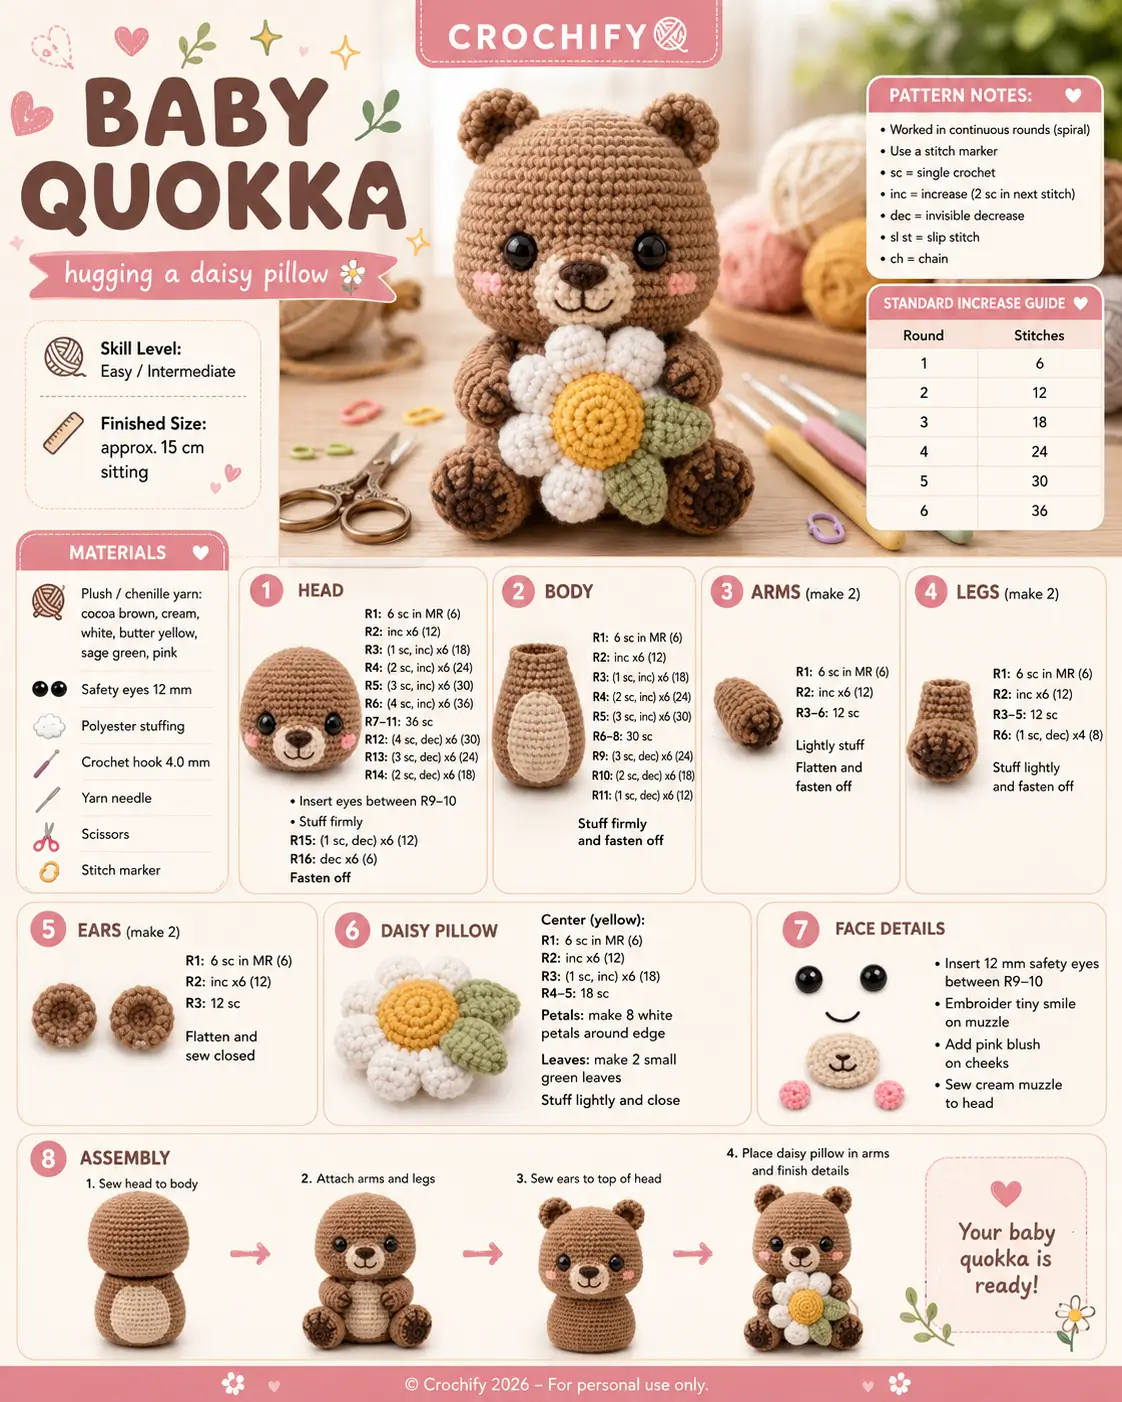
A quokka’s smile sits below the eyes, not across the whole muzzle; this quokka amigurumi crochet pattern controls that curve with a small oval snout. You will make a 15 cm plush quokka from chenille yarn with 12 mm safety eyes, a 4.0 mm hook, and a daisy pillow. Skill level: easy/intermediate. The finished toy reads well in front-view photos.
The Design: What Makes This Baby Quokka Different
This baby quokka crochet pattern uses a round 36-stitch head instead of a long animal head, because the face needs a wide cheek area and a low muzzle. The ears stay small and cup-like; tall ears would shift the silhouette toward a bear. A cream belly patch breaks up the cocoa body and keeps the daisy pillow from covering all torso detail. Published quokka patterns range from 11.5 cm to 18 cm, so the 15 cm plush size is a balanced middle point for a handheld toy. Source
One common mistake with a crochet quokka with flower is placing the eyes too high. The maker gets a blank forehead and a compressed muzzle. Here, the eye line stays at R9–10, with the muzzle directly below.
Project Info at a Glance
| Skill Level | Time | Finished Size | Hook | Best For |
|---|---|---|---|---|
| Easy / Intermediate | 4–6 hours | 15 cm sitting | 4.0 mm | Plush animal gift, nursery shelf, craft-fair display |
Materials and Tools
Comparable quokka patterns verify 15 cm sizing, 12 mm eye options, and a broad range of yarn weights. The uploaded sample is chenille, so the hook follows chunky amigurumi guidance rather than cotton sizing. Source
Yarn
- Cocoa brown — chunky chenille — 60 g — Himalaya Dolphin Baby, Premier Parfait Chunky, or similar
- Cream — chunky chenille — 20 g — muzzle and belly patch
- White — chunky chenille — 20 g — daisy petals
- Butter yellow — chunky chenille — 10 g — daisy center
- Sage green — chunky chenille — 8 g — leaves
- Pink — chunky chenille or cotton scrap — 2 g — cheek patches
- Dark brown — embroidery yarn or chenille scrap — small amount — nose and mouth
Tools
- Hook 4.0 mm
- 12 mm black safety eyes
- Polyester stuffing
- Yarn needle
- Stitch markers
- Pins
- Scissors
- Black or dark brown embroidery needle thread
Abbreviations
MR = magic ring; sc = single crochet; inc = increase; dec = invisible decrease; sl st = slip stitch; ch = chain; BLO = back loop only; hdc = half double crochet. Work invisible decrease through the front loops of the next 2 stitches so the decrease line does not form a visible ridge on the plush surface.
Pattern — Step by Step
Continuous spiral unless noted. Stitch counts in brackets mark the total stitch count at the end of each round. The head uses a medium 36-stitch plateau; the body uses a smaller 30-stitch plateau so the quokka sits with a heavy head and compact torso.
Head
Make 1. Yarn: cocoa brown.
R1: 6 sc in MR (6)
R2: inc ×6 (12)
R3: (1 sc, inc) ×6 (18)
R4: (2 sc, inc) ×6 (24)
R5: (3 sc, inc) ×6 (30)
R6: (4 sc, inc) ×6 (36)
R7: sc around (36)
R8: sc around (36)
R9: sc around (36)
R10: sc around (36)
R11: sc around (36)
R12: (4 sc, dec) ×6 (30)
R13: (3 sc, dec) ×6 (24)
R14: (2 sc, dec) ×6 (18)
Insert 12 mm safety eyes between R9 and R10, 7 stitches apart. Begin firm stuffing before the opening gets narrow.
R15: (1 sc, dec) ×6 (12)
R16: dec ×6 (6)
Fasten off. Leave a 20 cm tail and close the final hole through front loops.
Body
Make 1. Yarn: cocoa brown.
R1: 6 sc in MR (6)
R2: inc ×6 (12)
R3: (1 sc, inc) ×6 (18)
R4: (2 sc, inc) ×6 (24)
R5: (3 sc, inc) ×6 (30)
R6: sc around (30)
R7: sc around (30)
R8: sc around (30)
R9: (3 sc, dec) ×6 (24)
R10: (2 sc, dec) ×6 (18)
R11: (1 sc, dec) ×6 (12)
Stuff firmly at the base and lightly at the neck. A soft neck makes the head tip forward once the daisy is attached.
R12: dec ×6 (6)
Fasten off. Leave a 30 cm tail for sewing the head to the body.
Belly Patch
Make 1. Yarn: cream.
Ch 7.
R1: Starting in 2nd ch from hook, 5 sc, 3 sc in last ch, work on other side of chain, 4 sc, inc (14)
R2: inc, 4 sc, inc ×3, 4 sc, inc ×2 (20)
R3: sc around (20)
Fasten off. Leave a 25 cm tail. Do not stuff. Pin vertically on the front of the body from R4 to R9 before sewing.
Arms / Front Legs
Make 2. Yarn: cocoa brown.
R1: 6 sc in MR (6)
R2: inc ×6 (12)
R3: sc around (12)
R4: sc around (12)
R5: sc around (12)
R6: sc around (12)
Lightly stuff only the paw end. Flatten the top opening.
R7: sc through both layers across (6)
Fasten off. Leave a 25 cm tail.
Back Legs
Make 2. Yarn: cocoa brown.
R1: 6 sc in MR (6)
R2: inc ×6 (12)
R3: sc around (12)
R4: sc around (12)
R5: sc around (12)
R6: (1 sc, dec) ×4 (8)
Stuff lightly. Keep the foot broad, not round, so the toy sits without tipping.
Fasten off. Leave a 25 cm tail.
Ears
Make 2. Yarn: cocoa brown.
R1: 6 sc in MR (6)
R2: inc ×6 (12)
R3: sc around (12)
Flatten slightly. Do not stuff. Shape into a shallow cup with the yarn tail while sewing.
Fasten off. Leave a 20 cm tail.
Muzzle / Snout
Make 1. Yarn: cream.
Ch 5.
R1: Starting in 2nd ch from hook, 3 sc, 3 sc in last ch, work on other side of chain, 2 sc, inc (10)
R2: inc, 2 sc, inc ×3, 2 sc, inc ×2 (16)
R3: sc around (16)
Fasten off. Leave a 30 cm tail. Sew below the eyes, centered between R10 and R14. Add a dark brown triangular nose across the upper center, then embroider a short vertical line and two small smile curves.
Cheek Patches
Make 2. Yarn: pink.
R1: 6 sc in MR (6)
R2: inc ×6 (12)
Sl st to first stitch (12)
Fasten off. Leave a 15 cm tail. Sew one patch beside each side of the muzzle, level with the lower half of the eyes.
Daisy Center
Make 1. Yarn: butter yellow.
R1: 6 sc in MR (6)
R2: inc ×6 (12)
R3: (1 sc, inc) ×6 (18)
R4: sc around in BLO (18)
R5: (1 sc, dec) ×6 (12)
Add a thin layer of stuffing so the center rises above the petals.
R6: dec ×6 (6)
Fasten off. Leave a 25 cm tail.
Daisy Petals
Make 8. Yarn: white.
R1: 6 sc in MR (6)
R2: inc ×6 (12)
R3: sc around (12)
R4: sc around (12)
R5: (1 sc, dec) ×4 (8)
Stuff lightly at the rounded end only. Flatten the open end.
R6: sc through both layers across (4)
Fasten off. Leave a 20 cm tail on each petal.
Daisy Leaves
Make 2. Yarn: sage green.
R1: 6 sc in MR (6)
R2: inc ×6 (12)
R3: sc around (12)
R4: sc around (12)
R5: (1 sc, dec) ×4 (8)
Do not overstuff. Pinch one end while sewing to form a leaf point.
Fasten off. Leave a 20 cm tail.
Daisy Pillow Assembly
Make 1 assembled flower from white, yellow, and sage pieces.
Arrange the 8 petals in a circle with flattened ends meeting at the center. Sew neighboring petals together with 2–3 stitches at each side edge. Place the yellow center over the inner joins and sew through the BLO ridge from R4 so the seam stays hidden. Attach the two leaves behind the lower right side of the flower. Add a small amount of stuffing behind the center before closing the final stitches. The finished daisy should measure about 7 cm wide for a 15 cm quokka.
Assembly
- Sew the head to the body with the head centered over the body’s closing round.
- Add extra stitches at the front neck if the head tips forward.
- Sew the cream belly patch to the body front from R4 to R9.
- Sew the muzzle between the eyes and the lower face, then add the nose and smile.
- Attach the cheek patches on both sides of the muzzle.
- Sew the ears to the top of the head between R3 and R6, angled outward.
- Attach the back legs at the lower front sides of the body.
- Sew the arms to the upper body, angled forward so they can hold the daisy.
- Pin the daisy pillow against the chest and stitch the arms to two side petals.
- Weave all tails through the body, trim, and roll the toy between your palms to reset the plush pile.
The baby quokka is complete when it can sit unsupported and the daisy center remains visible from the front.
7 Technical Tips
- Eye placement failure mode: forehead-heavy face. Keep the 12 mm eyes between R9 and R10; moving them to R7 makes the muzzle sit too low and turns the quokka into a bear-like head.
- Stuffing failure mode: collapsing neck. Pack the body base firmly, then reduce stuffing at the top 2 rounds so the head seam can sit flat without a hard lump.
- Invisible decrease failure mode: diagonal gaps. On chenille yarn, work each dec through front loops only and pull the decrease closed with your finger behind the stitch.
- Stitch marker failure mode: drifting muzzle center. Move the marker every round and mark the front center of the head after R6; one missed stitch shifts the nose line by 3–4 mm.
- Velvet tension failure mode: worming tails. Leave 20–30 cm sewing tails and weave each tail in three directions, because short chenille tails can slide back out of the fabric.
- Pinning failure mode: crooked daisy pillow. Pin the daisy at three points before sewing: top petal to chest center, left side petal to left arm, right side petal to right arm.
- Cheek measurement failure mode: oversized blush. Keep each pink cheek to a 12-stitch flat circle; an 18-stitch cheek competes with the 12 mm eyes and crowds the muzzle.
Conclusion
Check the head width before sewing the flower, because the daisy changes the front balance more than the arms do. Pin the pillow first, then stitch only the back loops of two petals to the paws so the flower can sit proud of the body. Photograph the toy from eye level; that angle keeps the quokka muzzle visible instead of hiding it behind the daisy. Save this quokka amigurumi crochet pattern to Pinterest, and post the finished version on Instagram with #BabyQuokkaDaisy. For the next sample, test one change: would your quokka look more accurate with smaller ears or a wider cream muzzle?









