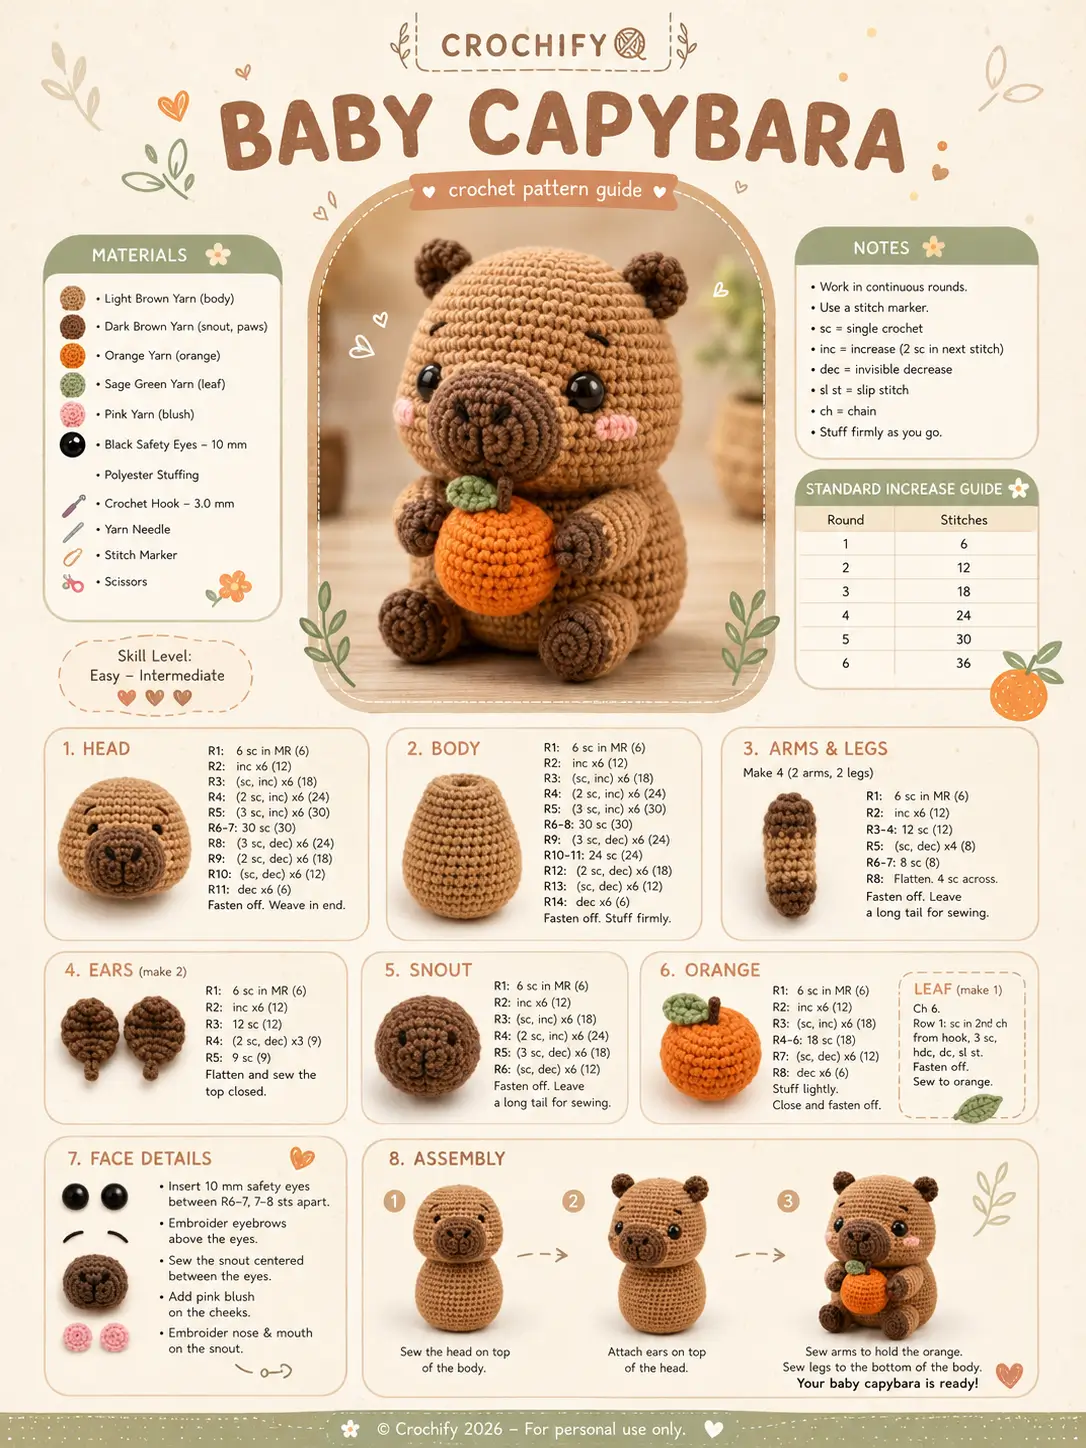
A capybara’s blocky muzzle has to look blunt, not bear-like. This baby capybara amigurumi crochet pattern builds that shape with a separate dark snout, small ears, cheek patches, and a held orange. Work it with DK/light worsted yarn, a 3.0 mm hook, and 10 mm eyes for a 12 cm easy-intermediate toy. It works well as a market-table sample because the orange identifies the character fast.
The Design: What Makes This Baby Capybara Different
You build the head as a small 30-stitch sphere, then add a low snout to pull the face forward. That choice matters because a capybara reads through muzzle mass, not ear size. The body stays wider at the base so the toy can sit while holding the orange. The maker should keep the back legs angled out; vertical legs make a capybara crochet pattern look like a bear cub. Small ears sit high and wide, which keeps the head rodent-like without adding height. Two secondary details carry the design: the free capybara crochet pattern style cheek patches and the capybara with orange crochet accessory. The common error is placing the eyes too high. Eyes set above the snout center remove the calm, low-faced capybara proportion.
Project Info at a Glance
| Skill Level | Time | Finished Size | Hook | Best For |
|---|---|---|---|---|
| Easy–Intermediate | 3–4 hours | 12 cm | 3.0 mm | Market samples, desk toys, fruit-themed amigurumi displays |
Materials and Tools
Yarn
- Light brown yarn — DK/light worsted — 45–50 g — YarnArt Jeans, Paintbox Cotton DK, or WeCrochet Brava-style acrylic
- Dark brown yarn — DK/light worsted — 18–30 g — snout, paws, ears, stem details
- Orange yarn — DK/light worsted — 10–12 g — held fruit
- Sage green yarn — DK/light worsted — 2 g — leaf
- Pink yarn — DK/light worsted — 2 g — cheek patches
- Black embroidery thread or yarn — small amount — brows, nose, and mouth
Tools
- Hook 3.0 mm
- Safety eyes 10 mm
- Polyester stuffing
- Yarn needle
- Stitch markers
- Pins
- Scissors
Abbreviations
- MR = magic ring
- sc = single crochet
- inc = increase, 2 sc in next stitch
- dec = invisible decrease
- sl st = slip stitch
- ch = chain
- BLO = back loop only
- FLO = front loop only
- hdc = half double crochet
- dc = double crochet
For invisible dec, insert the hook through the FLO of the next two stitches before pulling yarn through both.
Pattern — Step by Step
Work in a continuous spiral unless a part says rows.
Head
Yarn: light brown — Source: standard 6-stitch amigurumi math
R1: 6 sc in MR (6)
R2: inc ×6 (12)
R3: (sc, inc) ×6 (18)
R4: (2 sc, inc) ×6 (24)
R5: (3 sc, inc) ×6 (30)
R6: sc around (30)
R7: sc around (30)
R8: sc around (30)
R9: sc around (30)
R10: sc around (30)
R11: (3 sc, dec) ×6 (24)
R12: (2 sc, dec) ×6 (18)
R13: (sc, dec) ×6 (12)
Insert 10 mm eyes between R8 and R9, 7 stitches apart, before the opening becomes too small. Stuff firmly around the cheeks, not only at the crown.
R14: dec ×6 (6)
Fasten off. Leave a 20 cm tail and close the last 6 front loops.
Body
Yarn: light brown — Source: standard 6-stitch amigurumi math
R1: 6 sc in MR (6)
R2: inc ×6 (12)
R3: (sc, inc) ×6 (18)
R4: (2 sc, inc) ×6 (24)
R5: (3 sc, inc) ×6 (30)
R6: sc around (30)
R7: sc around (30)
R8: sc around (30)
R9: sc around (30)
R10: sc around (30)
R11: sc around (30)
R12: sc around (30)
R13: (3 sc, dec) ×6 (24)
R14: (2 sc, dec) ×6 (18)
Stuff from the base upward. Keep the lower half wider than the neck opening.
R15: (sc, dec) ×6 (12)
R16: dec ×6 (6)
Fasten off. Leave a 25 cm tail for sewing to the head.
Arms / Front Legs
Make 2. Yarn: start dark brown, change to light brown — Source: standard limb math
R1: With dark brown, 6 sc in MR (6)
R2: inc ×6 (12)
R3: sc around (12)
R4: sc around (12)
R5: dec ×6 (6)
R6: Change to light brown, sc around (6)
R7: sc around (6)
R8: sc around (6)
R9: sc around (6)
Do not overstuff. The front legs must bend around the orange.
Flatten the opening and work 3 sc across both layers (3). Fasten off. Leave a 20 cm tail.
Back Legs
Make 2. Yarn: start dark brown, change to light brown — Source: standard limb math
R1: With dark brown, 6 sc in MR (6)
R2: inc ×6 (12)
R3: (sc, inc) ×6 (18)
R4: sc around (18)
R5: sc around (18)
R6: Change to light brown, (sc, dec) ×6 (12)
R7: sc around (12)
R8: sc around (12)
Stuff the paw end only. Leave the upper leg soft so it sits flat against the body.
Flatten the opening and work 6 sc across both layers (6). Fasten off. Leave a 25 cm tail.
Ears
Make 2. Yarn: dark brown — Source: compact rounded-ear math
R1: 6 sc in MR (6)
R2: inc ×6 (12)
R3: sc around (12)
R4: sc around (12)
R5: dec ×6 (6)
Do not stuff. Pinch each ear into a low half dome before sewing.
Fasten off. Leave a 20 cm tail.
Snout
Yarn: dark brown — Source: standard dome math adapted for capybara muzzle
R1: 6 sc in MR (6)
R2: inc ×6 (12)
R3: (sc, inc) ×6 (18)
R4: sc around (18)
R5: sc around (18)
R6: (sc, dec) ×6 (12)
Stuff lightly. Overstuffing makes the muzzle round, which changes the capybara silhouette.
Fasten off. Leave a 30 cm tail. Embroider a vertical nose line and split mouth line after sewing.
Cheek Patches
Make 2. Yarn: pink — Source: flat circle math
R1: 6 sc in MR (6)
R2: inc ×6 (12)
sl st to first stitch (12)
Fasten off. Leave a 15 cm tail for sewing. Keep the patches flat.
Orange
Yarn: orange — Source: standard fruit sphere math
R1: 6 sc in MR (6)
R2: inc ×6 (12)
R3: (sc, inc) ×6 (18)
R4: (2 sc, inc) ×6 (24)
R5: sc around (24)
R6: sc around (24)
R7: sc around (24)
R8: (2 sc, dec) ×6 (18)
Start stuffing. Shape the fruit as a round sphere, not an egg.
R9: (sc, dec) ×6 (12)
R10: dec ×6 (6)
Fasten off. Leave a 15 cm tail and close the final opening.
Leaf
Yarn: sage green — Source: standard small leaf row
Ch 6.
Row 1: Starting in 2nd ch from hook, sl st, sc, hdc, dc, 3 sc in last ch; work along the underside: dc, hdc, sc, sl st (11).
Fasten off. Leave a 15 cm tail. Sew to the top of the orange.
Stem
Yarn: dark brown — Source: standard chain stem
Ch 5.
Row 1: Starting in 2nd ch from hook, sl st in each ch across (4).
Fasten off. Leave a 12 cm tail. Sew the stem beside the leaf.
Face Embroidery
Yarn: black embroidery thread — Source: photo-matched placement
Stitch one short brow above each eye between R6 and R7. Add two short nostril stitches on the snout, then work one vertical line down the center and two small curved mouth stitches. Keep all face stitches shallow so they do not pull the snout inward.
Assembly
- Sew the head to the body with the body opening centered under the head from R12 to R14.
- Pin the snout between the eyes with its top edge just below eye level.
- Sew the snout in place, adding a small amount of stuffing before the final quarter closes.
- Attach the ears high on the head between R4 and R6, aligned outside the eye columns.
- Sew the cheek patches beside the snout, one round lower than the eye line.
- Attach the back legs to the lower front body at a 35–45 degree outward angle.
- Pin the orange against the belly before sewing the arms.
- Sew the arms from shoulder level downward so the paws touch the orange.
- Attach the orange with 3–4 hidden stitches through the back of the fruit and body.
- Weave in all tails, then adjust stuffing through the fabric with the needle tip if the toy leans.
The finished piece is a sitting 12 cm baby capybara holding an orange.
7 Technical Tips
- Marker drift: If the round start moves more than 2 stitches by R10, the snout will sit off-center. Move the stitch marker every round and count the full 30-stitch plateau before closing the head.
- Stuffing firmness: A soft head collapses under the snout weight. Pack the cheek area until the head rebounds under finger pressure, then add less stuffing at the neck.
- Invisible dec gaps: Visible holes usually appear on R11–R14 of the head. Work each dec through FLO only and pull the next sc tight before moving to the following stitch.
- Eye placement timing: Insert 10 mm eyes before R13 of the head. After R13, the 12-stitch opening is too narrow for accurate washer pressure.
- Velvet tension: If substituting velvet or chenille, the same 30-stitch plateau may grow past 15 cm. Drop to a 2.75 mm hook or reduce one plateau round if the fabric stretches.
- Pinning angle: Back legs sewn level with the body make the toy tip backward. Pin each leg outward at 35–45 degrees and test the sitting balance before threading the needle.
- Tail weaving: Short yarn tails work loose near the orange because the arms are handled during display. Weave each orange and arm tail through at least 3 cm of body fabric before trimming.
Conclusion
Block the finished toy before final photos: pinch the ears forward, rotate the orange until the leaf points up, and trim every yarn end below the fabric surface. The baby capybara amigurumi crochet pattern should sit without support when the back legs are angled at 35–45 degrees from the body centerline. For the next step, photograph the toy from front, left three-quarter, and overhead views so the muzzle depth and orange scale are recorded. Share the finished capybara on Pinterest and Instagram with #BabyCapybaraOrange. Which placement reads more capybara-specific on your make: the orange held low in the paws, or the orange balanced higher under the snout?









