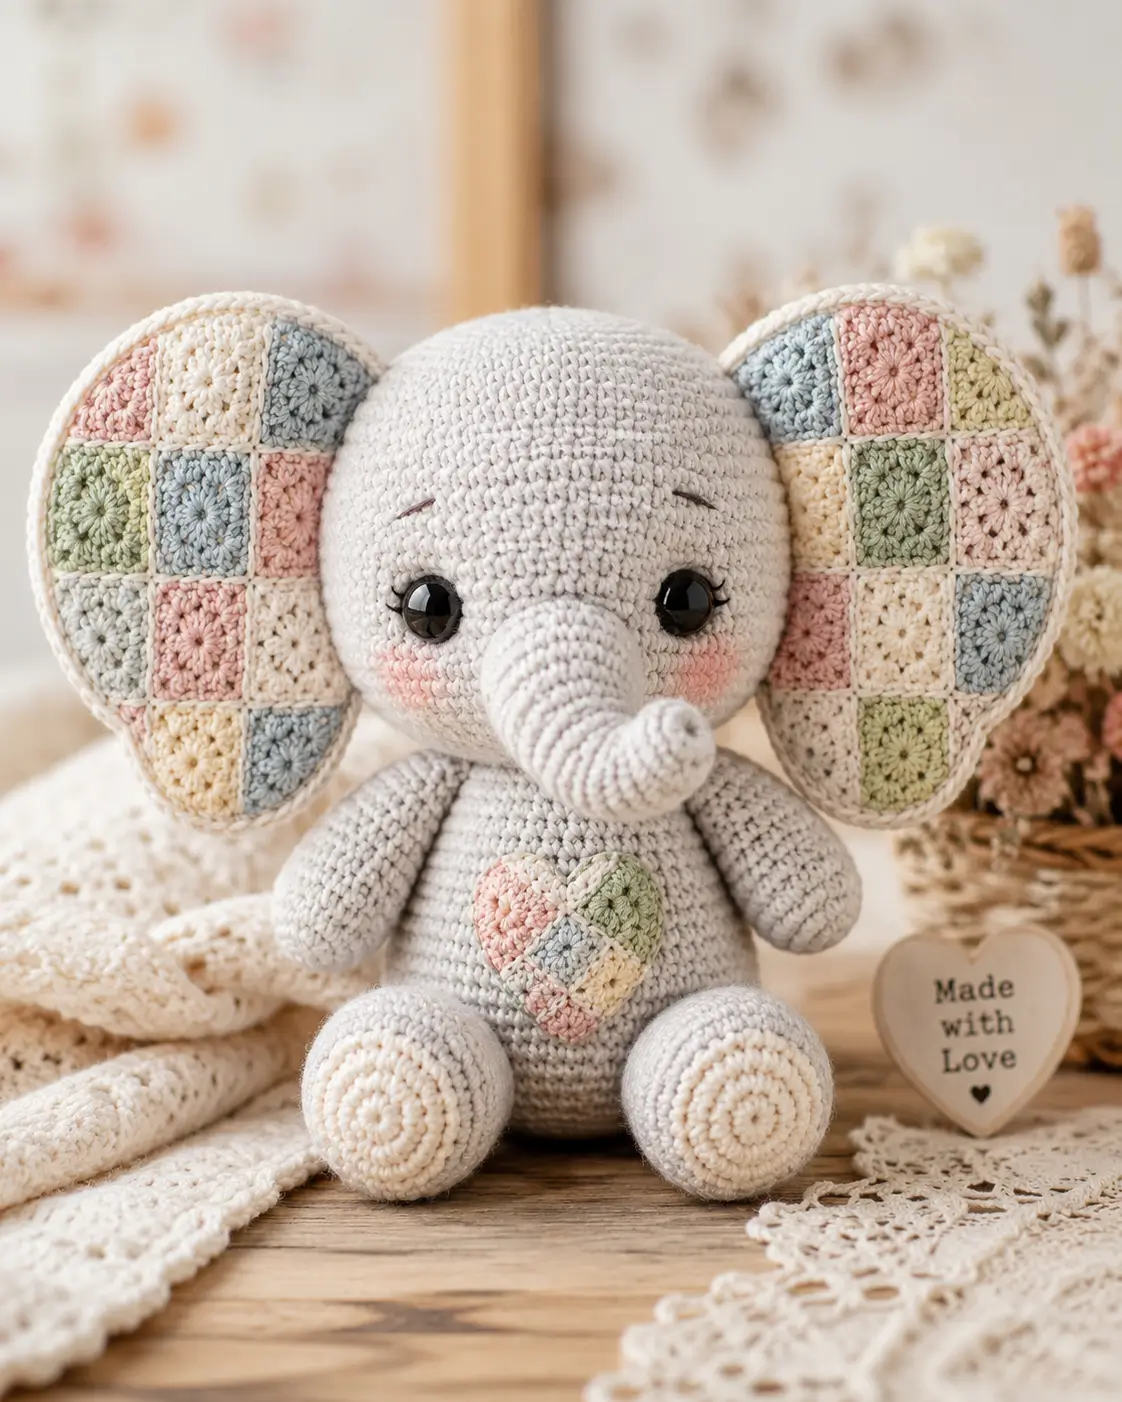
An elephant’s trunk has to curl without dragging the whole head forward. This elephant amigurumi crochet pattern uses worsted yarn, a 3.5–4 mm hook, 12 mm eyes, and a stable sitting build around 30.5 cm when the legs hang straight. Work it at intermediate level because the patchwork ears require color control. The finished toy is practical for nursery display or a pattern-shop sample.
The Design: What Makes This Elephant Different
The ears make the build different. Work the head as a plain sphere first, then treat each ear as a flat disk with a tiled face; this keeps the patchwork visible instead of forcing color changes through curved shaping. Place the trunk after the eyes, not before. That order gives you a vertical centerline, and the maker can pull the trunk tip upward without shifting the eye spacing. The sitting body uses a smaller plateau than the head, so the head reads elephant-heavy while the back legs hold the weight. Common error: making thin ears from only granny squares. They ripple, sag, and pull the head sideways. For a crochet elephant amigurumi, the patchwork elephant crochet pattern needs a firm backing.
Project Info at a Glance
| Skill Level | Time | Finished Size | Hook | Best For |
|---|---|---|---|---|
| Intermediate | One extended session | Approx. 30.5 cm head-to-feet with legs hanging straight | 3.5–4 mm | Patchwork practice, display samples, nursery shelves |
Materials and Tools
Yarn
- Warm ivory / pale gray — worsted #4 — 120 g — Lion Brand Basic Stitch, Paintbox Simply Aran, or similar smooth acrylic/cotton blend
- Cream — worsted #4 — 20 g — for ear borders, foot soles, and heart edging
- Blush pink — worsted #4 — 16 g — for cheeks and patchwork squares
- Powder blue — worsted #4 — 10 g — for patchwork squares
- Sage green — worsted #4 — 10 g — for patchwork squares
- Butter yellow — worsted #4 — 8 g — for patchwork squares
- Black embroidery thread — small amount — eyelashes and brows
Tools
- Hook 3.5 mm for firm cotton/acrylic tension, or Hook 4 mm for fuzzy worsted yarn
- 12 mm safety eyes, or larger 15 mm eyes if matching the photo scale
- Polyester stuffing
- Tapestry needle
- Locking stitch markers
- Pins
- Scissors
- Measuring tape
Abbreviations
- MR = magic ring
- sc = single crochet
- inc = increase, 2 sc in one stitch
- dec = invisible single crochet decrease
- sl st = slip stitch
- ch = chain
- BLO = back loop only
- FLO = front loop only
Invisible decrease uses the front loops of the next two stitches before the final yarn-over, reducing bulk on rounded amigurumi surfaces.
Pattern — Step by Step
Continuous spiral unless noted.
Head — Make 1
Yarn: warm ivory / pale gray
R1: 6 sc in MR (6)
R2: inc ×6 (12)
R3: (sc, inc) ×6 (18)
R4: (2 sc, inc) ×6 (24)
R5: (3 sc, inc) ×6 (30)
R6: (4 sc, inc) ×6 (36)
R7: (5 sc, inc) ×6 (42)
R8–R17: sc around (42)
R18: (5 sc, dec) ×6 (36)
R19: sc around (36)
R20: (4 sc, dec) ×6 (30)
R21: sc around (30)
R22: (3 sc, dec) ×6 (24)
R23: (2 sc, dec) ×6 (18)
Place eyes between R13 and R14, 10 stitches apart. Stuff firmly before the gap narrows.
R24: (sc, dec) ×6 (12)
R25: dec ×6 (6)
Fasten off. Leave 20 cm tail and close the opening.
Body — Make 1
Yarn: warm ivory / pale gray
R1: 6 sc in MR (6)
R2: inc ×6 (12)
R3: (sc, inc) ×6 (18)
R4: (2 sc, inc) ×6 (24)
R5: (3 sc, inc) ×6 (30)
R6: (4 sc, inc) ×6 (36)
R7–R16: sc around (36)
R17: (4 sc, dec) ×6 (30)
R18–R19: sc around (30)
R20: (3 sc, dec) ×6 (24)
R21: sc around (24)
R22: (2 sc, dec) ×6 (18)
Stuff the base more firmly than the neck area.
R23: (sc, dec) ×6 (12)
R24: dec ×6 (6)
Fasten off. Leave 35 cm tail for sewing to the head.
Arms / Front Legs — Make 2
Yarn: warm ivory / pale gray
R1: 6 sc in MR (6)
R2: inc ×6 (12)
R3: (sc, inc) ×6 (18)
R4–R8: sc around (18)
R9: (sc, dec) ×6 (12)
R10–R15: sc around (12)
Stuff the paw end only. Leave the upper arm soft enough to sit flat.
Fasten off. Leave 25 cm tail.
Back Legs / Seated Feet — Make 2
Yarn: cream for sole, then warm ivory / pale gray
R1: 6 sc in MR with cream (6)
R2: inc ×6 (12)
R3: (sc, inc) ×6 (18)
R4: (2 sc, inc) ×6 (24)
R5: BLO sc around (24)
Change to warm ivory / pale gray.
R6: sc around (24)
R7: (2 sc, dec) ×6 (18)
R8: sc around (18)
R9: (sc, dec) ×6 (12)
Stuff into a rounded foot. Keep the cream sole facing forward.
R10: dec ×6 (6)
Fasten off. Leave 30 cm tail.
Trunk — Make 1
Yarn: warm ivory / pale gray
R1: 6 sc in MR (6)
R2–R8: sc around (6)
R9: inc ×6 (12)
R10–R14: sc around (12)
R15: (sc, inc) ×6 (18)
R16–R18: sc around (18)
Stuff lightly. Thread the starting tail through the top side of R3–R8 and pull the tip upward to create the curl.
Fasten off. Leave 35 cm tail.
Ear Bases — Make 2
Yarn: cream outer edge, warm ivory / pale gray back
R1: 6 sc in MR (6)
R2: inc ×6 (12)
R3: (sc, inc) ×6 (18)
R4: (2 sc, inc) ×6 (24)
R5: (3 sc, inc) ×6 (30)
R6: (4 sc, inc) ×6 (36)
R7: (5 sc, inc) ×6 (42)
R8: sc around (42)
R9: (5 sc, dec) ×6 (36)
Do not stuff. Flatten the piece into a wide oval. Work one extra sl st at the top edge if the ear twists.
Fasten off. Leave 45 cm tail.
Patchwork Ear Tiles — Make 18
Yarn: blush pink, powder blue, sage green, butter yellow, cream
Each tile is worked in joined rounds.
R1: 6 sc in MR (6)
R2: inc ×6 (12)
R3: [2 sc, (sc, ch 2, sc) in next st] ×4 (16 sc + 4 corner spaces)
R4: with cream, sc in each sc and work 3 sc in each ch-2 corner (28)
Fasten off. Leave 10 cm tail per tile.
Make 9 tiles for each ear. Arrange them 3 across by 3 down on each flattened ear base. Sew through the cream borders only, then surface-crochet cream seams between tiles if the joins look loose.
Cheek Patches — Make 2
Yarn: blush pink
R1: 6 sc in MR (6)
R2: inc ×6 (12)
Sl st to first stitch.
Fasten off with 20 cm tail. Keep the circles flat. Do not stuff.
Patchwork Heart Belly Applique — Make 1
Yarn: blush pink, powder blue, sage green, butter yellow, cream
Make 4 mini tiles first.
R1: 6 sc in MR (6)
R2: inc ×6 (12)
R3: [2 sc, (sc, ch 2, sc) in next st] ×4 (16 sc + 4 corner spaces)
Fasten off each tile.
Sew the tiles into a 2 × 2 block. Rotate the block into a diamond. With cream, attach yarn at the top cleft: work 6 sc around the left top curve, 5 sc down the left side, 3 sc in the bottom point, 5 sc up the right side, and 6 sc around the right top curve (25). Sl st to close. Fasten off with 30 cm tail.
Eyebrows and Lashes — Make 2 Sets
Yarn: black embroidery thread
For each eyebrow, make one 1.8 cm curved backstitch above the eye. For each eyelash set, stitch three short lines at the outside edge of the eye: 4 mm, 5 mm, and 4 mm. Knot inside the head before final head closure if possible.
Assembly
- Pin the head with the eye line level and the lower closing point centered at the back underside.
- Place the body under the head with the body opening hidden against the lower head curve, then sew twice around the neck join.
- Add cheek patches two rounds below the eyes and slightly outside the trunk line.
- Embroider eyebrows above the eyes and lashes at the outer eye edges.
- Sew arms to the upper body, starting one round below the neck join.
- Attach back legs to the lower front body so the cream soles face forward and sit evenly.
- Center the trunk between the eyes, with the upper edge just below the eye line, then sew around the 18-stitch opening.
- Pin ears to both sides of the head from R8 to R17 and check that the patchwork panels face forward.
- Sew the heart applique to the center belly, keeping the bottom point aligned with the body centerline.
- Weave all tails through stuffed areas, trim only after tension is stable, and roll the toy gently on the table to test balance.
The elephant is complete when it sits without rolling backward and both ears hold the same angle.
7 Technical Tips
- Stitch marker drift: A one-stitch drift on the head will move the trunk off center by about 3–4 mm. Reset the marker after every decrease round, not after the full section.
- Stuffing firmness: A soft neck causes head wobble because the ears add side weight. Pack the lower head and upper body to medium-firm density before sewing.
- Invisible decrease gaps: Visible stuffing at R22–R25 means the hook is too large or the decreases are pulled loose. Switch from 4 mm to 3.5 mm for the head if gaps appear.
- Eye placement timing: Eyes inserted after R18 are harder to align because the head has already started closing. Mark both eyes at R13–R14, then check the trunk center before locking washers.
- Patchwork tension: Ear tiles that measure more than 3.5 cm each will crowd the disk and curl the ear edge. Block tiles to the same square size before sewing them onto the base.
- Pinning asymmetry: One ear 1 round higher than the other changes the face immediately. Pin both ear tops to the same head round before sewing the lower edges.
- Tail weaving: Short tails under 10 cm can pull out from cream borders during handling. Weave every tile tail through at least 4 nearby stitches before trimming.
Conclusion
This design depends on three checks: a centered trunk, reinforced ears, and a body firm enough to carry the head. Finish one ear completely before starting the second so the tile layout can be mirrored, not guessed. The next concrete step is to crochet one patchwork tile and measure it; that single square controls the final ear size. Save this elephant amigurumi crochet pattern to Pinterest, then post the finished elephant on Instagram with the ear layout facing the camera. Use hashtag #PatchworkEarElephant. Which tile color should sit closest to the trunk on your elephant’s left ear?









