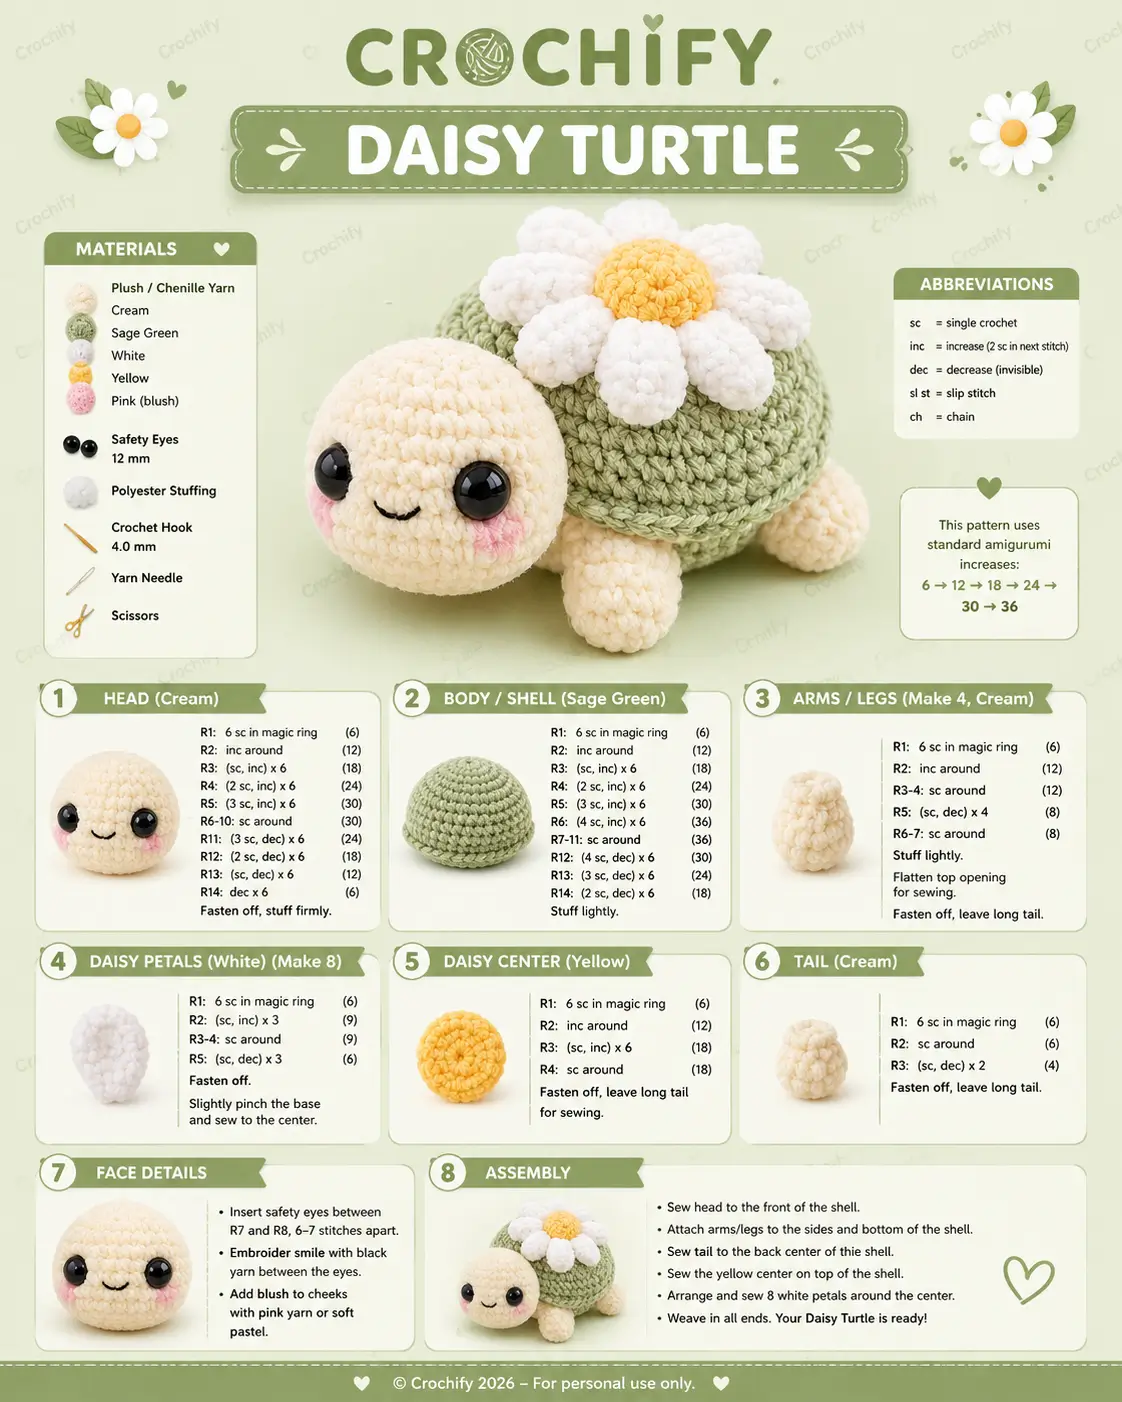
A turtle carrying a daisy shell has to balance a flat flower on a rounded dome. This daisy turtle amigurumi crochet pattern uses plush chenille yarn, a 4.0 mm hook, 12 mm safety eyes, and a medium 36-stitch shell. The finished piece suits advanced beginners who can read spiral rounds. Make it for spring market stock because the flower shell reads clearly from a table.
The Design: What Makes Daisy Turtle Different
The shell is the load-bearing part, so this design keeps the sage dome at a 36-stitch plateau instead of using a tall ball. A lower dome stops the daisy from rolling to one side when the turtle sits. The head uses a 30-stitch plateau, smaller than the shell, because a flower turtle amigurumi needs the shell to read first and the face second. Cream limbs are short cylinders, not long flippers; they brace the body without hiding the shell edge. The common mistake is sewing the daisy center before spacing all eight petals. That compresses one side and turns a crochet daisy turtle pattern into an uneven sunflower shape. Published flower turtle patterns also lean on bulky chenille and no-sew or low-sew construction, so this version adds clearer sewn placement points.
Project Info at a Glance
| Skill Level | Time | Finished Size | Hook | Best For |
|---|---|---|---|---|
| Advanced beginner / basic amigurumi | 1 hour plus sewn assembly | About 14–25 cm depending on yarn tension | 4.0 mm | Spring market plushies, nursery shelf pieces, flower-shell turtle sets |
Published Daisy Turtle patterns range from a compact 5.5 in version to a 25 cm YarnArt Dolce version, with hook sizes around 4.0–4.5 mm for plush yarn.
Materials and Tools
Yarn
Published turtle and flower-turtle patterns support these working amounts: about 30 g cream for the turtle body areas, plus about 35 g green, 15 g white, and 15 g yellow for the flower-shell version.
- Cream — super bulky chenille — 30 g — Premier Parfait Chunky or YarnArt Dolce
- Sage green — super bulky chenille — 35 g — Premier Parfait Chunky Seaglass, Pistachio, or close substitute
- White — super bulky chenille — 15 g — Premier Parfait Chunky White
- Yellow — super bulky chenille — 15 g — Premier Parfait Chunky Sunshine
- Pink blush — small scrap — chenille or soft acrylic for cheek patches
Tools
- Hook 4.0 mm
- 12 mm black safety eyes
- Polyester stuffing
- Yarn needle
- Stitch markers
- Pins
- Scissors
- Black embroidery yarn or thread
Premier Parfait Chunky is listed as #6 super bulky, 100% polyester, 100 g / 120 m, which matches the plush scale used by many daisy turtle patterns.
Abbreviations
- MR = magic ring
- sc = single crochet
- inc = increase, 2 sc in next stitch
- dec = invisible decrease
- sl st = slip stitch
- ch = chain
- BLO = back loop only
- FO = fasten off
Invisible decrease works through the front loops of the next two stitches before finishing one sc; it reduces visible bumps on amigurumi fabric.
Pattern — Step by Step
Use a continuous spiral unless a flat patch says to join. Place a stitch marker in the first stitch of every round. This daisy turtle amigurumi crochet pattern uses standard 6-stitch increase math: each increase round adds 6 stitches, and each decrease round removes 6 stitches.
Head
Yarn: cream — Source: standard 6-stitch amigurumi sphere math.
R1: 6 sc in MR (6)
R2: inc ×6 (12)
R3: (sc, inc) ×6 (18)
R4: (2 sc, inc) ×6 (24)
R5: (3 sc, inc) ×6 (30)
R6–R10: sc around (30)
R11: (3 sc, dec) ×6 (24)
R12: (2 sc, dec) ×6 (18)
R13: (sc, dec) ×6 (12)
Insert 12 mm safety eyes between R7 and R8, 6–7 stitches apart. Stuff firmly before final decrease.
R14: dec ×6 (6)
Fasten off. Leave a 20 cm tail and close the remaining hole.
Body / Shell
Yarn: sage green — Source: standard 36-stitch medium amigurumi dome math.
R1: 6 sc in MR (6)
R2: inc ×6 (12)
R3: (sc, inc) ×6 (18)
R4: (2 sc, inc) ×6 (24)
R5: (3 sc, inc) ×6 (30)
R6: (4 sc, inc) ×6 (36)
R7–R11: sc around (36)
R12: (4 sc, dec) ×6 (30)
R13: (3 sc, dec) ×6 (24)
R14: (2 sc, dec) ×6 (18)
Stuff lightly. The base should sit flat, not round like a ball.
R15: (sc, dec) ×6 (12)
R16: dec ×6 (6)
Fasten off. Leave a 30 cm tail for sewing to the head.
Arms / Front Legs
Yarn: cream — Source: standard small cylinder math.
R1: 6 sc in MR (6)
R2: inc ×6 (12)
R3–R4: sc around (12)
R5: (sc, dec) ×4 (8)
R6–R7: sc around (8)
Stuff only the rounded end. Flatten the opening for sewing.
Fasten off. Leave a 15 cm tail on each leg.
Back Legs
Yarn: cream — Source: standard small cylinder math.
R1: 6 sc in MR (6)
R2: inc ×6 (12)
R3: sc around (12)
R4: (sc, dec) ×4 (8)
R5–R6: sc around (8)
Stuff lightly so the back legs do not lift the shell.
Fasten off. Leave a 15 cm tail on each leg.
Tail
Yarn: cream — Source: small amigurumi tail math.
R1: 6 sc in MR (6)
R2: sc around (6)
R3: (sc, dec) ×2 (4)
Fasten off. Leave a 12 cm tail for sewing.
Daisy Petals
Yarn: white — Make 8 — Source: standard small oval amigurumi math.
R1: 6 sc in MR (6)
R2: inc ×6 (12)
R3–R4: sc around (12)
R5: (sc, dec) ×4 (8)
Do not stuff firmly. A flat petal base is easier to arrange around the center.
R6: dec ×4 (4)
Fasten off. Leave a 12 cm tail on each petal. Pinch the base before sewing.
Daisy Center
Yarn: yellow — Source: flat circle using standard 6-stitch increase math.
R1: 6 sc in MR (6)
R2: inc ×6 (12)
R3: (sc, inc) ×6 (18)
R4: sc around (18)
Fasten off. Leave a 25 cm tail for sewing over the petal bases.
Cheek Patches
Yarn: pink — Make 2 — Source: flat mini circle math.
R1: 6 sc in MR (6)
R2: inc ×6 (12)
Sl st to first stitch.
Fasten off. Leave a 10 cm tail for sewing.
Face Details
Yarn: black embroidery yarn — Source: visible image detail.
Use one strand or split yarn for the mouth. Insert the needle below the center gap between the eyes, form a shallow “U” curve, then anchor both ends inside the head. Keep the smile no wider than 4 stitches.
Assembly
- Pin the head to the front lower edge of the sage shell with the eye line facing forward.
- Sew the head to the shell through 10–12 contact stitches, then weave the tail inside the body.
- Place both cheek patches below the eyes and slightly outward from the mouth curve.
- Sew each cheek patch with small whip stitches through the outer round only.
- Attach the front legs to the lower front sides of the shell, one round behind the head seam.
- Attach the back legs to the lower rear sides, matching their height to the front legs.
- Sew the tail at the back center of the shell, angled slightly upward.
- Pin eight white petals in a ring on the top shell before sewing any one petal fully.
- Sew the yellow center over the petal bases so the white pieces stay evenly spaced.
- Weave in all tails, trim loose fibers, and reshape the shell with light pressure.
The finished piece is a cream turtle with a sage shell and centered daisy topper.
7 Technical Tips
- Use a stitch marker in R1 and move it every round. The failure mode is a shifted shell seam that pulls the daisy off center by R11.
- Keep the head stuffing firm, but stop before the stitches stretch open. A 30-stitch head with visible stuffing gaps will look larger than the 36-stitch shell.
- Work invisible decreases on R11–R14 of the head. Standard decreases create six small ridges around the face closure.
- Place the safety eyes before R13 closes the head. After the opening drops to 12 stitches, 12 mm washers are difficult to press flat.
- Pin all eight petals before sewing the yellow center. A 2–3 mm spacing error on the first petal becomes a full petal-width gap by the eighth.
- Use lighter stuffing in each leg than in the head. Overstuffed 8-stitch leg openings push the shell upward and make the turtle rock.
- Weave tails through the shell, not through the daisy center only. Petal tails cut short at the center can slip out after handling.
Conclusion
A daisy shell changes the build order of a turtle. The shell must be stable first, then the flower can sit flat, and only after that should the face and limbs be judged for balance. Use the checked 36-stitch shell, pin the eight petals before sewing, and keep the yellow center large enough to cover every petal base. The next step is to make one test turtle in scrap chenille and measure the shell height before cutting yarn for a batch. Share the finished daisy turtle amigurumi crochet pattern on Pinterest and Instagram with #DaisyTurtle. Which petal layout gives your turtle the cleanest daisy circle: tight petals or a slight gap between each one?









