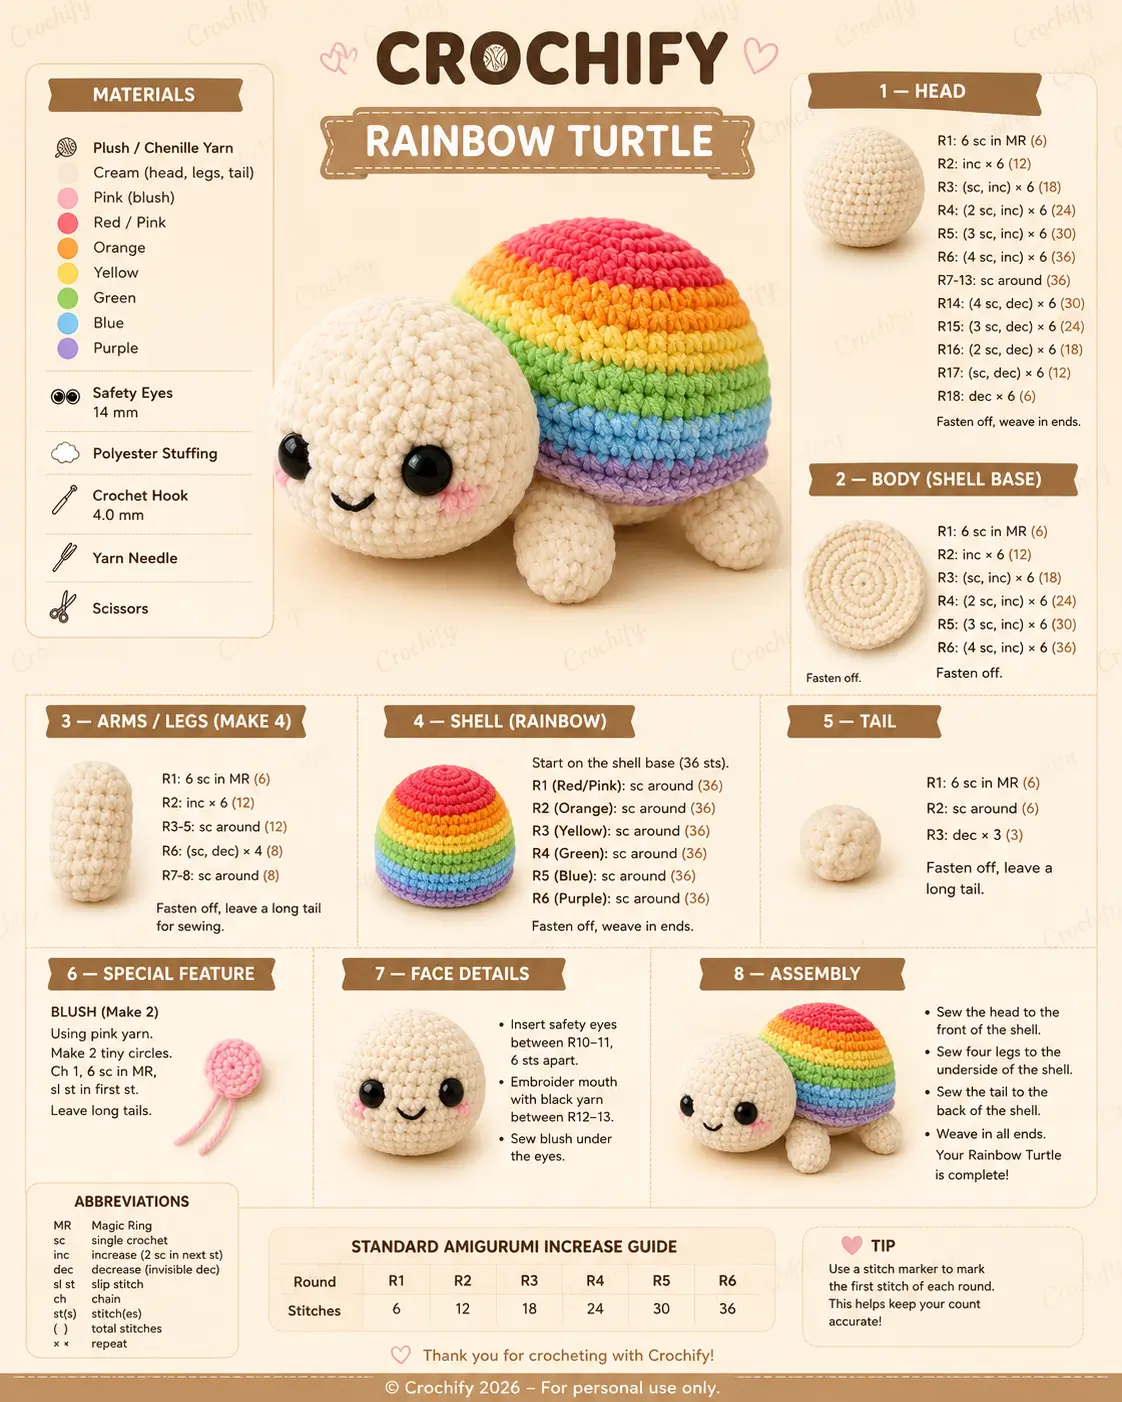
A turtle stops reading as a turtle the instant the shell starts over the cheeks. This rainbow turtle amigurumi crochet pattern keeps the head fully outside the dome, uses plush chenille yarn, a 4.0 mm hook, and 14 mm eyes, and finishes at about 18 cm long for an advanced-beginner build. Short shell stripes also make it useful for leftover color management.
The Design: What Makes Rainbow Turtle Different
First, the shell is split into a flat 36-stitch base and a striped upper dome. That choice gives you a clean lower edge, better balance on a flat surface, and a stable place to sew the head and legs. Next, the head stays a full 36-stitch sphere instead of being tucked under the shell line. The maker gets a broader cheek zone, which leaves room for large eyes, blush, and a low embroidered smile without crowding the face. Last, the legs stay short and cylindrical, narrowing from 12 stitches to 8, so the body sits low and the shell remains the visual center. A common failure in any crochet turtle plushie is overstuffing the head while leaving the shell soft. The result looks front-heavy, and the rainbow turtle pattern loses its low turtle profile.
Project Info at a Glance
| Skill Level | Time | Finished Size | Hook | Best For |
|---|---|---|---|---|
| Advanced Beginner | 2.5–3.5 hours | Approx. 18 cm / 7 in long | 4.0 mm | Leftover chenille stripes, gift plush, market sample |
Materials and Tools
Yarn
- Cream — plush / chenille — approx. 45–50 g — Premier Parfait Chunky or similar
- Red/Pink — plush / chenille — approx. 4–5 g — bright coral or hot pink
- Orange — plush / chenille — approx. 4–5 g — vivid orange
- Yellow — plush / chenille — approx. 4–5 g — saturated yellow
- Green — plush / chenille — approx. 4–5 g — medium grass green
- Blue — plush / chenille — approx. 4–5 g — sky to medium blue
- Purple — plush / chenille — approx. 4–5 g — lavender or light purple
- Pink — plush / chenille or matching scrap yarn — under 1 g — blush circles
Tools
- Hook 4.0 mm
- Safety eyes 14 mm
- Polyester stuffing
- Yarn needle
- Stitch markers
- Scissors
- Black embroidery yarn or thread for the mouth
Abbreviations
MR = magic ring
sc = single crochet
inc = increase
dec = decrease
sl st = slip stitch
ch = chain
BLO = back loop only
Invisible decrease is worked through the front loops of the next two stitches before completing one sc, which reduces hole size in plush fabric.
Pattern — Step by Step
Continuous spiral unless noted.
The round counts below are transcribed from the chart in your uploaded image and checked against standard six-stitch amigurumi math.
Head (Make 1)
Yarn: cream plush / chenille
R1: 6 sc in MR (6)
R2: inc x6 (12)
R3: (sc, inc) x6 (18)
R4: (2 sc, inc) x6 (24)
R5: (3 sc, inc) x6 (30)
R6: (4 sc, inc) x6 (36)
R7: sc around (36)
R8: sc around (36)
R9: sc around (36)
R10: sc around (36)
R11: sc around (36)
R12: sc around (36)
R13: sc around (36)
Insert the 14 mm safety eyes between R10 and R11, 6 sts apart.
Embroider the mouth between R12 and R13.
Stuff firmly before starting the decrease section.
R14: (4 sc, dec) x6 (30)
R15: (3 sc, dec) x6 (24)
R16: (2 sc, dec) x6 (18)
R17: (sc, dec) x6 (12)
R18: dec x6 (6)
Fasten off. Leave a 25 cm tail for sewing.
Body — Shell Base (Make 1)
Yarn: cream plush / chenille
R1: 6 sc in MR (6)
R2: inc x6 (12)
R3: (sc, inc) x6 (18)
R4: (2 sc, inc) x6 (24)
R5: (3 sc, inc) x6 (30)
R6: (4 sc, inc) x6 (36)
Fasten off.
Rainbow Shell Dome (Make 1)
Yarn: red/pink, orange, yellow, green, blue, purple
Rejoin yarn to any stitch on the outer edge of the shell base so you are working around the 36-stitch perimeter.
R1: sc around in red/pink (36)
R2: sc around in orange (36)
R3: sc around in yellow (36)
R4: sc around in green (36)
R5: sc around in blue (36)
R6: sc around in purple (36)
Keep tension slightly tighter here than on the base so the dome curves rather than flares.
Fasten off. Weave in the shell ends.
Front Legs (Make 2)
Yarn: cream plush / chenille
R1: 6 sc in MR (6)
R2: inc x6 (12)
R3: sc around (12)
R4: sc around (12)
R5: sc around (12)
R6: (sc, dec) x4 (8)
R7: sc around (8)
R8: sc around (8)
Stuff lightly. Keep the last round flexible enough to sit flat when sewn on.
Fasten off. Leave a 20 cm tail.
Back Legs (Make 2)
Yarn: cream plush / chenille
R1: 6 sc in MR (6)
R2: inc x6 (12)
R3: sc around (12)
R4: sc around (12)
R5: sc around (12)
R6: (sc, dec) x4 (8)
R7: sc around (8)
R8: sc around (8)
Stuff lightly. Match both back legs before sewing so the turtle does not rock.
Fasten off. Leave a 20 cm tail.
Tail (Make 1)
Yarn: cream plush / chenille
R1: 6 sc in MR (6)
R2: sc around (6)
R3: dec x3 (3)
Do not overstuff. A dense tail forms a hard lump at the shell edge.
Fasten off. Leave a 15 cm tail.
Blush Cheek Patches (Make 2)
Yarn: pink
Ch 1.
R1: 6 sc in MR (6)
Join with sl st in first st.
These are flat circles, not stuffed appliqués.
Fasten off. Leave a 12 cm tail on each.
Face Details
Place the eyes between R10 and R11, centered on the face, with 6 stitches between them. Embroider a shallow curved mouth between R12 and R13 using black yarn. Sew one blush circle under each eye, slightly offset toward the outer cheek.
Assembly
- Finish the head first and flatten the closing round so the face sits level.
- Build the shell base and rainbow dome before attaching any separate parts.
- Check the face placement on the stuffed head and correct the mouth line before sewing.
- Pin the head to the front edge of the shell so the cheeks sit fully outside the dome profile.
- Sew the head in place with small whip stitches, keeping the neck seam even from side to side.
- Pin and sew the two front legs to the underside, one on each side of the head.
- Pin and sew the two back legs to the underside, spaced evenly from the front pair.
- Sew the tail to the rear center of the shell base.
- Attach the blush circles under the eyes if you have not already secured them during face finishing.
- Weave in every tail through the stuffing path or along the inner seam line, then shape the shell with your hands until the turtle sits on all four legs.
The piece is complete when the shell stays rounded, the head points slightly forward, and all four legs touch the surface together.
7 Technical Tips
- Mark every first stitch. Missing one marker on a 36-stitch shell round shifts the color join and makes the stripe stack look like a spiral drift instead of clean horizontal bands.
- Stuff the head to medium-firm density. If your thumb sinks in more than a few millimeters, the 14 mm eyes will pull the face inward and flatten the cheeks.
- Use invisible decreases on every closing round. Standard decreases leave larger holes in chenille, and those holes show stuffing fastest on R14–R18 of the head.
- Install the eyes before the final decrease section. On this turtle they belong between R10 and R11 with 6 stitches between them, and later placement distorts the face because the head starts shrinking immediately after the plateau.
- Tighten your shell tension one step over your base tension. Loose upper rounds turn the dome into a ruffle, while slightly tighter rounds hold the turtle silhouette low and smooth.
- Pin the head and all four legs before sewing any one part permanently. A leg that sits even one stitch farther out than its pair can make the turtle tip diagonally when placed on a desk.
- Weave chenille tails in two passes, not one heavy pass. A single bulky pass under the shell edge creates a visible knot ridge, especially beside the tail seam and the rear legs.
Conclusion
Rainbow shell bands are unforgiving, so count control matters more here than on a solid-color turtle. Check the final sample for three things: a round shell dome, eyes set between R10 and R11, and legs that touch the table evenly. Then photograph the toy from the side, because the neck-to-shell line is the detail most likely to win the click on Pinterest and the save on Instagram. For the next pass, write your actual gram use beside each color before starting a second sample. That turns this rainbow turtle amigurumi crochet pattern into a repeatable stash project. Share your result with #RainbowTurtlePattern. Did you keep the purple stripe at the base, or move it higher on the shell?









