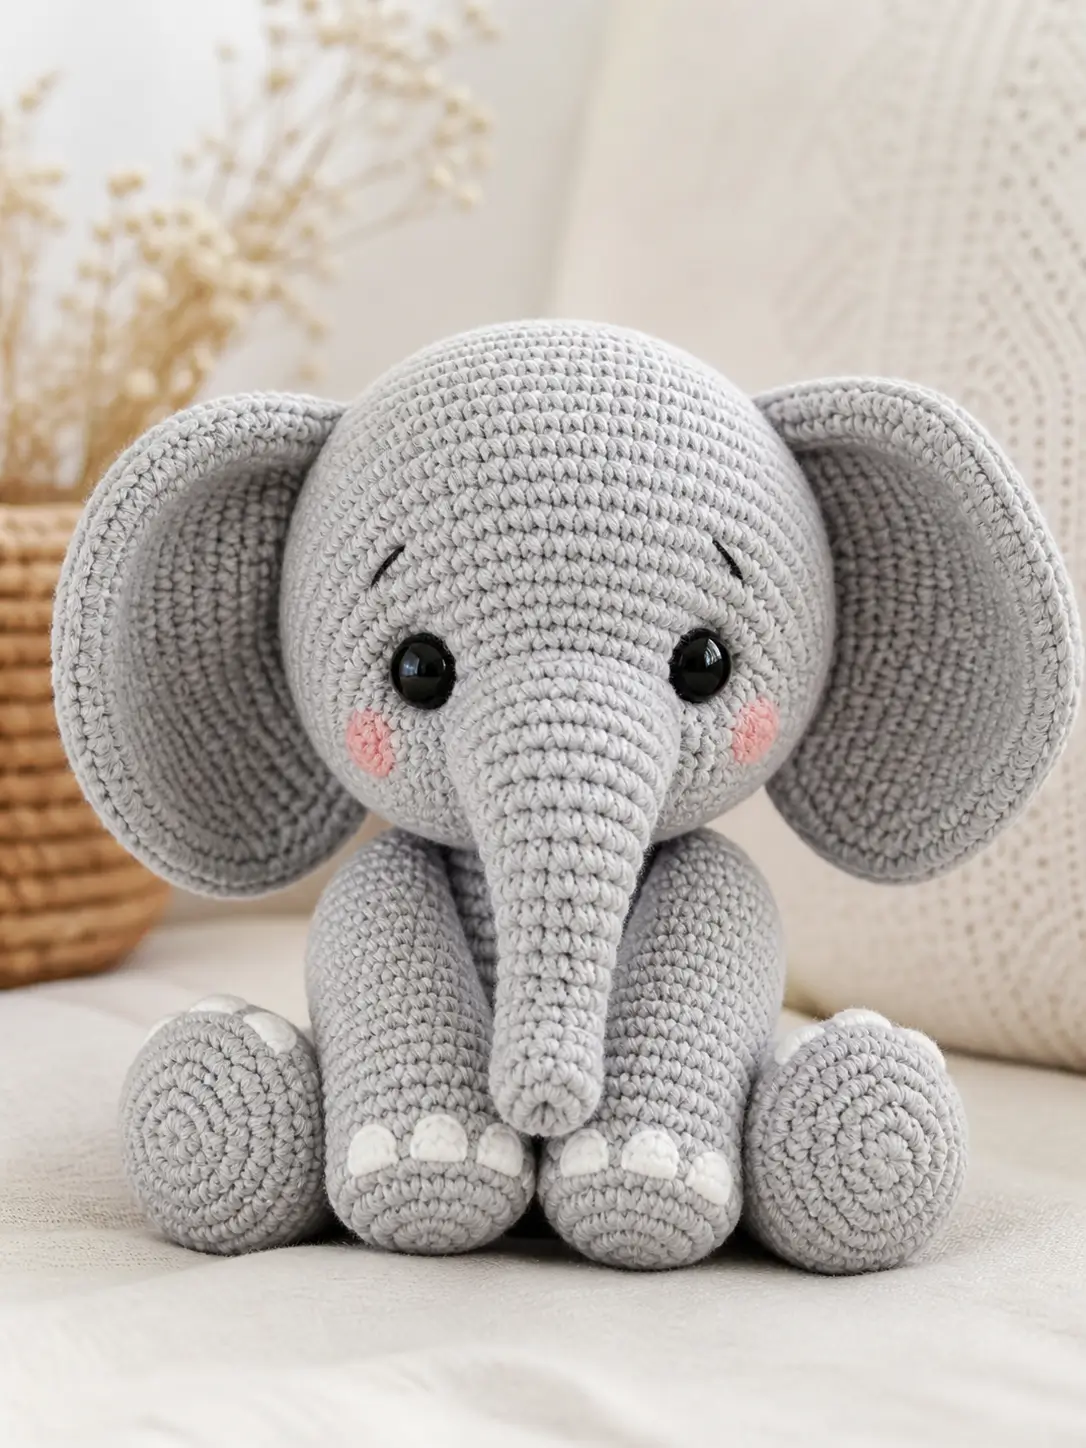
Elephant ears must balance a head before the trunk pulls the face forward. This elephant amigurumi crochet pattern uses light grey worsted yarn, white toe caps, pink cheek patches, and 15 mm safety eyes to make a 30.5 cm toy for intermediate crocheters. The seated build keeps the body stable, so the finished elephant can sit on a shelf without a stand.
The Design: What Makes This Elephant Different
An elephant reads as an elephant only when the ear span is wider than the head. This design uses flat, unstuffed ear disks with a raised outer rim, so the ears stay broad without pulling the head sideways. The trunk is worked as a narrow tube that widens at the face; that taper keeps the nose from collapsing and gives the face a center line.
You read the shape first through the ears, then the maker controls balance by shortening the body. The seated body is lower than the head because a crochet elephant amigurumi tips forward when the trunk, eyes, and ears all sit on the same axis. A common mistake in a free crochet elephant pattern is placing the back legs directly under the body. The finished toy then rolls backward. Pin the back legs forward, almost touching the front legs, before sewing.
Project Info at a Glance
| Skill Level | Time | Finished Size | Hook | Best For |
|---|---|---|---|---|
| Intermediate | 6–8 hours | 30.5 cm head-to-feet; about 24 cm seated | 3.5 mm | Safari set, nursery shelf, photo display |
The size and material choices are benchmarked against published elephant patterns using 30.5–36 cm sizing, 3.5–4 mm hooks, worsted yarn, and 12–15 mm safety eyes.
Materials and Tools
Yarn
- Light grey — worsted #4 — 121 g — Lion Brand 24/7 Cotton, Paintbox Cotton Aran, or Stylecraft Special Aran.
- White — worsted #4 — 2–5 g — use for toe caps.
- Soft pink — worsted #4 — 2–16 g — use for cheek patches; the higher amount covers test swatches or larger cheeks.
- Black or dark grey — embroidery thread or light yarn — 1 g — use for eyebrows.
Tools
- Hook 3.5 mm
- 15 mm black safety eyes
- Polyester stuffing
- Yarn needle
- Locking stitch markers
- Sewing pins
- Scissors
- Black embroidery needle
Safety eyes are not suitable for toys intended for children under 3; embroider eyes instead.
Abbreviations
- MR = magic ring
- sc = single crochet
- inc = increase, 2 sc in one stitch
- dec = invisible decrease
- sl st = slip stitch
- ch = chain
- BLO = back loop only
- st = stitch
- sts = stitches
Invisible decrease works through the front loops of the next two stitches, then finishes as one sc to keep closure seams flatter.
Pattern — Step by Step
Continuous spiral unless noted. Move the stitch marker at the end of every round.
Head
Make 1. Yarn: light grey.
R1: 6 sc in MR (6)
R2: inc ×6 (12)
R3: (sc, inc) ×6 (18)
R4: (2 sc, inc) ×6 (24)
R5: (3 sc, inc) ×6 (30)
R6: (4 sc, inc) ×6 (36)
R7: (5 sc, inc) ×6 (42)
R8: sc around (42)
R9: sc around (42)
R10: sc around (42)
R11: sc around (42)
R12: sc around (42)
R13: sc around (42)
R14: sc around (42)
R15: sc around (42)
R16: sc around (42)
R17: sc around (42)
R18: (5 sc, dec) ×6 (36)
R19: (4 sc, dec) ×6 (30)
R20: (3 sc, dec) ×6 (24)
R21: (2 sc, dec) ×6 (18)
R22: (sc, dec) ×6 (12)
R23: dec ×6 (6)
Place 15 mm safety eyes between R12 and R13, 10 stitches apart, before closing. Stuff firmly from R18 onward.
Fasten off. Leave 20 cm tail.
Body
Make 1. Yarn: light grey.
R1: 6 sc in MR (6)
R2: inc ×6 (12)
R3: (sc, inc) ×6 (18)
R4: (2 sc, inc) ×6 (24)
R5: (3 sc, inc) ×6 (30)
R6: (4 sc, inc) ×6 (36)
R7: (5 sc, inc) ×6 (42)
R8: sc around (42)
R9: sc around (42)
R10: sc around (42)
R11: sc around (42)
R12: sc around (42)
R13: sc around (42)
R14: sc around (42)
R15: (5 sc, dec) ×6 (36)
R16: sc around (36)
R17: sc around (36)
R18: (4 sc, dec) ×6 (30)
R19: sc around (30)
R20: (3 sc, dec) ×6 (24)
R21: (2 sc, dec) ×6 (18)
R22: (sc, dec) ×6 (12)
R23: dec ×6 (6)
Stuff the lower body firmly and the neck end lightly so the head sits flat.
Fasten off. Leave 35 cm tail.
Arms / Front Legs
Make 2. Yarn: light grey.
R1: 6 sc in MR (6)
R2: inc ×6 (12)
R3: (sc, inc) ×6 (18)
R4: sc around (18)
R5: sc around (18)
R6: sc around (18)
R7: (sc, dec) ×6 (12)
R8: sc around (12)
R9: sc around (12)
R10: sc around (12)
R11: sc around (12)
R12: sc around (12)
R13: sc around (12)
R14: sc around (12)
R15: sc around (12)
R16: sc around (12)
R17: sc around (12)
R18: sc around (12)
R19: dec ×6 (6)
Stuff the rounded paw firmly. Keep the upper half softer so the front legs sit close to the body.
Fasten off. Leave 25 cm tail.
Back Legs
Make 2. Yarn: light grey.
R1: 6 sc in MR (6)
R2: inc ×6 (12)
R3: (sc, inc) ×6 (18)
R4: (2 sc, inc) ×6 (24)
R5: (3 sc, inc) ×6 (30)
R6: sc around (30)
R7: sc around (30)
R8: sc around (30)
R9: (3 sc, dec) ×6 (24)
R10: (2 sc, dec) ×6 (18)
R11: (sc, dec) ×6 (12)
R12: dec ×6 (6)
Stuff firmly enough to form a round side foot, not a flat disk.
Fasten off. Leave 30 cm tail.
Ears
Make 2. Yarn: light grey.
R1: 6 sc in MR (6)
R2: inc ×6 (12)
R3: (sc, inc) ×6 (18)
R4: (2 sc, inc) ×6 (24)
R5: (3 sc, inc) ×6 (30)
R6: (4 sc, inc) ×6 (36)
R7: (5 sc, inc) ×6 (42)
R8: BLO sc around (42)
R9: sc around (42)
R10: sl st around loosely (42)
Do not stuff. The BLO round forms a shallow rim like the photo.
Fasten off. Leave 45 cm tail.
Trunk
Make 1. Yarn: light grey.
R1: 6 sc in MR (6)
R2: sc around (6)
R3: sc around (6)
R4: sc around (6)
R5: sc around (6)
R6: sc around (6)
R7: inc ×6 (12)
R8: sc around (12)
R9: sc around (12)
R10: sc around (12)
R11: sc around (12)
R12: sc around (12)
R13: sc around (12)
R14: (sc, inc) ×6 (18)
R15: sc around (18)
R16: sc around (18)
R17: sc around (18)
R18: sc around (18)
Stuff the tip lightly and the face end medium-firm. The trunk should hang straight, not curl upward.
Fasten off. Leave 40 cm tail.
Cheek Patches
Make 2. Yarn: soft pink.
R1: 6 sc in MR (6)
R2: inc ×6 (12)
R3: sl st around loosely (12)
Keep these flat. Do not stuff.
Fasten off. Leave 15 cm tail.
Toe Caps
Make 12. Yarn: white.
R1: 6 sc in MR (6)
R2: sc around (6)
Use three toe caps per foot. Flatten each cap before sewing.
Fasten off. Leave 10 cm tail on each cap.
Eyebrows
Make 2. Yarn: black embroidery thread or thin black yarn.
Row 1: ch 6 (6)
Curve each chain into a short brow above the eye. The photo uses angled brows, not lashes.
Fasten off. Leave 12 cm tail.
No Accessory Shown in the Photo
No prop, bow, scarf, hat, blanket, or flower crown is visible. Keep the elephant unadorned so the ears, trunk, cheeks, and white toe caps remain the only detail layer.
Assembly
- Pin the head above the body with the eye line horizontal and the trunk area centered over the body front.
- Sew the body to the lower center of the head using the 35 cm body tail; pass through both closed pieces for a firm join.
- Check the safety-eye backs, then sew the two black eyebrow chains above R11 with a slight downward angle toward the trunk.
- Sew the pink cheek patches between R13 and R15, two stitches outside each eye.
- Sew the front legs to the body front between body R7 and R14, leaving a 3-stitch gap at the center.
- Sew the back legs to the lower side body between body R4 and R10, angled forward until the elephant sits without support.
- Sew the trunk to the head with the wide end spanning head R13 to R17, centered between the eyes.
- Sew each ear to the side of the head from head R6 down to R16, with the rim facing forward.
- Sew three white toe caps to each foot; place the middle cap first, then set the side caps 1 stitch away.
- Weave every tail through three different stitch paths, trim close, and press the seated base flat.
The finished elephant has a closed head, closed body, centered trunk, oversized ears, four feet, blush cheeks, brows, and white toe caps.
7 Technical Tips
- Stitch marker drift: If the marker shifts more than 3 stitches by head R12, the face line will twist. Move the marker to the back-center point before placing eyes.
- Stuffing firmness: A soft head makes the safety eyes sink and the trunk pull downward. Pack the head to medium-firm density before R21, then add small tufts through the final opening.
- Invisible decrease ridges: Standard decreases leave six visible ridges across the lower face. Use front-loop invisible decreases on R18–R23 of the head to keep the cheek curve smooth.
- Eye placement timing: Install the 15 mm eyes between R12 and R13, 10 stitches apart. Placing them after R18 forces the backs through a smaller opening and can stretch the stitches.
- Worsted tension holes: Holes larger than 2 mm will show white stuffing through grey yarn. Drop to a 3.25 mm hook if the head fabric opens when stuffed.
- Ear pinning failure: Ears sewn too low make the elephant look like a mouse. Keep the ear top no lower than head R6 and pin both ears before sewing either side.
- Tail weaving: A yarn tail shorter than 10 cm can slip out of a round foot. Weave each tail vertically, diagonally, and horizontally before trimming.
Conclusion
Use the first finished elephant as a gauge sample before cutting yarn for a second one. If the ears droop below the back legs, shorten their sewing line by two rounds and add one hidden tack near the cheek; that keeps the profile closer to the photo. Save this elephant amigurumi crochet pattern to Pinterest with a front-facing image, then post the seated version on Instagram from a low angle so the ear span stays visible. Tag the project with #GreyElephantAmigurumi and note the hook size in the caption. Would your elephant look more accurate with a straight trunk, or should the tip bend slightly left like a real calf?









