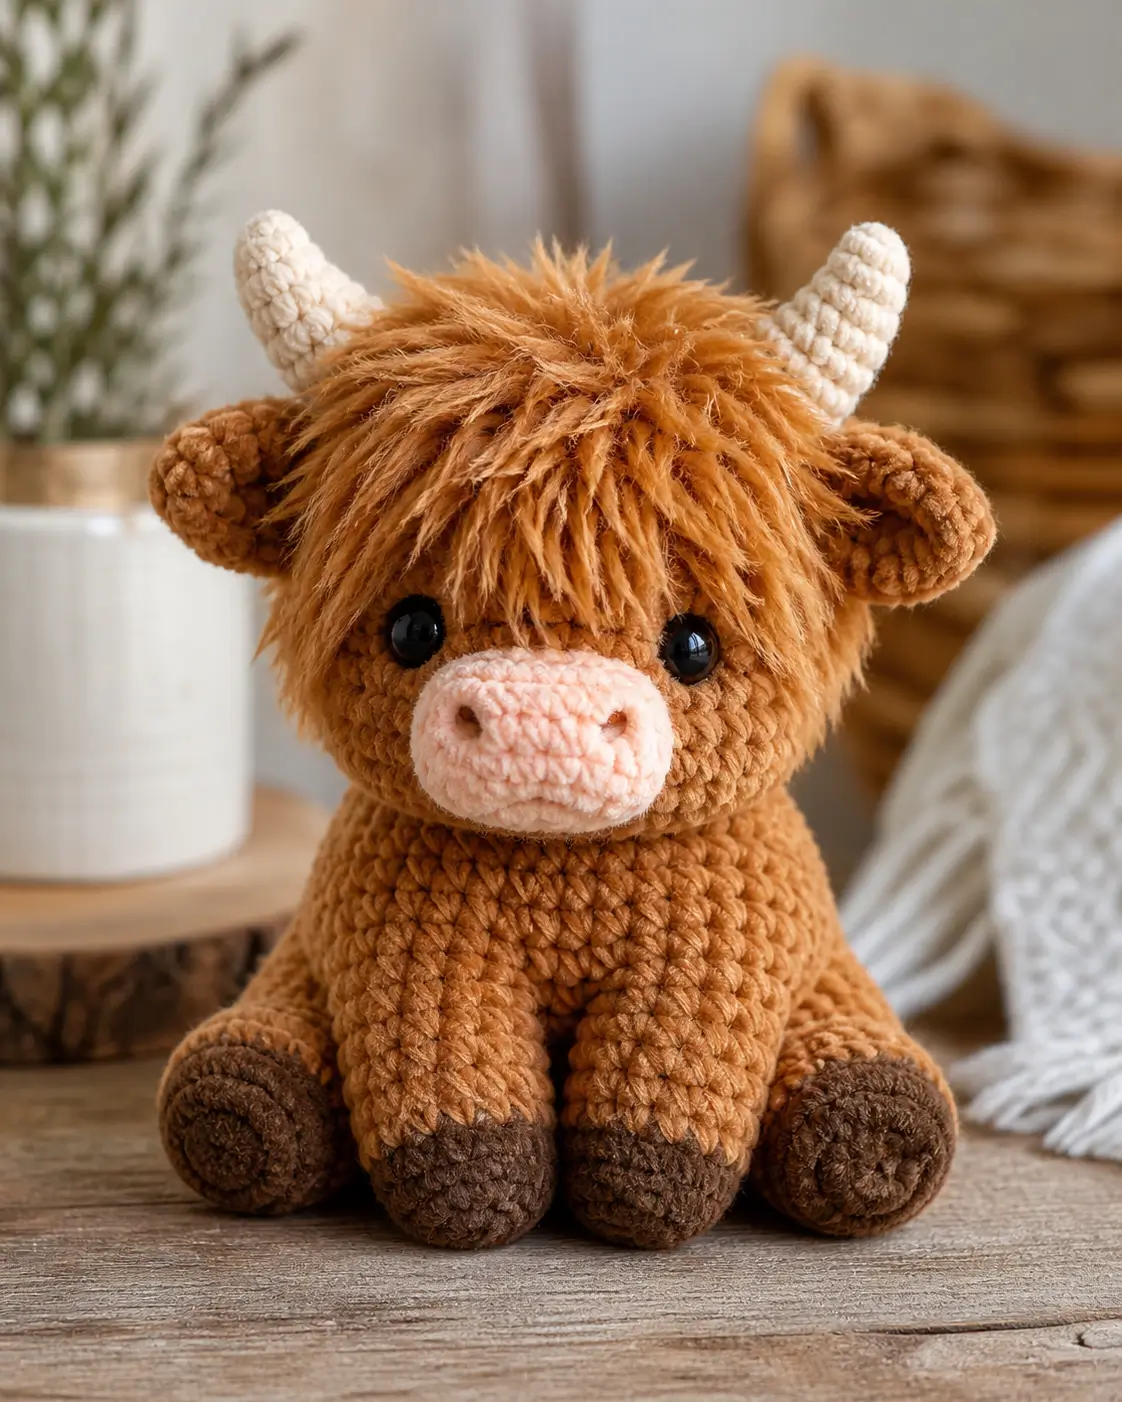
A Highland cow’s fringe has to cover the forehead without burying both eyes. This Highland cow amigurumi crochet pattern builds a 20 cm sitting plush with chunky chenille, a 4.5 mm hook, 12 mm safety eyes, shaped horns, an oval pink muzzle, and intermediate-level assembly. Make it as a photo-match farm animal for markets, nursery shelves, or pattern portfolio samples.
The Design: What Makes This Highland Cow Different
The design is built around three pressure points: the forehead, the muzzle, and the seated legs. A crochet Highland cow amigurumi needs a wide head because the horns, ears, and fringe all compete for the same upper-face space. The 36-stitch head plateau gives room for 12 mm eyes without forcing the horns too far back. The muzzle is worked as a stuffed round piece, then sewn into a horizontal oval, because a flat circle looks too button-like on this animal. The legs use dark hoof sections before the ginger body color, matching the photo and giving the toy visual weight at the base. A common mistake in a shaggy cow crochet pattern is adding too much fringe after the eyes are installed; the animal then loses its face under the hair.
Project Info at a Glance
| Skill Level | Time | Finished Size | Hook | Best For |
|---|---|---|---|---|
| Intermediate | 5–7 hours | 20 cm sitting | 4.5 mm | Plush farm animal, market table sample, nursery shelf display |
Materials and Tools
Yarn
- Ginger brown — chunky chenille or plush worsted — 60–100 g — Premier Basix Chenille, Bernat Blanket, or Paintbox-style DK held firmly for a tighter toy.
- Cream — same weight or one step lighter — 10–20 g — horns and optional horn shaping stitches.
- Pale pink — same weight — 8–10 g — muzzle and cheek patches.
- Dark brown — same weight — 15–25 g — hooves and optional tail tuft.
- Long-pile ginger or brushed strands — faux-fur yarn or cut chenille strands — 15–20 g — shaggy forehead fringe.
Tools
- Hook 4.5 mm
- Safety eyes 12 mm
- Polyester stuffing
- Tapestry needle
- Locking stitch markers
- Long pins
- Small scissors
- Black embroidery yarn for nostrils
Abbreviations
- MR = magic ring
- sc = single crochet
- inc = 2 sc in same stitch
- dec = invisible decrease over next 2 stitches
- sl st = slip stitch
- ch = chain
- BLO = back loop only
- FO = fasten off
Invisible decrease means working through the front loops of the next two stitches before finishing one single crochet, which keeps the decrease line flatter on stuffed amigurumi.
Pattern — Step by Step
Continuous spiral unless noted. Mark the first stitch of every round.
Head
Yarn: ginger brown.
R1: 6 sc in MR (6)
R2: inc ×6 (12)
R3: (sc, inc) ×6 (18)
R4: (2 sc, inc) ×6 (24)
R5: (3 sc, inc) ×6 (30)
R6: (4 sc, inc) ×6 (36)
R7–R13: sc around (36)
Insert safety eyes between R9 and R10, 8 stitches apart. Keep the lower edge of each eye visible below the future fringe.
R14: (4 sc, dec) ×6 (30)
R15: (3 sc, dec) ×6 (24)
R16: sc around (24)
R17: (2 sc, dec) ×6 (18)
Stuff firmly across the cheeks, then add a smaller amount to the crown so the top does not dome too high.
R18: (sc, dec) ×6 (12)
R19: dec ×6 (6)
Fasten off. Leave a 20 cm tail and close the last 6 stitches.
Body
Yarn: ginger brown.
R1: 6 sc in MR (6)
R2: inc ×6 (12)
R3: (sc, inc) ×6 (18)
R4: (2 sc, inc) ×6 (24)
R5: (3 sc, inc) ×6 (30)
R6: (4 sc, inc) ×6 (36)
R7–R14: sc around (36)
R15: (4 sc, dec) ×6 (30)
R16: sc around (30)
R17: (3 sc, dec) ×6 (24)
R18: sc around (24)
R19: (2 sc, dec) ×6 (18)
Stuff the lower body firmly enough to sit flat. Leave the neck area slightly softer for sewing the head.
R20: (sc, dec) ×6 (12)
R21: dec ×6 (6)
Fasten off. Leave a 30 cm tail.
Front Legs / Arms
Yarn: dark brown for hoof, ginger brown for leg. Make 2.
R1: 6 sc in MR with dark brown (6)
R2: inc ×6 (12)
R3: (sc, inc) ×6 (18)
R4: sc in BLO around (18)
R5: sc around (18)
R6: (sc, dec) ×6 (12)
Change to ginger brown.
R7–R14: sc around (12)
Stuff the hoof and lower half only. Leave the top flat for a clean side seam.
R15: Fold flat and sc through both layers (6)
Fasten off. Leave a 25 cm tail on each leg.
Back Legs
Yarn: dark brown for hoof, ginger brown for leg. Make 2.
R1: 6 sc in MR with dark brown (6)
R2: inc ×6 (12)
R3: (sc, inc) ×6 (18)
R4: (2 sc, inc) ×6 (24)
R5: sc in BLO around (24)
R6: sc around (24)
R7: (2 sc, dec) ×6 (18)
Change to ginger brown.
R8–R12: sc around (18)
R13: (sc, dec) ×6 (12)
R14: sc around (12)
Stuff the hoof firmly and the upper leg lightly. The back legs should sit outward, not point straight down.
R15: Fold flat and sc through both layers (6)
Fasten off. Leave a 30 cm tail.
Ears
Yarn: ginger brown. Make 2.
R1: 6 sc in MR (6)
R2: inc ×6 (12)
R3: (sc, inc) ×6 (18)
R4–R5: sc around (18)
R6: (sc, dec) ×6 (12)
Do not stuff. Flatten the ear so it curves like a small side cup.
R7: Fold flat and sc through both layers (6)
Fasten off. Leave a 25 cm tail.
Horns
Yarn: cream. Make 2.
R1: 6 sc in MR (6)
R2–R4: sc around (6)
R5: inc ×6 (12)
R6–R8: sc around (12)
Stuff lightly. Curve the horn inward during sewing by taking one small anchor stitch from tip to base.
Fasten off. Leave a 30 cm tail.
Muzzle
Yarn: pale pink.
R1: 6 sc in MR (6)
R2: inc ×6 (12)
R3: (sc, inc) ×6 (18)
R4: (2 sc, inc) ×6 (24)
R5–R6: sc around (24)
R7: (2 sc, dec) ×6 (18)
Stuff lightly. Pin into a horizontal oval before sewing to the lower front of the head.
Fasten off. Leave a 35 cm tail.
Cheek Patches
Yarn: pale pink. Make 2.
R1: 6 sc in MR (6)
R2: inc ×6 (12)
Sl st to first stitch (12)
Fasten off. Leave a 15 cm tail.
Shaggy Fringe and Forehead Mane
Yarn: ginger faux-fur, brushed chenille strands, or matching brown yarn.
Cut 36 strands, each 12 cm long. Attach them as lark’s-head knots across four rows: 9 strands between the horns, 9 strands in front of the left horn, 9 strands in front of the right horn, and 9 strands just above the eye line. Trim the lower edge so the longest strands reach the top rim of the muzzle, not the eye centers.
For a fuller photo-match version, add 12 extra strands behind the first row. Keep those back-row strands 2 cm shorter so the fringe lifts rather than collapsing over the eyes.
Tail
Yarn: ginger brown with dark brown tuft.
R1: 6 sc in MR with ginger brown (6)
R2–R8: sc around (6)
Fasten off. Leave a 20 cm tail.
Cut six dark brown strands, each 8 cm long. Knot them through the final round of the tail and trim to 3 cm.
Nostrils
Yarn: dark brown embroidery strand.
Mark two nostrils on the muzzle, 4 stitches apart. Make three short satin stitches per nostril, angled slightly downward toward the center. Tie knots inside the muzzle seam so no thread ends show on the face.
Assembly
- Place the head on the body with the muzzle area facing forward and the head tilted down by 5–10 degrees.
- Sew the body to the underside of the head through R18–R21 of the body and R15–R17 of the head.
- Pin the muzzle centered between the eyes, with its top edge one round below the eye line.
- Sew the muzzle flat across the top first, then add light stuffing before closing the lower edge.
- Add nostrils before the muzzle is fully closed so the embroidery knots can sit inside.
- Position the front legs on the body sides, starting near R11 and ending near R16.
- Attach the back legs low on the body, with both dark hoof circles touching the table surface.
- Sew ears at the side of the head, then place horns just inside the ears with 4 stitches between horn bases.
- Add fringe last, checking that both safety eyes remain partly visible from the front.
- Attach the tail to the back of the body between R8 and R10, then weave all remaining tails for at least 10 cm.
The completed figure is a sitting Highland cow with four dark hooves, a pink oval muzzle, cream horns, side ears, and a controlled shaggy fringe.
7 Technical Tips
- Stitch marker drift: A one-stitch drift by R10 shifts the muzzle off center. Move the marker only at the end of a round, and count 36 stitches on every head plateau round.
- Overstuffed muzzle: Too much filling turns the oval muzzle into a ball. Use a stuffing amount about the size of a walnut for a 20 cm toy.
- Eye placement timing: Safety eyes must go in before R14 of the head closes the opening. Place 12 mm eyes between R9 and R10 with 8 stitches between them.
- Visible decrease ridges: Regular decreases can leave diagonal scars on chenille. Work invisible decreases on R14–R19 of the head and R15–R21 of the body.
- Fringe overload: More than 48 strands on this size can hide the whole face. Start with 36 strands at 12 cm, then add only 12 extra if the crown still looks sparse.
- Horn spread error: Horns placed too far apart make the head look like a goat rather than a Highland cow. Keep 4 stitches between the inner horn bases and angle the tips inward.
- Loose tail weaving: Short woven ends can pull out of plush yarn after handling. Weave every sewing tail through 10 cm of fabric, then reverse direction once before trimming.
Conclusion
This pattern depends on proportion more than stitch variety. The head stays wide, the muzzle stays flat, and the fringe is measured before it is trimmed. That gives the toy the Highland shape without covering the face. For the next pass, crochet the head first and test eye placement with the horn and fringe pieces pinned in place. Save the finished Highland cow amigurumi crochet pattern notes to Pinterest, then post the front and side views on Instagram with #HighlandCowFringe. Which part of the cow should carry more visual weight in your version: the horns, the pink muzzle, or the shaggy forehead?










Just a bit of useless info, I was stationed in the the Scotland Highland and they would never say or write it as cow, it would be a Highand Coo.
It’s actually a cool and helpful piece of information. I am happy that you just shared this helpful information with us.
Please keep us up to date like this. Thank you for sharing.