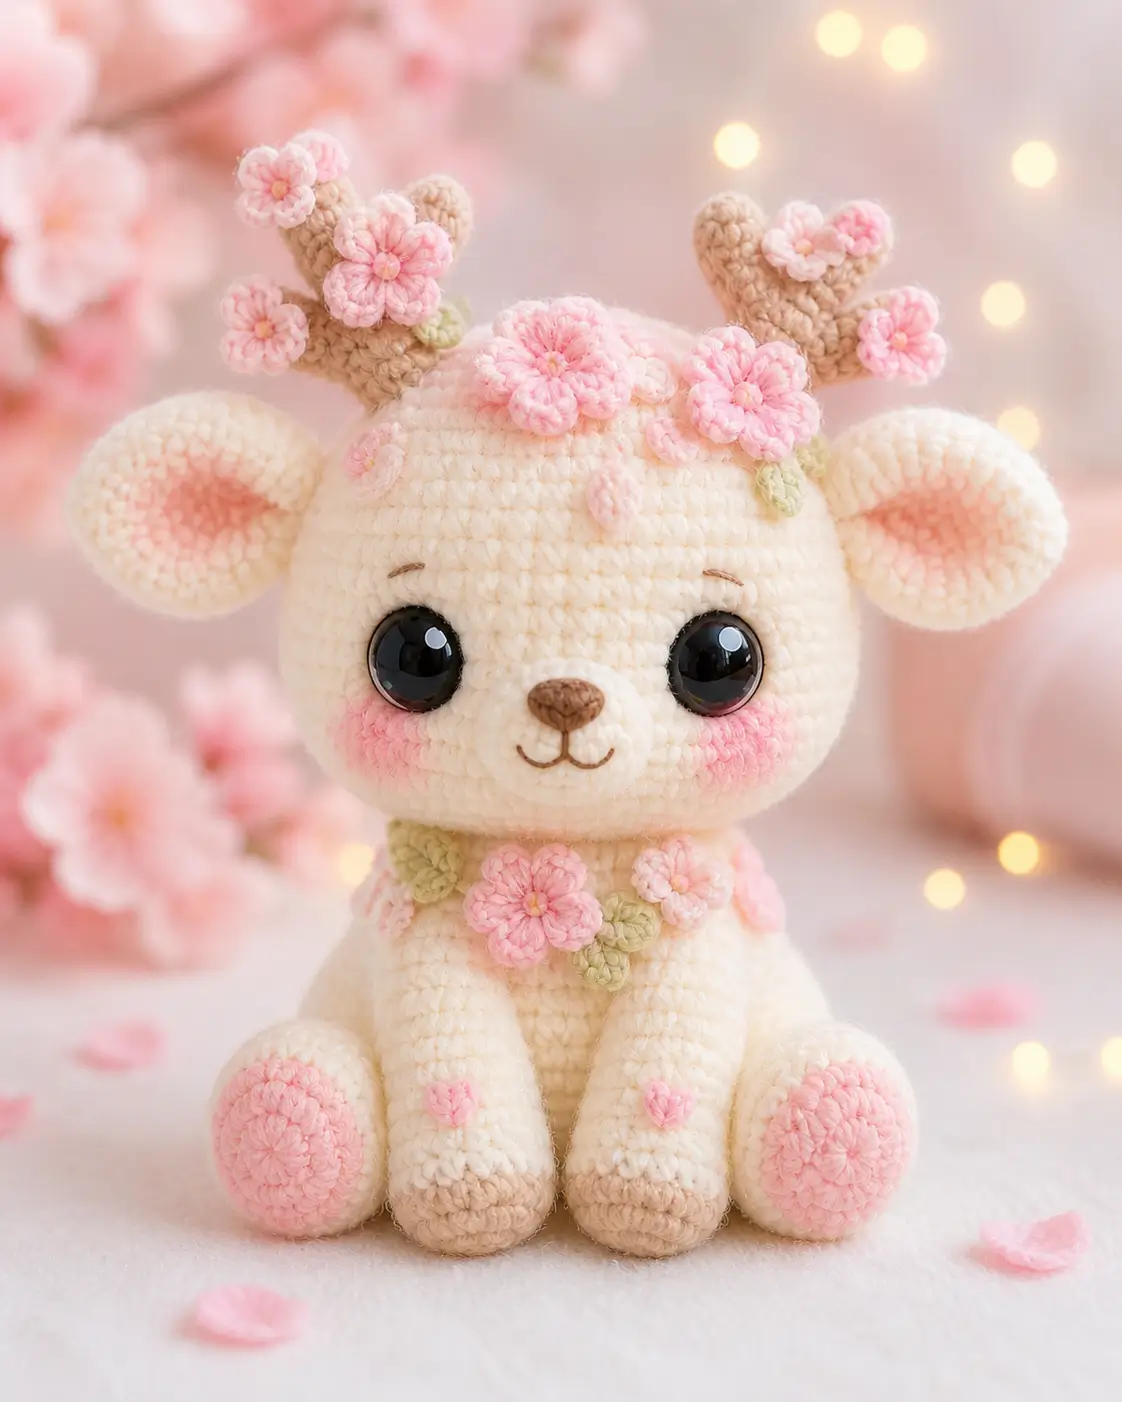
Fawns do not grow blossom-covered antlers, so this spring deer amigurumi pattern treats the crown as branch-shaped decoration rather than anatomy. Use worsted-weight cream yarn, tan hooves, brown antlers, pink flower appliques, and a 3.5 mm hook for an 18 cm seated toy. The project is intermediate because the face is simple but the antlers, flowers, and symmetrical eye placement need controlled assembly. It works as a shelf sample for spring market photos.
The Design: What Makes Blossom Fawn Different
The head uses a 42-stitch plateau because the photographed deer reads through the eyes and cheeks first, not through the body. That large crown also gives enough fabric for 15 mm eyes without crowding the muzzle. Antlers are built as narrow tubes, then treated like branch supports for flowers; solid tubes keep the crown from twisting once the appliques are sewn on. For this spring deer amigurumi pattern, the body stays at 36 stitches so the toy sits under its head instead of becoming a standing reindeer. A common maker mistake in a deer amigurumi crochet pattern is placing ears too high. The ear centers should sit slightly below the antler bases, or the fawn crochet pattern loses the soft, round silhouette shown in the photo.
Project Info at a Glance
| Skill Level | Time | Finished Size | Hook | Best For |
|---|---|---|---|---|
| Intermediate | 5–7 hours | 18 cm seated | 3.5 mm | Spring display, market table sample, photo prop |
Comparable deer patterns list 13 cm with DK yarn and a 2.5 mm hook, and 17.7 cm with worsted yarn and a 3.5 mm hook; this version targets the larger seated look from the photo.
Materials and Tools
Published deer amigurumi sources use DK or worsted yarn, 2.5–3.5 mm hooks, and safety eyes from 6 mm to 15 mm depending on the toy size. This version follows the 3.5 mm worsted approach for a larger head and big-eye face.
Yarn
- Cream — worsted weight — 50 g — Big Twist Value Cream, Paintbox Simply Aran Vanilla, or similar
- Light tan — worsted weight — 15 g — muzzle, inner ears, hooves
- Medium brown — worsted weight — 12 g — antlers and nose embroidery
- Blush pink — worsted or DK — 20 g — cheek patches, flowers, paw pads, hearts
- Pale green — DK or worsted scraps — 8 g — leaves
- Yellow — embroidery floss or DK scraps — 1 g — flower centers
Tools
- Hook 3.5 mm
- 15 mm safety eyes
- Polyester stuffing
- Yarn needle
- Stitch markers
- Straight pins
- Embroidery needle
- Scissors
Abbreviations
- MR = magic ring
- sc = single crochet
- inc = 2 sc in one stitch
- dec = single crochet decrease
- sl st = slip stitch
- ch = chain
- BLO = back loop only
- hdc = half double crochet
- dc = double crochet
Work invisible decrease through the front loops of the next two stitches to keep the cream head surface closed.
Pattern — Step by Step
Continuous spiral unless noted. This is an original photo-matched stitch plan; the 6-to-42 head math follows standard amigurumi shaping and is cross-checked against published deer patterns that also use 42-stitch head shaping.
Head
Yarn: cream — Source: Standard amigurumi math
R1: 6 sc in MR (6)
R2: inc ×6 (12)
R3: (sc 1, inc) ×6 (18)
R4: (sc 2, inc) ×6 (24)
R5: (sc 3, inc) ×6 (30)
R6: (sc 4, inc) ×6 (36)
R7: (sc 5, inc) ×6 (42)
R8–15: sc around (42)
R16: (sc 5, dec) ×6 (36)
R17: (sc 4, dec) ×6 (30)
R18: (sc 3, dec) ×6 (24)
R19: (sc 2, dec) ×6 (18)
R20: (sc 1, dec) ×6 (12)
R21: dec ×6 (6)
Place 15 mm eyes between R12 and R13 with 8 visible stitches between them. Start firm stuffing before R18, then add small pieces after each decrease round.
Fasten off. Leave a 20 cm tail and close the last 6 stitches.
Body
Yarn: cream — Source: Standard amigurumi math
R1: 6 sc in MR (6)
R2: inc ×6 (12)
R3: (sc 1, inc) ×6 (18)
R4: (sc 2, inc) ×6 (24)
R5: (sc 3, inc) ×6 (30)
R6: (sc 4, inc) ×6 (36)
R7–13: sc around (36)
R14: (sc 4, dec) ×6 (30)
R15: (sc 3, dec) ×6 (24)
R16: (sc 2, dec) ×6 (18)
R17: (sc 1, dec) ×6 (12)
R18: dec ×6 (6)
Stuff the base firmly enough to sit flat. Do not overfill the neck edge, because the head must settle low against the body.
Fasten off. Leave a 35 cm tail for sewing.
Front Legs
Yarn: tan then cream — Source: Standard amigurumi math
Make 2.
R1: 6 sc in MR with tan (6)
R2: inc ×6 (12)
R3: (sc 1, inc) ×6 (18)
R4: BLO sc around (18)
R5: sc around with tan (18)
R6: change to cream, BLO sc around (18)
R7–12: sc around (18)
R13: (sc 1, dec) ×6 (12)
R14: sc around (12)
Stuff the lower half only. Flatten the top edge so the legs sit against the body front.
Fasten off. Leave a 25 cm tail.
Back Legs
Yarn: cream with tan hoof base — Source: Standard amigurumi math
Make 2.
R1: 6 sc in MR with tan (6)
R2: inc ×6 (12)
R3: (sc 1, inc) ×6 (18)
R4: (sc 2, inc) ×6 (24)
R5: BLO sc around with tan (24)
R6: change to cream, sc around (24)
R7–8: sc around (24)
R9: (sc 2, dec) ×6 (18)
R10: sc around (18)
R11: (sc 1, dec) ×6 (12)
R12: sc around (12)
Stuff the toe area firmly and leave the top softer. The feet need a round front edge for the pink pads.
Fasten off. Leave a 30 cm tail.
Ears
Yarn: cream with optional blush inner stitching — Source: Standard amigurumi math
Make 2.
R1: 6 sc in MR (6)
R2: inc ×6 (12)
R3: (sc 1, inc) ×6 (18)
R4–5: sc around (18)
R6: (sc 1, dec) ×6 (12)
R7: sc around (12)
Do not stuff. Flatten each ear, curve the bottom into a shallow cup, and add blush pink embroidery inside the lower half.
Fasten off. Leave a 30 cm tail.
Muzzle and Nose
Yarn: light tan, brown embroidery — Source: Standard amigurumi math
Muzzle:
R1: 6 sc in MR (6)
R2: inc ×6 (12)
R3: (sc 1, inc) ×6 (18)
R4: sc around (18)
Add a pea-sized amount of stuffing under the center only.
Fasten off. Leave a 30 cm tail.
Nose embroidery:
Use medium brown yarn. Stitch a small triangle across the upper center of the muzzle, about 3 stitches wide and 2 rows tall. Add one vertical stitch below the triangle, then form two curved mouth stitches.
Antlers
Yarn: medium brown — Source: Standard amigurumi math; stuffed-tube variation for flower support
Make 2 main stems and 2 side branches.
Main stem, make 2:
R1: 6 sc in MR (6)
R2–9: sc around (6)
Stuff lightly with yarn tails or a narrow strand of stuffing. Keep the tube flexible, not heavy.
Fasten off. Leave a 25 cm tail.
Side branch, make 2:
R1: 6 sc in MR (6)
R2–5: sc around (6)
Attach one branch to each main stem at R5–6. Mirror the placement so both branches point outward.
Fasten off. Leave a 15 cm tail for sewing.
Cheek Patches
Yarn: blush pink — Source: Standard amigurumi math
Make 2.
R1: 6 sc in MR (6)
R2: inc ×6 (12)
Keep these flat. Sew one patch under each eye, slightly toward the outside edge of the face.
Fasten off. Leave a 20 cm tail.
Back Foot Paw Pads
Yarn: blush pink — Source: Standard amigurumi math
Make 2.
R1: 6 sc in MR (6)
R2: inc ×6 (12)
R3: (sc 1, inc) ×6 (18)
Press flat before sewing. Place each pad on the front face of a back foot, centered over the tan base.
Fasten off. Leave a 25 cm tail.
Flower Appliques
Yarn: blush pink and yellow — Source: Standard amigurumi math
Make 5 large flowers and 4 small flowers.
Large flower:
R1: 6 sc in MR (6)
R2: (sl st, ch 2, 2 hdc, ch 2, sl st) in each stitch around (6 petals)
Add one yellow French knot or short straight stitch in the center.
Fasten off. Leave a 20 cm tail.
Small flower:
R1: 6 sc in MR (6)
R2: (sl st, ch 1, hdc, ch 1, sl st) in each stitch around (6 petals)
Use small flowers on antler tips and side spaces where large flowers would hide the antler shape.
Fasten off. Leave a 15 cm tail.
Leaves
Yarn: pale green — Source: Standard crochet applique shaping
Make 8.
Row 1: ch 6, sc in 2nd ch from hook, hdc, dc, hdc, sc (5)
Row 2: rotate to work the other side of the chain, sc, hdc, dc, hdc, sc (10 total edge stitches)
Pull the starting tail tight to sharpen the leaf base. Sew leaves under flowers, not on top of petals.
Fasten off. Leave a 15 cm tail.
Front-Leg Heart Marks
Yarn: blush pink — Source: embroidery detail from photo
Make 2 embroidered marks.
Place the needle 5 rounds above the tan hoof. Work two angled stitches into a V shape, then add one short vertical stitch through the center. Keep each heart under 8 mm wide so it does not read as a paw pad.
Assembly
- Sew the head to the body with the head tilted slightly forward; use the body tail and pass through at least 18 stitches around the neck.
- Pin the muzzle between the eyes, with its top edge one round below the lower eye line, then sew it down with light stuffing inside.
- Embroider the brown nose and mouth before adding cheeks, because the yarn path needs open access through the muzzle.
- Sew cheek patches under the eyes, leaving 1 stitch of cream space between each eye and patch.
- Attach the front legs to the body front, starting 2 rounds below the neck seam and angling the hooves inward.
- Attach the back legs to the lower sides of the body so the pink pads face forward and touch the table line.
- Sew ears to the head from R7 to R10, with the lower edge angled outward.
- Sew antlers between the ears, set 3 stitches inside each ear base, then stitch through each antler twice for stability.
- Place large flowers across the forehead and chest, then use small flowers on the antler branches and side gaps.
- Add leaves under selected flowers, weave all tails into the head or body, and trim only after the crown sits level.
The finished deer measures about 18 cm seated when made with worsted yarn and a 3.5 mm hook.
7 Technical Tips
- Stitch marker failure mode: the head crown spirals left after R10 if the marker moves into the second stitch of a round. Place the marker in the first stitch and count R7, R10, R13, and R16 before installing eyes.
- Stuffing failure mode: flat cheeks appear when the head is filled only at the end. Fill the head to about 80% firmness before R18, then add small pieces through R21.
- Invisible decrease failure mode: cream gaps show across R16–R21 when standard decreases are used on the face side. Work every decrease through front loops only and pull the second loop tight before the next sc.
- Eye placement measurement: 15 mm eyes should sit between R12 and R13 with 8 visible stitches between posts. Installing washers after R16 is too late and can dent the muzzle area.
- Velvet tension failure mode: chenille or velvet yarn can make the 42-stitch head swell past 22 cm. Drop to a 3.25 mm hook or reduce the head plateau to 36 stitches when using plush yarn.
- Pinning failure mode: antlers lean backward when flowers are sewn before crown testing. Pin antlers, ears, three forehead flowers, and two leaves at once, then view the toy from the front and both sides.
- Tail weaving measurement: flower tails need at least 6 hidden stitches under the head surface. A 2-stitch tail path lets petals lift when the toy is handled.
Conclusion
Block the flower appliques with steam held above the surface, not pressed into the stitches. Sew the crown last, because antlers can shift after the head is attached to the body. The next practical step is to make one test head, install the eyes, and pin the antlers before crocheting every flower. That test gives the correct crown width for your yarn. Share the finished spring deer amigurumi pattern on Pinterest with a front-facing photo and on Instagram with a side view of the antlers. Use #BlossomFawnAmigurumi. Which detail changes the deer most: the oversized eyes, the pink cheek patches, or the flowers growing across the antlers?









