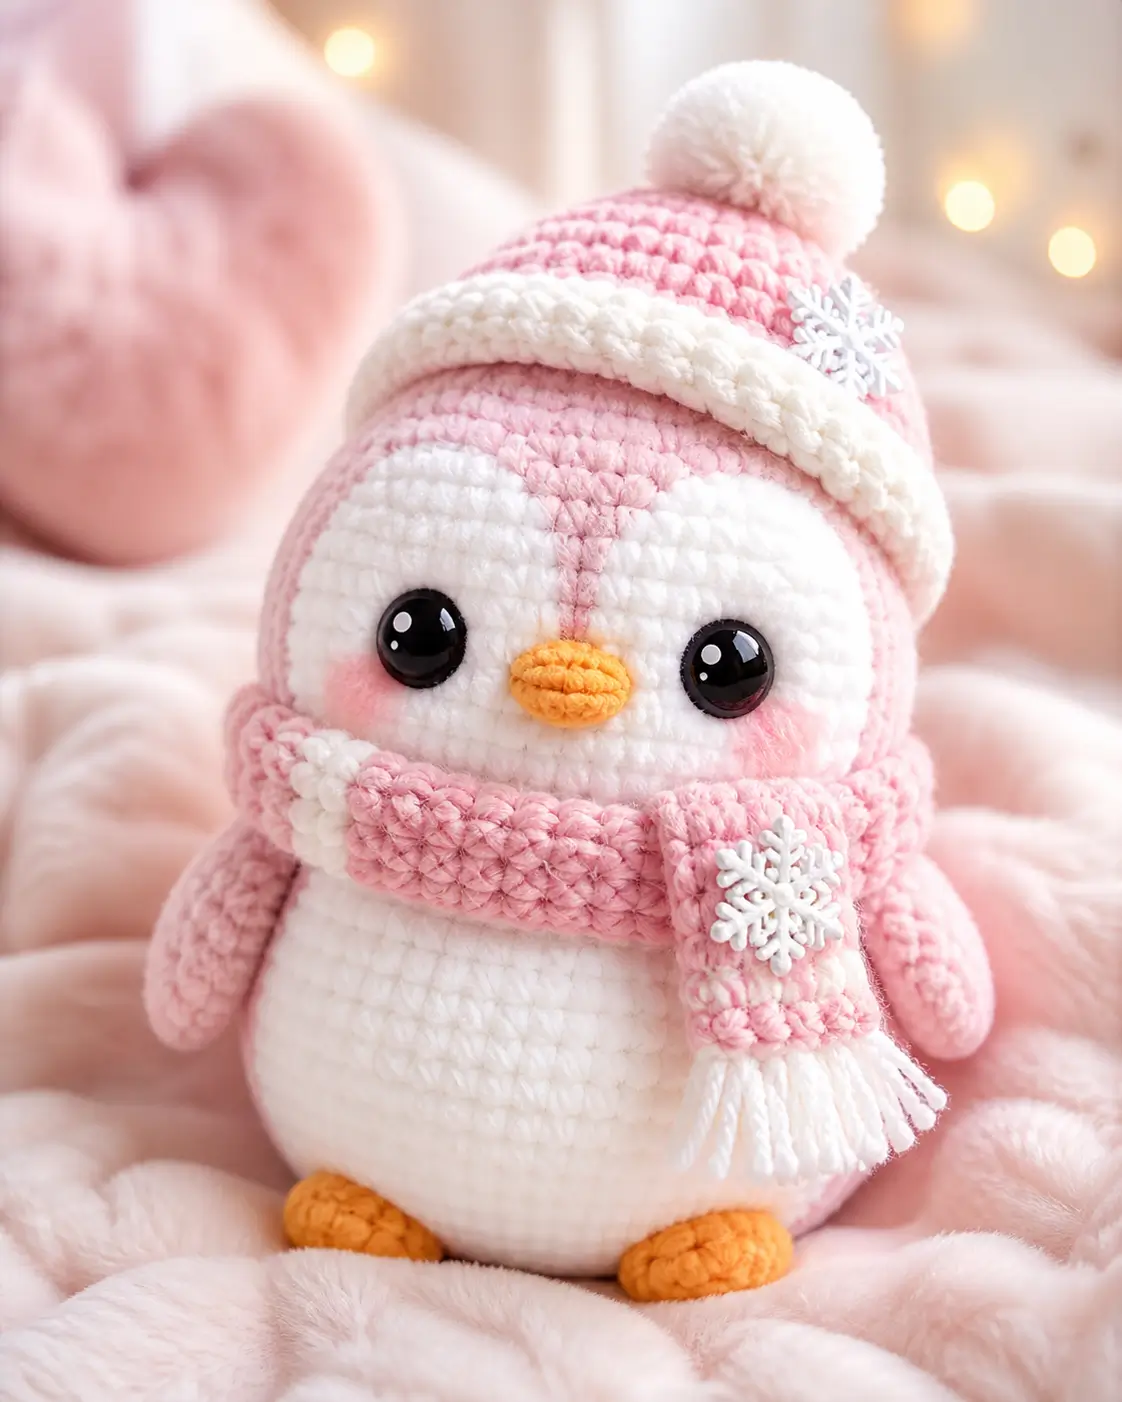
A penguin cannot wear a hat above ears it does not have, so this penguin amigurumi crochet pattern builds the winter shape with a low brim, a centered face patch, and a front-loaded scarf. You will use chunky velvet yarn, a 4 mm hook, 15 mm eyes, and stuffing to make a 22 cm advanced-beginner plush. The result works well as winter nursery decor.
The Design: What Makes Pink Winter Penguin Different
This pink penguin crochet pattern treats the head as a large sphere, then covers the front with a separate white face patch. You place the eyes through that patch and the head at the same time, so the glossy eyes sit flush instead of floating on a loose applique. The body is kept shorter than the head because a winter penguin amigurumi with a tall scarf can become top-heavy. Small flattened wings are sewn slightly forward; the maker then reads the side view as a tucked-in flipper, not a sleeve. The hat uses a 42-stitch brim, matching the head plateau, so it grips without forcing the face out of shape. A common mistake with a crochet penguin with hat is setting the brim too high. It exposes too much forehead and removes the baby-bird proportion.
Project Info at a Glance
| Skill Level | Time | Finished Size | Hook | Best For |
|---|---|---|---|---|
| Advanced beginner | 2–3 hr base penguin; accessory time extra | 22 cm benchmark | 4 mm | Winter shelf display, nursery decor, craft fair sample |
Materials and Tools
Yarn
- Pastel pink velvet/chenille yarn — Super Bulky #5 — 50 g — Lion Brand Feels Like Bliss, Himalaya Dolphin Baby, or similar
- White velvet/chenille yarn — Super Bulky #5 — 30 g — same yarn family as main color
- Orange velvet or worsted yarn — 5–10 g — beak and feet
- White cotton thread or DK cotton — 2 g — snowflake appliques
- Pink DK cotton or acrylic — 2 g — cheek patches, optional if blush is not embroidered
- Polyester stuffing — 25–35 g — head and body
Tools
- Hook 4 mm
- 15 mm black safety eyes
- Yarn needle
- Stitch markers
- Straight pins
- Scissors
- Pom-pom maker, optional
- Black embroidery thread, optional for child-safe eyes
Safety eyes are not recommended for toys intended for children under three; embroider the eyes for that use case.
Abbreviations
- MR = magic ring
- sc = single crochet
- inc = increase
- dec = decrease
- sl st = slip stitch
- ch = chain
- BLO = back loop only
- FO = fasten off
- st = stitch
Use invisible decrease by picking up the front loops of the next two stitches and completing one sc so dec rounds reduce bulk without paired bars.
Pattern — Step by Step
Continuous spiral unless noted. This is an original photo-matched pattern using standard 6-stitch amigurumi increase and decrease math.
Head — Make 1
Yarn: pastel pink velvet
R1: 6 sc in MR (6)
R2: inc ×6 (12)
R3: (sc, inc) ×6 (18)
R4: (2 sc, inc) ×6 (24)
R5: (3 sc, inc) ×6 (30)
R6: (4 sc, inc) ×6 (36)
R7: (5 sc, inc) ×6 (42)
R8–14: sc around (42)
Do not install the eyes yet. The face patch must be pinned first.
R15: (5 sc, dec) ×6 (36)
R16: (4 sc, dec) ×6 (30)
R17: (3 sc, dec) ×6 (24)
R18: (2 sc, dec) ×6 (18)
Stuff firmly, shaping the lower front into a soft oval.
R19: (sc, dec) ×6 (12)
R20: dec ×6 (6)
Fasten off. Leave 25 cm tail and close the final hole.
White Face Patch — Make 1
Yarn: white velvet
Ch 8.
R1: Starting in 2nd ch from hook, 6 sc, 3 sc in last ch, work opposite side, 5 sc, inc (16)
R2: inc, 5 sc, inc ×3, 5 sc, inc ×2 (22)
R3: sc, inc, 5 sc, (sc, inc) ×3, 5 sc, (sc, inc) ×2 (28)
R4: 2 sc, inc, 5 sc, (2 sc, inc) ×3, 5 sc, (2 sc, inc) ×2 (34)
R5: sc around (34)
Fasten off. Leave 35 cm tail.
Pin the patch across the lower front of the head, with the top edge sitting just below R8. Insert safety eyes through both layers between head R10 and R11, 10 stitches apart. Set the backs only after both eyes look level from the front.
Body — Make 1
Yarn: white velvet
R1: 6 sc in MR (6)
R2: inc ×6 (12)
R3: (sc, inc) ×6 (18)
R4: (2 sc, inc) ×6 (24)
R5: (3 sc, inc) ×6 (30)
R6: (4 sc, inc) ×6 (36)
R7: (5 sc, inc) ×6 (42)
R8–13: sc around (42)
R14: (5 sc, dec) ×6 (36)
R15–17: sc around (36)
R18: (4 sc, dec) ×6 (30)
R19: (3 sc, dec) ×6 (24)
R20: (2 sc, dec) ×6 (18)
Stuff the base more firmly than the neck so the penguin sits without rocking.
R21: (sc, dec) ×6 (12)
R22: dec ×6 (6)
Fasten off. Leave 30 cm tail and close.
Wings / Front Flippers — Make 2
Yarn: pastel pink velvet
R1: 6 sc in MR (6)
R2: inc ×6 (12)
R3: (sc, inc) ×6 (18)
R4–9: sc around (18)
R10: (sc, dec) ×6 (12)
Do not stuff. Flatten the opening and sc through both layers across 6 sts (6).
Fasten off. Leave 25 cm tail for sewing.
Back Legs / Feet — Make 2
Yarn: orange velvet or worsted
R1: 6 sc in MR (6)
R2: inc ×6 (12)
R3: (sc, inc) ×6 (18)
R4–5: sc around (18)
R6: (sc, dec) ×6 (12)
Do not stuff. Flatten the opening and sc through both layers across 6 sts (6).
Fasten off. Leave 25 cm tail.
Beak — Make 1
Yarn: orange velvet or worsted
R1: 6 sc in MR (6)
R2: inc ×6 (12)
R3: sc around (12)
Flatten into a horizontal oval.
Fasten off. Leave 20 cm tail.
Sew the beak centered between the eyes, with its top edge one round below the eye line.
Cheek Patches — Make 2
Yarn: pale pink DK or thin velvet
R1: 6 sc in MR (6)
R2: inc ×6 (12)
Sl st to first st.
Fasten off. Leave 18 cm tail.
Sew one cheek below each eye, two stitches away from the beak edge. For a flatter finish, split the yarn tail and sew with half thickness.
Winter Hat — Make 1
Yarn: pastel pink velvet
R1: 6 sc in MR (6)
R2: inc ×6 (12)
R3: (sc, inc) ×6 (18)
R4: (2 sc, inc) ×6 (24)
R5: (3 sc, inc) ×6 (30)
R6: (4 sc, inc) ×6 (36)
R7: (5 sc, inc) ×6 (42)
R8–9: sc around (42)
R10: (5 sc, dec) ×6 (36)
R11: sc around (36)
Fasten off. Leave 35 cm tail.
The lower edge should sit behind the white brim, not on the eye line.
Hat Brim — Make 1
Yarn: white velvet
Ch 43. Join with sl st to form a ring, without twisting.
R1: ch 1, sc in each ch around (42)
R2–3: sc around (42)
Fasten off. Leave 30 cm tail.
Sew the brim around the lower edge of the hat. Let it overlap the head by one round at the back and lift slightly at the front.
Pom-Pom — Make 1
Yarn: white velvet or faux-fur yarn
R1: 6 sc in MR (6)
R2: inc ×6 (12)
R3: (sc, inc) ×6 (18)
R4: sc around (18)
R5: (sc, dec) ×6 (12)
Stuff lightly so the top stays round, not heavy.
R6: dec ×6 (6)
Fasten off. Leave 20 cm tail.
Sew to the top back of the hat, centered over the final hat decrease line.
Scarf — Make 1
Yarn: pastel pink velvet
Ch 9.
Row 1: Starting in 2nd ch from hook, 8 sc, ch 1, turn (8)
Rows 2–42: 8 sc, ch 1, turn (8)
Fasten off. Weave in both ends.
Cut 12 white strands, each 10 cm long. Attach 6 strands to each scarf end as fringe. Trim to 3 cm after the scarf is sewn in place.
Snowflake Appliques — Make 2
Yarn: white cotton thread or white DK cotton
R1: 6 sc in MR, join with sl st (6)
R2: (ch 5, sl st in 2nd ch from hook, sc in next ch, hdc in next ch, dc in next ch, sl st into next sc of R1) ×6 (6 points)
Fasten off. Leave 15 cm tail.
Sew one snowflake to the right side of the hat brim and one to the lower hanging scarf end.
Assembly
- Sew the head to the body with the face patch centered over the front body line.
- Pin the body upright and check that the head does not tilt more than one stitch to either side.
- Sew the white face patch fully to the head after the safety-eye backs are locked.
- Attach the beak between the eyes, one round below the eye line.
- Sew the cheek patches below the eyes, matching their lower edges to the top of the beak.
- Attach the wings at body R15–R17, angled downward and slightly forward.
- Sew the feet to the lower front of the body at R4–R6, with 5 stitches between them.
- Sew the hat to the head, then sew the brim over the hat’s lower edge.
- Wrap the scarf around the neck and stitch it at the back plus one hidden stitch under the hanging front end.
- Sew the pom-pom and snowflake appliques last, then weave all tails at least 5 cm inside the stuffed pieces.
The finished penguin has a pink winter hat, a crossed scarf, white snowflake details, orange feet, and a centered face.
7 Technical Tips
- Stitch marker drift: If the round start moves more than 3 stitches away from the back center, the face patch will lean. Reset the marker at the rear before head R8, R12, and R16.
- Stuffing firmness: A soft body will collapse under the 42-stitch head. Fill the body until the base rebounds only 2–3 mm when pressed.
- Invisible decrease: Standard decreases leave paired bars across velvet yarn. Work each dec through front loops only on R15–R20 of the head and R14–R22 of the body.
- Eye placement timing: Setting the safety backs before pinning the face patch can trap the patch too low. Place 15 mm eyes between head R10 and R11, exactly 10 stitches apart.
- Velvet tension: Gaps wider than 4 mm will show white stuffing through the pink head. Drop from a 4 mm hook to a 3.5 mm hook if the gaps stay open after R4.
- Pinning: A face patch shifted by one full row changes the beak angle. Use at least 12 pins around the patch before sewing: top, bottom, sides, and the four diagonal points.
- Tail weaving: Short tails can pull loose from chenille after the scarf is handled. Weave every structural tail 5 cm into the piece, reverse direction once, then bury the final 2 cm.
Conclusion
Use the finished sample as a proportion check, not only a decorative target. The head should read wider than the body, the face patch should sit high enough to leave a pink forehead point, and the scarf must not hide the beak. For the next sample, make one color change only: replace pastel pink with ice blue or lavender while keeping the white face and orange feet unchanged. Share a front-facing image on Pinterest and a side view on Instagram so the hat slope and scarf fringe are visible. Tag it #PinkWinterPenguin. Which detail should be revised on this penguin amigurumi crochet pattern first: the snowflake applique, the hat brim, or the oval beak?









