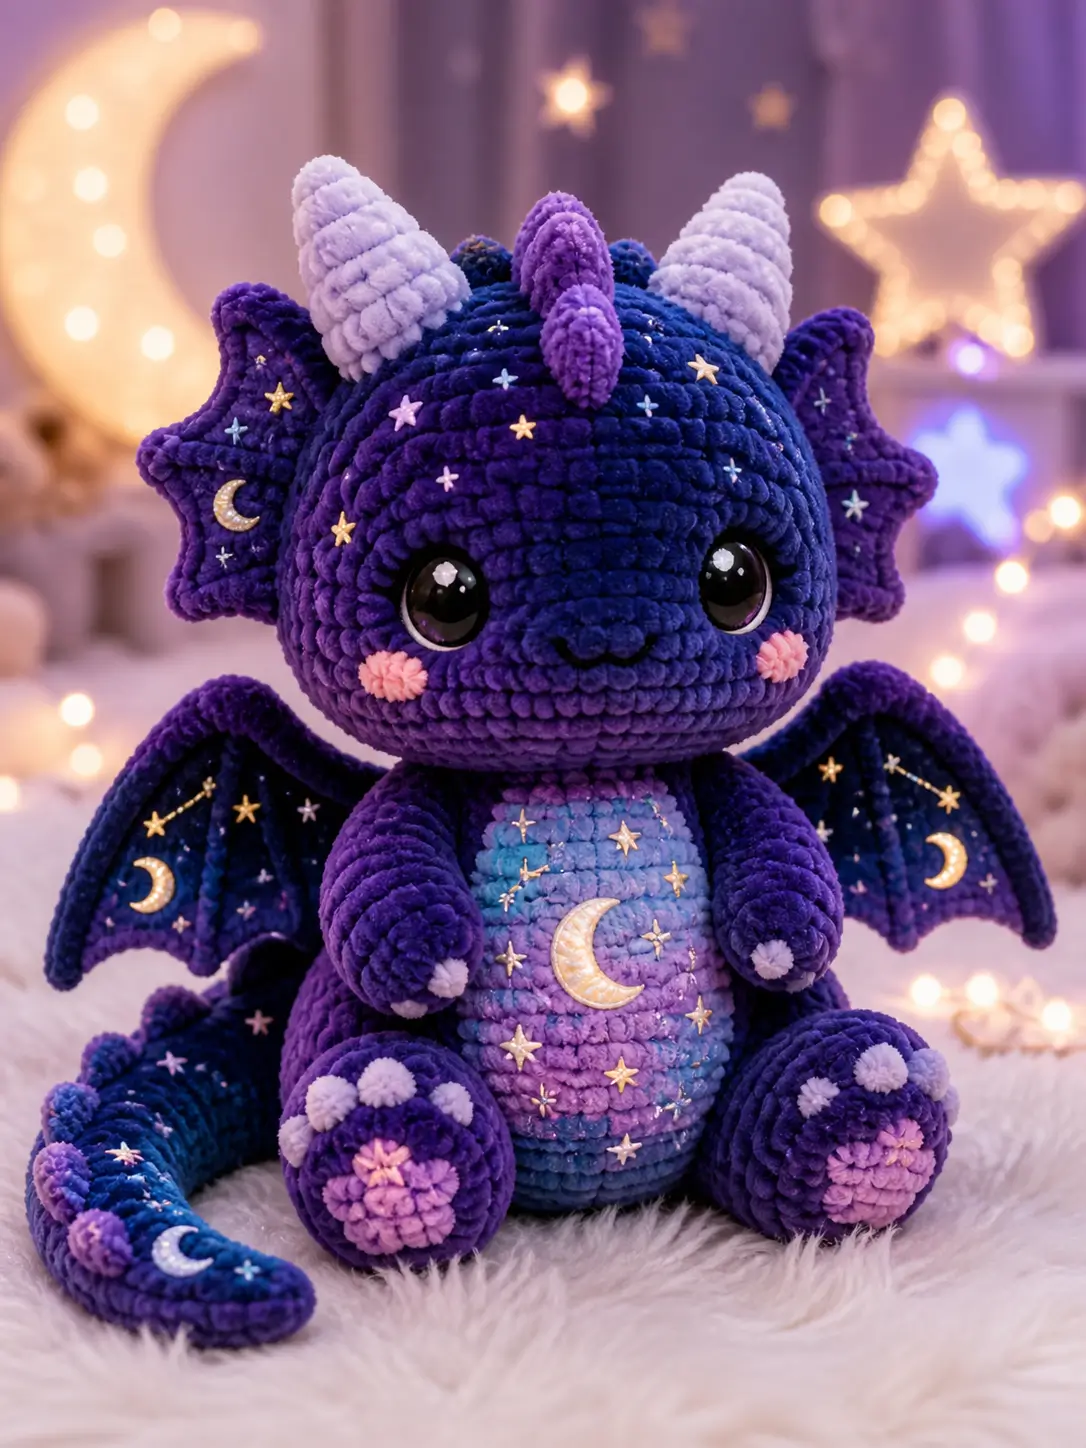
This dragon has two ribbed horns, two starry wings, and one crescent belly; balance is the first problem. This celestial dragon amigurumi crochet pattern uses velvet yarn, a 6 mm hook, 15 mm eyes, and a large 42-stitch head plateau. The finished plush suits an intermediate maker who can read spiral rounds. Make it for shelf display where the wings need to hold shape.
The Design: What Makes This Dragon Different
A night-sky dragon needs weight in the lower body, not just a large head. The body uses a 42-stitch plateau to keep the plush seated after the wings are sewn on. Wings are worked flat and edged in the darker body color because unsupported chenille membranes can curl inward. The horns are short, ribbed cones; long horns pull the head backward on a chunky dragon amigurumi. The belly panel is applied after stuffing so the crescent moon sits centered rather than drifting toward one side.
A common maker error is sewing wings too low. That makes the plush dragon crochet pattern tip back, especially when the tail is stuffed firmly. Verified sitting dragon sources also place wings, horns, muzzle, legs, and tail as separate structural parts.
Project Info at a Glance
| Skill Level | Time | Finished Size | Hook | Best For |
|---|---|---|---|---|
| Intermediate | 6–12 hours | About 25 cm sitting baseline | 6 mm for chunky velvet | Decorative sitting dragon |
A 25 cm sitting dragon is a practical planning baseline for this style. A chunky baby dragon source also verifies Weight 6 yarn, a 6 mm hook, and 15 mm safety eyes. Use the same table as a starting point, then measure your first head before cutting long accent strands.
Materials and Tools
Yarn
- Deep navy / royal purple — chunky velvet or chenille, Weight 6 — 100–150 g — Bernat Blanket, Sweet Snuggles Lite, or similar
- Lavender — chunky velvet or chenille, Weight 6 — 25–40 g — for horns, claws, and toe pads
- Violet — chunky velvet or chenille, Weight 6 — 25–35 g — for spine ridge and wing edging
- Blue-lavender gradient colors — chunky velvet or chenille, Weight 6 — 35–50 g total — for belly and wing panels
- Soft pink — chunky velvet or chenille, Weight 6 — 5–10 g — for cheek patches
- Gold, silver, or pale yellow thread — embroidery thread or thin cotton — small amount — for stars and crescent details
Tools
- Hook 6 mm
- 15 mm safety eyes or embroidered eyes for a child-safe version
- Polyester stuffing
- Yarn needle
- Locking stitch markers
- Straight pins
- Embroidery needle
- Optional felt or flat charms for moons and stars
Abbreviations
MR = magic ring / sc = single crochet / inc = increase / dec = invisible decrease / sl st = slip stitch / ch = chain / BLO = back loop only / st = stitch / R = round or row
Work invisible decreases through the front loops only so the velvet surface closes without a raised knot.
Pattern — Step by Step
Continuous spiral unless noted. Mark the first stitch of every round.
Head
Yarn: deep navy / royal purple — Source: Standard amigurumi math.
R1: 6 sc in MR (6)
R2: inc ×6 (12)
R3: [sc, inc] ×6 (18)
R4: [2 sc, inc] ×6 (24)
R5: [3 sc, inc] ×6 (30)
R6: [4 sc, inc] ×6 (36)
R7: [5 sc, inc] ×6 (42)
R8–R16: sc around (42)
Place safety eyes between R12 and R13, 8 stitches apart. Add light stuffing before the head narrows.
R17: [5 sc, dec] ×6 (36)
R18: sc around (36)
R19: [4 sc, dec] ×6 (30)
R20: [3 sc, dec] ×6 (24)
R21: [2 sc, dec] ×6 (18)
R22: [sc, dec] ×6 (12)
R23: dec ×6 (6)
Fasten off. Leave a 20 cm tail and close through front loops.
Body
Yarn: deep navy / royal purple — Source: Standard amigurumi math.
R1: 6 sc in MR (6)
R2: inc ×6 (12)
R3: [sc, inc] ×6 (18)
R4: [2 sc, inc] ×6 (24)
R5: [3 sc, inc] ×6 (30)
R6: [4 sc, inc] ×6 (36)
R7: [5 sc, inc] ×6 (42)
R8–R14: sc around (42)
R15: [5 sc, dec] ×6 (36)
R16: sc around (36)
R17: [4 sc, dec] ×6 (30)
R18–R19: sc around (30)
R20: [3 sc, dec] ×6 (24)
R21: sc around (24)
R22: [2 sc, dec] ×6 (18)
Stuff the lower body firmly. Keep the neck end softer so the head can sit level.
R23: [sc, dec] ×6 (12)
R24: dec ×6 (6)
Fasten off. Leave a 35 cm tail for sewing.
Snout / Muzzle
Yarn: slightly lighter purple — Source: Standard amigurumi math.
R1: 6 sc in MR (6)
R2: inc ×6 (12)
R3: [sc, inc] ×6 (18)
R4: sc around (18)
R5: [sc, dec] ×6 (12)
Fasten off. Leave a 25 cm tail. Stuff lightly, then flatten the back edge before sewing.
Front Arms
Yarn: deep navy / royal purple with lavender tips — Source: Standard amigurumi math.
Make 2.
R1: 6 sc in MR (6)
R2: inc ×6 (12)
R3: [sc, inc] ×6 (18)
R4–R7: sc around (18)
R8: [sc, dec] ×6 (12)
R9–R11: sc around (12)
Stuff the paw end only. Leave the upper arm soft for a clean side seam.
R12: dec ×6 (6)
Fasten off. Leave a 25 cm tail for sewing.
Back Legs
Yarn: deep navy / royal purple — Source: Standard amigurumi math.
Make 2.
R1: 6 sc in MR (6)
R2: inc ×6 (12)
R3: [sc, inc] ×6 (18)
R4: [2 sc, inc] ×6 (24)
R5–R8: sc around (24)
R9: [2 sc, dec] ×6 (18)
R10–R12: sc around (18)
R13: [sc, dec] ×6 (12)
Stuff the foot firmly. Keep the top flat so the leg sits beside the body rather than under it.
R14: dec ×6 (6)
Fasten off. Leave a 30 cm tail.
Foot Pads
Yarn: pink-lavender — Source: Standard amigurumi math.
Make 2.
R1: 6 sc in MR (6)
R2: inc ×6 (12)
R3: [sc, inc] ×6 (18)
Sl st to finish. Leave a 20 cm tail and sew to the front face of each back foot.
Toe Claws
Yarn: pale lavender — Source: Standard amigurumi math.
Make 12.
R1: 6 sc in MR (6)
Sl st into first stitch. Fasten off with a 12 cm tail. Sew three claws to each back foot and three claws to each front paw.
Wings
Yarn: blue-lavender for membrane; violet or navy for edging — Source: Standard flat-row shaping.
Make 2.
Ch 4.
Row 1: sc in second ch from hook and next 2 ch, ch 1, turn (3)
Row 2: inc, sc, inc, ch 1, turn (5)
Row 3: sc across, ch 1, turn (5)
Row 4: inc, sc 3, inc, ch 1, turn (7)
Row 5: sc across, ch 1, turn (7)
Row 6: inc, sc 5, inc, ch 1, turn (9)
Row 7: sc across, ch 1, turn (9)
Row 8: inc, sc 7, inc, ch 1, turn (11)
Row 9: sc across, ch 1, turn (11)
Row 10: inc, sc 9, inc, ch 1, turn (13)
Row 11: sc across, ch 1, turn (13)
Row 12: inc, sc 11, inc, ch 1, turn (15)
Row 13: sc across, ch 1, turn (15)
Row 14: dec, sc 11, dec, ch 1, turn (13)
Row 15: dec, sc 9, dec, ch 1, turn (11)
Edging: attach navy at the upper corner. Work 36 sc evenly around the wing, placing 3 picots along the lower edge (36 base sc).
Fasten off. Leave a 40 cm tail.
Horns
Yarn: lavender — Source: Standard amigurumi math.
Make 2.
R1: 6 sc in MR (6)
R2: sc around (6)
R3: inc ×6 (12)
R4: sc around (12)
R5: [sc, inc] ×6 (18)
R6–R8: sc around (18)
Fasten off. Leave a 30 cm tail. Surface stitch a spiral ridge around each horn with the same yarn.
Dorsal Ridge Bumps
Yarn: violet — Source: Standard amigurumi math.
Make 5.
R1: 6 sc in MR (6)
R2: sc around (6)
R3: inc ×6 (12)
R4: sc around (12)
R5: dec ×6 (6)
Fasten off. Leave 18 cm tails. Make one larger center bump by repeating R4 once before R5.
Tail
Yarn: deep navy / royal purple — Source: Standard amigurumi math.
R1: 6 sc in MR (6)
R2: sc around (6)
R3: inc ×6 (12)
R4–R6: sc around (12)
R7: [sc, inc] ×6 (18)
R8–R13: sc around (18)
R14: [2 sc, inc] ×6 (24)
R15–R20: sc around (24)
R21: [3 sc, inc] ×6 (30)
R22–R24: sc around (30)
Fasten off. Leave a 35 cm tail. Stuff from tip to base, firmer at the base.
Belly Patch
Yarn: blue-lavender-pink gradient colors — Source: Standard oval shaping.
Ch 9.
R1: sc in second ch from hook, sc 6, 3 sc in last ch, work opposite side: sc 6, inc (18)
R2: inc, sc 6, inc ×3, sc 6, inc ×2 (24)
R3: [sc, inc], sc 6, [sc, inc] ×3, sc 6, [sc, inc] ×2 (30)
R4: sc around (30)
R5: [4 sc, inc] ×6 (36)
R6: sc around (36)
Sl st to finish. Leave a 40 cm sewing tail. Add a crescent moon after the patch is sewn flat.
Cheek Patches
Yarn: soft pink — Source: Standard amigurumi math.
Make 2.
R1: 6 sc in MR (6)
R2: inc ×6 (12)
Sl st to finish. Leave a 15 cm tail and flatten before sewing.
Crescent Moon Appliqués
Yarn: pale yellow, cream, or metallic embroidery cotton — Source: Standard applique shaping.
Make 3.
Ch 9.
Row 1: sl st in second ch from hook, sc, hdc, dc, dc, hdc, sc, sl st (8)
Row 2: working along the other side of the chain, sl st, sc, hdc, hdc, hdc, sc, sl st, sl st (8)
Fasten off. Curve the strip into a crescent as you sew. Place one large crescent on the belly and one smaller crescent on each wing or tail.
Star Details
Yarn/thread: gold, silver, pale blue, and lavender — Source: embroidery placement from photo analysis.
Make 12–18 embroidered stars.
Work each star with five straight stitches crossing from one center point. Keep stars 1.5–2 cm away from the eye washers, wing seam, and leg seams. Use smaller thread stars on the face and larger thread stars on the belly and wings.
Assembly
- Sew the body to the lower back of the head, using the body tail and adding stuffing at the neck before the seam closes.
- Pin the snout between the eyes, with its top edge one round below the eye line, then sew around the flattened back edge.
- Embroider a small black nose and curved mouth on the snout, anchoring each stitch inside the head.
- Sew the cheek patches two rounds below the eyes and slightly outside the snout edge.
- Attach the front arms to the upper body, angled inward so the claws face the belly patch.
- Sew the back legs to the lower sides of the body, then add the foot pads and toe claws.
- Attach the tail to the back base of the body; curve it to one side and tack it down with two hidden stitches.
- Sew the horns to the top of the head, then add the dorsal ridge bumps from crown to upper back.
- Pin the wings high on the back, with the top edge just below the neck seam, then sew through both the edging and the body fabric.
- Sew the belly patch, crescent moons, and embroidered stars last, keeping heavy charms off the wing tips.
The finished dragon sits with the tail acting as a rear support point.
7 Technical Tips
- Marker drift: Velvet can hide the first stitch by 2–3 mm after only five rounds. Move the marker into the first stitch of every round before making the second stitch.
- Stuffing firmness: A soft lower body causes the dragon to lean backward once both wings are attached. Pack the base until it springs back slowly under thumb pressure.
- Invisible decrease gaps: Chenille gaps show most on R17–R23 of the head. Pull the working loop low and snug after each front-loop decrease.
- Eye placement timing: Install eyes before closing R17 on the head. After R19, the opening is too small for 15–20 mm washers.
- Wing pinning: Wings sewn below the neck seam make the plush tip backward. Pin the upper wing edge 1 round below the head-body join and test the sitting angle before sewing.
- Horn symmetry: A 1-stitch offset at the horn base is visible from the front. Count 6 stitches from the head centerline on both sides before pinning.
- Tail weaving: A short tail end can pull through velvet pile after handling. Weave every structural tail at least 5 cm through stuffed fabric before trimming.
Conclusion
Check the wing balance before sewing any stars, because the decorations should not correct a structural tilt. The practical next step is to crochet the head and one wing first, then compare the eye size and wing height against the photo. Pin the horns while the head is stuffed but still separate from the body. After finishing, share a flat front photo on Pinterest and a side-angle reel on Instagram so makers can see the tail support and wing height. Use #NightSkyDragon with your finished project. Save this celestial dragon amigurumi crochet pattern for the next velvet yarn test: should the crescent sit on the belly center or curve toward the dragon’s right paw?