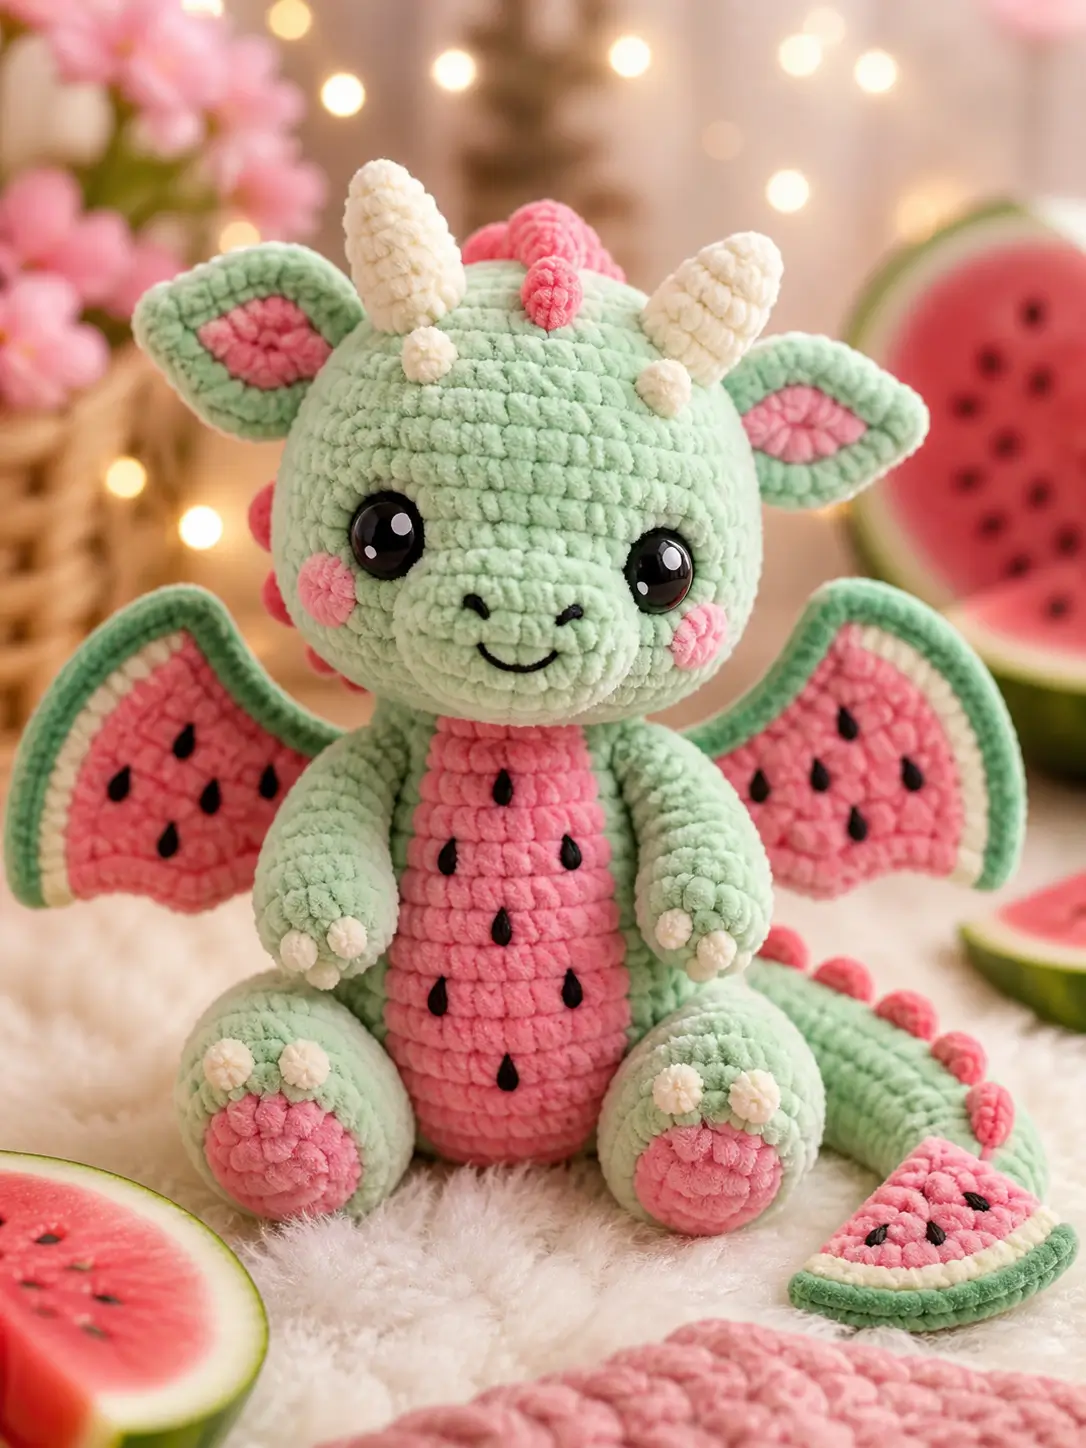
Watermelon dragons fail when the rind wings look like plain green bat wings. This watermelon dragon amigurumi crochet pattern builds a 15 cm seated plush with mint chenille, pink belly colorwork, cream horns, and 15 mm safety eyes. The skill level is intermediate because the wings need row shaping and edge color changes. Make it as a summer table display that will not roll off a shelf.
The Design: What Makes This Watermelon Dragon Different
You are balancing two silhouettes at once: fruit slice and baby dragon. The head stays oversized, because the snout, cheeks, horns, and ears need room without crowding the eyes. The body uses a 36-stitch medium plateau, so the seated base remains narrow enough for back legs to frame the pink belly panel. The maker who widens the body too early loses the upright pose; the toy starts to read as a round dinosaur instead of a dragon. Wings carry the main watermelon signal. Pink membranes sit inside a cream rind stripe and mint outer edge, then black seed stitches break up the flat surface. That is where this crochet dragon pattern differs from a generic chunky dragon amigurumi: the color order does the anatomy work.
Project Info at a Glance
| Skill Level | Time | Finished Size | Hook | Best For |
|---|---|---|---|---|
| Intermediate | 4–5 hours | 15 cm seated benchmark | 6 mm | Photo-matched fruit dragon display plush |
The 15 cm, 6 mm hook, weight 6 yarn, and 15 mm eye choices match the closest chunky baby dragon benchmark found during research.
Materials and Tools
Yarn
- Mint green — weight 6 chenille — 100 g — Sweet Snuggles Lite, Bernat Blanket, or similar plush yarn
- Watermelon pink — weight 6 chenille — 50 g — same brand family as main yarn
- Cream/white — weight 6 chenille — 20 g — horns, claws, rind stripe, head nubs
- Black — worsted cotton or embroidery yarn — 2–5 g — seeds, nostrils, mouth
Tools
- Hook 6 mm
- 15 mm safety eyes, or embroidered eyes for a child-safe display
- Polyester stuffing
- Large yarn needle
- Stitch markers
- Pins
- Scissors
- Black embroidery needle
Abbreviations
MR = magic ring / sc = single crochet / inc = 2 sc in one stitch / dec = single crochet two stitches together / sl st = slip stitch / ch = chain / BLO = back loop only / st = stitch.
Invisible decrease: insert the hook through the front loops of the next two stitches, yarn over, pull through both front loops, yarn over again, and pull through both loops on the hook.
Pattern — Step by Step
Continuous spiral unless noted. Use a stitch marker at the first stitch of each round.
Head
Yarn: mint green — Source: Standard amigurumi math, benchmarked against public dragon shaping references.
R1: 6 sc in MR (6)
R2: inc ×6 (12)
R3: (sc, inc) ×6 (18)
R4: (2 sc, inc) ×6 (24)
R5: (3 sc, inc) ×6 (30)
R6: (4 sc, inc) ×6 (36)
R7: sc around (36)
R8: sc around (36)
R9: sc around (36)
R10: sc around (36)
R11: sc around (36)
R12: sc around (36)
R13: sc around (36)
R14: (4 sc, dec) ×6 (30)
R15: (3 sc, dec) ×6 (24)
R16: (2 sc, dec) ×6 (18)
R17: (sc, dec) ×6 (12)
R18: dec ×6 (6)
Place safety eyes between R10 and R11, 10 stitches apart, before R15. Stuff firmly through the lower opening before closing.
Fasten off. Weave the tail through the front loops of R18 and pull closed.
Snout
Yarn: mint green — Source: Standard amigurumi math.
R1: 6 sc in MR (6)
R2: inc ×6 (12)
R3: (sc, inc) ×6 (18)
R4: sc around (18)
R5: sc around (18)
R6: (sc, dec) ×6 (12)
Stuff lightly. Flatten the lower edge slightly so the snout sits wide across the face.
Fasten off. Leave a 35 cm tail.
Cheek Patches
Make 2. Yarn: watermelon pink — Source: Standard amigurumi math.
R1: 6 sc in MR (6)
R2: inc ×6 (12)
Fasten off. Leave a 25 cm tail for sewing.
Body
Yarn: mint green — Source: Standard amigurumi math, with 36-stitch medium plateau.
R1: 6 sc in MR (6)
R2: inc ×6 (12)
R3: (sc, inc) ×6 (18)
R4: (2 sc, inc) ×6 (24)
R5: (3 sc, inc) ×6 (30)
R6: (4 sc, inc) ×6 (36)
R7: sc around (36)
R8: sc around (36)
R9: sc around (36)
R10: sc around (36)
R11: sc around (36)
R12: (4 sc, dec) ×6 (30)
R13: sc around (30)
R14: (3 sc, dec) ×6 (24)
R15: sc around (24)
R16: (2 sc, dec) ×6 (18)
R17: (sc, dec) ×6 (12)
R18: dec ×6 (6)
Stuff the lower half more firmly than the neck edge, or the head will tilt forward.
Fasten off. Close the base.
Belly Panel
Yarn: watermelon pink — Source: Standard amigurumi math.
R1: 6 sc in MR (6)
R2: inc ×6 (12)
R3: (sc, inc) ×6 (18)
R4: (2 sc, inc) ×6 (24)
R5: (3 sc, inc) ×6 (30)
R6: (4 sc, inc) ×6 (36)
Block flat with pins. Sew vertically to the front of the body, stretching it into an oval while sewing.
Fasten off. Leave a 45 cm tail.
Arms / Front Legs
Make 2. Yarn: mint green — Source: Standard amigurumi math.
R1: 6 sc in MR (6)
R2: inc ×6 (12)
R3: sc around (12)
R4: sc around (12)
R5: sc around (12)
R6: sc around (12)
R7: sc around (12)
R8: sc around (12)
R9: dec ×6 (6)
R10: sc around (6)
Stuff only the paw end. Flatten the top edge.
Fasten off. Leave a 30 cm tail.
Back Legs
Make 2. Yarn: watermelon pink for R1–R2, mint green from R3 — Source: Standard amigurumi math.
R1: 6 sc in MR (6)
R2: inc ×6 (12)
R3: change to mint, BLO, (sc, inc) ×6 (18)
R4: (2 sc, inc) ×6 (24)
R5: sc around (24)
R6: sc around (24)
R7: sc around (24)
R8: (2 sc, dec) ×6 (18)
R9: (sc, dec) ×6 (12)
Stuff firmly at the heel and lightly at the top edge.
Fasten off. Leave a 35 cm tail.
Claw Nubs
Make 10. Yarn: cream — Source: Standard amigurumi math.
R1: 6 sc in MR (6)
R2: sc around (6)
Fasten off. Leave a 15 cm tail on each nub. Sew three to each back foot and two to each arm.
Ears
Make 2 outer ears. Yarn: mint green — Source: Standard amigurumi math.
R1: 6 sc in MR (6)
R2: inc ×6 (12)
R3: (sc, inc) ×6 (18)
R4: (2 sc, inc) ×6 (24)
R5: sc around (24)
R6: (2 sc, dec) ×6 (18)
R7: (sc, dec) ×6 (12)
Do not stuff. Flatten into a rounded leaf shape.
Fasten off. Leave a 35 cm tail.
Inner Ear Patches
Make 2. Yarn: watermelon pink — Source: Standard amigurumi math.
R1: 6 sc in MR (6)
R2: inc ×6 (12)
R3: (sc, inc) ×6 (18)
Fasten off. Sew one patch to the center of each outer ear before attaching the ears to the head.
Horns
Make 2. Yarn: cream — Source: Standard amigurumi math adapted for a blunt plush horn.
R1: 6 sc in MR (6)
R2: sc around (6)
R3: sc around (6)
R4: inc ×6 (12)
R5: sc around (12)
R6: sc around (12)
Stuff with small pinches only. Shape the tip with two tightening stitches through R1.
Fasten off. Leave a 30 cm tail.
Head Nubs
Make 2. Yarn: cream — Source: Standard amigurumi math.
R1: 6 sc in MR (6)
R2: sc around (6)
Fasten off. Leave a 20 cm tail.
Crest Spikes
Make 6. Yarn: watermelon pink — Source: Standard amigurumi math.
R1: 6 sc in MR (6)
R2: sc around (6)
R3: inc ×6 (12)
R4: sc around (12)
Stuff lightly. These read as soft fruit bumps rather than sharp spikes.
Fasten off. Leave a 25 cm tail.
Watermelon Wings
Make 2. Yarn: watermelon pink, cream, mint green — Source: wing structure benchmark plus watermelon applique color order.
With watermelon pink:
R1: 6 sc in MR (6)
R2: inc ×6 (12)
R3: (sc, inc) ×6 (18)
R4: (2 sc, inc) ×6 (24)
R5: (3 sc, inc) ×6 (30)
Fold the circle in half, wrong sides together.
Cream rind edge:
R6: working through both layers along the curved edge, sc 15 (15)
Mint outer rind edge:
R7: ch 1, turn, sc 15 across cream edge (15)
Do not stuff. Embroider three black teardrop seeds on each pink membrane before assembly.
Fasten off. Leave a 45 cm tail.
Tail
Yarn: mint green — Source: Standard amigurumi math.
R1: 6 sc in MR (6)
R2: sc around (6)
R3: inc ×6 (12)
R4: sc around (12)
R5: sc around (12)
R6: sc around (12)
R7: sc around (12)
R8: sc around (12)
R9: sc around (12)
R10: sc around (12)
R11: sc around (12)
R12: sc around (12)
R13: sc around (12)
R14: sc around (12)
Stuff lightly so the tail can curve around the side of the body.
Fasten off. Leave a 40 cm tail.
Watermelon Slice Tail Fin
Yarn: watermelon pink, cream, mint green — Source: watermelon applique color order adapted to plush scale.
With watermelon pink:
R1: 6 sc in MR (6)
R2: inc ×6 (12)
R3: (sc, inc) ×6 (18)
Fold in half.
Cream edge:
R4: working through both layers along the curved edge, sc 9 (9)
Mint edge:
R5: ch 1, turn, sc 9 across cream edge (9)
Add two black seed stitches before sewing it to the tail tip.
Fasten off. Leave a 30 cm tail.
Watermelon Seeds and Face Details
Yarn: black — Source: photo-matched surface embroidery.
Seeds on belly: embroider five vertical teardrops, with one centered near the top, two in the middle, and two near the lower belly.
Seeds on wings: embroider three teardrops per wing, angled toward the outer rind.
Nostrils: add two short diagonal stitches on the snout, 3 stitches apart.
Mouth: embroider a shallow curved line under the snout, ending below the cheek patches.
Assembly
- Sew the head to the body with the head centered over the body R16–R18 neck area.
- Pin the snout across head R11–R14, then sew around the base and add the nostrils.
- Attach the safety eyes if not already locked, then sew the cheek patches one round below the eyes.
- Sew the belly panel to the front body, stretching it from body R4 down to R15.
- Attach arms on both sides of the upper body, angled toward the belly panel.
- Sew back legs to the lower front body so the pink paw pads face forward.
- Sew ears to the head sides between R7 and R12, then place horns between the ears.
- Add head nubs beside the horns and sew crest spikes from the top head down the back.
- Attach wings to the back body between R7 and R13, leaving 5–6 stitches between inner wing edges.
- Sew the tail to the lower back body, attach the watermelon slice fin to the tail tip, and weave all tails under nearby stitches.
The finished plush is a seated mint dragon with watermelon belly, rind wings, cheek patches, horns, and a slice-tail accent.
7 Technical Tips
- Eye placement timing: Safety eyes must go in before head R15 because the opening narrows to 24 stitches after that round. Placing them later forces the washer against stuffed fabric and can dent the face.
- Stitch marker drift: Chenille spirals can shift the start point 1–2 stitches by R10. Move the first stitch marker every round and check that the eyes still sit evenly across the snout line.
- Stuffing firmness: The body bottom needs firm stuffing, while the neck edge needs medium stuffing only. Overstuffing the neck creates a visible ridge under the head.
- Invisible decrease: Gaps show fastest on R14–R18 of the head because the fabric curves toward the viewer. Work decreases through front loops only and pull the working yarn tight after each decrease.
- Velvet tension: A 6 mm hook can still leave holes if chenille is pulled loose. Keep each single crochet snug enough that the stuffing cannot be seen between R6 and R13 of the head.
- Pinning wings: Pin each wing with its top edge 5–6 stitches away from the other wing. Wider spacing makes the wings disappear behind the arms when the plush is viewed from the front.
- Tail weaving: Every claw nub and seed stitch needs a tail buried at least 3 cm inside the piece. Shorter buried tails can work loose because velvet yarn grips poorly after repeated handling.
Conclusion
This pattern is built around the parts that identify the toy from the photo: rind wings, pink seeded belly, cream horns, cheek patches, paw pads, crest bumps, and the watermelon slice tail fin. Work the head and body first, then finish every flat fruit piece before assembly so seed placement stays symmetrical. The next step is to test one wing at full scale and compare it against the body width before making the second wing. Share the finished watermelon dragon amigurumi crochet pattern sample on Pinterest and Instagram with #WatermelonDragonAmigurumi. For the next version, should the wing seeds stay embroidered, or should they become raised black bobbles?









