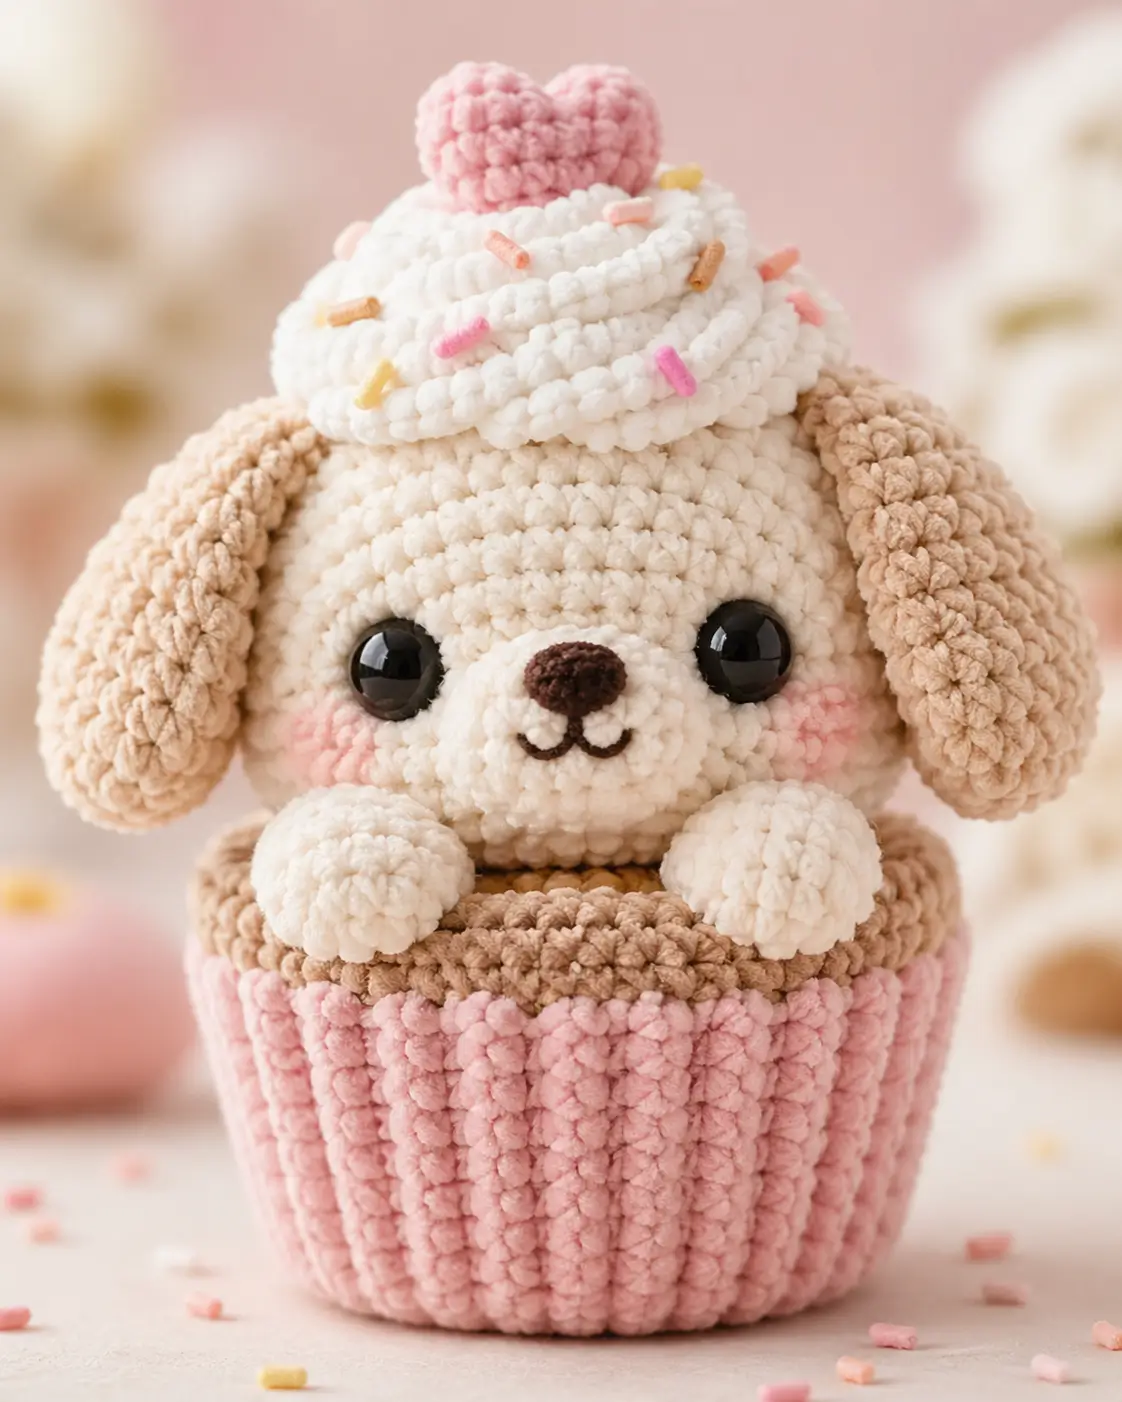
A cupcake puppy needs two silhouettes at once: a round dog face and a fluted dessert base. This cupcake puppy amigurumi crochet pattern uses plush chenille, a 7 mm hook, 14 mm eyes, and a medium 15 cm finished size for an intermediate make. Build it for market-table display where the frosting cap, heart topper, and floppy ears read clearly from the front.
The Design: What Makes Cupcake Puppy Different
The main engineering choice is weight placement. The cupcake liner is wider than the puppy head, so the base uses a 42-stitch plateau while the head stays at 36 stitches. That keeps the figure upright without flattening the face. The frosting is not just decoration; it hides the top seam and adds height without adding a second head. For a pupcake crochet pattern, floppy ears must hang outside the liner, not tuck behind it, because the ears are the feature that separates the design from a plain cupcake. The most common mistake in a dog cupcake amigurumi is making the muzzle too large. A deep muzzle pushes the eyes outward and makes the face read as a bear, not a puppy.
Project Info at a Glance
| Skill Level | Time | Finished Size | Hook | Best For |
|---|---|---|---|---|
| Intermediate | Not stated in reviewed sources | Approx. 15 cm | 7 mm for plush chenille | Display, market prep, dessert-animal collections |
Skill, hook, and size are based on comparable Pupcake, Cupcake Dog, and puppy-cupcake listings.
Materials and Tools
Yarn
- Cream — super bulky chenille — approx. 35 g — Bernat Blanket or similar plush chenille
- Pink — super bulky chenille — approx. 30 g — cupcake liner and heart topper
- White — super bulky chenille — approx. 20 g — frosting cap and frosting ridges
- Tan — super bulky chenille — approx. 20 g — floppy ears and cake rim
- Dark brown — DK cotton or embroidery yarn — less than 3 g — nose and mouth
- Pastel scraps — DK cotton or velvet scraps — less than 2 g each — sprinkles and cheeks
Tools
- Hook 7 mm
- 14 mm black safety eyes
- Polyester stuffing
- Yarn needle
- Locking stitch markers
- Embroidery needle
- Scissors
- Pins for assembly
Abbreviations
MR = magic ring / sc = single crochet / inc = increase / dec = decrease / sl st = slip stitch / ch = chain / BLO = back loop only / FLO = front loop only / hdc = half double crochet.
Work each invisible decrease through the front loops of the next two stitches before drawing up yarn so the chenille surface does not open into a visible gap.
Pattern — Step by Step
Continuous spiral unless noted. The stitch counts below use standard amigurumi math with 6-sc starts, +6 increase rounds, and −6 decrease rounds.
Head Make 1
Yarn: cream — Source: standard amigurumi math, adjusted to the verified 36-stitch animal cupcake head structure.
R1: 6 sc in MR (6)
R2: inc ×6 (12)
R3: (1 sc, inc) ×6 (18)
R4: (2 sc, inc) ×6 (24)
R5: (3 sc, inc) ×6 (30)
R6: (4 sc, inc) ×6 (36)
R7–R13: sc around (36)
Insert safety eyes between R9 and R10, 8 stitches apart. Stuff gradually.
R14: (4 sc, dec) ×6 (30)
R15: (3 sc, dec) ×6 (24)
R16: (2 sc, dec) ×6 (18)
R17: (1 sc, dec) ×6 (12)
R18: dec ×6 (6)
Fasten off. Leave a 20 cm tail.
Body Make 1
Yarn: cream — Source: standard amigurumi math for a hidden puppy body inside a liner.
R1: 6 sc in MR (6)
R2: inc ×6 (12)
R3: (1 sc, inc) ×6 (18)
R4: (2 sc, inc) ×6 (24)
R5: (3 sc, inc) ×6 (30)
R6: (4 sc, inc) ×6 (36)
R7–R11: sc around (36)
R12: (4 sc, dec) ×6 (30)
R13: (3 sc, dec) ×6 (24)
R14: (2 sc, dec) ×6 (18)
R15: (1 sc, dec) ×6 (12)
R16: dec ×6 (6)
Stuff firmly at the base and lightly near the neck.
Fasten off. Leave a 25 cm tail.
Front Paws Make 2
Yarn: cream — Source: standard amigurumi math.
R1: 6 sc in MR (6)
R2: inc ×6 (12)
R3: (1 sc, inc) ×6 (18)
R4–R5: sc around (18)
R6: (1 sc, dec) ×6 (12)
R7: sc around (12)
Stuff only the front half so the paws sit flat on the cake rim.
Fasten off. Leave a 20 cm tail.
Back Legs Make 2 Hidden Support
Yarn: cream — Source: standard amigurumi math.
R1: 6 sc in MR (6)
R2: inc ×6 (12)
R3: (1 sc, inc) ×6 (18)
R4–R5: sc around (18)
R6: (1 sc, dec) ×6 (12)
R7: sc around (12)
Do not overstuff. These legs brace the puppy inside the liner rather than showing from the front.
Fasten off. Leave a 15 cm tail.
Floppy Ears Make 2
Yarn: tan — Source: dog-ear structure verified in animal cupcake patterns, resized for chenille.
R1: 6 sc in MR (6)
R2: inc ×6 (12)
R3: (1 sc, inc) ×6 (18)
R4: (2 sc, inc) ×6 (24)
R5: (3 sc, inc) ×6 (30)
R6–R11: sc around (30)
R12: (3 sc, dec) ×6 (24)
R13: sc around (24)
R14: (2 sc, dec) ×6 (18)
R15: sc around (18)
R16: (1 sc, dec) ×6 (12)
R17: sc around (12)
Flatten the opening. Do not stuff.
Fasten off. Leave a 30 cm tail.
Muzzle Make 1
Yarn: cream — Source: standard amigurumi math.
R1: 6 sc in MR (6)
R2: inc ×6 (12)
R3: (1 sc, inc) ×6 (18)
R4–R5: sc around (18)
R6: (1 sc, dec) ×6 (12)
Add a small amount of stuffing before sewing.
Fasten off. Leave a 25 cm tail.
Nose Make 1
Yarn: dark brown — Source: standard amigurumi math.
R1: 6 sc in MR (6)
R2: inc ×6 (12)
R3: sc around (12)
R4: dec ×6 (6)
Flatten slightly into an oval before sewing to the muzzle.
Fasten off. Leave a 15 cm tail.
Cheek Patches Make 2
Yarn: pale pink — Source: standard flat-circle amigurumi math.
R1: 6 sc in MR (6)
R2: inc ×6 (12)
R3: (1 sc, inc) ×6 (18)
Sl st to finish (18).
Do not stuff. Keep the circles flat.
Fasten off. Leave a 20 cm tail.
Cupcake Liner and Cake Rim Make 1
Yarn: pink, then tan — Source: cupcake base structures verified from cupcake amigurumi patterns.
R1: 6 sc in MR with pink (6)
R2: inc ×6 (12)
R3: (1 sc, inc) ×6 (18)
R4: (2 sc, inc) ×6 (24)
R5: (3 sc, inc) ×6 (30)
R6: (4 sc, inc) ×6 (36)
R7: (5 sc, inc) ×6 (42)
R8–R15: BLO sc around (42)
R16: change to tan, sc around (42)
R17–R18: sc around (42)
Leave the top open. Add vertical surface slip stitches in pink from R8 to R15 every 3 stitches to form liner ribs.
Fasten off. Leave a 35 cm tail.
Frosting Cap Make 1
Yarn: white — Source: standard amigurumi math, with scallop edge adapted from cupcake frosting construction.
R1: 6 sc in MR (6)
R2: inc ×6 (12)
R3: (1 sc, inc) ×6 (18)
R4: (2 sc, inc) ×6 (24)
R5: (3 sc, inc) ×6 (30)
R6: (4 sc, inc) ×6 (36)
R7–R9: sc around (36)
R10: FLO [sl st, skip 1 st, 5 hdc in next st, skip 1 st] ×9 around (36 base sts)
Stuff very lightly so the frosting sits like a cap, not a second head.
Fasten off. Leave a 35 cm tail.
Frosting Swirl Ridges Make 2
Yarn: white — Source: visual match to the photographed spiral frosting.
Long ridge: ch 31, starting in 2nd ch from hook, sl st in each ch across (30)
Short ridge: ch 19, starting in 2nd ch from hook, sl st in each ch across (18)
Sew the long ridge around the frosting edge and the short ridge closer to the heart topper.
Fasten off. Leave a 25 cm tail on each ridge.
Heart Topper Make 1
Yarn: pink — Source: standard two-lobe amigurumi heart construction.
Lobe A:
R1: 6 sc in MR (6)
R2: inc ×6 (12)
R3: sc around (12)
Fasten off.
Lobe B:
R1: 6 sc in MR (6)
R2: inc ×6 (12)
R3: sc around (12)
Do not fasten off. Join to Lobe A.
Heart body:
R4: sc around both lobes (24)
R5: (2 sc, dec) ×6 (18)
R6: (1 sc, dec) ×6 (12)
R7: dec ×6 (6)
Stuff lightly before closing. Pinch the center dip between the lobes with two small stitches.
Fasten off. Leave a 25 cm tail.
Sprinkles Make 10–12
Yarn: pastel scraps — Source: photo-matched accessory.
For each sprinkle: ch 4, starting in 2nd ch from hook, sl st in each ch across (3).
Make pink, peach, yellow, and tan sprinkles. Keep all bars short so they do not overpower the frosting.
Fasten off. Leave tails for sewing.
Assembly
- Sew the head to the top front of the body with the head tilted slightly forward.
- Place the body inside the cupcake liner so the tan rim covers the lower body seam.
- Sew the body to the inside back wall of the liner, then tack the lower front body to the liner base.
- Sew the muzzle between the eyes, centered over R12–R15 of the head.
- Attach the nose to the upper half of the muzzle and embroider a short vertical line with two curved mouth stitches.
- Sew the cheek patches under the eyes, one patch on each side of the muzzle.
- Sew the floppy ears to the sides of the head between R7 and R11, with the widest part hanging outside the liner.
- Attach the front paws to the tan cake rim and sew the hidden back legs inside the liner for support.
- Sew the frosting cap to the top of the head, add the two frosting ridges, then attach the heart topper at the center.
- Sew the sprinkles across the frosting, weave all tails through the nearest seam, and trim inside the plush surface.
The finished figure is a front-facing cupcake puppy with visible liner ribs, tan cake rim, floppy ears, frosting, heart, and sprinkles.
7 Technical Tips
- Use a locking stitch marker on every round of the head because chenille makes the first stitch hard to read. A one-stitch drift will move the eyes off center by about 3–4 mm.
- Stuff the cupcake liner base more firmly than the puppy head. A soft base will collapse under the 36-stitch head and make the puppy lean forward.
- Close decreases with invisible dec, not standard sc2tog, on the cheeks, muzzle, and head. Standard decreases leave diagonal gaps that show through pale chenille.
- Place safety eyes before closing the head at R14. After R15, the washer angle becomes cramped and can distort the face.
- Pin both ears before sewing either one. A 5 mm height mismatch changes the dog silhouette more than it changes most round amigurumi animals.
- Keep the frosting cap lightly stuffed. Overstuffing by even one extra pinch turns the frosting into a second head shape.
- Weave sprinkle tails into the frosting, not through the head. Threads pulled through the head can dimple the face and shift the safety eye spacing.
Conclusion
This design works because the cupcake is treated as structure, not only decoration. The 42-stitch liner anchors the puppy, the 36-stitch head keeps the face compact, and the frosting cap hides the upper seam while adding the dessert cue. For the next sample, test one version with darker tan ears and one with a white liner rim to see which reads better in photos. Save this cupcake puppy amigurumi crochet pattern to Pinterest, then post the finished front view and side view on Instagram with #CupcakePuppyAmigurumi. Which detail should stay largest on this character: the floppy ears, the frosting swirl, or the pink heart?









