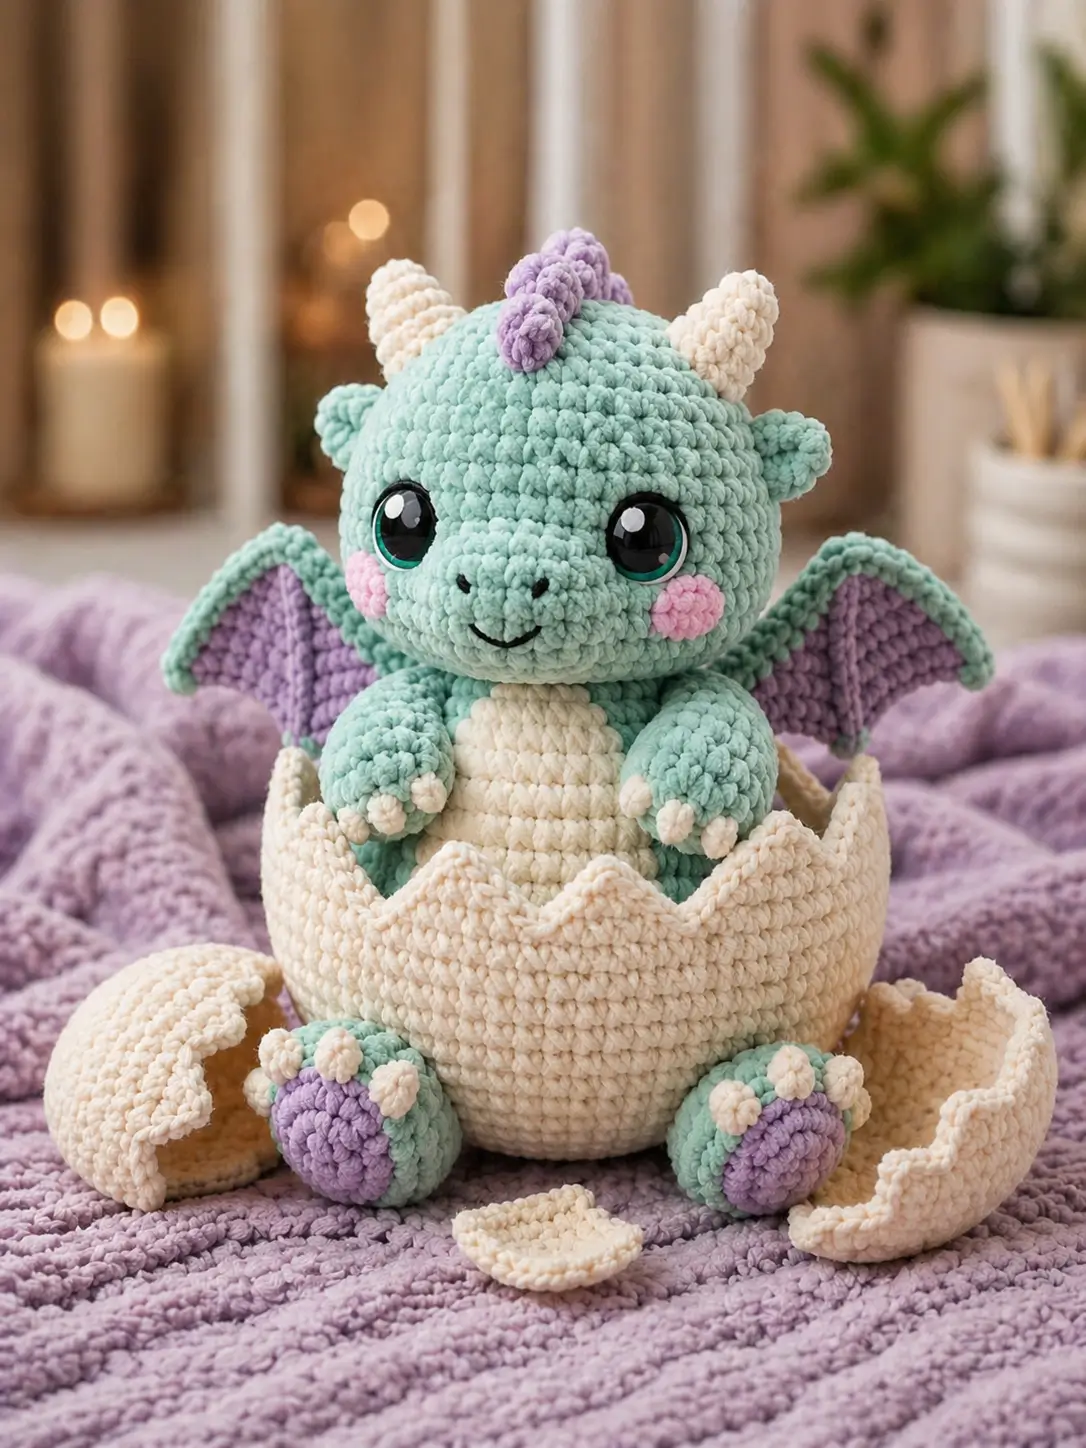
A cracked shell changes the engineering: the shell must hold the plush upright while the small dragon stays round and visible. This hatching dragon amigurumi pattern builds an 18 cm mint baby dragon with cream shell pieces, lavender wings, 18 mm safety eyes, and a 4.0 mm hook. The skill level is intermediate because the wings, shell rim, claws, horns, and face placement all need controlled counting.
Quick Answer: Hatching Baby Dragon Build
A hatching baby dragon crochet build needs a round head, compact body, short limbs, two horns, side wings, and a firm cracked egg shell. Work the dragon in spiral rounds with single crochet, stuff the body firmly, then sew the shell cup around the lower body for stable display.
Table of Contents
- What Makes This Pattern Unique
- Project Info at a Glance
- Materials and Tools
- Abbreviations
- Pattern Step by Step
- Assembly
- FAQ
- Best Yarn for This Pattern
- Hook Size Guide
- 7 Technical Tips
- Quick Reference Card
What Makes This Baby Dragon Unique
The cracked egg shell is not decoration only. It becomes the support structure, so the body can be smaller than the head without tipping forward. The photo shows a large round head, short snout, visible belly, compact arms, lavender wing panels, cream horns, and loose shell pieces. Those parts need separate tension control.
Unlike a standing dragon amigurumi, this plush depends on a low center of gravity. The egg cup hides the lower body and supports the sitting pose. The most common error when sewing this baby dragon head is placing it too high on the body. A high join exposes the neck seam and weakens the hatching effect. Pin the shell first, then position the head so the face clears the rim by 2–3 cm.
Project Info at a Glance
Quick answer: The baby dragon measures about 18 cm tall, uses a 4.0 mm hook, and takes about 5–7 hours to complete.
| Skill Level | Time | Finished Size | Hook | Yarn Weight |
|---|---|---|---|---|
| Intermediate | 5–7 hours | 18 cm | 4.0 mm | Bulky chenille |
Materials and Tools
Yarn
- Mint green chenille yarn — bulky weight — 85 g
- Cream chenille yarn — bulky weight — 55 g for horns, claws, belly, and shell
- Lavender chenille yarn — bulky weight — 25 g for wings, foot pads, and head spikes
- Pink chenille scrap — 5 g for cheek patches
- Black embroidery thread — nostrils and mouth
Tools
- Crochet hook 4.0 mm — tight enough for plush yarn while keeping the shell flexible
- Safety eyes 18 mm — sized for the large head shown in the photo
- Polyfill stuffing — firm density for head, body, legs, and shell base
- Yarn needle — blunt tip
- Stitch markers — at least 4
- Sewing pins — needed for shell and wing placement
- Scissors
Save this pattern to your Pinterest board before starting — you’ll need to reference the stitch counts throughout.
Abbreviations
| Short | Full Term |
|---|---|
| MR | Magic ring |
| sc | Single crochet |
| inc | Increase: 2 sc in same stitch |
| dec | Invisible decrease |
| sl st | Slip stitch |
| ch | Chain |
| BLO | Back loop only |
| hdc | Half double crochet |
| dc | Double crochet |
| st | Stitch |
The invisible decrease joins the front loops of 2 stitches before completing a single crochet. This keeps the amigurumi fabric smoother than a standard decrease, especially on the snout, head, and shell curve.
Baby Dragon Pattern Step by Step
Work in continuous spiral rounds unless a row section says otherwise. Counts appear at the end of every round or row.
Head — Make 1
Yarn: mint green.
R1: 6 sc in MR (6)
R2: inc × 6 (12)
R3: [sc 1, inc] × 6 (18)
R4: [sc 2, inc] × 6 (24)
R5: [sc 3, inc] × 6 (30)
R6: [sc 4, inc] × 6 (36)
R7: sc around (36)
R8: sc around (36)
R9: sc around (36)
R10: sc around (36)
R11: sc around (36)
R12: sc around (36)
Insert safety eyes between R9 and R10, 8 stitches apart.
R13: [sc 4, dec] × 6 (30)
R14: [sc 3, dec] × 6 (24)
R15: [sc 2, dec] × 6 (18)
Stuff firmly, filling cheeks and crown.
R16: [sc 1, dec] × 6 (12)
R17: dec × 6 (6)
Fasten off. Leave 25 cm tail.
Snout — Make 1
Yarn: mint green.
R1: 6 sc in MR (6)
R2: inc × 6 (12)
R3: [sc 1, inc] × 6 (18)
R4: sc around (18)
R5: sc around (18)
R6: [sc 1, dec] × 6 (12)
Lightly stuff. Fasten off with 20 cm tail.
Embroider two nostrils with black thread before sewing the snout to the head. Place the snout between R10 and R14, centered under the eyes.
Body — Make 1
Yarn: mint green.
R1: 6 sc in MR (6)
R2: inc × 6 (12)
R3: [sc 1, inc] × 6 (18)
R4: [sc 2, inc] × 6 (24)
R5: [sc 3, inc] × 6 (30)
R6: [sc 4, inc] × 6 (36)
R7: sc around (36)
R8: sc around (36)
R9: sc around (36)
R10: sc around (36)
R11: sc around (36)
R12: sc around (36)
R13: [sc 4, dec] × 6 (30)
R14: [sc 3, dec] × 6 (24)
R15: [sc 2, dec] × 6 (18)
Stuff firmly through the center.
R16: [sc 1, dec] × 6 (12)
R17: dec × 6 (6)
Fasten off. Leave 30 cm tail for sewing.
Cream Belly Patch — Make 1
Yarn: cream.
Row 1: ch 7, sc in 2nd ch from hook and across (6)
Row 2: inc, sc 4, inc, ch 1, turn (8)
Row 3: inc, sc 6, inc, ch 1, turn (10)
Row 4: sc across, ch 1, turn (10)
Row 5: sc across, ch 1, turn (10)
Row 6: dec, sc 6, dec, ch 1, turn (8)
Row 7: dec, sc 4, dec (6)
Border: sc evenly around the oval edge (26)
Fasten off. Leave 25 cm tail.
Sew to the front of the body before attaching the shell cup.
Arms — Make 2
Yarn: mint green.
R1: 6 sc in MR (6)
R2: inc × 6 (12)
R3: sc around (12)
R4: sc around (12)
R5: [sc 1, dec] × 4 (8)
R6: sc around (8)
R7: sc around (8)
R8: sc around (8)
Lightly stuff the paw end only. Fasten off with 18 cm tail.
Arm Claws — Make 6
Yarn: cream.
R1: 6 sc in MR (6)
Sl st to close (6)
Fasten off. Leave 8 cm tail. Sew 3 claws to each arm.
Legs — Make 2
Yarn: mint green.
R1: 6 sc in MR (6)
R2: inc × 6 (12)
R3: [sc 1, inc] × 6 (18)
R4: sc around (18)
R5: sc around (18)
R6: [sc 1, dec] × 6 (12)
R7: sc around (12)
R8: sc around (12)
Stuff firmly. Fasten off with 20 cm tail.
Foot Pads — Make 2
Yarn: lavender.
R1: 6 sc in MR (6)
R2: inc × 6 (12)
R3: sc around (12)
Fasten off. Leave 15 cm tail. Sew to the lower front of each leg.
Toe Claws — Make 6
Yarn: cream.
R1: 6 sc in MR (6)
Sl st to close (6)
Fasten off. Sew 3 toe claws above each lavender foot pad.
Horns — Make 2
Yarn: cream.
R1: 6 sc in MR (6)
R2: sc around (6)
R3: sc around (6)
R4: sc around (6)
Stuff lightly. Fasten off with 15 cm tail.
Attach horns to the crown between head R3 and R6, spaced 10 stitches apart.
Head Spikes — Make 3
Yarn: lavender.
R1: 6 sc in MR (6)
R2: sc around (6)
R3: sc around (6)
Fasten off. Leave 12 cm tail.
Sew the center spike between the horns. Place the remaining two behind it in a short line.
Side Ears — Make 2
Yarn: mint green.
R1: 6 sc in MR (6)
R2: inc × 6 (12)
R3: sc around (12)
R4: [sc 1, dec] × 4 (8)
Flatten. Do not stuff. Fasten off with 15 cm tail.
Attach each ear at head R9–R11, level with the upper eye line.
Cheek Patches — Make 2
Yarn: pink.
R1: 6 sc in MR (6)
R2: inc × 6 (12)
Fasten off. Leave 12 cm tail. Do not stuff.
Sew each patch under the eye, slightly toward the snout.
Wing Panel — Make 2
Yarn: lavender.
Row 1: ch 7, sc in 2nd ch from hook and across, ch 1, turn (6)
Row 2: inc, sc 4, inc, ch 1, turn (8)
Row 3: inc, sc 6, inc, ch 1, turn (10)
Row 4: sc across, ch 1, turn (10)
Row 5: sl st 1, sc 2, hdc 2, dc 2, hdc 2, sc 1 (10)
Fasten off.
Wing Border — Make 2
Yarn: mint green.
Join yarn at the lower inner corner of one lavender panel.
Border Round: work 20 sc evenly around the panel edge (20)
Top Ridge: ch 1, turn, sc 8 across top edge only (8)
Fasten off. Leave 25 cm tail.
The mint border thickens the wing and helps it hold the curved shape seen in the photo.
Cracked Egg Shell Cup — Make 1
Yarn: cream.
R1: 6 sc in MR (6)
R2: inc × 6 (12)
R3: [sc 1, inc] × 6 (18)
R4: [sc 2, inc] × 6 (24)
R5: [sc 3, inc] × 6 (30)
R6: [sc 4, inc] × 6 (36)
R7: [sc 5, inc] × 6 (42)
R8: [sc 6, inc] × 6 (48)
R9: BLO sc around (48)
R10: sc around (48)
R11: sc around (48)
R12: sc around (48)
R13: sc around (48)
R14 cracked rim: [sc 2, hdc 1, dc 1, ch 2, sl st in 2nd ch from hook, dc 1, hdc 1, sc 2] × 6 (48 base stitches, 6 points)
Fasten off. Leave a long tail.
The BLO round creates a base edge so the shell stands flatter.
Loose Egg Shards — Make 3
Yarn: cream.
Row 1: ch 2, 2 sc in 2nd ch from hook, ch 1, turn (2)
Row 2: inc × 2, ch 1, turn (4)
Row 3: inc, sc 2, inc, ch 1, turn (6)
Row 4: inc, sc 4, inc, ch 1, turn (8)
Row 5: sc across, ch 1, turn (8)
Row 6: dec, sc 4, dec (6)
Border: sc evenly around shard edge (18)
Fasten off. Weave ends.
Make one shard slightly curled by tightening the border stitches.
Assembly
- Sew the snout to the head first. Keep the lower edge near R14.
- Embroider nostrils and a short smile before adding cheeks.
- Attach the cheek patches under the eyes, centered beside the snout.
- Sew the horns to the upper head, then add lavender crown spikes between and behind them.
- Attach side ears at R9–R11. Match both sides from the front view.
- Sew the head to the body. The head should lean forward by about 5 mm.
- Sew the belly patch to the front of the body.
- Place the body inside the shell cup. Pin the cup rim before stitching.
- Sew the shell cup to the body around the lower half only, leaving the upper rim free.
- Attach arms over the shell rim so the paws rest on the cracked edge.
- Sew claws to arms and toe claws to feet.
- Attach legs at the lower front, outside the shell rim.
- Sew wings to the back at body R8–R12, angled outward.
- Place loose shell shards around the finished plush.
- Check that the dragon sits without leaning. Add stuffing inside the shell base if needed.
Frequently Asked Questions
How do you crochet a dragon anyway?
Crochet a dragon by building a round head, compact body, limbs, wings, horns, and a tail or shell feature in separate amigurumi pieces. Start most round pieces with 6 sc in a magic ring, increase by 6 stitches per round, stuff firmly, then sew the parts in a stable order.
What size safety eyes should I use for a baby dragon?
Use 18 mm safety eyes for this chunky plush version. For DK or worsted yarn, 9–12 mm usually fits better. The eye should fill the face without crowding the snout. Place both eyes before the head closes so spacing can be checked from the front and side.
What yarn works best for a plush dragon?
Chunky chenille works best for the soft rounded look in this photo. Cotton gives sharper stitch definition, but the surface looks less plush. Acrylic is easier to pull back during corrections. For this baby dragon, chenille supports the round head, soft wings, and rounded shell edge.
How do you make crochet dragon wings hold their shape?
Make the wing panel flat, add a firm border, and sew the top ridge with several anchor points. Do not overstuff the wing. For this pattern, the lavender panel gives color contrast while the mint border adds structure. Pin both wings before sewing so the angles match.
Best Yarn for This Baby Dragon
This dragon needs plush yarn that can hide seams but still show enough shape in the snout, paws, and shell rim.
Chunky chenille matches the photo best. It softens stitch definition and makes the head, cheeks, and egg shell look rounded. The tradeoff is reduced stitch visibility, so stitch markers matter more.
Cotton worsted gives sharper edges for horns, claws, and cracked shell points. It is better for small display pieces but will not match the thick plush surface in the photo.
Acrylic worsted works for a lower-cost version. It stretches more than cotton, which helps when sewing wings and shell parts, but the fabric may need extra stuffing to keep the rounded dragon shape.
Best choice for this build: bulky chenille for the dragon and shell, with a 4.0 mm hook. Use cotton only for tiny embroidered details if chenille feels too thick.
Crochet Hook Size Guide for This Baby Dragon
Hook size controls density. For this 18 cm plush, start with a 4.0 mm hook and bulky chenille yarn. That pairing keeps the single crochet fabric tight enough to hide polyfill stuffing while still allowing a soft shell cup.
If stuffing shows through the mint head, drop to 3.5 mm. If the shell becomes stiff and hard to curve around the body, test 4.5 mm for the shell only. Do not change hook size halfway through the head because the safety eye spacing will shift.
For the wing panels, 4.0 mm gives enough firmness for the mint border. A loose wing edge droops after assembly, especially when the plush is handled.
7 Technical Tips
- Mark every round start. Chenille hides the start point. Move a locking marker every round, not every few rounds.
- Stuff the head before R16. After R16, the opening is too narrow to shape the cheeks. Add small amounts around the safety eye backs.
- Check eye spacing before locking washers. The eyes sit between R9 and R10. View from 30 cm away before pressing the backs in place.
- Keep the shell rim unstuffed. The cup base can be firm, but the cracked points should stay flexible. Stiff points look thick rather than broken.
- Pin wings from the back view. Matching the side view only can leave one wing higher. Check the back line before sewing.
- Sew the head with 2 passes. First pass joins. Second pass stabilizes. The large head can tilt if sewn with one weak pass.
- Hide tails through stuffing. Pass each yarn tail through the stuffed body at least 4 directions before trimming. Chenille tails can work loose if trimmed too early.
Quick Reference Card
| Finished Size | 18 cm |
|---|---|
| Hook | 4.0 mm |
| Yarn Weight | Bulky chenille |
| Main Yarn | Mint, 85 g |
| Accent Yarn | Cream 55 g, lavender 25 g |
| Safety Eyes | 18 mm |
| Head | R1 6 → R17 6 |
| Body | R1 6 → R17 6 |
| Shell Cup | R1 6 → R14 cracked rim, 48 base stitches |
| Total Time | 5–7 hours |
| Skill Level | Intermediate |
Bookmark or pin this card for quick reference while crocheting.
Conclusion
The hatching dragon amigurumi pattern works because the egg is part of the structure, not an afterthought. Finish the dragon first, then fit the shell cup around the lower body so the rim sits under the arms. After assembly, check three points: the head angle, the wing height, and the cracked shell balance. Those details decide whether the plush reads as a baby dragon emerging from an egg or a dragon sitting inside a bowl. Share your finished work on Pinterest and Instagram: #BabyDragonAmigurumi #KROCHIFYpattern
Last updated: April 2026 — Pattern verified against the photo and standard 6-stitch amigurumi shaping.









