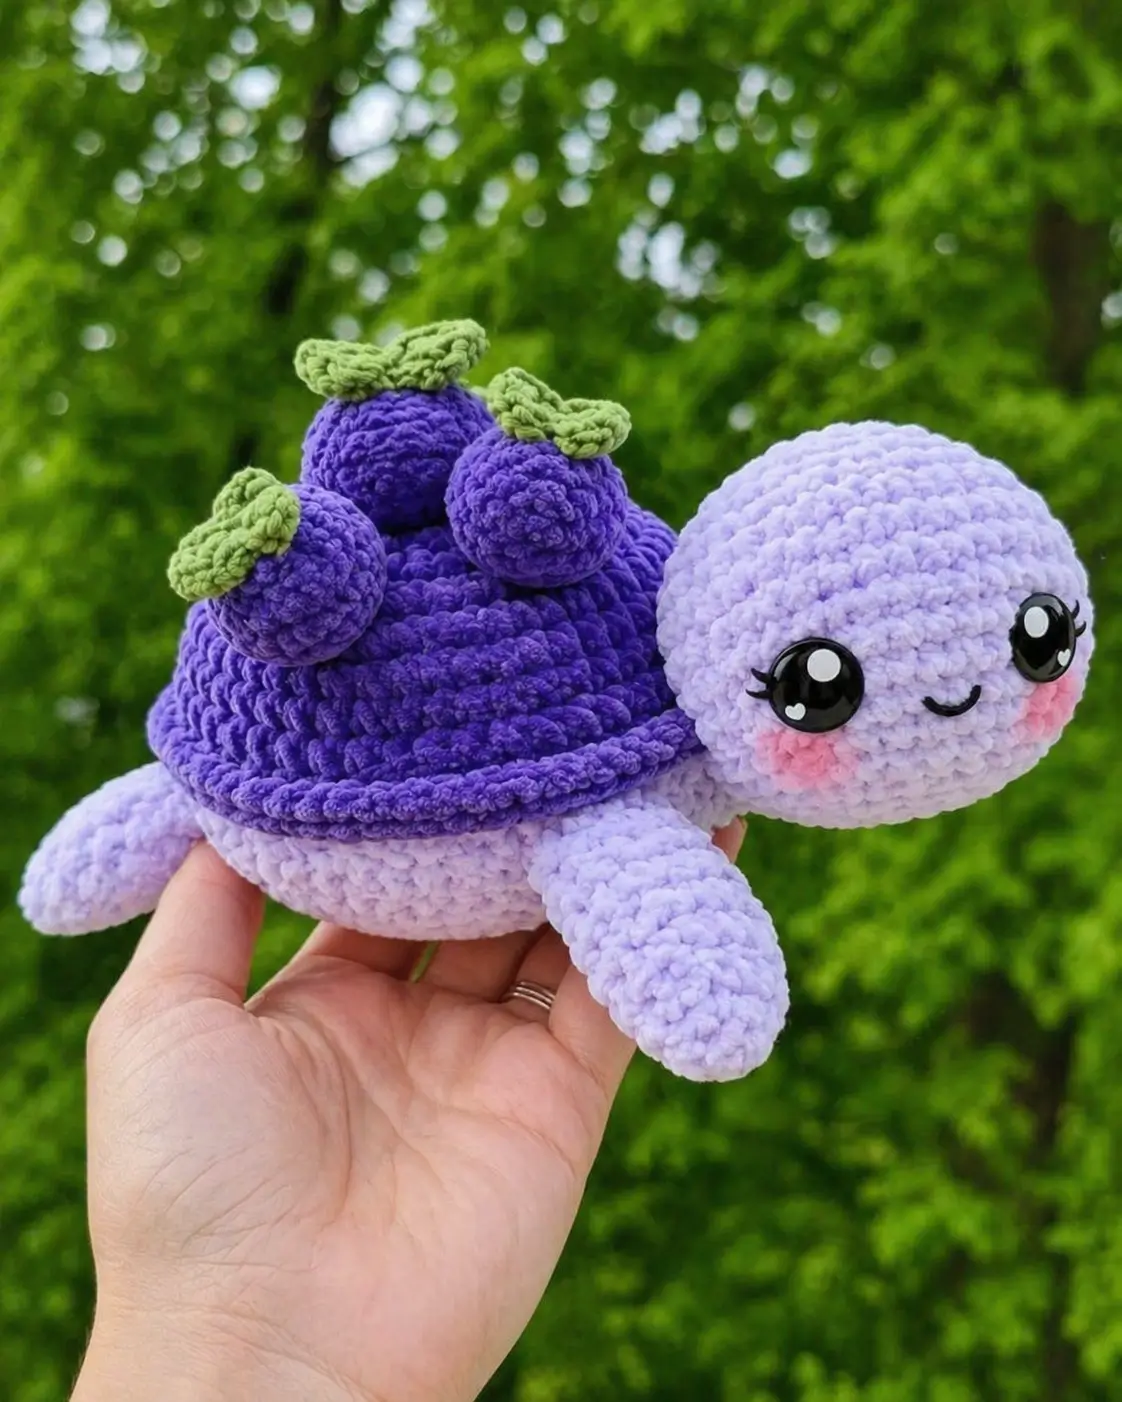
Grapes force the shell to act like a fruit basket, not a turtle dome. This crochet grape turtle amigurumi uses plush chenille yarn, a 5.0 mm hook, and 14 mm safety eyes to make an estimated 24 cm long plush. The build suits confident beginners because the turtle body stays simple while the shell carries the grape cluster, leaf caps, and raised rim.
Quick Answer: What You Need to Know
Use this crochet grape turtle amigurumi pattern to make a lavender turtle with a purple domed shell, separate grape spheres, green leaf caps, and firm plush shaping. Use #6 chenille yarn, a 5.0 mm hook, 14 mm safety eyes, and polyfill stuffing for a finished size near 24 cm long.
Table of Contents
- What Makes This Grape Turtle Unique
- Project Info at a Glance
- Materials and Tools
- Abbreviations
- Pattern — Step by Step
- Assembly
- FAQ
- Best Yarn for Grape Turtle Amigurumi
- Crochet Hook Size Guide
- 7 Technical Tips
- Quick Reference Card
What Makes This Grape Turtle Unique
The grape turtle works because the shell is not treated as a plain turtle back. It becomes a fruit mound. The purple dome sets the base, the raised rim keeps the silhouette round, and the separate grape spheres add height without hiding the head. That structure matters because a flat grape shell reads like a purple cap, while a shell that is too tall makes the turtle body disappear.
The most common error when sewing this grape turtle head is placing it too low under the shell rim. The face needs forward projection. Pin the head before stitching and check it from the side. Unlike a standard sea turtle amigurumi, this build needs a shell that carries more visual weight than the flippers. The finished size also depends on grape placement; stack the center grape slightly higher than the side grapes.
Project Info at a Glance
Quick answer: this grape turtle amigurumi measures about 24 cm long, uses a 5.0 mm hook size, and takes about 4–5 hours to complete.
| Skill Level | Time | Finished Size | Hook | Yarn Weight |
|---|---|---|---|---|
| Confident beginner | 4–5 hours | 24 cm long | 5.0 mm | #6 chenille |
crochet grape turtle amigurumi: Materials and Tools
Yarn
- Lavender chenille yarn — #6 super bulky — 60 g for head, body, flippers, and tail
- Deep purple chenille yarn — #6 super bulky — 90 g for shell and grape spheres
- Green chenille yarn — #6 super bulky or bulky — 15 g for leaves and grape caps
- Pink yarn or textile-safe blush — scrap amount for cheek patches
- Black embroidery thread — small amount for smile and lashes
Tools
- 5.0 mm crochet hook — tight enough for chenille amigurumi fabric
- 14 mm safety eyes — estimated from the photo; use embroidered eyes for children under 3
- Polyfill stuffing — firm density for head, body, shell, and grapes
- Yarn needle — large eye, blunt tip
- Stitch markers — at least 3
- Scissors
- Pins — needed before sewing the head and shell
Save this pattern to your Pinterest board before starting — you’ll need to reference the stitch counts throughout.
Abbreviations: Magic Ring and Single Crochet
| Short | Full Term |
|---|---|
| MR | Magic Ring |
| sc | Single crochet |
| inc | Increase: 2 sc in same stitch |
| dec | Invisible decrease |
| sl st | Slip stitch |
| ch | Chain |
| BLO | Back loop only |
| FLO | Front loop only |
| hdc | Half double crochet |
The invisible decrease uses the front loops of 2 stitches before pulling through. It reduces dents in chenille amigurumi fabric and keeps polyfill stuffing from showing through the face.
Grape Turtle Amigurumi Pattern — Step by Step
Work in continuous spiral rounds unless a section states otherwise. Count every round. Increases move by +6 and decreases move by -6.
Head — Make 1
Yarn: lavender chenille
- R1: 6 sc in MR (6)
- R2: inc × 6 (12)
- R3: [sc, inc] × 6 (18)
- R4: [sc 2, inc] × 6 (24)
- R5: [sc 3, inc] × 6 (30)
- R6: [sc 4, inc] × 6 (36)
- R7–R11: sc around (36)
- R12: [sc 4, dec] × 6 (30)
Insert safety eyes between R8 and R9, about 12 stitches apart. Add black lashes beside each eye before the back of the eye is locked.
- R13: [sc 3, dec] × 6 (24)
- R14: [sc 2, dec] × 6 (18)
Stuff firmly with polyfill stuffing. Shape the face as a rounded oval.
- R15: [sc, dec] × 6 (12)
- R16: dec × 6 (6)
Fasten off. Leave a 25 cm tail for sewing.
Body Underside — Make 1
Yarn: lavender chenille
- R1: 6 sc in MR (6)
- R2: inc × 6 (12)
- R3: [sc, inc] × 6 (18)
- R4: [sc 2, inc] × 6 (24)
- R5: [sc 3, inc] × 6 (30)
- R6: [sc 4, inc] × 6 (36)
- R7–R9: sc around (36)
- R10: [sc 4, dec] × 6 (30)
- R11: [sc 3, dec] × 6 (24)
- R12: [sc 2, dec] × 6 (18)
Stuff lightly. Do not close completely. The shell will cover the top. Fasten off. Leave a 30 cm tail.
Shell Dome — Make 1
Yarn: deep purple chenille
- R1: 6 sc in MR (6)
- R2: inc × 6 (12)
- R3: [sc, inc] × 6 (18)
- R4: [sc 2, inc] × 6 (24)
- R5: [sc 3, inc] × 6 (30)
- R6: [sc 4, inc] × 6 (36)
- R7: [sc 5, inc] × 6 (42)
- R8–R12: sc around (42)
- R13: [sc 5, dec] × 6 (36)
Stuff the dome so it holds a rounded grape-basket shape. Fasten off with a long sewing tail.
Raised Shell Rim — Make 1
Yarn: deep purple chenille
Join yarn to the front loop edge near the shell base.
- R1: sc around shell edge (36)
- R2: [sc 5, inc] × 6 (42)
- R3: sl st around (42)
Fasten off and weave the tail inside the rim. The rim should sit proud of the underside, not hang below it.
Large Grapes — Make 3
Yarn: deep purple chenille
- R1: 6 sc in MR (6)
- R2: inc × 6 (12)
- R3: [sc, inc] × 6 (18)
- R4–R5: sc around (18)
- R6: [sc, dec] × 6 (12)
Stuff each grape firmly.
- R7: dec × 6 (6)
Fasten off. Leave 20 cm tail on each grape.
Leaf Caps — Make 3
Yarn: green chenille
- R1: 6 sc in MR (6)
- R2: [ch 5, sc in 2nd ch from hook, hdc 2, sc 1, sl st into next MR stitch] × 6 (6 anchor stitches with 6 leaves)
Pull the Magic Ring tight. Fasten off with a 20 cm tail. Sew one leaf cap to the top of each grape.
Front Flippers — Make 2
Yarn: lavender chenille
- R1: 6 sc in MR (6)
- R2: inc × 6 (12)
- R3: [sc, inc] × 6 (18)
- R4–R5: sc around (18)
- R6: [sc, dec] × 6 (12)
- R7–R9: sc around (12)
Do not overstuff. Flatten the opening and sc across both layers (6). Fasten off with a 20 cm tail.
Rear Flippers — Make 2
Yarn: lavender chenille
- R1: 6 sc in MR (6)
- R2: inc × 6 (12)
- R3: [sc, inc] × 6 (18)
- R4: sc around (18)
- R5: [sc, dec] × 6 (12)
- R6–R7: sc around (12)
Flatten and sc across both layers (6). Fasten off with a 15 cm tail.
Tail — Make 1
Yarn: lavender chenille
- R1: 6 sc in MR (6)
- R2: [sc, inc] × 3 (9)
- R3–R5: sc around (9)
- R6: [sc, dec] × 3 (6)
Fasten off with a 15 cm tail. Stuff lightly, or leave unstuffed for a flatter tail.
Cheek Patches — Make 2
Yarn: pink chenille or pink worsted scrap
- R1: 6 sc in MR (6)
- R2: inc × 6 (12)
Fasten off. Do not stuff. For a softer photo match, surface-stitch the cheek area instead of adding raised circles.
Smile and Lashes
Use black embroidery thread. Stitch a shallow curved smile between R10 and R11 of the head. Add two small lashes outside each eye. Keep the smile width under 5 stitches so the face does not spread too wide.
Assembly
- Pin the shell dome to the lavender body underside. The rim should overlap the body by 3–5 mm.
- Sew the shell to the body through the base of R13 and the upper body edge. Add more polyfill stuffing before closing the last 4 cm.
- Pin the head to the front of the body under the shell rim. The head should angle slightly upward.
- Sew the head with mattress stitch. Work around twice because chenille yarn hides weak joins.
- Attach front flippers at body R6–R8, angled forward.
- Attach rear flippers at body R9–R11, angled back.
- Sew the tail to the back center between the rear flippers.
- Place the grapes on top of the shell: one center grape, one left grape, one right grape.
- Sew each grape through its lower third, not through the leaf cap. This keeps the grape sphere round.
- Add each green leaf cap after the grape is fixed.
- Sew or surface-stitch the cheek patches below the safety eyes.
- Weave every tail through stuffing in 4 different directions before trimming.
Final check: the turtle should sit with the head visible from the front, the grape cluster visible from above, and the flippers balanced under the shell.
Frequently Asked Questions
How do you crochet a turtle amigurumi?
Crochet a turtle amigurumi by making a head, body underside, shell dome, flippers, and tail, then sewing them in a fixed order. Start each rounded part with MR 6, increase by 6 stitches per round, then decrease by 6 stitches per round before closing.
What size safety eyes are best for a crochet turtle?
For a small DK turtle, 8 mm eyes are common. For this chenille grape turtle, 14 mm safety eyes match the large glossy look in the photo. Place them between R8 and R9 of the head, about 12 stitches apart, before the head opening becomes narrow.
What yarn is best for turtle amigurumi?
Cotton gives crisp stitch definition, while chenille gives the plush texture shown in the photo. For a grape turtle, chenille works well because the grape spheres and shell rim need soft rounded volume. Use a smaller hook than the yarn label suggests so stuffing stays hidden.
How long does a turtle amigurumi take to make?
This grape turtle takes about 4–5 hours because it has extra shell fruit pieces. A plain small turtle may take less time, but the grape spheres, leaf caps, rim, face embroidery, and pinning stages add assembly work. Sewing accuracy matters more than speed.
Best Yarn for Grape Turtle Amigurumi
The grape shell needs rounded texture more than sharp stitch definition. That makes plush chenille the best match for this photo. #6 chenille creates large, soft stitches and lets each grape sphere sit visibly on top of the shell.
Chenille Yarn
Chenille yarn is the photo-match choice. It hides stitch lines, makes the shell look dense, and gives the grapes a soft fruit shape. Use lavender for the turtle, deep purple for the shell, and green for the leaf caps.
Cotton Yarn
Cotton yarn creates sharper stitches but a smaller, firmer turtle. It is better for keychains or display pieces. It will not match the plush volume in the photo unless a larger yarn weight is selected.
Acrylic Worsted Yarn
Acrylic worsted yarn is useful for testing the stitch math before using chenille. It tolerates unpicking better than velvet or plush yarn. For the final photo-style turtle, switch back to chenille.
Best choice: #6 polyester chenille for the body, shell, grapes, and leaf caps.
Crochet Hook Size Guide for Grape Turtle
Hook size controls fabric density. The yarn label may suggest a larger hook for blankets, but amigurumi needs tighter fabric so polyfill stuffing does not show.
For this 24 cm grape turtle, start with a 5.0 mm hook. That size is smaller than many #6 chenille label recommendations, but it still moves through plush yarn without excessive wrist strain.
| Result | Fix |
|---|---|
| Stuffing shows through | Move to 4.5 mm |
| Shell curls inward | Move to 5.5 mm |
| Grapes look angular | Add more stuffing before R7 |
| Head tilts down | Sew head higher under shell rim |
The most sensitive part is the shell rim. If the hook is too large, the rim droops. If the hook is too small, the shell pulls into a bowl shape.
7 Technical Tips
- Mark every round start. Chenille hides skipped stitches, and one missed increase on the 42-stitch shell makes the dome lean.
- Stuff the head before R15. After that, the opening is too small to distribute polyfill stuffing evenly across the cheeks.
- Sew the head before the grapes. The grape cluster blocks hand access to the top shell, making head attachment less accurate.
- Keep the middle grape highest. This creates a natural cluster shape. Three grapes in a flat row make the shell read like buttons.
- Do not overstuff flippers. Soft flat flippers sit better under the shell and make the turtle stable in the hand.
- Use black thread sparingly. A wide smile competes with the large safety eyes. Keep the mouth short and low.
- Pin all fruit parts before sewing. Grape placement shifts the visual center of the shell. Pinning prevents a left-heavy or right-heavy finish.
Quick Reference Card
| Finished Size | About 24 cm long |
|---|---|
| Hook | 5.0 mm |
| Yarn Weight | #6 chenille |
| Main Yarn | Lavender, 60 g |
| Shell Yarn | Deep purple, 90 g |
| Leaf Yarn | Green, 15 g |
| Safety Eyes | 14 mm |
| Head | R1 6 to R16 6 |
| Body | R1 6 to R12 18 |
| Shell | R1 6 to R13 36 |
| Grapes | 3 spheres, R1 6 to R7 6 |
| Total Time | About 4–5 hours |
| Skill Level | Confident beginner |
Bookmark or pin this card for quick reference while crocheting.
Conclusion
The crochet grape turtle amigurumi is finished when the head projects beyond the shell rim, the grape cluster sits centered on the dome, and the flippers support the underside without twisting. After sewing, photograph the turtle from a front three-quarter angle so the eyes, shell rim, grapes, and green leaf caps are visible in one frame. The most useful next check is balance: place the turtle on a flat surface and confirm the shell does not pull backward. Share your finished work on Pinterest and Instagram with #GrapeTurtleAmigurumi #KROCHIFYpattern.
Last updated: April 2026 — Pattern math verified against the photo estimate and current comparable turtle plush data.









