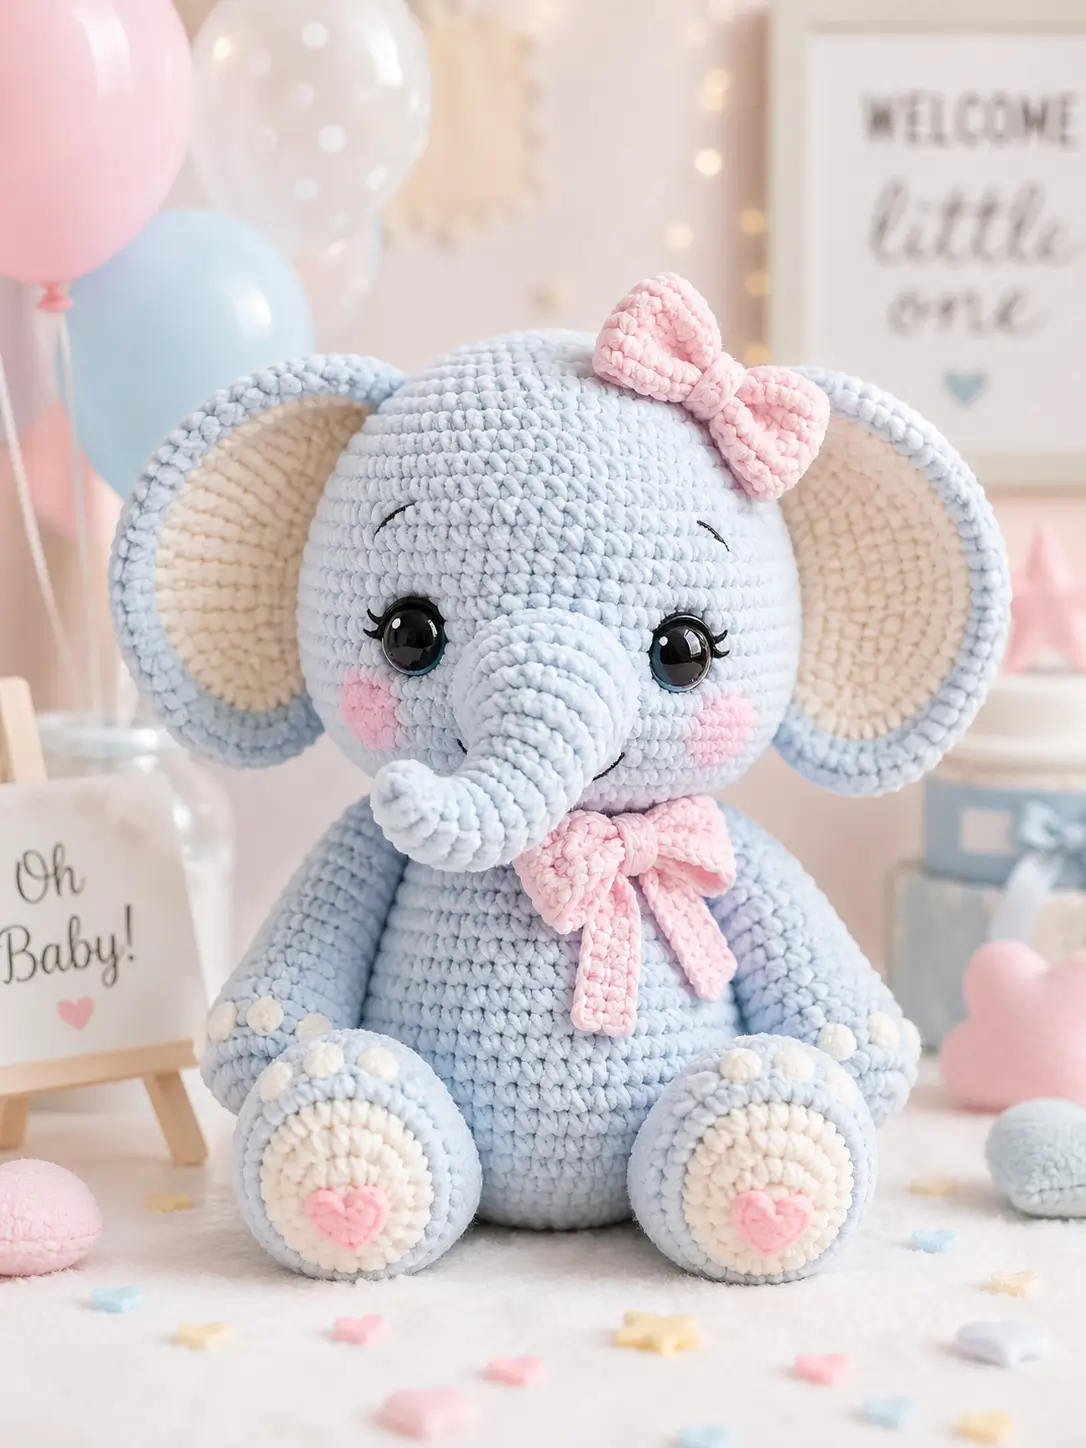
An elephant trunk has to bend forward before the head even looks like an elephant. This elephant amigurumi crochet pattern builds a light blue chenille sitter with cream ear panels, pink bow pieces, 18 mm eyes, and a 30 cm finished height. Work it as an intermediate plush project with a 4.0 mm hook. The stable sitting base makes it useful for nursery shelf styling.
The Design: What Makes This Elephant Different
This elephant amigurumi crochet pattern starts with scale. The head needs a larger plateau than the body because the ears, eyes, trunk, and bows all compete for the same front view. A 42-stitch head gives room for 18 mm eyes without crowding the trunk. The body stays at 36 stitches so the toy sits upright rather than tipping backward.
The ears use a blue outer disk with a smaller cream insert. That creates the baby elephant amigurumi look from the photo while keeping the rim thick enough to hold shape. The trunk is made separately, then sewn low on the face so the eyes stay visible. A common mistake in a plush elephant crochet pattern is placing the ears too far forward; they should frame the head from the sides, not cover the cheek patches.
Project Info at a Glance
| Skill Level | Time | Finished Size | Hook | Best For |
|---|---|---|---|---|
| Intermediate | 5–7 hrs | 30.5 cm | 4.0 mm | Nursery shelf décor, baby-shower display, handmade photo prop |
The 30.5 cm size, 4.0 mm hook, and worsted-weight velvet/chenille direction are based on a verified elephant amigurumi listing. Plastic safety eyes are not suitable for children under 3; embroider the eyes for a baby toy or toddler gift.
Materials and Tools
Yarn
- Light blue — worsted-weight chenille/velvet — 121–150 g — soft washable baby chenille in a pale blue shade
- Cream — matching chenille/velvet — 25 g — soft ivory chenille for ears and foot pads
- Pastel pink — matching chenille/velvet — 16–25 g — baby pink chenille for bows, cheeks, and hearts
- Black embroidery yarn — small amount — for lashes, brows, and mouth line
Tools
- Hook 4.0 mm
- 18 mm safety eyes, or embroidered eyes for children under 3
- Polyester stuffing
- Yarn needle
- Locking stitch markers
- Straight pins
- Scissors
- Black embroidery needle
Abbreviations
MR = magic ring; sc = single crochet; inc = 2 sc in one stitch; dec = single crochet 2 stitches together; sl st = slip stitch; ch = chain; BLO = back loop only; st = stitch; R = round; Row = worked flat. Use an invisible decrease by working through the front loops of the next two stitches before completing one sc.
Pattern — Step by Step
Continuous spiral unless noted. This pattern uses standard amigurumi math: MR begins with 6 sc, each full increase round adds 6 stitches, and each full decrease round removes 6 stitches.
Head
Yarn: light blue
R1: 6 sc in MR (6)
R2: inc ×6 (12)
R3: (sc, inc) ×6 (18)
R4: (2 sc, inc) ×6 (24)
R5: (3 sc, inc) ×6 (30)
R6: (4 sc, inc) ×6 (36)
R7: (5 sc, inc) ×6 (42)
R8–R16: sc around (42)
Place safety eyes between R12 and R13, 10 stitches apart, centered above the trunk position. Do not attach backings until the trunk is pinned.
R17: (5 sc, dec) ×6 (36)
R18: (4 sc, dec) ×6 (30)
R19: (3 sc, dec) ×6 (24)
Stuff firmly around the eye backs and upper forehead.
R20: (2 sc, dec) ×6 (18)
R21: (sc, dec) ×6 (12)
R22: dec ×6 (6)
Fasten off. Leave 20 cm tail and close the opening.
Body
Yarn: light blue
R1: 6 sc in MR (6)
R2: inc ×6 (12)
R3: (sc, inc) ×6 (18)
R4: (2 sc, inc) ×6 (24)
R5: (3 sc, inc) ×6 (30)
R6: (4 sc, inc) ×6 (36)
R7–R14: sc around (36)
R15: (4 sc, dec) ×6 (30)
R16–R17: sc around (30)
R18: (3 sc, dec) ×6 (24)
R19: (2 sc, dec) ×6 (18)
Stuff the base firmly and the neck lightly.
R20: (sc, dec) ×6 (12)
R21: dec ×6 (6)
Fasten off. Leave 35 cm tail for sewing to the head.
Trunk
Yarn: light blue
R1: 6 sc in MR (6)
R2–R4: sc around (6)
R5: inc ×6 (12)
R6–R10: sc around (12)
R11: (sc, inc) ×6 (18)
R12–R15: sc around (18)
Stuff the base only. Leave the tip soft so it curves.
Fasten off. Leave 40 cm tail. Shape a gentle upward curve while sewing.
Outer Ears
Yarn: light blue — make 2
R1: 6 sc in MR (6)
R2: inc ×6 (12)
R3: (sc, inc) ×6 (18)
R4: (2 sc, inc) ×6 (24)
R5: (3 sc, inc) ×6 (30)
R6: (4 sc, inc) ×6 (36)
R7: (5 sc, inc) ×6 (42)
R8: sc around (42)
Fasten off. Leave 50 cm tail on each ear.
Inner Ear Panels
Yarn: cream — make 2
R1: 6 sc in MR (6)
R2: inc ×6 (12)
R3: (sc, inc) ×6 (18)
R4: (2 sc, inc) ×6 (24)
R5: (3 sc, inc) ×6 (30)
R6: (4 sc, inc) ×6 (36)
Fasten off. Leave 35 cm tail. Sew one cream panel to each blue outer ear, leaving a visible blue rim.
Arms / Front Legs
Yarn: light blue — make 2
R1: 6 sc in MR (6)
R2: inc ×6 (12)
R3: (sc, inc) ×6 (18)
R4–R6: sc around (18)
R7: (sc, dec) ×6 (12)
R8–R15: sc around (12)
Stuff the paw section only. Keep the upper arm flat for sewing.
Fasten off. Leave 30 cm tail on each arm.
Back Legs / Feet
Yarn: light blue — make 2
R1: 6 sc in MR (6)
R2: inc ×6 (12)
R3: (sc, inc) ×6 (18)
R4: (2 sc, inc) ×6 (24)
R5–R7: sc around (24)
R8: (2 sc, dec) ×6 (18)
R9: (sc, dec) ×6 (12)
R10–R13: sc around (12)
Stuff the round foot firmly and the ankle lightly.
Fasten off. Leave 35 cm tail on each foot.
Foot Pads
Yarn: cream — make 2
R1: 6 sc in MR (6)
R2: inc ×6 (12)
R3: (sc, inc) ×6 (18)
R4: (2 sc, inc) ×6 (24)
Fasten off. Leave 35 cm tail. Sew one pad to the front face of each back foot.
Toe Nubs
Yarn: cream — make 12 total
R1: 6 sc in MR (6)
Sl st to close.
Fasten off. Leave 12 cm tail. Sew as raised toe dots.
Cheek Patches
Yarn: pastel pink — make 2
R1: 6 sc in MR (6)
R2: inc ×6 (12)
Fasten off. Leave 20 cm tail. Sew one cheek under each eye, outside the trunk line.
Foot Heart Patches
Yarn: pastel pink — make 2
R1: 6 sc in MR (6)
R2: inc ×6 (12)
Fasten off. Leave 25 cm tail. Pinch the lower point with two vertical stitches, then pull one shallow dimple into the top center to form a heart shape. Sew one heart to each cream foot pad.
Head Bow
Yarn: pastel pink
Bow loops, make 2:
Row1: ch 9, sc in second ch from hook and across (8)
Row2–Row5: ch 1, turn, sc across (8)
Fasten off. Leave 20 cm tail.
Center band:
Row1: ch 5, sc in second ch from hook and across (4)
Row2–Row4: ch 1, turn, sc across (4)
Fasten off. Wrap the band around both bow loops and sew to the top right side of the head.
Neck Bow and Tails
Yarn: pastel pink
Neck bow loops, make 2:
Row1: ch 11, sc in second ch from hook and across (10)
Row2–Row6: ch 1, turn, sc across (10)
Fasten off. Leave 25 cm tail.
Neck tails, make 2:
Row1: ch 16, sc in second ch from hook and across (15)
Row2: ch 1, turn, sc across (15)
Fasten off. Leave 20 cm tail.
Center band:
Row1: ch 6, sc in second ch from hook and across (5)
Row2–Row5: ch 1, turn, sc across (5)
Fasten off. Wrap around the loops and tails. Sew under the head at the front neck seam.
Assembly
- Sew the body to the underside of the head with the body centered under the trunk line.
- Pin the trunk between the eyes and over the lower face, then sew around the 18-stitch base.
- Attach safety eye backings only after trunk placement is confirmed, or embroider eyes now.
- Sew the cream inner panels to the blue outer ears before attaching ears to the head.
- Pin ears at the side of the head, with the top edge starting near R8 and the lower edge near R15.
- Sew cheek patches below the eyes, leaving equal blue space beside the trunk.
- Attach the back feet to the front base of the body so the foot pads face forward.
- Sew arms to the body sides, slightly above the back feet and angled downward.
- Add toe nubs, foot hearts, lashes, brows, and a small black mouth curve under the trunk.
- Sew the head bow to the upper right side and the neck bow to the front seam.
The finished elephant sits with the trunk centered, ears level, and both foot hearts visible from the front.
7 Technical Tips
- Stitch marker drift: If the marker moves more than 2 stitches left by R12 of the head, the trunk will sew on at an angle. Move the marker only after the final stitch of each round.
- Stuffing firmness: The body base should spring back within 1 second after thumb pressure. If it dents longer than that, add stuffing in 5 g increments before closing R21.
- Invisible decrease gaps: Chenille gaps usually appear on R17, R20, and R21 of the head. Work each decrease through front loops only and keep the hook shaft parallel to the round.
- Eye placement timing: Place eyes between R12 and R13 with a 10-stitch gap before closing past R18. A smaller gap makes the trunk look too wide for the face.
- Velvet tension: If the 42-stitch head plateau shows laddering, the hook is too large for the yarn. Drop from 4.5 mm to 4.0 mm and remake R1–R7.
- Ear pinning: One ear will droop if only the top edge is pinned. Pin the top, middle, and lower point of each ear, then check that both lower edges sit on the same head round.
- Tail weaving on bows: Bow centers loosen when the tail is woven only once through chenille. Weave each pink tail through at least 8 cm of stitches under the center band.
Conclusion
Finish the elephant by checking symmetry from the front, not the side, because the ears can look level while the trunk sits off-center. The next concrete step is to block the ear rims under pins for one hour, then sew the head bow after the fabric relaxes. This elephant amigurumi crochet pattern is ready for a WordPress post when the maker photos show eye spacing, trunk curve, and both foot hearts in the same frame. Share the finished sitter on Pinterest and Instagram with #BlueBowElephant. Which part changed the character more on your version: the cream inner ears or the raised pink hearts on the feet?









