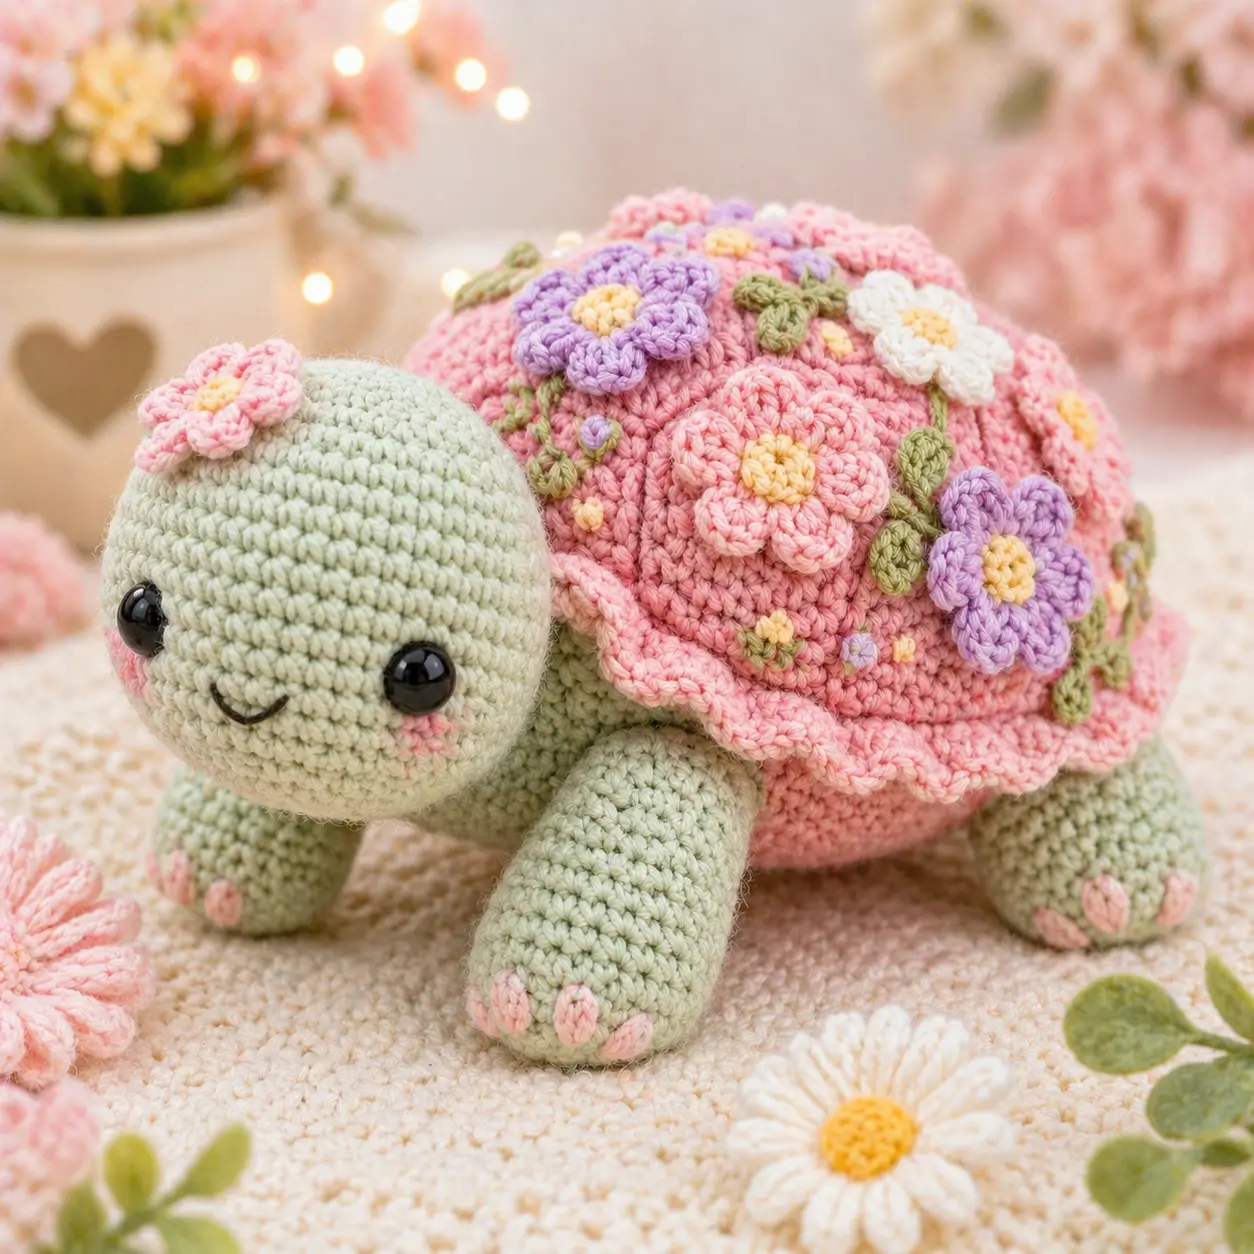
A turtle shell carries the flowers, but the head must still read as reptile. This flower turtle amigurumi crochet pattern uses mint DK yarn, a pink layered shell, 8 mm safety eyes, and a 2.5 mm hook to make an advanced-beginner toy about 10–12 cm tall. You can build the shell décor separately for cleaner placement. The maker gets a stable desk figure with visible stitch logic.
The Design: What Makes This Turtle Different
The shell is not just a color change. It works as a raised pink dome over a separate mint body, so the legs can sit low while the floral shell remains high. That proportion matters because turtles look grounded when the body is hidden under the carapace. The head uses a 36-stitch plateau, wider than many mini turtle heads, so the eyes and cheeks have room without crowding the smile. A ruffled edge is added after the dome is made, not during the body rounds, because attached edging gives better control over scallop spacing. Common mistake: placing every flower in the shell center. A floral turtle crochet pattern needs visual weight across the rear and sides, or the crochet flower shell turtle tilts forward in photos.
Project Info at a Glance
| Skill Level | Time | Finished Size | Hook | Best For |
|---|---|---|---|---|
| Advanced beginner | 4–6 hours | 10–12 cm | 2.5 mm | Display turtle, market sample, spring décor |
Materials and Tools
Yarn
- Pale mint green — DK / light worsted — 25–30 g — Paintbox Cotton DK, Scheepjes Catona, or similar cotton blend
- Soft pink — DK / light worsted — 25–30 g — main shell and ruffle
- Lavender — DK / light worsted — 5 g — shell flowers
- White — DK / light worsted — 5 g — daisy petals
- Yellow — DK / light worsted — 3–5 g — flower centers
- Olive green — DK / light worsted — 5 g — vines and leaves
- Blush pink — DK / light worsted — 3–5 g — cheeks and toe patches
- Black embroidery floss — small amount — mouth
Tools
- Hook 2.5 mm
- 8 mm safety eyes
- Polyester stuffing
- Yarn needle
- Stitch markers
- Pins
- Small scissors
Abbreviations
MR = magic ring; sc = single crochet; inc = increase; dec = decrease; sl st = slip stitch; ch = chain; BLO = back loop only; FLO = front loop only; hdc = half double crochet; dc = double crochet; tr = treble crochet. Invisible decrease works through the front loops of the next two stitches so the closing rounds stay compact.
Pattern — Step by Step
Continuous spiral unless noted.
Head
Yarn: pale mint green.
R1: 6 sc in MR (6)
R2: inc ×6 (12)
R3: (sc, inc) ×6 (18)
R4: (2 sc, inc) ×6 (24)
R5: (3 sc, inc) ×6 (30)
R6: (4 sc, inc) ×6 (36)
R7–R12: sc around (36)
R13: (4 sc, dec) ×6 (30)
R14: (3 sc, dec) ×6 (24)
R15: (2 sc, dec) ×6 (18)
Insert eyes between R9 and R10, about 10 stitches apart. Stuff firmly at the front and lightly near the neck.
R16: (sc, dec) ×6 (12)
R17: dec ×6 (6)
Fasten off. Leave a 25 cm tail.
Body
Yarn: pale mint green.
R1: 6 sc in MR (6)
R2: inc ×6 (12)
R3: (sc, inc) ×6 (18)
R4: (2 sc, inc) ×6 (24)
R5: (3 sc, inc) ×6 (30)
R6: (4 sc, inc) ×6 (36)
R7–R10: sc around (36)
R11: (4 sc, dec) ×6 (30)
R12: (3 sc, dec) ×6 (24)
Stuff into a low oval, not a ball.
R13: (2 sc, dec) ×6 (18)
R14: (sc, dec) ×6 (12)
R15: dec ×6 (6)
Fasten off. Close the gap.
Top Shell
Yarn: soft pink.
R1: 6 sc in MR (6)
R2: inc ×6 (12)
R3: (sc, inc) ×6 (18)
R4: (2 sc, inc) ×6 (24)
R5: (3 sc, inc) ×6 (30)
R6: (4 sc, inc) ×6 (36)
R7–R10: sc around (36)
R11: BLO sc around (36)
R12: (4 sc, dec) ×6 (30)
Do not close the shell. This piece sits over the body like a cap.
Fasten off. Leave a 45 cm sewing tail.
Shell Ruffle Border
Yarn: soft pink.
Attach yarn to any unused front loop from Top Shell R11.
R1: (sl st, ch 2, sl st) in each front loop around (36 scallops)
Fasten off. Weave the end under the shell.
Side Shell Flaps
Yarn: soft pink. Make 2.
R1: 6 sc in MR (6)
R2: inc ×6 (12)
R3: (sc, inc) ×6 (18)
R4: sc around (18)
Flatten the piece.
R5: sc through both layers across (9)
Fasten off. Leave a 20 cm tail.
Front Legs
Yarn: pale mint green. Make 2.
R1: 6 sc in MR (6)
R2: inc ×6 (12)
R3: (sc, inc) ×6 (18)
R4–R8: sc around (18)
R9: (sc, dec) ×6 (12)
R10: sc around (12)
Stuff the paw end only. Leave the shoulder slightly flat.
Flatten opening.
R11: sc through both layers across (6)
Fasten off. Leave a 25 cm tail.
Back Legs
Yarn: pale mint green. Make 2.
R1: 6 sc in MR (6)
R2: inc ×6 (12)
R3: (sc, inc) ×6 (18)
R4: (2 sc, inc) ×6 (24)
R5–R7: sc around (24)
R8: (2 sc, dec) ×6 (18)
R9: (sc, dec) ×6 (12)
R10: dec ×6 (6)
Stuff enough to hold a rounded paw.
Fasten off. Leave a 25 cm tail.
Tail
Yarn: pale mint green.
R1: 6 sc in MR (6)
R2: inc ×6 (12)
R3–R4: sc around (12)
R5: dec ×6 (6)
Fasten off. Leave a 15 cm tail.
Cheek Patches
Yarn: blush pink. Make 2.
R1: 6 sc in MR (6)
R2: inc ×6 (12)
Sl st to first stitch (12)
Fasten off. Leave a 15 cm tail.
Toe Ovals
Yarn: blush pink. Make 12.
Ch 4.
R1: sc in second ch from hook, sc in next ch, 3 sc in last ch, work on opposite side, sc in next ch, inc in last ch (8)
Sl st to close (8)
Fasten off. Leave a 10 cm tail.
Head Flower
Yarn: yellow center, pink petals.
Center:
R1: 6 sc in MR (6)
R2: inc ×6 (12)
Petals:
R3: [sl st, ch 2, 2 dc, ch 2, sl st] in every other stitch around (6 petals)
Fasten off. Leave a 20 cm tail.
Large Shell Flowers
Yarn: lavender, pink, white, and yellow. Make 5.
Center in yellow:
R1: 6 sc in MR (6)
R2: inc ×6 (12)
Petals in flower color:
R3: [sl st, ch 2, 3 dc, ch 2, sl st] in every other stitch around (6 petals)
Fasten off. Leave a 25 cm tail.
Small Bud Flowers
Yarn: yellow, pink, lavender. Make 6.
R1: 6 sc in MR (6)
R2: [sl st, ch 2, dc, ch 2, sl st] in each stitch around (6 petals)
Fasten off. Leave a 15 cm tail.
Vines and Leaves
Yarn: olive green.
Make 2 vines.
Ch 42.
R1: sl st in second ch from hook and each ch across (41)
Fasten off. Leave tails at both ends.
Make 12 leaves.
Ch 5.
R1: sc in second ch from hook, hdc in next ch, dc in next ch, 3 sc in last ch; work on opposite side, dc in next ch, hdc in next ch, sc in last ch (9)
Fasten off. Leave a 10 cm tail.
Assembly
- Sew the head to the front of the body across 8–10 stitches, keeping the lower edge of the head aligned with R7 of the body.
- Center the top shell over the body and sew around R12 of the shell, catching the body lightly so the dome stays raised.
- Attach the cheek patches below the eyes, one round lower than the eye line.
- Embroider the mouth with black floss in a shallow V, two stitches wide.
- Sew the front legs under the shell at the front corners, angled slightly forward.
- Sew the back legs under the shell at the rear corners, angled outward for balance.
- Attach the tail at the rear center between the back legs.
- Sew the side shell flaps under the shell ruffle, one on each side.
- Pin the vines first, then sew flowers over the vine ends to hide joins.
- Attach toe ovals to each foot, using three ovals per visible paw.
The finished turtle has a mint body, domed pink shell, floral surface, and four stable feet.
7 Technical Tips
- Stitch marker drift: If the marker moves diagonally by more than 3 stitches across the head, your spiral is twisting. Shift the eye placement by the same amount before locking the washers.
- Stuffing firmness: The head should spring back when pressed but not stretch open between stitches. Stop stuffing if the 2.5 mm fabric shows white fiber through two adjacent rounds.
- Invisible decrease gaps: Loose decreases on R15–R17 of the head make the face pucker. Pull the working yarn tight after each dec, then make the next sc at normal tension.
- Eye placement timing: Place the safety eyes after R12 and before R13. After R13, the opening narrows and the washer can distort the cheek curve.
- Cotton tension: DK cotton at 2.5 mm can lean stiff if pulled too tightly. Keep the shell plateau at 36 stitches across 5 cm, or the dome will shrink below the body width.
- Pinning failure mode: Flowers sewn without pins usually migrate toward the shell center. Pin the largest flower first, then place vines so at least two leaves cross the shell side line.
- Tail weaving: A 10 cm tail can pull loose under the shell edge. Weave every flower tail under at least 5 back bars before trimming.
Conclusion
Block the shell before final flower placement, then compare the side silhouette from eye level. A turtle with a high shell and low head reads correctly; a high head turns it into a generic plush. The next step is to make one test shell in scrap yarn and check whether the 36-stitch plateau gives the dome you want. Save this flower turtle amigurumi crochet pattern to Pinterest, and post the finished turtle on Instagram with #BloomShellTurtle. For the next version, which shell detail should carry more weight: the lavender daisy cluster, the pink rose center, or the green vine line?









