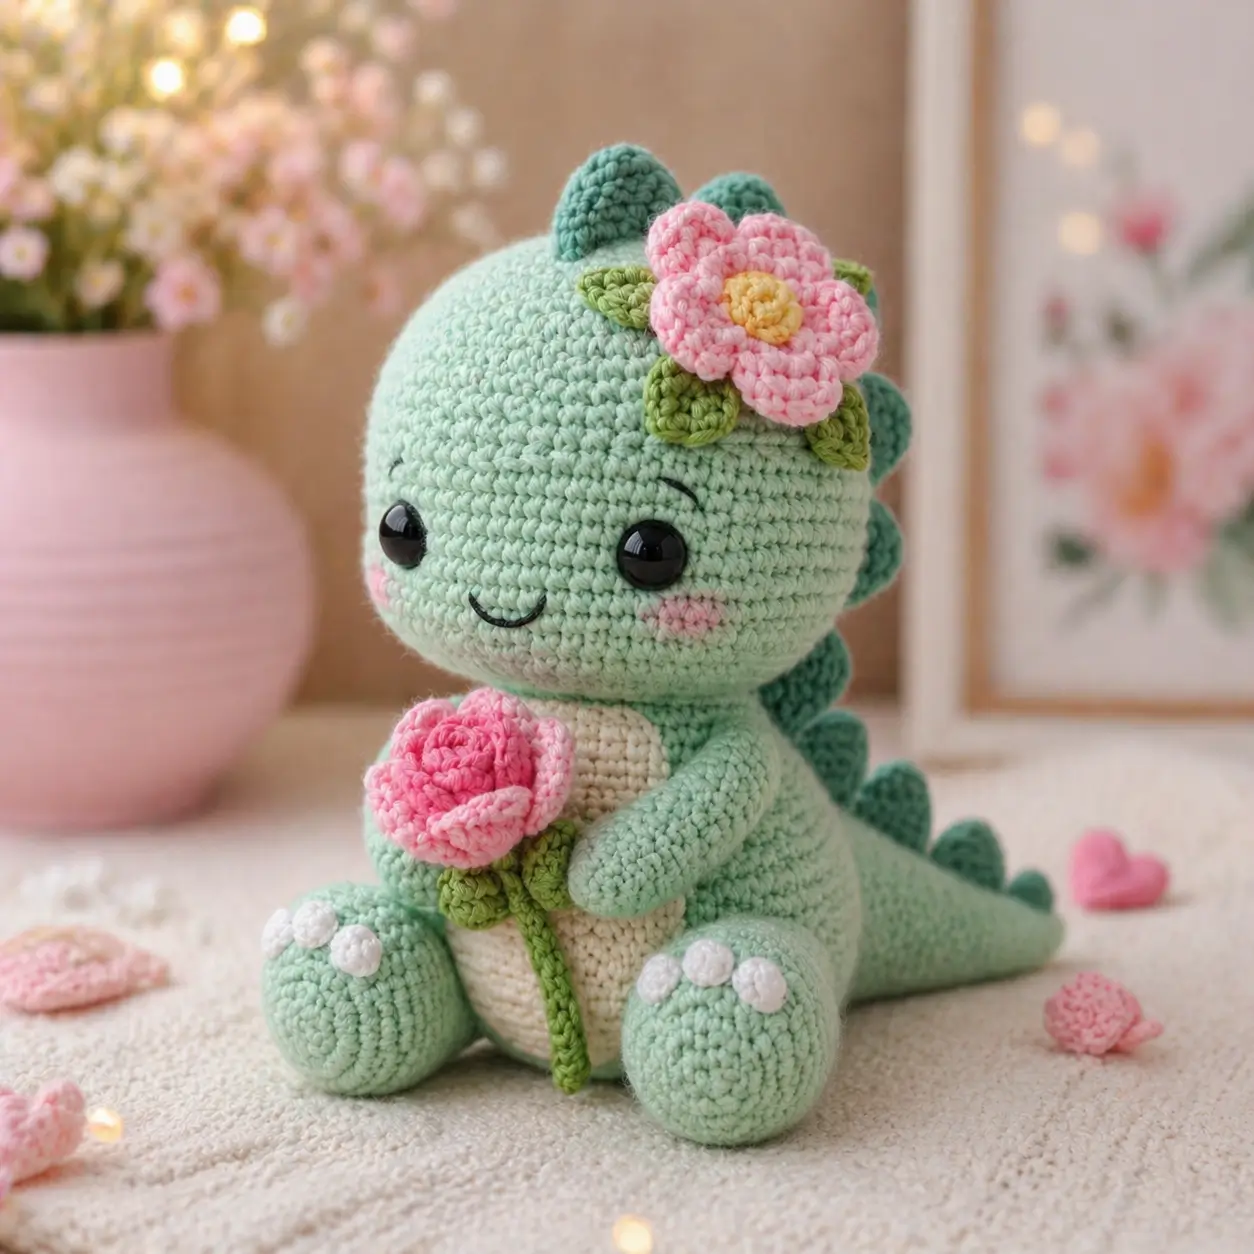
A flower dragon without a tail counterweight pitches forward. This flower dragon amigurumi crochet pattern uses DK cotton, a 2.5 mm hook, 12 mm safety eyes, and firm stuffing to finish at about 18 cm seated. The skill level is intermediate because the toy combines sphere shaping, pinned limbs, dorsal spines, and two flower types. Make it when a fantasy plush needs to sit upright while holding a stemmed rose.
The Design: What Makes This Flower Dragon Different
The head is built larger than the body, but the body is kept rounded rather than narrow. That choice matches the photo: a baby dragon with a heavy kawaii face, short arms, and a stable seated base. The tail is not decoration only. It works as a rear support, so it must be stuffed lightly at the tip and more firmly near the body. The dorsal spines stay flat, not stuffed, because raised cones would pull the silhouette toward a dinosaur instead of a soft flower dragon crochet toy. Another key decision is the cream belly patch. It breaks up the mint body and gives the arms a visual center when they hold the rose. A common maker mistake with a baby dragon amigurumi is sewing the back legs too low; then the body rolls backward and the rose points down.
Project Info at a Glance
| Skill Level | Time | Finished Size | Hook | Best For |
|---|---|---|---|---|
| Intermediate | 6–8 hours | About 18 cm seated | 2.5 mm | Decorative plush, fantasy nursery shelf, market sample |
Finished size and hook choice follow the researched small-to-medium flower dragon range, where cotton versions appear near 13–20 cm and use 2.5–3.5 mm hooks. Source: Trishagurumi Flower Dragon.
Materials and Tools
Yarn
- Pale mint green — DK cotton — 55 g — YarnArt Jeans, Paintbox Cotton DK, or similar
- Cream — DK cotton — 12 g — for belly patch
- Dark teal green — DK cotton — 10 g — for ears/horns and dorsal spines
- Pink — DK cotton — 10 g — for cheeks, rose, and head flower petals
- Light pink — DK cotton — 5 g — optional petal contrast
- Olive green — DK cotton — 6 g — for leaves and rose stem
- Yellow — DK cotton — 3 g — for flower center
- White — DK cotton — 3 g — for toe pads
Comparable dragon material listings show main yarn near 50–56 g and accent yarns around 10–25 g, so the amounts above suit a compact seated dragon with extra floral details. Source: Etsy dragon crochet pattern listing.
Tools
- Hook 2.5 mm
- 12 mm black safety eyes
- Polyester fiberfill
- Yarn needle
- Locking stitch markers
- Pins
- Black embroidery thread
- Scissors
Safety eye size varies by yarn scale, but 12 mm appears in flower dragon and comparable dragon sources and fits the large-eyed photo style. Source: Ravelry Flower Dragon.
Abbreviations
- MR = magic ring
- sc = single crochet
- inc = increase
- dec = decrease
- sl st = slip stitch
- ch = chain
- BLO = back loop only
- hdc = half double crochet
- dc = double crochet
- st = stitch
- R = round or row
Invisible decrease: work through the front loops of the next 2 stitches before completing one sc so the decrease line stays inside the fabric.
Pattern — Step by Step
Continuous spiral unless noted. This original pattern uses a medium 36-stitch plateau for the head and body, with all magic rings starting at 6 sc.
Head
Yarn: pale mint green — Source: Standard amigurumi math; medium 36-st plateau.
R1: 6 sc in MR (6)
R2: inc ×6 (12)
R3: (sc, inc) ×6 (18)
R4: (2 sc, inc) ×6 (24)
R5: (3 sc, inc) ×6 (30)
R6: (4 sc, inc) ×6 (36)
R7–R13: sc around (36)
R14: (4 sc, dec) ×6 (30)
R15: (3 sc, dec) ×6 (24)
Insert safety eyes between R9 and R10, 8 stitches apart. Embroider the smile between R11 and R13 before the opening narrows.
R16: (2 sc, dec) ×6 (18)
R17: (sc, dec) ×6 (12)
Stuff firmly, especially around the cheeks.
R18: dec ×6 (6)
Fasten off. Weave through front loops and close.
Body
Yarn: pale mint green — Source: Standard amigurumi math; medium 36-st plateau.
R1: 6 sc in MR (6)
R2: inc ×6 (12)
R3: (sc, inc) ×6 (18)
R4: (2 sc, inc) ×6 (24)
R5: (3 sc, inc) ×6 (30)
R6: (4 sc, inc) ×6 (36)
R7–R12: sc around (36)
R13: (4 sc, dec) ×6 (30)
R14–R15: sc around (30)
R16: (3 sc, dec) ×6 (24)
R17–R18: sc around (24)
R19: (2 sc, dec) ×6 (18)
R20: (sc, dec) ×6 (12)
Stuff the lower half firmly. Leave the neck area slightly softer so the head sits flush.
R21: dec ×6 (6)
Fasten off. Close the opening and leave a 25 cm tail.
Cream Belly Patch
Yarn: cream — Source: Standard flat oval math.
Ch 7.
R1: sc in 2nd ch from hook, sc 4, 3 sc in last ch, work on the opposite side, sc 4, inc (14)
R2: inc, sc 4, inc ×3, sc 4, inc ×2 (20)
R3: (sc, inc), sc 4, (sc, inc) ×3, sc 4, (sc, inc) ×2 (26)
R4: sc around (26)
Fasten off. Leave a 35 cm tail for sewing.
Arms / Front Legs
Yarn: pale mint green — Source: Standard amigurumi tube math.
Make 2.
R1: 6 sc in MR (6)
R2: inc ×6 (12)
R3–R10: sc around (12)
Stuff only the lower half. Keep the shoulder end flat so it can wrap toward the rose.
Fasten off. Leave a 25 cm tail on each arm.
Back Legs
Yarn: pale mint green — Source: Standard amigurumi oval-limb math.
Make 2.
R1: 6 sc in MR (6)
R2: inc ×6 (12)
R3: (sc, inc) ×6 (18)
R4–R7: sc around (18)
R8: (sc, dec) ×6 (12)
R9–R10: sc around (12)
Stuff firmly at the toe end and lightly at the seam edge.
Fasten off. Leave a 30 cm tail on each leg.
White Toe Pads
Yarn: white — Source: Standard flat circle.
Make 6.
R1: 6 sc in MR (6)
sl st into first sc (6)
Fasten off. Leave a 12 cm tail on each pad.
Rounded Ears / Horns
Yarn: dark teal green — Source: Standard amigurumi cap math.
Make 2.
R1: 6 sc in MR (6)
R2: inc ×6 (12)
R3–R5: sc around (12)
R6: dec ×6 (6)
Stuff very lightly. The piece should stay rounded, not pointed.
Fasten off. Leave a 20 cm tail.
Tail
Yarn: pale mint green — Source: Standard amigurumi cone-tube math.
R1: 6 sc in MR (6)
R2: inc ×6 (12)
R3–R5: sc around (12)
R6: (sc, inc) ×6 (18)
R7–R13: sc around (18)
R14: (2 sc, inc) ×6 (24)
R15–R21: sc around (24)
R22: (2 sc, dec) ×6 (18)
R23–R24: sc around (18)
Stuff the tip lightly and the base firmly. Bend the final 5 cm upward while stuffing so the tail rests behind the body.
Fasten off. Leave a 40 cm tail for sewing.
Dorsal Spines
Yarn: dark teal green — Source: Standard flat triangle rows.
Make 7.
Ch 2.
Row 1: 2 sc in 2nd ch from hook, ch 1, turn (2)
Row 2: inc ×2, ch 1, turn (4)
Row 3: sc across, ch 1, turn (4)
Row 4: inc, sc 2, inc (6)
Fasten off. Leave a 20 cm tail on each spine.
Cheek Patches
Yarn: pink — Source: Standard flat circle.
Make 2.
R1: 6 sc in MR (6)
R2: inc ×6 (12)
sl st into first sc (12)
Fasten off. Leave a 15 cm tail.
Head Flower
Yarn: pink, yellow, olive green — Source: Standard crochet applique math.
Center, yellow:
R1: 6 sc in MR (6)
R2: inc ×6 (12)
sl st into first sc (12)
Fasten off, leaving a 20 cm tail.
Petals, pink: make 5.
Ch 5.
Row 1: sc in 2nd ch from hook, hdc 2, 5 hdc in last ch, work on opposite side, hdc 2, sc (12)
Fasten off, leaving a 15 cm tail.
Leaves, olive green: make 3.
Ch 6.
Row 1: sl st in 2nd ch from hook, sc, hdc, dc, 3 dc in last ch, work on opposite side, dc, hdc, sc, sl st (10)
Fasten off, leaving a 15 cm tail.
Held Rose
Yarn: pink and olive green — Source: Standard crochet rose strip.
Rose strip, pink:
Ch 26.
Row 1: sc in 2nd ch from hook and across (25)
Row 2: ch 2, 3 hdc in same st, sl st in next st, *4 hdc in next st, sl st in next st* repeat across to end (25 base sts)
Roll from the smaller end into a rose. Sew through the base several times so the roll does not open.
Stem, olive green:
Ch 23.
Row 1: sl st in 2nd ch from hook and across (22)
Rose leaves, olive green: make 2.
Ch 6.
Row 1: sl st in 2nd ch from hook, sc, hdc, dc, 3 dc in last ch, work on opposite side, dc, hdc, sc, sl st (10)
Sew the rose to one end of the stem. Leave 15 cm tails on the leaves.
Assembly
- Pin the body upright with the 6-st close at the bottom and the narrower neck at the top.
- Sew the head to the body over 2 rounds of overlap, adding a small amount of stuffing before the seam closes.
- Sew the cream belly patch to the front of the body from R6 to R18, centered under the head.
- Stitch the smile, short eyebrow curves, and cheek patches; place cheeks one round below the eyes and 1 stitch outward from each eye.
- Sew the back legs to the lower front body between R6 and R10, angled outward so the dragon sits without rolling.
- Sew the arms from body R13 to R17, curving the tips inward around the rose stem.
- Attach the tail to the back lower body across 8 stitches, then pin the tail to touch the table surface before final stitching.
- Sew the rounded ears/horns to the head between R4 and R7, spaced about 9 stitches apart.
- Sew the 7 dorsal spines in a line from the back of the head to the tail, placing the largest visual spacing near the neck.
- Sew the head flower above the right eye, attach leaves behind it, then stitch the held rose between both arms.
The finished dragon is a seated mint flower dragon with a supported tail, visible belly patch, floral headpiece, and held rose.
7 Technical Tips
- Failure mode: spiral drift across the face. Move the stitch marker every round and check that the eyes still sit level between R9 and R10 before locking the washers.
- Failure mode: lumpy cheeks from late stuffing. Add tiny pieces of fiberfill around the cheeks before R16, then pack the crown and back of the head last.
- Failure mode: visible decrease ridges on the forehead. Place invisible decreases on R14–R18 and rotate the start point toward the lower back of the head before closing.
- Measurement: eye spacing should be 8 stitches. If 12 mm eyes touch the smile curve, move each eye 1 stitch outward rather than lowering the mouth.
- Failure mode: tail collapse. Stuff the first 5 cm of the tail lightly and the base firmly, because overstuffing the tip makes the tail lift instead of acting as a rear support.
- Measurement: pin the belly patch before sewing at four points. Use top, bottom, left, and right pins first; extra pins can go every 4 stitches around the oval.
- Failure mode: rose stem twisting out of the arms. Tack the stem to the belly patch at two hidden points before sewing the arm tips over it.
Conclusion
This pattern is built around balance: a large head, short limbs, firm lower body, and tail support. Work the head and body first, then test the sitting angle before sewing the tail, legs, and rose. That order prevents the main problem with flower dragons: a face-heavy toy that tips forward once the accessories are added. The final flower dragon amigurumi crochet pattern gives you a mint dragon with a cream belly, dark dorsal spines, a head flower, and a stemmed rose. Pin the finished toy on Pinterest, post the front and side view on Instagram, and tag it with #MintFlowerDragon. Which detail should change first: the flower color, the spine count, or the rose position?









