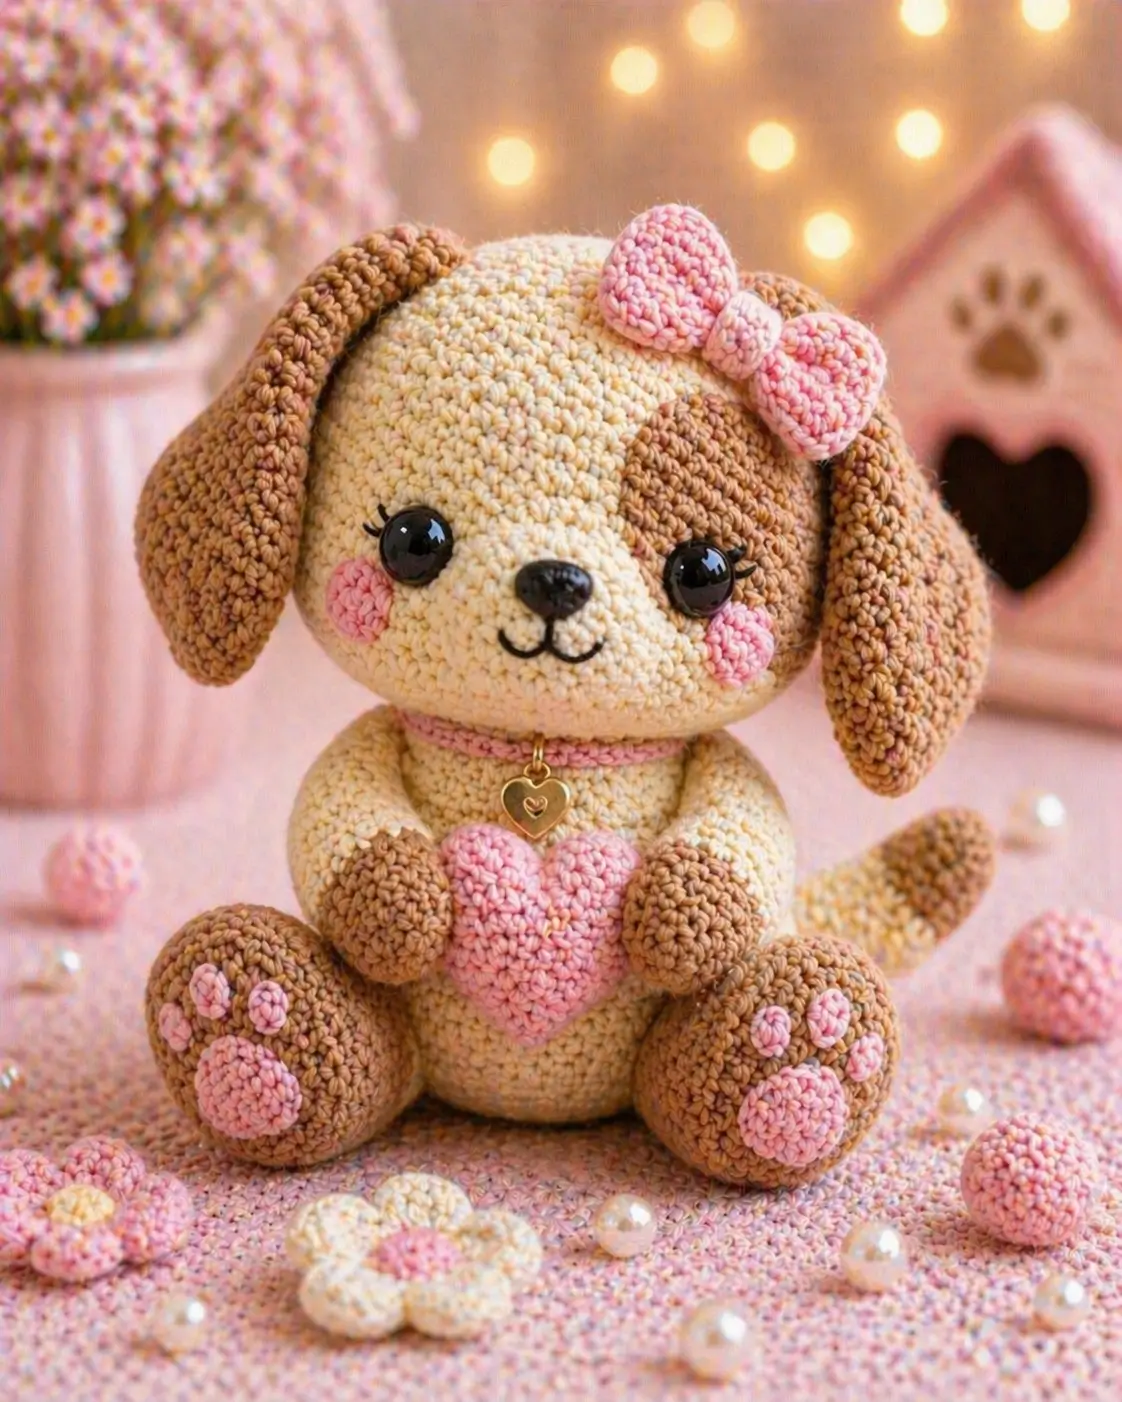
A puppy’s floppy ears drag the visual weight below the eyes; that is the first shape to control. This puppy amigurumi crochet pattern uses worsted yarn, a 3.5 mm hook, 12 mm safety eyes, and a 20–21 cm sitting build for intermediate makers. Make it when you need a stable shelf piece with fixed face placement, paw pads, and a removable-looking bow.
The Design: What Makes Bow Puppy Different
The design treats the puppy as a front-heavy sit. You make the head wider than the body, then anchor it with back legs that sit low and forward. That keeps the floppy ears from making the toy tip. A separate muzzle gives the black nose height without forcing color changes inside the head sphere. The brown face patch stays flat, so the eye remains aligned on a clean curve. For a crochet puppy amigurumi, ears must be long enough to read as spaniel-like but light enough not to pull side stitches open. The maker often makes one mistake with an amigurumi dog pattern: attaching the ears too high. On this model, their top seam belongs behind the bow line, not at the crown.
Project Info at a Glance
| Skill Level | Time | Finished Size | Hook | Best For |
|---|---|---|---|---|
| Intermediate | 1–2 days | 20–21 cm sitting estimate | 3.5 mm | Shelf puppy with floppy ears, bow, and paw pads |
Materials and Tools
Yarn
- Cream — worsted / size 4 — 90 g — Paintbox Cotton Aran, YarnArt Jeans Plus, or similar
- Caramel brown — worsted / size 4 — 35 g — for ears, patch, paws, and tail tip
- Soft pink — worsted / size 4 — 15 g — for bow, cheeks, collar, paw pads, and heart pillow
- Black embroidery yarn — small amount — for mouth line
- Gold charm or ring — 8–12 mm — optional collar detail
Tools
- Hook 3.5 mm
- 12 mm safety eyes
- 10–12 mm safety nose or embroidered satin-stitch nose
- Polyester stuffing
- Tapestry needle
- Locking stitch markers
- Pins
- Scissors
- Black sewing thread for optional eyelashes
Abbreviations
MR = magic ring; sc = single crochet; inc = 2 sc in same stitch; dec = invisible decrease; sl st = slip stitch; ch = chain; BLO = back loop only; FO = fasten off.
An invisible decrease is worked through front loops only to reduce gaps at the muzzle, paw, and head closure.
Pattern — Step by Step
Continuous spiral unless noted. This original photo-based pattern uses medium-size amigurumi math: main head and body plateau at 36 stitches.
Head
Yarn: cream
R1: 6 sc in MR (6)
R2: inc ×6 (12)
R3: (sc, inc) ×6 (18)
R4: (2 sc, inc) ×6 (24)
R5: (3 sc, inc) ×6 (30)
R6: (4 sc, inc) ×6 (36)
R7–R14: sc around (36)
R15: (4 sc, dec) ×6 (30)
R16: (3 sc, dec) ×6 (24)
R17: (2 sc, dec) ×6 (18)
Insert safety eyes between R10 and R11, 8 stitches apart. Leave the right eye area open for the brown face patch placement.
R18: (sc, dec) ×6 (12)
Stuff firmly. Add extra stuffing under the forehead, not under the chin.
R19: dec ×6 (6)
Fasten off. Close the opening and hide the tail.
Body
Yarn: cream
R1: 6 sc in MR (6)
R2: inc ×6 (12)
R3: (sc, inc) ×6 (18)
R4: (2 sc, inc) ×6 (24)
R5: (3 sc, inc) ×6 (30)
R6: (4 sc, inc) ×6 (36)
R7–R12: sc around (36)
R13: (4 sc, dec) ×6 (30)
R14: (3 sc, dec) ×6 (24)
R15: (2 sc, dec) ×6 (18)
R16: (sc, dec) ×6 (12)
Stuff the base firmly so the puppy sits without leaning backward.
R17: dec ×6 (6)
Fasten off. Leave a 25 cm tail for attaching the head.
Muzzle
Yarn: cream
R1: 6 sc in MR (6)
R2: inc ×6 (12)
R3: (sc, inc) ×6 (18)
R4–R5: sc around (18)
R6: (sc, dec) ×6 (12)
Place safety nose centered between R3 and R4 before sewing the muzzle on.
Fasten off. Leave a 30 cm tail.
Brown Face Patch
Yarn: caramel brown
Ch 7.
R1: sc in 2nd ch from hook, 4 sc, 3 sc in last ch; work on other side of chain, 4 sc, inc in last st (14)
R2: inc, 4 sc, inc ×3, 4 sc, inc ×2 (20)
R3: sc, inc, 5 sc, (sc, inc) ×3, 5 sc, (sc, inc) ×2 (26)
R4: sc around (26)
Fasten off. Leave a 35 cm tail. Pin around the right eye before sewing; the eye should sit inside the patch, not on its edge.
Floppy Ears
Yarn: caramel brown
R1: 6 sc in MR (6)
R2: inc ×6 (12)
R3: (sc, inc) ×6 (18)
R4: (2 sc, inc) ×6 (24)
R5–R9: sc around (24)
R10: (2 sc, dec) ×6 (18)
R11–R13: sc around (18)
R14: (sc, dec) ×6 (12)
R15–R17: sc around (12)
R18: dec ×6 (6)
Do not stuff. Flatten lengthwise.
Fasten off. Leave a 35 cm tail for each ear.
Arms / Front Legs
Yarn: caramel brown for paw, cream for arm
R1: with caramel brown, 6 sc in MR (6)
R2: inc ×6 (12)
R3: sc around (12)
R4: change to cream, sc around (12)
R5–R9: sc around (12)
R10: dec ×6 (6)
Stuff only the paw half so the arm can hang close to the heart pillow.
Fasten off. Leave a 25 cm tail.
Back Legs
Yarn: caramel brown
R1: 6 sc in MR (6)
R2: inc ×6 (12)
R3: (sc, inc) ×6 (18)
R4: (2 sc, inc) ×6 (24)
R5–R6: sc around (24)
R7: (2 sc, dec) ×6 (18)
R8: (sc, dec) ×6 (12)
R9–R11: sc around (12)
R12: dec ×6 (6)
Stuff the front of each paw firmly and the upper leg lightly.
Fasten off. Leave a 30 cm tail.
Tail
Yarn: cream with caramel brown tip
R1: with caramel brown, 6 sc in MR (6)
R2: inc ×6 (12)
R3–R5: sc around (12)
R6: change to cream, sc around (12)
R7–R12: sc around (12)
Stuff lightly. Bend the tail upward while sewing.
Fasten off. Leave a 25 cm tail.
Cheek Patches
Yarn: soft pink
R1: 6 sc in MR (6)
R2: inc ×6 (12)
Sl st to first stitch (12)
Fasten off. Leave a 20 cm tail. Make 2.
Paw Pads
Yarn: soft pink
Big pads, make 2:
R1: 6 sc in MR (6)
R2: inc ×6 (12)
Sl st to first stitch (12)
Toe pads, make 6:
R1: 6 sc in MR (6)
Sl st to first stitch (6)
Fasten off each pad. Leave 12–15 cm tails for sewing.
Bow Loops
Yarn: soft pink
Make 2 rectangles.
Ch 9.
Row 1: sc in 2nd ch from hook and across (8)
Rows 2–6: ch 1, turn, sc across (8)
Row 7: ch 1, turn, sc across (8)
Fasten off. Leave a 20 cm tail. Pinch each rectangle at center before wrapping.
Bow Center Band
Yarn: soft pink
Ch 5.
Row 1: sc in 2nd ch from hook and across (4)
Rows 2–5: ch 1, turn, sc across (4)
Fasten off. Wrap around both bow loops and sew at the back.
Collar
Yarn: soft pink
Ch 34, or chain to fit around the neck without stretching.
Row 1: sc in 2nd ch from hook and across (33)
Row 2: ch 1, turn, sc across (33)
Fasten off. Leave tails for sewing the collar closed at the back neck. Add the gold heart charm at the front center.
Heart Pillow
Yarn: soft pink
First lobe:
R1: 6 sc in MR (6)
R2: inc ×6 (12)
R3: sc around (12)
Fasten off.
Second lobe:
R1: 6 sc in MR (6)
R2: inc ×6 (12)
R3: sc around (12)
Do not fasten off.
Join the lobes:
R4: sc 12 around first lobe, sc 12 around second lobe (24)
R5: sc around (24)
R6: (2 sc, dec) ×6 (18)
R7: (sc, dec) ×6 (12)
Stuff the heart before the final round. Shape the top valley with two small stitches after closing.
R8: dec ×6 (6)
Fasten off. Leave a 25 cm tail if sewing the heart to the paws.
Assembly
- Sew the head to the body with the face angled slightly downward.
- Sew the muzzle over R11–R15 of the head, centered between the eyes.
- Sew the brown face patch around the right eye, keeping the patch edge flat.
- Embroider the mouth with one vertical line from the nose and two small curved lines below it.
- Sew the cheek patches beside the muzzle, one under each eye.
- Attach the ears at R7–R9 of the head, behind the bow line, and tack each lower edge so it drops forward.
- Sew the arms to the upper body, then position the heart pillow between them.
- Sew the back legs low on the body, then sew the big paw pads and three toe pads onto each foot.
- Attach the tail to the back body between R8 and R10.
- Sew the collar around the neck, attach the charm at center front, and sew the bow above the right ear.
The puppy is complete when it sits level and the ear tips rest below the cheek line.
7 Technical Tips
- Stitch marker drift: If the marker shifts more than 3 stitches off center by R10 of the head, the face patch will tilt. Add one offset sc at the back of the head before placing the eyes.
- Stuffing firmness: A soft body base makes the 20–21 cm puppy fall backward. Pack the lower body until it resists thumb pressure, then leave the neck area slightly softer for sewing.
- Invisible decrease gaps: Gaps show fastest on cream yarn at R17–R19 of the head. Work each decrease through front loops only and keep the working yarn under steady tension.
- Eye placement timing: Insert the 12 mm eyes before closing past R16. After R17, the opening is too small for washer pressure and the eye spacing can shift.
- Velvet tension warning: Do not switch to velvet yarn without resizing the hook and eye diameter. A size-6 plush yarn may turn this medium pattern into a much larger toy.
- Pinning ears: Pin both ears for 10 minutes before sewing. If one ear starts 1 round higher, the bow will look rotated even when the bow is centered.
- Tail weaving: Weave each yarn tail through at least 5 cm of dense stitches before trimming. Shorter tails can work loose at the paws because the toy rests on those seams.
Conclusion
Block the cheeks before final assembly and photograph the puppy from eye level, not above the bow. That angle checks whether the face patch, muzzle, and ear drop still read as one dog instead of separate pieces. The concrete next step is simple: crochet the head, muzzle, and one ear first, then pin them together before making the second ear. Record the eye spacing in millimeters for repeat work. Share the finished puppy amigurumi crochet pattern test on Pinterest and Instagram with #BowPuppyAmigurumi. For the next version, would you keep the right-side brown eye patch, or move the spot to the left to balance the bow?









