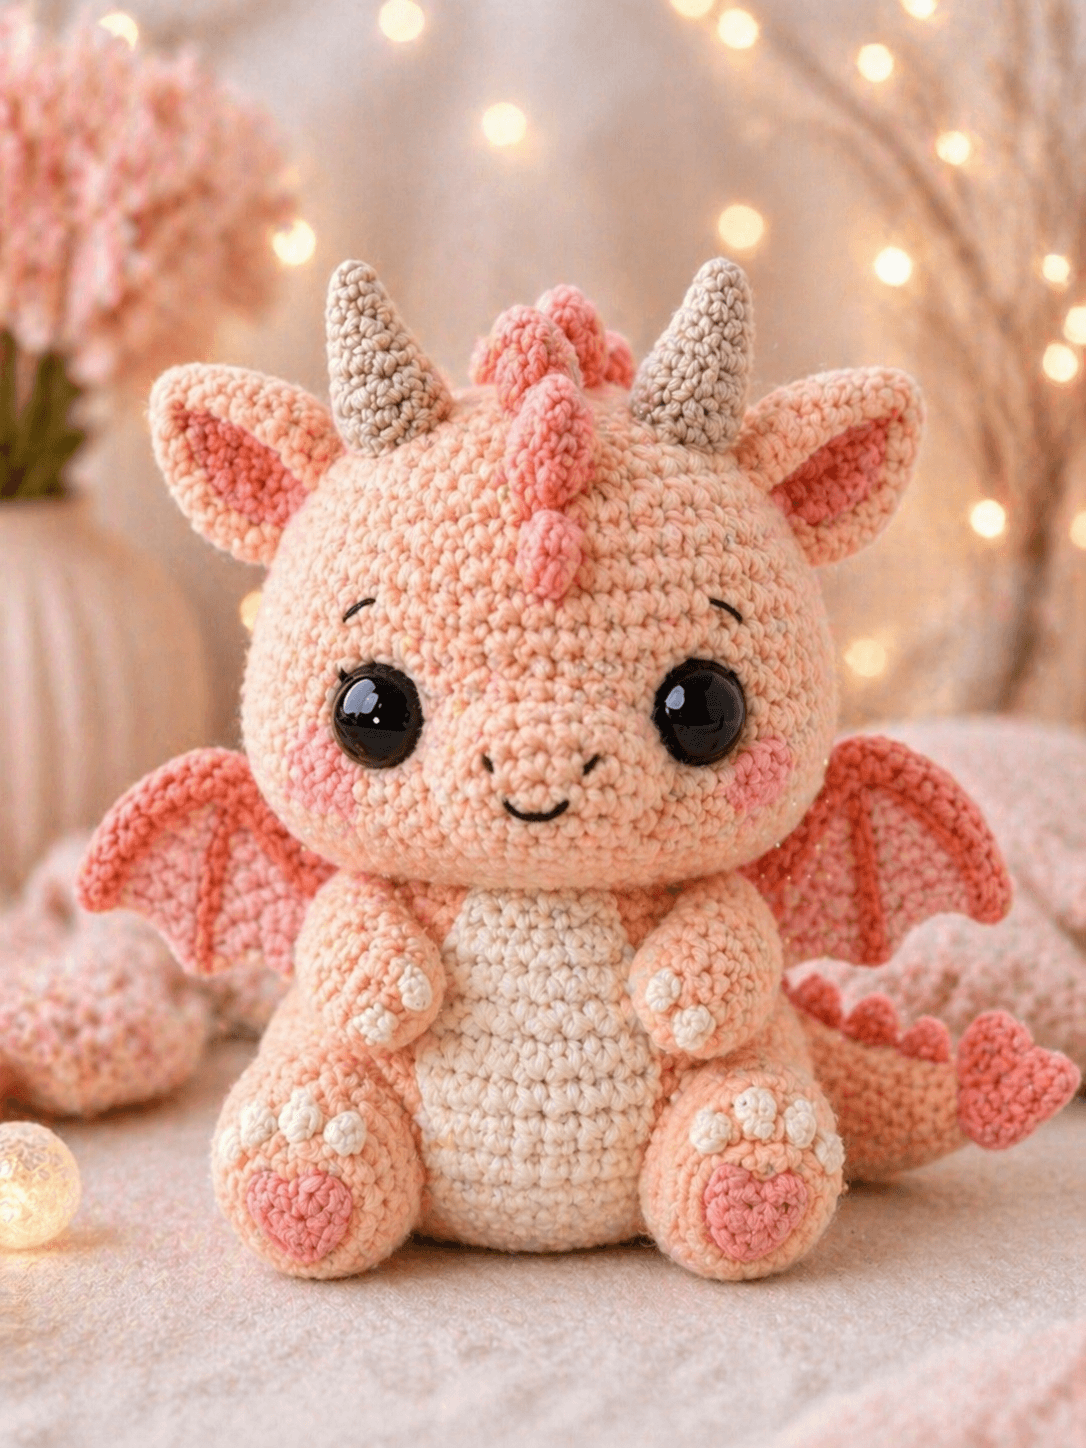
A dragon head has to carry horns, ears, crest bumps, cheeks, and a snout before the body even starts. This dragon amigurumi crochet pattern uses worsted/Aran cotton, a 4 mm hook, and a medium 16 cm seated build for an intermediate maker. Build it when a display toy needs clear fantasy features from the front view.
The Design: What Makes This Baby Dragon Different
The photograph asks for three structural decisions. First, the head stays wider than the body so the safety eyes, cheeks, snout, ears, horns, and crest do not crowd each other. You place the face early, then the maker judges balance from the front before sewing any side pieces. Second, the wings sit low enough to frame the body without hiding the cheeks. That matters in an amigurumi dragon with wings because high wings can push the ears outward. Third, the tail gets a heart tip, not a pointed barb, so this crochet dragon pattern reads soft rather than reptilian. The common mistake is treating the horns, ears, and crest as separate afterthoughts. They need a shared center line.
Project Info at a Glance
| Skill Level | Time | Finished Size | Hook | Best For |
|---|---|---|---|---|
| Intermediate | Not source-stated | 16 cm seated | 4 mm | Display dragon with wings, horns, cheeks, and heart tail |
The 16 cm seated size, Aran yarn, 4 mm hook, and 8 mm eye reference come from a verified dragon pattern listing; this photo-matched version uses 12 mm eyes for a larger kawaii face. Source
Materials and Tools
Yarn
- Peach blush — Worsted / Aran cotton — 56 g — Rico Design Creative Cotton Aran or Paintbox Cotton Aran
- Cream — Worsted / Aran cotton — 12 g — belly, snout highlights, paw dots
- Coral pink — Worsted / Aran cotton — 12 g — cheeks, inner ears, crest, heart tail tip
- Beige-gray — Worsted / Aran cotton — 6–8 g — horns
- Black embroidery thread — small amount — mouth, nostrils, brow stitches
The Aran/worsted yarn amount and 4 mm hook pairing follow the 16 cm seated dragon reference, while the visible cotton-style stitch texture matches the photo better than chenille. Source
Tools
- Hook 4 mm
- 12 mm black safety eyes
- Polyester stuffing
- Yarn needle
- Locking stitch markers
- Pins
- Scissors
- Embroidery needle
Abbreviations
MR = magic ring / sc = single crochet / inc = 2 sc in same stitch / dec = invisible decrease / sl st = slip stitch / ch = chain / BLO = back loop only / hdc = half double crochet / dc = double crochet.
Invisible decrease means working through the front loops of the next 2 stitches before completing 1 sc; it reduces the visible gap on stuffed parts.
Pattern — Step by Step
Continuous spiral unless noted.
Head
Yarn: peach blush — Source: Standard amigurumi math, photo-matched proportions
R1: 6 sc in MR (6)
R2: inc ×6 (12)
R3: (sc, inc) ×6 (18)
R4: (2 sc, inc) ×6 (24)
R5: (3 sc, inc) ×6 (30)
R6: (4 sc, inc) ×6 (36)
R7–R14: sc around (36)
R15: (4 sc, dec) ×6 (30)
R16: sc around (30)
R17: (3 sc, dec) ×6 (24)
R18: (2 sc, dec) ×6 (18)
R19: (sc, dec) ×6 (12)
R20: dec ×6 (6)
Place eyes between R10 and R11, 8 stitches apart. Stuff firmly before R18. Embroider brows over R8–R9 and mouth below the snout after assembly.
Fasten off. Leave 20 cm tail for closing.
Body
Yarn: peach blush — Source: Standard amigurumi math
R1: 6 sc in MR (6)
R2: inc ×6 (12)
R3: (sc, inc) ×6 (18)
R4: (2 sc, inc) ×6 (24)
R5: (3 sc, inc) ×6 (30)
R6: (4 sc, inc) ×6 (36)
R7–R11: sc around (36)
R12: (4 sc, dec) ×6 (30)
R13: sc around (30)
R14: (3 sc, dec) ×6 (24)
R15: sc around (24)
R16: (2 sc, dec) ×6 (18)
R17: (sc, dec) ×6 (12)
R18: dec ×6 (6)
Stuff the lower body firmly and the neck area extra firm.
Fasten off. Leave 25 cm tail for sewing.
Arms / Front Legs
Yarn: peach blush — Make 2 — Source: Standard amigurumi math
R1: 6 sc in MR (6)
R2: inc ×6 (12)
R3–R5: sc around (12)
R6: dec ×6 (6)
R7: sc around (6)
Stuff only the lower half so the arms sit flat against the belly.
Fasten off. Leave 18 cm tail.
Back Legs
Yarn: peach blush — Make 2 — Source: Standard amigurumi math
R1: 6 sc in MR (6)
R2: inc ×6 (12)
R3: (sc, inc) ×6 (18)
R4–R5: sc around (18)
R6: (sc, dec) ×6 (12)
R7–R8: sc around (12)
R9: dec ×6 (6)
Stuff to medium firmness. Flatten the top edge before sewing.
Fasten off. Leave 20 cm tail.
Ears
Yarn: peach blush outer, coral pink inner — Make 2 outer and 2 inner — Source: Standard row shaping
Outer ear:
Row 1: ch 6, sc in 2nd ch from hook and across (5)
Row 2: ch 1, turn, sc across (5)
Row 3: ch 1, turn, dec, sc, dec (3)
Row 4: ch 1, turn, dec, sc (2)
Row 5: ch 1, turn, dec (1)
Inner ear:
Row 1: ch 5, sc in 2nd ch from hook and across (4)
Row 2: ch 1, turn, dec, dec (2)
Row 3: ch 1, turn, dec (1)
Stitch inner ear onto outer ear. Pin ears between R7 and R10 of the head, slightly behind the eyes.
Fasten off. Leave 18 cm tail.
Horns
Yarn: beige-gray — Make 2 — Source: Standard amigurumi math
R1: 6 sc in MR (6)
R2–R3: sc around (6)
R4: inc ×6 (12)
R5–R6: sc around (12)
Stuff lightly so the horn keeps a cone shape without bulging.
Fasten off. Leave 20 cm tail.
Forehead Crest Bumps
Yarn: coral pink — Make 5 — Source: Standard amigurumi math
R1: 6 sc in MR (6)
R2: sc around (6)
R3: inc ×6 (12)
R4: sc around (12)
R5: dec ×6 (6)
Stuff lightly. The center bump goes first; place the rest along the head midline.
Fasten off. Leave 15 cm tail.
Snout
Yarn: peach blush — Source: Standard amigurumi math
R1: 6 sc in MR (6)
R2: inc ×6 (12)
R3: (sc, inc) ×6 (18)
R4–R5: sc around (18)
R6: (sc, dec) ×6 (12)
Stuff lightly. Sew below the eyes, centered over R12–R15 of the head.
Fasten off. Leave 20 cm tail.
Cheek Patches
Yarn: coral pink — Make 2 — Source: Standard amigurumi math
R1: 6 sc in MR (6)
R2: inc ×6 (12)
sl st to first stitch (12)
Do not stuff. Sew flat under each eye, one round lower than the snout top edge.
Fasten off. Leave 15 cm tail.
Belly Patch
Yarn: cream — Source: Standard oval shaping
R1: ch 8, sc in 2nd ch from hook, sc 5, 3 sc in last ch, work other side, sc 5, inc in last base ch (16)
R2: inc, sc 5, inc ×3, sc 5, inc ×2 (22)
R3: sc around (22)
Block flat with pins before sewing. Place on body from R6 to R14.
Fasten off. Leave 30 cm tail.
Wings
Yarn: coral pink with peach blush edge — Make 2 — Source: Flat row wing construction; published dragon references also use row-built wings. Source
Row 1: ch 10, sc in 2nd ch from hook and across (9)
Row 2: ch 1, turn, inc, sc 7, inc (11)
Row 3: ch 1, turn, sc across (11)
Row 4: ch 1, turn, dec, sc 7, dec (9)
Row 5: ch 1, turn, dec, sc 5, dec (7)
Row 6: ch 1, turn, sc, hdc, dc, sl st, sc, hdc, dc (7)
Edge: with peach blush, sc evenly around the wing, placing 2 sc in each lower corner.
Do not stuff. Curve each wing by pinning the top edge slightly inward before sewing.
Fasten off. Leave 25 cm tail.
Tail
Yarn: peach blush — Source: Standard amigurumi math
R1: 6 sc in MR (6)
R2: sc around (6)
R3: inc ×6 (12)
R4–R8: sc around (12)
R9: (sc, inc) ×6 (18)
R10–R13: sc around (18)
R14: (sc, dec) ×6 (12)
R15: sc around (12)
Stuff lightly from the base only. Leave the tip flexible for the heart cap.
Fasten off. Leave 25 cm tail.
Heart Tail Tip
Yarn: coral pink — Source: Standard amigurumi math adapted into 2 joined lobes
Lobe A:
R1: 6 sc in MR (6)
R2: inc ×6 (12)
R3: sc around (12)
Fasten off.
Lobe B:
R1: 6 sc in MR (6)
R2: inc ×6 (12)
R3: sc around (12)
Do not fasten off. Join to Lobe A.
Heart body:
R4: sc around both lobes (24)
R5: (2 sc, dec) ×6 (18)
R6: (sc, dec) ×6 (12)
R7: dec ×6 (6)
Shape the center dip with two small stitches between the lobes. Sew to tail tip.
Fasten off. Leave 20 cm tail.
Paw Pads and Toe Dots
Yarn: cream and coral pink — Source: Standard amigurumi math
Foot pads, make 2 in coral pink:
R1: 6 sc in MR (6)
R2: inc ×6 (12)
sl st to close (12)
Toe dots, make 10 in cream:
R1: 6 sc in MR (6)
sl st to close (6)
Front paw dots, make 4 in cream:
R1: 6 sc in MR (6)
sl st to close (6)
Flatten all dots. Sew 3 toe dots above each back foot pad and 2 dots on each front paw.
Fasten off. Leave 10 cm tails for sewing.
Assembly
- Sew the head to the body with the face centered over the cream belly patch line.
- Add extra stuffing into the neck before closing the final third of the head-body seam.
- Sew the snout between the eyes, then embroider two nostrils with two short vertical stitches.
- Sew cheek patches under the eyes, matching left and right height before knotting.
- Attach horns between R4 and R7 of the head, 5 stitches apart.
- Attach ears behind the horns, tilted outward by about 20 degrees.
- Sew the crest bumps down the head center line, starting between the horns.
- Sew arms to the upper body and back legs to the lower sides in a seated pose.
- Attach wings to the back between body R7 and R12, then sew the tail at the lower back.
- Add the heart tail tip, belly patch edge stitches, paw pads, toe dots, brows, and mouth.
The finished piece is a seated peach baby dragon with wings, horns, cheeks, and a heart tail tip.
7 Technical Tips
- Eye placement failure mode: cross-eyed face. Place both 12 mm safety eyes before stuffing the head, between R10 and R11, with 8 stitches between posts.
- Neck collapse failure mode: head tipping forward. Pack a firm cylinder of stuffing into the top 2 cm of the body before sewing the head down.
- Wing curl failure mode: one wing cupping backward. Pin both wings flat for 10 minutes and sew through the top edge only, not through the whole membrane.
- Horn lean failure mode: horns pointing sideways. Sew each horn through all 12 stitches of its base, then add one anchor stitch from the inner horn wall into the head.
- Cheek mismatch failure mode: uneven expression. Count from each eye post to the cheek edge; both patches should begin 2 stitches away from the eye post.
- Invisible decrease gap failure mode: stuffing dots showing on the head. Use front-loop invisible decreases on R15, R17, R18, R19, and R20 of the head.
- Tail-heart twist failure mode: heart rotating after handling. Sew the heart to the tail with 6 anchor points: top left, top right, center dip, lower left, lower right, and bottom point.
Conclusion
Check the head before final assembly: eyes level, cheeks even, horns balanced, crest centered. That one inspection prevents most dragon errors. Next, pin the wings and tail together before sewing either piece, because the side view changes once the heart tail tip is attached. Save this dragon amigurumi crochet pattern to Pinterest for the stitch counts, then post the finished dragon on Instagram with a front and side photo. Use hashtag #PeachBabyDragon so the horn spacing, wing curve, and heart-tail choices are easy to compare. Will you keep the heart tail tip, or change this baby dragon to a pointed tail barb?









