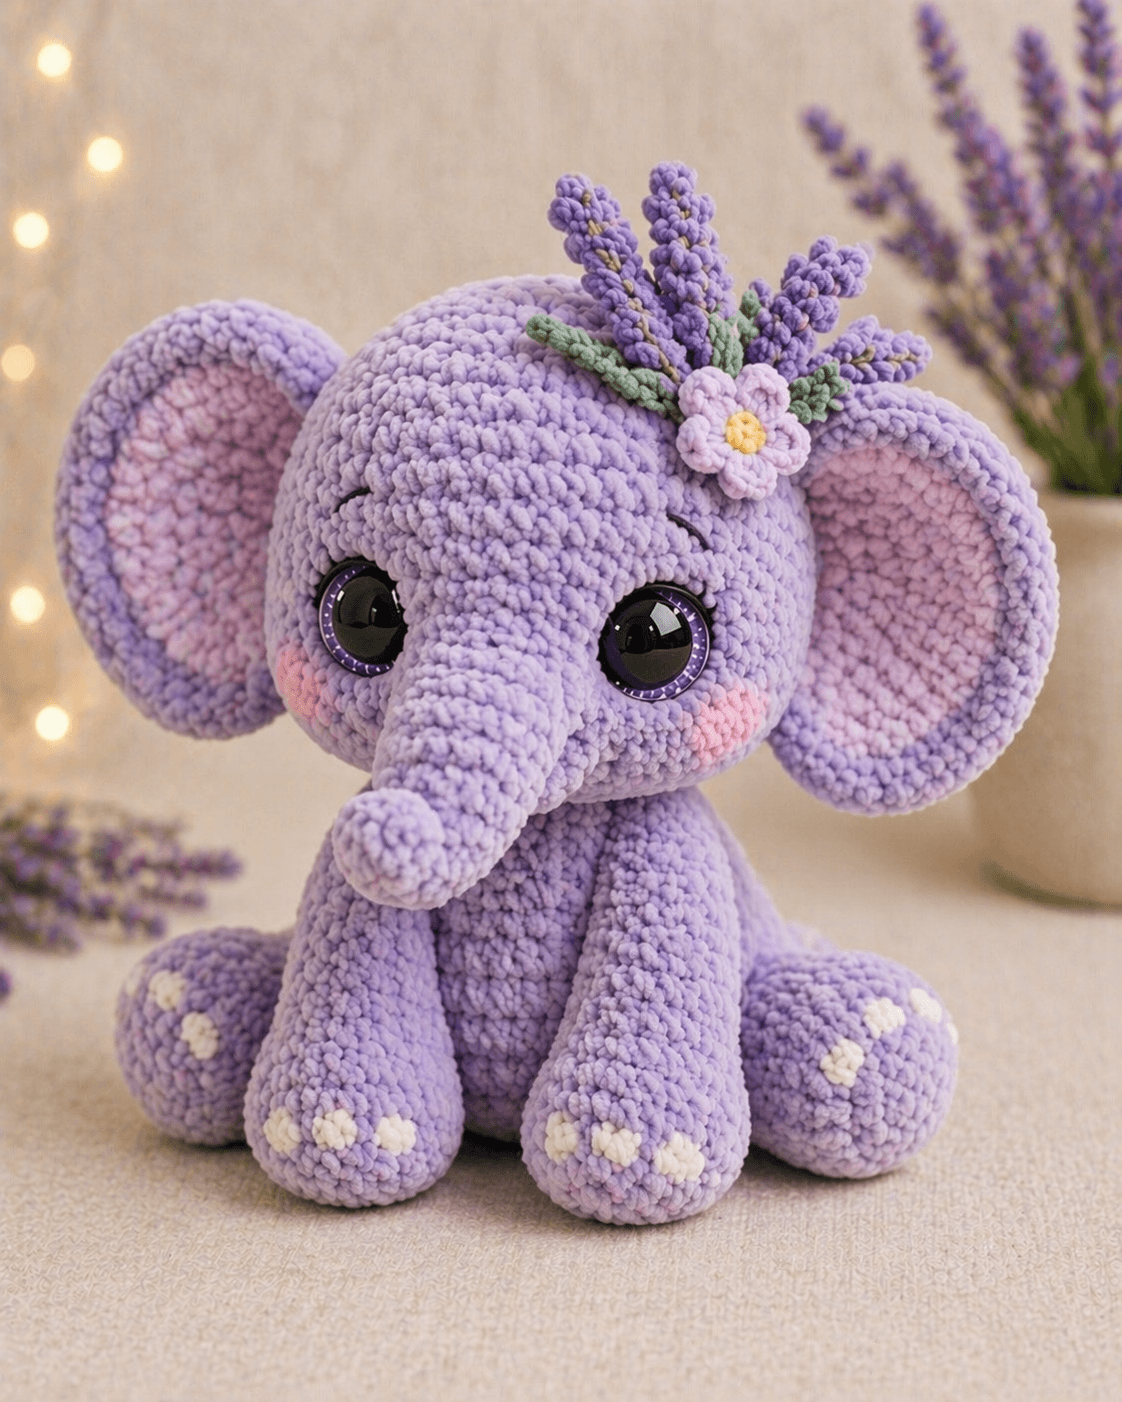
An elephant head looks wrong the moment the trunk starts too low. This elephant amigurumi crochet pattern uses super bulky chenille, a 4.5 mm hook, and a seated 22–25 cm profile to keep the face balanced. You will work it at an easy-intermediate level with separate ears, trunk, limbs, cheeks, and a floral crown. The toy suits shelf display, nursery decor, or photo props.
The Design: What Makes This Elephant Different
The trunk needs a high root and a narrow taper, or the whole face starts to read as another animal. You place the attachment just under the eye line so the forehead keeps more volume than the muzzle. Oversized ears matter too. They widen the silhouette, balance the trunk length, and make the seated shape read clearly from the front. A chenille elephant amigurumi also benefits from squat back legs set slightly forward; that shift stops the toy from pitching backward once the head is stuffed. Many standard results show a grey plush elephant crochet pattern, but fewer explain how eye size changes once the yarn jumps to super bulky. The common maker error is simple: trunk stuffed too hard, ears sewn too low, head profile flattened.
Project Info at a Glance
| Skill Level | Time | Finished Size | Hook | Best For |
|---|---|---|---|---|
| Easy-intermediate | 6–8 hours | 22–25 cm sitting | 4.5 mm | Display plush, nursery shelf, baby gift |
Materials and Tools
Yarn
- Lavender — super bulky chenille (#6) — 105–150 g — Premier Parfait Chunky or Himalaya Dolphin Baby
- Blush pink — chenille or velvet scrap — 10–15 g — inner ears and cheeks
- White — DK or chenille scrap — 5 g — toe spots
- Sage green — DK cotton — small amount — leaves
- Purple — DK cotton — small amount — lavender sprigs
- Lilac — DK cotton — small amount — flower petals
- Yellow — DK cotton — scrap — flower center
Tools
- Hook 4.5 mm
- Hook 2.5 mm for the floral topper
- 18–20 mm safety eyes
- Polyester stuffing
- Tapestry needle
- Stitch markers
- Pins
Abbreviations
MR = magic ring; sc = single crochet; inc = increase; dec = decrease; sl st = slip stitch; ch = chain; BLO = back loop only; FO = fasten off.
Invisible decrease is worked through the front loops only so chenille gaps stay smaller on visible shaping rounds.
Pattern — Step by Step
Continuous spiral unless noted.
Head
Yarn: lavender chenille
- R1: 6 sc in MR (6)
- R2: inc ×6 (12)
- R3: (sc, inc) ×6 (18)
- R4: (sc 2, inc) ×6 (24)
- R5: (sc 3, inc) ×6 (30)
- R6: (sc 4, inc) ×6 (36)
- R7: (sc 5, inc) ×6 (42)
- R8: sc around (42)
- R9: sc around (42)
- R10: sc around (42)
- R11: sc around (42)
- R12: sc around (42)
- R13: sc around (42)
- R14: sc around (42)
- R15: (sc 5, dec) ×6 (36)
- R16: sc around (36)
- R17: (sc 4, dec) ×6 (30)
- R18: (sc 3, dec) ×6 (24)
- R19: (sc 2, dec) ×6 (18)
- R20: (sc, dec) ×6 (12)
- R21: dec ×6 (6)
Insert eyes between R10 and R11, about 12 sts apart. Stuff after R15 and keep the forehead firmer than the lower face.
Fasten off. Leave a 35 cm tail.
Body
Yarn: lavender chenille
- R1: 6 sc in MR (6)
- R2: inc ×6 (12)
- R3: (sc, inc) ×6 (18)
- R4: (sc 2, inc) ×6 (24)
- R5: (sc 3, inc) ×6 (30)
- R6: (sc 4, inc) ×6 (36)
- R7: sc around (36)
- R8: sc around (36)
- R9: sc around (36)
- R10: sc around (36)
- R11: (sc 4, dec) ×6 (30)
- R12: sc around (30)
- R13: sc around (30)
- R14: sc around (30)
- R15: (sc 3, dec) ×6 (24)
- R16: sc around (24)
- R17: (sc 2, dec) ×6 (18)
- R18: (sc, dec) ×6 (12)
- R19: dec ×6 (6)
Stuff the lower body firm. Keep the upper third slightly lighter so the neck seam stays flat.
Fasten off. Leave a 35 cm tail.
Front Legs (Make 2)
Yarn: lavender chenille
- R1: 6 sc in MR (6)
- R2: inc ×6 (12)
- R3: (sc, inc) ×6 (18)
- R4: sc around (18)
- R5: sc around (18)
- R6: sc around (18)
- R7: sc around (18)
- R8: sc around (18)
- R9: sc around (18)
- R10: (sc, dec) ×6 (12)
- R11: sc around (12)
- R12: sc around (12)
- R13: sc around (12)
- R14: sc around (12)
- R15: sc around (12)
Stuff the foot and lower half only. Flatten the top opening when sewing so the leg points forward instead of outward.
Fasten off. Leave a 25 cm tail.
Back Legs (Make 2)
Yarn: lavender chenille
- R1: 6 sc in MR (6)
- R2: inc ×6 (12)
- R3: (sc, inc) ×6 (18)
- R4: (sc 2, inc) ×6 (24)
- R5: sc around (24)
- R6: sc around (24)
- R7: sc around (24)
- R8: (sc 2, dec) ×6 (18)
- R9: sc around (18)
- R10: sc around (18)
- R11: (sc, dec) ×6 (12)
- R12: sc around (12)
Stuff these firmer than the front legs. Their job is to prop the seated angle from behind.
Fasten off. Leave a 25 cm tail.
Outer Ears (Make 2)
Yarn: lavender chenille
- R1: 6 sc in MR (6)
- R2: inc ×6 (12)
- R3: (sc, inc) ×6 (18)
- R4: (sc 2, inc) ×6 (24)
- R5: (sc 3, inc) ×6 (30)
- R6: (sc 4, inc) ×6 (36)
- R7: (sc 5, inc) ×6 (42)
- R8: sc around (42)
Do not stuff. Chenille ears hold shape once lightly cupped at the base.
Fasten off. Leave a 30 cm tail.
Inner Ears (Make 2)
Yarn: blush pink chenille or velvet
- R1: 6 sc in MR (6)
- R2: inc ×6 (12)
- R3: (sc, inc) ×6 (18)
- R4: (sc 2, inc) ×6 (24)
- R5: (sc 3, inc) ×6 (30)
- R6: (sc 4, inc) ×6 (36)
Center each inner ear on an outer ear and stitch it down before final head assembly.
Fasten off. Leave a 20 cm tail.
Trunk
Yarn: lavender chenille
- R1: 6 sc in MR (6)
- R2: inc ×6 (12)
- R3: sc around (12)
- R4: sc around (12)
- R5: (sc, inc) ×6 (18)
- R6: sc around (18)
- R7: sc around (18)
- R8: (sc 2, inc) ×6 (24)
- R9: sc around (24)
- R10: sc around (24)
- R11: (sc 3, inc) ×6 (30)
- R12: sc around (30)
- R13: sc around (30)
Stuff only the lower half and tip. Keep the face end soft enough to bend around the head curve.
Fasten off. Leave a 35 cm tail.
Cheek Patches (Make 2)
Yarn: blush pink velvet or chenille scrap
- R1: 6 sc in MR (6)
- R2: inc ×6 (12)
Leave these flat. A full sphere reads as a muzzle, not a blush patch.
Fasten off. Leave a 15 cm tail.
Toe Spots (Make 12)
Yarn: white scrap
- R1: 6 sc in MR (6)
Make three for each visible foot surface. Use a smaller hook if the circles spread too wide.
Fasten off. Leave a 10 cm tail.
Lavender Sprigs (Make 5)
Yarn: purple DK cotton
- Row 1: ch 8
- Row 2: starting in 2nd ch from hook, (sl st, ch 3, sl st in same ch) in each of next 5 ch, sl st in last 2 ch (7)
Each sprig should stay narrow. Pull the picot loops small so the stem does not twist.
Fasten off. Leave an 18 cm tail.
Leaves (Make 3)
Yarn: sage green DK cotton
- Row 1: ch 6
- Row 2: starting in 2nd ch from hook, sl st, sc, hdc, sc, sl st (5)
Pinch the base when sewing so the leaf angles upward instead of lying flat.
Fasten off. Leave a 15 cm tail.
Flower (Make 1)
Yarn: yellow center, lilac petals
- R1: with yellow, 6 sc in MR (6)
- R2: change to lilac, (sl st, ch 2, 2 dc, ch 2, sl st) in next st ×6 (6 petals)
Keep the center compact. Wide petals overpower the sprigs on a small head cluster.
Fasten off. Leave a 20 cm tail.
Assembly
- Sew the head to the body, centering the face over the body’s front midpoint.
- Attach the trunk to the middle of the face so the top edge sits just below the eye line.
- Sew the cheek patches under the eyes, one on each side of the trunk base.
- Add the outer ears with the inner ears already attached, placing the top edge about two rounds above the eyes.
- Sew the front legs to the lower front of the body, close enough to frame the belly but not touch.
- Attach the back legs slightly out to the sides and a little forward so the plush sits without rocking.
- Sew three toe spots to each foot surface visible from the front and sides.
- Embroider the curved lash lines above both eyes with fine black yarn.
- Stitch the lavender sprigs, leaves, and flower into one cluster and sew it to the upper right side of the head.
- Weave in all tails inside the head or body, then press the plush onto a flat surface and adjust leg angle if needed.
After the last tail is buried, the elephant should sit upright with the trunk centered and the ears clear of the shoulder line.
7 Technical Tips
- Front-center drift is common once the head passes round 10. Keep one marker at round start and a second temporary marker on the face centerline so the trunk lands exactly between the cheeks.
- Base collapse happens when the lower body is packed the same way as the neck. Fill the bottom third firm, then reduce stuffing above round 14 so the toy sits instead of buckling.
- Decrease gaps show quickly in chenille on visible shaping rounds. Work every face-side dec as an invisible decrease, especially from head round 15 onward.
- Eye timing matters more with plush yarn than with cotton. Install 18–20 mm eyes before the head is more than half stuffed, or the posts become hard to seat cleanly.
- Pile stripping is a real failure mode with repeated frogging. If the chenille core starts to show, cut a fresh length and rework only that area instead of pulling the same strand again.
- Ear placement error changes the animal read immediately. Pin each ear so its top edge starts about two rounds above the eye line and check both side views before sewing.
- Tail security fails when chenille ends are cut short. Leave at least 25 cm on the trunk and ears, then bury each tail through three direction changes inside the head.
Conclusion
Next comes finishing, not redesign. Sew the parts in the order above, check the trunk line from both side views, and pin the floral cluster only after the ears are fixed. That sequence keeps this elephant amigurumi crochet pattern balanced instead of top-heavy. Post one front view and one side view to Pinterest and Instagram so other makers can compare ear height, trunk curl, and foot spacing. Use #LavenderElephantPattern when you share the finished plush. Then test the sit on a flat surface and adjust the back-leg angle if needed. Did you keep the trunk tip low and rounded, or did you tack it upward for a stronger curl?









