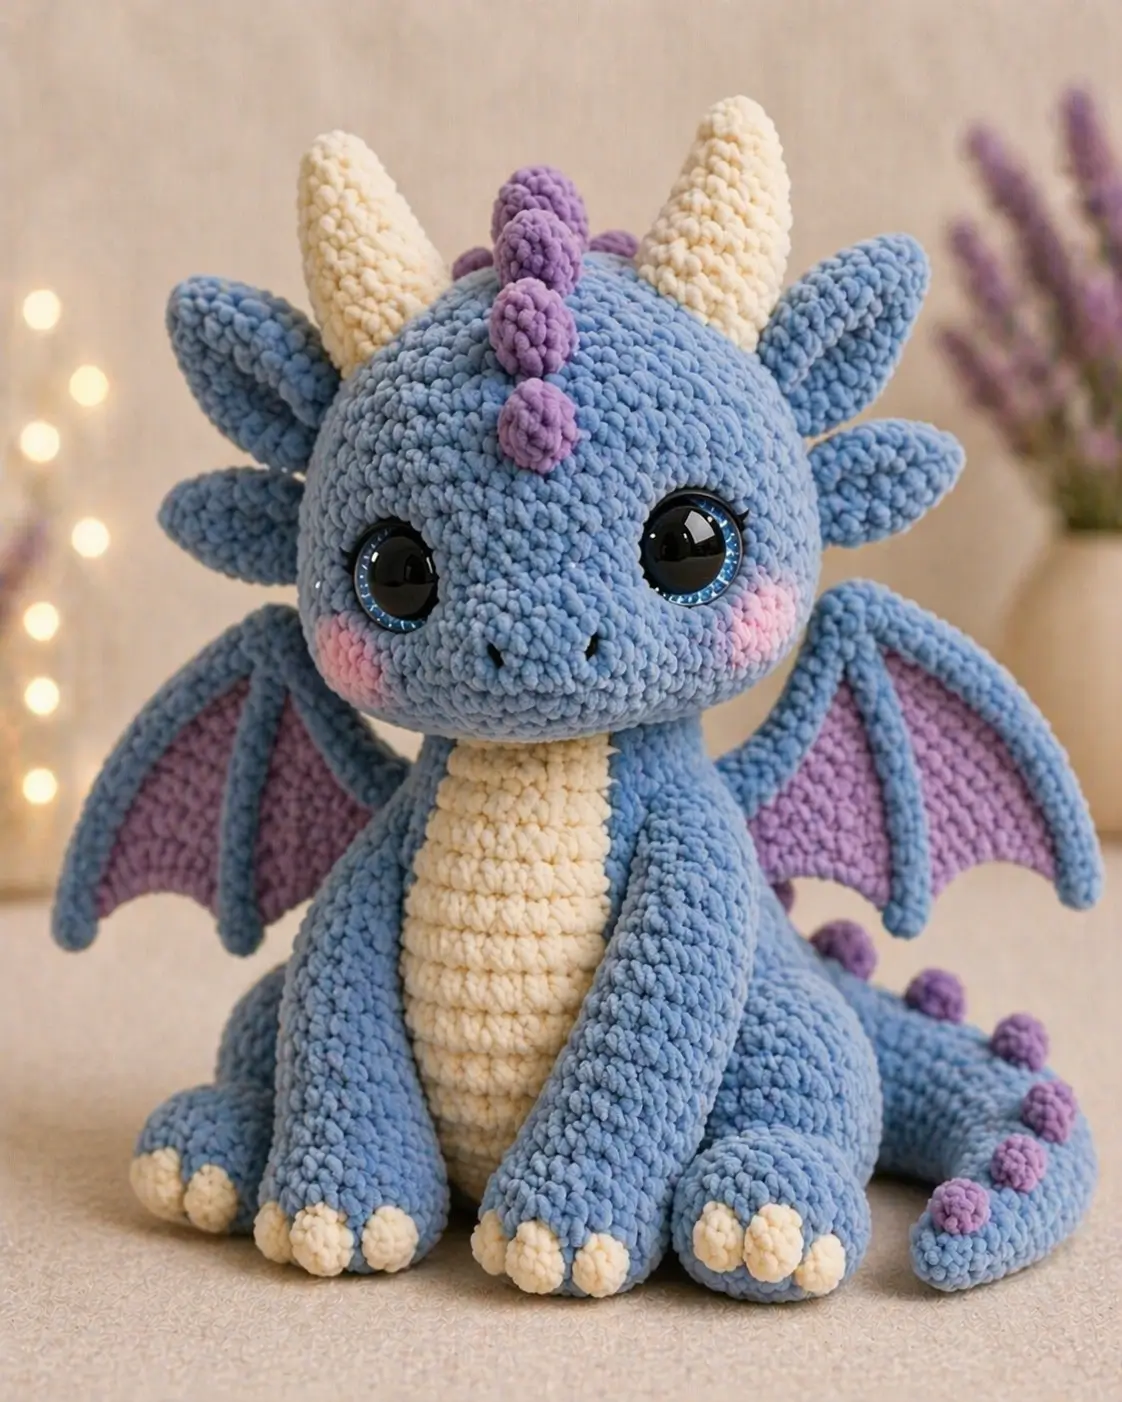
Baby dragons need room for horns, wing roots, and a spiked tail before they read as dragons at all. This dragon amigurumi crochet pattern uses super bulky chenille, a 4.5 mm hook, and an intermediate build to produce a sitting plush of about 23 cm. Make one when you need a shelf mascot that stays upright, photographs cleanly, and hides seam lines inside dense texture. Source
The Design: What Makes This Dragon Different
This reference dragon depends on four structural choices. First, you need an oversized head, because the horns, side fins, cheek patches, and eyes all compete for space on one sphere. The dragon reads correctly only when that sphere stays broad. Second, the snout works better as a separate padded cup than as surface embroidery, since the nostrils need forward projection. Third, the wings sit high, not low, so the sitting dragon amigurumi keeps its front-facing silhouette instead of widening at the shoulder line. Fourth, the back details are rounded bumps rather than sharp scales, which suits chenille and avoids twist. A common mistake in a plush dragon crochet pattern is crowding the horns outward and dropping the wings too far down the body; that shortens the neck visually and weakens the profile.
Project Info at a Glance
| Skill Level | Time | Finished Size | Hook | Best For |
|---|---|---|---|---|
| Intermediate | Not stated in accessible source set | 23 cm seated | 4.5 mm | Craft fairs / gifts |
Materials and Tools
Yarn
- Dusty blue — super bulky chenille — 110 g benchmark — Premier Parfait Chunky or similar
- Cream — super bulky chenille — about 25 g working estimate — same yarn family
- Lavender — super bulky chenille — about 20 g working estimate — same yarn family
- Blush pink — super bulky chenille — about 5 g working estimate — same yarn family
Tools
- Hook 4.5 mm
- 14 mm safety eyes
- Polyfill stuffing
- Tapestry needle
- Stitch markers
- Sewing pins
- Optional blue felt or eye washers for the photo-style iris effect
The 110 g main-yarn figure and 10 g accent figure come from a current super bulky sitting dragon listing. The cream, lavender, and blush amounts are drafting estimates based on the uploaded photo, because the accessible listings do not break this exact palette into separate verified weights. Source
Abbreviations
- MR = magic ring
- sc = single crochet
- inc = increase
- dec = decrease
- sl st = slip stitch
- ch = chain
- BLO = back loop only
- FO = fasten off
Work invisible decreases through the front loops only; chenille shows full-loop decreases as open seams much faster than smooth cotton does.
Pattern — Step by Step
Continuous spiral unless noted.
Drafting note: The instructions below are an original photo-matched draft, not a transcription of any published paid pattern. Verified external sources were used only for size, yarn class, eye range, and common dragon construction references. Source
Head (Make 1)
Yarn: dusty blue — Source: Standard amigurumi math
R1: 6 sc in MR (6)
R2: inc x6 (12)
R3: (sc, inc) x6 (18)
R4: (2 sc, inc) x6 (24)
R5: (3 sc, inc) x6 (30)
R6: (4 sc, inc) x6 (36)
R7: (5 sc, inc) x6 (42)
R8: sc around (42)
R9: sc around (42)
R10: sc around (42)
R11: sc around (42)
R12: sc around (42)
R13: sc around (42)
R14: sc around (42)
Insert safety eyes between R11 and R12, 10 stitches apart.
R15: (5 sc, dec) x6 (36)
R16: (4 sc, dec) x6 (30)
R17: (3 sc, dec) x6 (24)
Stuff firmly, especially above the snout line.
R18: (2 sc, dec) x6 (18)
R19: (sc, dec) x6 (12)
R20: dec x6 (6)
Fasten off. Leave 20 cm tail.
Snout (Make 1)
Yarn: dusty blue — Source: Standard amigurumi math
R1: 6 sc in MR (6)
R2: inc x6 (12)
R3: (sc, inc) x6 (18)
R4: sc around (18)
R5: sc around (18)
R6: (sc, dec) x6 (12)
Stuff lightly so the snout stays rounded, not hard.
Fasten off. Leave 20 cm tail.
Body (Make 1)
Yarn: dusty blue — Source: Standard amigurumi math
R1: 6 sc in MR (6)
R2: inc x6 (12)
R3: (sc, inc) x6 (18)
R4: (2 sc, inc) x6 (24)
R5: (3 sc, inc) x6 (30)
R6: (4 sc, inc) x6 (36)
R7: (5 sc, inc) x6 (42)
R8: sc around (42)
R9: sc around (42)
R10: sc around (42)
R11: sc around (42)
R12: (5 sc, dec) x6 (36)
R13: sc around (36)
R14: sc around (36)
R15: sc around (36)
R16: (4 sc, dec) x6 (30)
R17: sc around (30)
R18: sc around (30)
R19: (3 sc, dec) x6 (24)
R20: sc around (24)
R21: (2 sc, dec) x6 (18)
R22: sc around (18)
Stuff the base firm. Keep the neck section softer so head attachment stays controlled.
Fasten off. Leave 25 cm tail.
Belly Panel (Make 1)
Yarn: cream — Source: Standard amigurumi math
Row 1: ch 5, sc in 2nd ch from hook and across (4)
Row 2: ch 1, turn, inc, sc 2, inc (6)
Row 3: ch 1, turn, inc, sc 4, inc (8)
Row 4: ch 1, turn, inc, sc 6, inc (10)
Row 5: ch 1, turn, inc, sc 8, inc (12)
Row 6: ch 1, turn, sc across (12)
Row 7: ch 1, turn, sc across (12)
Row 8: ch 1, turn, sc across (12)
Row 9: ch 1, turn, sc across (12)
Row 10: ch 1, turn, sc across (12)
Row 11: ch 1, turn, sc across (12)
Row 12: ch 1, turn, sc across (12)
Row 13: ch 1, turn, dec, sc 8, dec (10)
Row 14: ch 1, turn, dec, sc 6, dec (8)
Row 15: ch 1, turn, sc across (8)
Fasten off. Leave 25 cm tail.
Front Legs (Make 2)
Yarn: cream + dusty blue — Source: Standard amigurumi math
R1: 6 sc in MR with cream (6)
R2: inc x6 (12)
R3: BLO, sc around (12)
Change to dusty blue at end of round.
R4: sc around (12)
R5: sc around (12)
R6: (4 sc, dec) x2 (10)
R7: sc around (10)
R8: sc around (10)
R9: sc around (10)
R10: sc around (10)
R11: sc around (10)
R12: sc around (10)
R13: flatten opening and sc 5 through both layers (5)
Stuff only the foot and lower half. Keep the upper arm soft so it hangs forward.
Fasten off. Leave 25 cm tail.
Back Legs (Make 2)
Yarn: cream + dusty blue — Source: Standard amigurumi math
R1: 6 sc in MR with cream (6)
R2: inc x6 (12)
R3: BLO, sc around (12)
Change to dusty blue at end of round.
R4: sc around (12)
R5: sc around (12)
R6: sc around (12)
R7: (4 sc, dec) x2 (10)
R8: sc around (10)
R9: sc around (10)
R10: flatten opening and sc 5 through both layers (5)
Stuff firmly at the foot only. The top seam should stay flat for sewing.
Fasten off. Leave 20 cm tail.
Horns (Make 2)
Yarn: cream — Source: Standard amigurumi math
R1: 6 sc in MR (6)
R2: sc around (6)
R3: (2 sc, inc) x2 (8)
R4: sc around (8)
R5: sc around (8)
R6: sc around (8)
Fasten off. Leave 18 cm tail.
Side Fins (Make 6)
Yarn: dusty blue — Source: Standard amigurumi math
Row 1: ch 2, 1 sc in 2nd ch from hook (1)
Row 2: ch 1, turn, inc (2)
Row 3: ch 1, turn, sc, inc (3)
Row 4: ch 1, turn, sc 2, inc (4)
Row 5: ch 1, turn, sc 3, inc (5)
Row 6: ch 1, turn, dec, sc, dec (3)
Row 7: ch 1, turn, dec, sc (2)
Row 8: ch 1, turn, dec (1)
Fasten off. Leave 12 cm tail.
Wings Outer Frames (Make 2)
Yarn: dusty blue — Source: Standard amigurumi math; wing row logic compared against current free dragon wing tutorials. Source
Row 1: ch 11, sc in 2nd ch from hook and across (10)
Row 2: ch 1, turn, dec, sc 6, dec (8)
Row 3: ch 1, turn, sc across (8)
Row 4: ch 1, turn, dec, sc 4, dec (6)
Row 5: ch 1, turn, sc across (6)
Row 6: ch 1, turn, dec, sc 2, dec (4)
Row 7: ch 1, turn, sc across (4)
Fasten off. Leave 25 cm tail.
Wing Membranes (Make 2)
Yarn: lavender — Source: Standard amigurumi math
Row 1: ch 9, sc in 2nd ch from hook and across (8)
Row 2: ch 1, turn, dec, sc 4, dec (6)
Row 3: ch 1, turn, sc across (6)
Row 4: ch 1, turn, dec, sc 2, dec (4)
Row 5: ch 1, turn, sc across (4)
Fasten off. Leave 20 cm tail.
Tail (Make 1)
Yarn: dusty blue — Source: Standard amigurumi math
R1: 6 sc in MR (6)
R2: sc around (6)
R3: inc x6 (12)
R4: sc around (12)
R5: sc around (12)
R6: sc around (12)
R7: sc around (12)
R8: sc around (12)
R9: (sc, inc) x6 (18)
R10: sc around (18)
R11: sc around (18)
R12: sc around (18)
R13: sc around (18)
R14: sc around (18)
R15: sc around (18)
R16: flatten opening and sc 9 through both layers (9)
Stuff lightly through the middle and more firmly near the base.
Fasten off. Leave 25 cm tail.
Spine Bumps (Make 9)
Yarn: lavender — Source: Standard amigurumi math
R1: 6 sc in MR (6)
R2: inc x6 (12)
R3: dec x6 (6)
Do not stuff. Flatten slightly before sewing.
Fasten off. Leave 12 cm tail.
Cheek Patches (Make 2)
Yarn: blush pink — Source: Standard amigurumi math
R1: 6 sc in MR (6)
R2: inc x6 (12)
R3: sl st in next st (12)
Fasten off. Leave 15 cm tail.
Assembly
- Sew the snout to the lower center of the head so the top edge sits roughly between rounds 10 and 14.
- Embroider two nostrils on the snout, two stitches apart, with dark thread or darker blue yarn.
- Attach the cheek patches under the eyes, offset one stitch toward the outer face on each side.
- Sew the horns to the top of the head, about 7 stitches apart, angled slightly outward rather than straight up.
- Add three side fins to each side of the head, graduating from largest near the eye line to smallest toward the back.
- Join the head to the body at the neck opening and add extra stuffing to the join before closing the seam.
- Sew the belly panel from the chin line down the center front of the body; keep it flat and do not stretch it wider than the cream section in the photo.
- Attach the front legs along the front body curve so the feet sit slightly ahead of the belly panel, then sew the back legs low and wide for sitting support.
- Stitch the lavender membranes onto the dusty blue outer wings, then sew the finished wings high on the back with a slight rearward angle.
- Sew the tail low on the back, then attach three spine bumps on the forehead and six more down the tail line.
The completed dragon should sit on four feet with the tail acting as a rear counterweight.
7 Technical Tips
- Marker drift: Put a marker in the first stitch of every round, not every other round. Chenille hides the spiral line, and a one-stitch drift will throw horn spacing off by several millimeters.
- Head firmness: Stuff the head until a thumb press springs back instead of denting. Underfilled heads sag under horn weight and pull the safety eyes downward.
- Invisible decreases: Work all facial decreases invisibly. Standard decreases leave open V-shaped scars that become obvious beside 14 mm to 20 mm eyes.
- Eye timing: Install the eyes before round closure tightens past the halfway point. For this head, placing them around rounds 11–12 keeps the cheeks below the eye line instead of beside it.
- Wing angle: Pin both wings before sewing and compare them from the front. A difference of even 5 mm at the top edge makes one wing read higher and the dragon look twisted.
- Stuffing control in limbs: Pack the feet hard and the upper limbs soft. Full stuffing all the way through the arm creates a pipe shape instead of the photo’s relaxed front-leg drop.
- Tail weaving: Run chenille tails through at least three direction changes inside the body. Short buried ends shed fast, especially where the tail seam takes the dragon’s sitting load.
Conclusion
This dragon amigurumi crochet pattern works best when you finish the head, test the wing angle with pins, and lock the tail seam only after the body sits flat on the table. Next, photograph the front, side, and back before gifting or listing it, because this design changes noticeably with horn tilt and wing height. Post a vertical process collage to Pinterest, then share a seated front view on Instagram so the cheek patches, side fins, and wing membranes read clearly. Tag the result with #SkyDriftDragon. When you make your version, did you keep all six side fins from the reference dragon, or did you reduce that crown to four?









