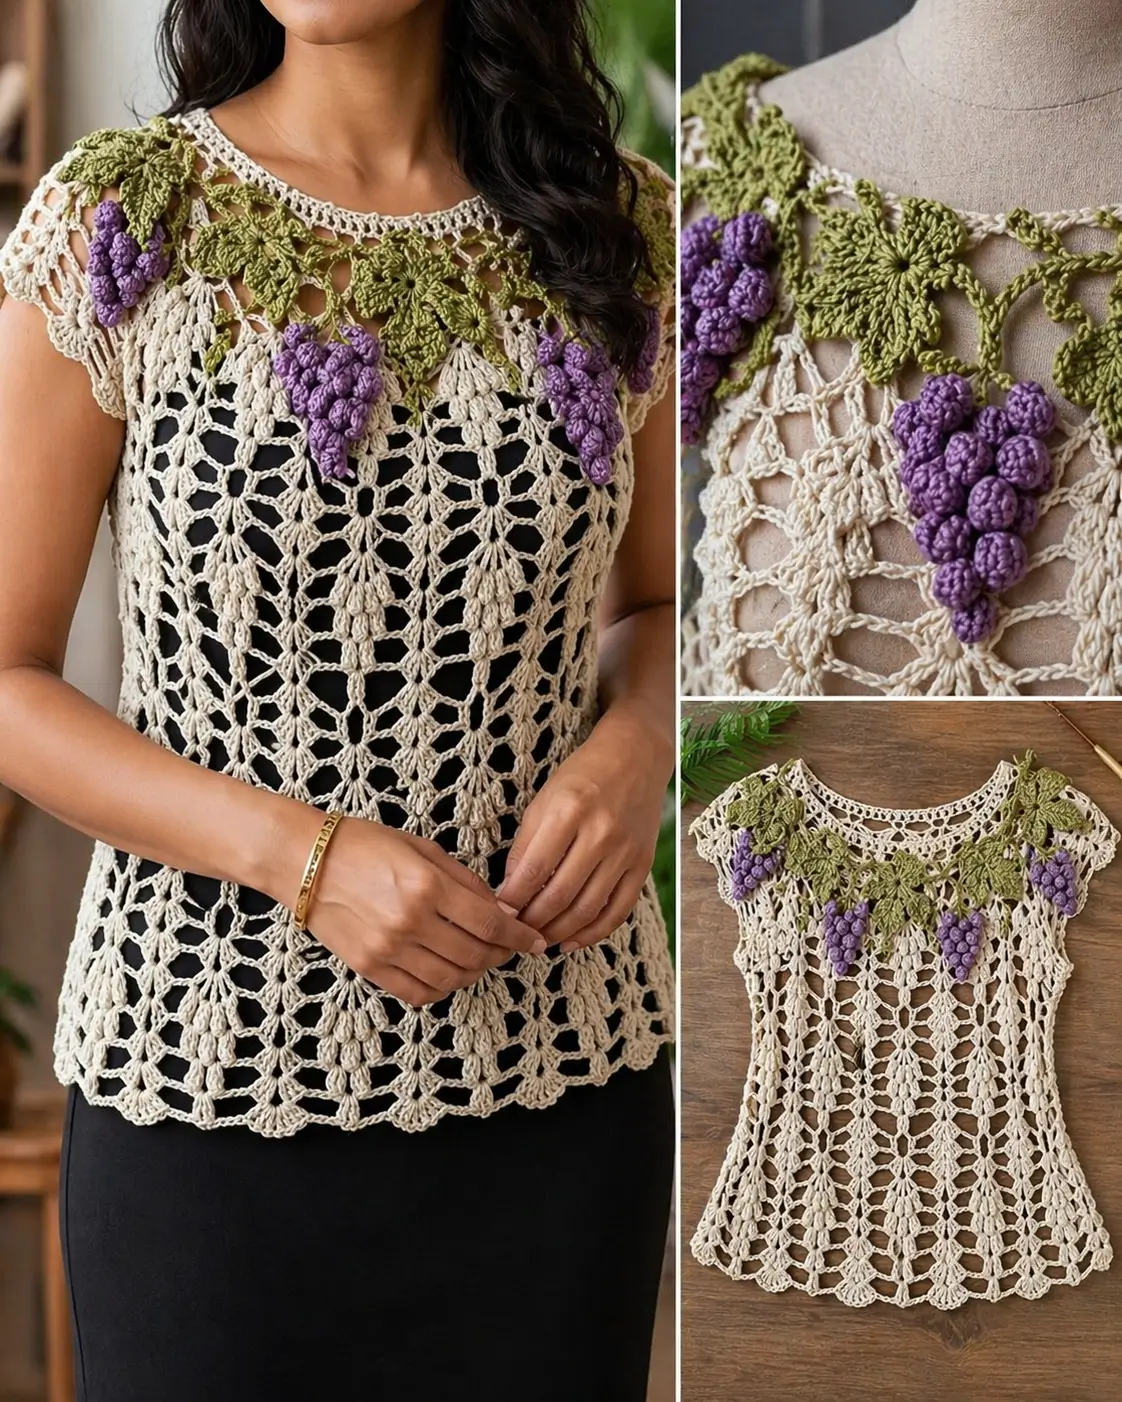
Grape clusters pull downward by weight, so the neckline has to carry decoration without dropping into the mesh. This grapevine crochet top pattern uses fine cotton, a 3 mm hook, and separate leaf-and-cluster motifs to build an intermediate lace blouse around a comparable 94 cm bust sample. It works as a breathable layer over a camisole, fitted tank, or slip dress.
The Design: What Makes This Grapevine Top Different
A grape-themed neckline fails fast when the motifs are treated as decoration only. Here, the leaves need to act like a visual yoke, spreading the load across the collar edge rather than hanging from a single center point. That is why this reconstruction uses a stable mesh body first, then adds the grape motifs in a controlled sequence. Irish-crochet construction follows the same broad logic: motifs first, mesh as the linking structure. A second structural choice is the short cap sleeve. Anything deeper would compete with the leaf line and pull the neckline outward. Third, the body stays open and vertical, not dense, because the grape clusters already supply the visual mass. The usual failure in a crochet grape blouse is overloading the top edge; an Irish crochet grape top still needs restraint at the neckline.
Project Info at a Glance
| Skill Level | Time | Finished Size | Hook | Best For |
|---|---|---|---|---|
| Intermediate | 18–24 hrs | 94 cm bust sample | 3.0 mm | Layering over a camisole or dress |
The size, yarn, and hook above come from comparable adult blouse tutorials and adjacent lace-top listings rather than a verified original chart for this exact photo.
Materials and Tools
Comparable grape-stitch blouse tutorials point to fine cotton thread, a 3 mm hook, and roughly 210–320 g for large adult samples. Separate grape applique references also support purple and green cotton remnants for the motif work.
Yarn
- Ecru cotton crochet thread — fine cotton / crochet thread — 210–320 g — try a mercerized cotton with crisp stitch definition
- Olive green cotton — same weight — small remnant — for leaves and vine joins
- Purple cotton — same weight — small remnant — for grape clusters
Tools
- Hook 3.0 mm
- Tapestry needle
- Locking stitch markers
- Lightweight blocking mats
- Steam or wet blocking setup
- Optional support thread for the back neckline
Abbreviations
MR = magic ring
ch = chain
sc = single crochet
sl st = slip stitch
hdc = half double crochet
dc = double crochet
tr = treble crochet
sp = space
rep = repeat
RS = right side
WS = wrong side
If you choose stuffed micro-grapes instead of popcorn grapes, make the invisible decrease through the front loops only so the bead closes without a visible notch.
Pattern — Photo-Inspired Reconstruction
Construction note: the exact chart cannot be verified from the image alone. The instructions below rebuild the blouse from the visible structure: open vertical mesh body, scalloped hem, cap sleeves, leaf yoke, and hanging grape clusters.
Gauge and Size Formula
Work one swatch over 10 cm x 10 cm in your body mesh before starting the blouse. After blocking, aim for a fabric that stays open but does not slump under the weight of the motifs.
For the sample shown here:
- Bust target: 94 cm
- Body panels: front and back, each about 47 cm wide after blocking
- Length target: 58–60 cm from shoulder to hem
- Motif count: 8 to 10 leaves, 5 grape clusters
Add or remove one full body repeat per panel to change width. Add rows to change length. Keep the neckline motif count proportional; once the body grows, the yoke needs more spread, not just larger clusters.
Back Panel
- Ch a length that gives you 12 body repeats across after blocking. For the sample, start with a chain that finishes close to 47 cm wide.
- Work 1 base row of sc across to stabilize the edge.
- Set up an open mesh row using evenly spaced arches across the panel.
- On the next row, place a shell or fan in alternating arches so vertical columns begin to appear.
- Return to mesh on the following row.
- Repeat those two texture rows until the panel measures 44 cm from the lower edge.
- Continue straight for the upper back until total height reaches 50 cm.
- Shape a shallow back neck by leaving the center 20 cm unworked and finishing each shoulder separately for the final 4 cm.
- Fasten off. Block the panel flat before joining.
Front Panel
- Match the back width exactly.
- Work the same body mesh and vertical fan sequence until the front reaches 44 cm.
- Mark the center 24 cm for the neckline opening.
- Finish each shoulder separately, decreasing one mesh arch at the neck edge every other row 3 times.
- Work shoulders until they match the back shoulder depth.
- Fasten off.
- Block the panel flat and compare shoulder widths before seaming.
Shoulder Join
- Place front and back RS together.
- Seam each shoulder over 8–9 cm.
- Leave the center neck opening fully clear.
- Press the seams flat with light steam through a cloth if your yarn tolerates it.
Side Seams
- Mark armhole depth at 20–22 cm from the shoulder.
- Seam each side from the hem upward to that marker.
- Leave the remaining opening for the cap sleeve edging.
- Try the blouse on before weaving the last seam tails.
Neckline Edge
- Join ecru yarn at the back neck.
- Work 1 round sc evenly around the full neckline.
- Work 1 round of small arches: ch 3, skip 2 sts, sc in next st around.
- Finish with 1 round picot trim: sc in arch, ch 3, sl st in first ch, sc in next arch around.
- Fasten off. This edge acts as the hidden support line for the motif band.
Cap Sleeves
- Join yarn at the underarm.
- Work 1 round sc evenly around the armhole.
- Work 2 rounds of open arches to create a short cap sleeve rather than a deep sleeve head.
- Add a final shell edge if you want a softer outline.
- Fasten off. Block both sleeves to the same depth.
Hem Edge
- Join yarn at a side seam.
- Work 1 round sc evenly around the lower edge.
- Work 1 round scallops: skip 2 sts, 7 dc in next st, skip 2 sts, sc in next st around.
- Work a light blocking pass so the scallops open and point downward.
Grape Leaf Motif (Make 8 to 10)
Yarn: olive green cotton
Rnd 1: 10 dc in MR, join with sl st. (10)
Rnd 2: sl st in next st, [sc, hdc, dc, ch 2, dc, hdc, sc] in next st; rep 5 times around. Join. (5 lobes)
Rnd 3: Sl st around each lobe to sharpen the outline if needed.
Fasten off. Leave a 20 cm tail for sewing.
Leaf note: Add a surface-sl-st center vein from the ring to each lobe tip if your yarn looks flat after blocking.
Vine Connector Strips (Make 3 to 5)
Yarn: olive green cotton
- Ch 18.
- Sl st in 2nd ch from hook and in each ch across.
- At one end, make 3 tendrils by repeating: ch 4, sl st in 2nd ch from hook, sl st in next 2 ch, sl st back into strip end.
- Fasten off. Leave 15 cm tails.
These strips sit behind the leaf line and help distribute the weight of the grape clusters.
Popcorn Grapes (Make 45 to 50)
Yarn: purple cotton
- Ch 2.
- Work 5 dc in the 2nd ch from hook.
- Drop loop, insert hook in first dc, pull dropped loop through to close the popcorn.
- Ch 1 and fasten off, leaving an 8 cm tail.
Make enough beads for 5 clusters of 9–10 grapes each.
Grape Cluster Assembly (Make 5)
- Thread a tapestry needle with one grape tail.
- Sew the beads into a tapered cluster in this order: 1 / 2 / 3 / 2 / 1.
- Add one extra bead at the lower point if you want a longer drop.
- Stitch through each bead twice so the cluster does not twist.
- Attach a short green stem at the top with 6–8 chains, then sl st back along the chain.
- Fasten off. Leave a long tail for joining to the neckline.
Neckline Garland Layout
- Lay the blouse flat.
- Place the leaves first, overlapping them slightly around the neckline.
- Keep the center front motifs balanced. In the photo, the decoration reads as a yoke, not a random applique scatter.
- Position the vine strips behind the leaves.
- Add one grape cluster near each shoulder and three across the front neckline.
- Check spacing before sewing. The clusters should hang free of the body mesh by at least 1.5 cm.
Joining the Motifs
- Sew each leaf to the neckline edge, not only to the mesh body.
- Anchor each vine strip at several points so the weight spreads across the yoke.
- Sew the grape clusters under the leaves and through the vine strip.
- Reinforce the back neckline with an inside line of matching cotton if the front begins to dip.
- Weave tails along existing stitch paths only. Do not cut them flush at the motif edge.
Assembly
- Block front and back panels separately.
- Join the shoulders.
- Close the side seams, leaving matched armholes.
- Work the neckline edge.
- Work both cap sleeves to the same depth.
- Add the lower hem scallops.
- Pin the leaves around the neckline and correct the spacing before sewing.
- Attach vine strips behind the leaf line.
- Sew the grape clusters under the leaves, keeping each cluster clear of the body mesh.
- Reinforce the inside back neck if the front edge drops, then weave in every tail and block once more.
The blouse is complete when the neckline sits level and the clusters hang vertically without dragging the front opening downward.
7 Technical Tips
- Mark every fourth body repeat. Losing one repeat in open mesh shifts the shoulder width by several centimeters and becomes obvious only after the side seams are closed.
- Weigh one finished grape cluster. Keep each cluster under about 6 g or the neckline will start to tilt forward after a few hours of wear.
- Block the panels before adding motifs. Motif placement on an unblocked body almost always drifts, and the leaf line ends up wider after washing.
- Leave at least 2 cm between cluster tops. Grapes packed too closely merge into one heavy mass and hide the leaf outlines.
- Anchor leaves to the neckline edge, not just the mesh. Open mesh can stretch under point load, while the neckline edging spreads the tension across more stitches.
- Test sleeve depth before final edging. A cap sleeve deeper than 6 cm competes with the leaf yoke and pulls the eye away from the motif band.
- Weave tails for 5 to 7 cm along dense stitches. Short tail burying inside open lace slips out faster because the mesh has fewer friction points.
Conclusion
This build works because the motifs are treated as structure, not garnish. Start with a blocked body panel, confirm the neckline sits flat, then add the leaves before the grape clusters. That order matters. Next, crochet one full leaf and one full cluster, pin them to a paper neckline curve, and check the spread before you touch the blouse itself. After that, post the finished yoke on Pinterest and Instagram with #GrapevineCrochetTop so the neckline layout is visible from a flat-lay angle as well as on-body. One question remains: would you keep five front clusters, or cut the center one to reduce the pull in this grapevine crochet top pattern?









