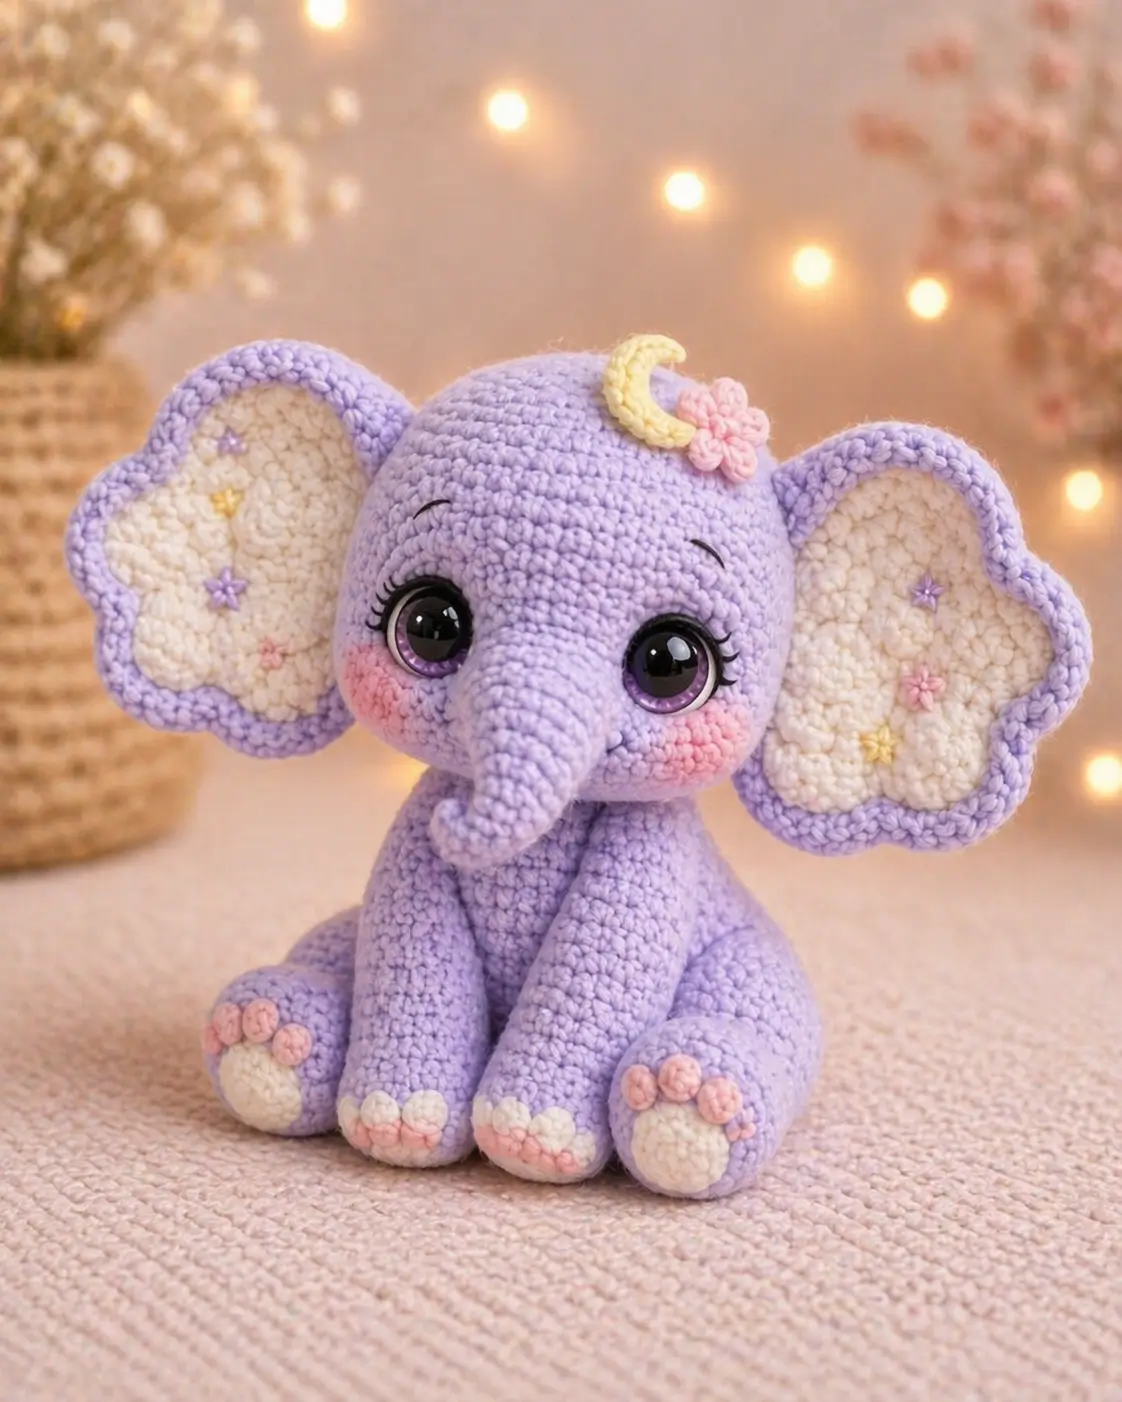
An elephant trunk cannot hang straight on a seated toy and still clear the front legs. This elephant amigurumi crochet pattern solves that with a narrow curved trunk, oversized layered ears, and a compact seated body. Work it in DK yarn with a 3.5 mm hook for a verified 8–9 in. / 20–23 cm finish at intermediate level. It fits nursery shelves and baby-gift boxes without a stand.
The Design: What Makes This Elephant Different
You need the trunk to read clearly from the front, but the toy also has to sit without the tip crashing into the forelegs. That is why this version separates the trunk from the head and keeps the face broad, a choice that preserves the baby elephant amigurumi look while giving more control during assembly. Oversized ears matter too: a sitting elephant crochet pattern loses species definition fast when the ears are underscaled, so the outer ear is worked larger than the inner panel and pinched at the top for a soft double-lobe silhouette. Another structural choice is the short neck transition. Too much neck length makes the head wobble and pushes the center of gravity backward. Many prominent results currently lean standing, mini, or generic market builds, which leaves room for a photo-matched seated pastel version with cheek patches and a crown accessory.
Project Info at a Glance
| Skill Level | Time | Finished Size | Hook | Best For |
|---|---|---|---|---|
| Intermediate | 6–8 hours | 8–9 in. / 20–23 cm | 3.5 mm | Nursery shelf, baby gift, display plush |
Materials and Tools
Yarn
- Lavender — DK — about 100 g total main c⁶olor — Stylecraft Special DK, Paintbox DK, or similar
- Cream — DK — about 25 g for ear centers and pads
- Blush pink — DK — 10–15 g for cheeks, toe details, and flower
- Pale yellow — DK — small scrap for the moon
- Purple embroidery thread or yarn scrap — small amount for ear stars
- Black embroidery thread — small amount for brows and lashes
Tools
- Hook 3.5 mm
- 12 mm safety eyes
- Polyester stuffing
- Yarn needle
- Stitch markers
- Pins
- Small sharp scissors
Abbreviations
MR / sc / inc / dec / sl st / ch / BLO / hdc / dc
Use invisible decrease for all shaping rounds that close the head, body, and limbs; standard decreases leave a harder ridge on pastel plush builds.
Pattern — Step by Step
Continuous spiral unless noted.
The rounds below are an original photo-matched draft built on standard amigurumi math, using the verified material baseline above.
Head (Make 1)
Yarn: lavender
R1: 6 sc in MR (6)
R2: inc ×6 (12)
R3: (1 sc, inc) ×6 (18)
R4: (2 sc, inc) ×6 (24)
R5: (3 sc, inc) ×6 (30)
R6: (4 sc, inc) ×6 (36)
R7: sc around (36)
R8: sc around (36)
R9: sc around (36)
R10: sc around (36)
R11: sc around (36)
R12: sc around (36)
R13: (4 sc, dec) ×6 (30)
R14: sc around (30)
R15: (3 sc, dec) ×6 (24)
R16: sc around (24)
R17: (2 sc, dec) ×6 (18)
R18: (1 sc, dec) ×6 (12)
R19: dec ×6 (6)
Place safety eyes between R9 and R10, about 10 stitches apart. Stuff firmly after R13 and keep the lower face full so the trunk sits cleanly against it.
Fasten off. Leave 20 cm tail.
Body (Make 1)
Yarn: lavender
R1: 6 sc in MR (6)
R2: inc ×6 (12)
R3: (1 sc, inc) ×6 (18)
R4: (2 sc, inc) ×6 (24)
R5: (3 sc, inc) ×6 (30)
R6: (4 sc, inc) ×6 (36)
R7: sc around (36)
R8: sc around (36)
R9: sc around (36)
R10: sc around (36)
R11: (4 sc, dec) ×6 (30)
R12: sc around (30)
R13: (3 sc, dec) ×6 (24)
R14: sc around (24)
R15: (2 sc, dec) ×6 (18)
R16: sc around (18)
R17: (1 sc, dec) ×6 (12)
R18: dec ×6 (6)
Stuff the base firmly and the upper body slightly softer. Flatten the underside with your hands while adding stuffing so the elephant keeps a seated profile.
Fasten off. Leave 25 cm tail.
Front Legs (Make 2)
Yarn: cream, then lavender
R1: 6 sc in MR in cream (6)
R2: inc ×6 (12)
R3: (1 sc, inc) ×6 (18)
R4: BLO sc around (18)
R5: change to lavender, sc around (18)
R6: sc around (18)
R7: sc around (18)
R8: sc around (18)
R9: sc around (18)
R10: (1 sc, dec) ×6 (12)
R11: sc around (12)
R12: sc around (12)
R13: sc around (12)
Stuff the foot firmly and the upper section lightly. Close the opening flat with the tail after stuffing.
Fasten off. Leave 20 cm tail.
Back Legs (Make 2)
Yarn: cream, then lavender
R1: 6 sc in MR in cream (6)
R2: inc ×6 (12)
R3: (1 sc, inc) ×6 (18)
R4: (2 sc, inc) ×6 (24)
R5: BLO sc around (24)
R6: change to lavender, sc around (24)
R7: sc around (24)
R8: (2 sc, dec) ×6 (18)
R9: sc around (18)
R10: sc around (18)
R11: sc around (18)
R12: sc around (18)
R13: (1 sc, dec) ×6 (12)
R14: sc around (12)
Stuff the foot area hard enough to hold shape and the upper leg lightly so it can be angled outward in assembly.
Fasten off. Leave 20 cm tail.
Ears (Make 2)
Yarn: lavender outer, cream inner
Outer ear in lavender
R1: 6 sc in MR (6)
R2: inc ×6 (12)
R3: (1 sc, inc) ×6 (18)
R4: (2 sc, inc) ×6 (24)
R5: (3 sc, inc) ×6 (30)
R6: (4 sc, inc) ×6 (36)
Fasten off. Leave 25 cm tail.
Inner ear in cream
R1: 6 sc in MR (6)
R2: inc ×6 (12)
R3: (1 sc, inc) ×6 (18)
R4: (2 sc, inc) ×6 (24)
R5: (3 sc, inc) ×6 (30)
Do not overstuff. Sew the cream circle centered on the lavender circle, leaving an even border. Pinch the upper edge slightly when attaching to the head so the ear reads closer to the photo than a flat round disc would.
Fasten off. Leave 15 cm tail on the inner ear.
Trunk (Make 1)
Yarn: lavender
R1: 6 sc in MR (6)
R2: sc around (6)
R3: sc around (6)
R4: sc around (6)
R5: (1 sc, inc) ×3 (9)
R6: sc around (9)
R7: sc around (9)
R8: sc around (9)
R9: (2 sc, inc) ×3 (12)
R10: sc around (12)
R11: sc around (12)
R12: sc around (12)
R13: (3 sc, inc) ×3 (15)
R14: sc around (15)
R15: sc around (15)
Stuff the lower two-thirds only. Keep the tip softer, then tack the underside lightly during assembly to create the upward curl.
Fasten off. Leave 30 cm tail.
Cheek Patches (Make 2)
Yarn: blush pink
R1: 6 sc in MR (6)
R2: inc ×6 (12)
Flatten each circle before sewing so it sits as a blush disc instead of a puffed button.
Fasten off. Leave 15 cm tail.
Sole Pads (Make 2)
Yarn: cream
R1: 6 sc in MR (6)
R2: inc ×6 (12)
R3: (1 sc, inc) ×6 (18)
These sit on the front of the back feet only. Steam is not required; finger-shaping is enough.
Fasten off. Leave 15 cm tail.
Toe Pads (Make 12)
Yarn: 6 in cream for front feet, 6 in pink for back feet
R1: 6 sc in MR (6)
Make three per foot. Keep them flat and very lightly stuffed, or leave them unstuffed for a lower profile.
Fasten off. Leave 10 cm tail.
Moon Applique (Make 1)
Yarn: pale yellow
Ch 9.
Row 1: starting in second ch from hook, sl st, sc, hdc 2, dc 2, hdc, sc, sl st (8)
Curve the strip into a crescent while sewing. Place the thicker center over the top-right side of the head.
Fasten off. Leave 15 cm tail.
Flower Applique (Make 1)
Yarn: blush pink
R1: 5 sc in MR (5)
R2: (ch 2, 2 dc, ch 2, sl st) in next st repeat 5 times (5 petals)
Flatten the flower with your fingertips before stitching it beside the moon. A tiny knot or French-knot center works if you want the photo’s raised look.
Fasten off. Leave 12 cm tail.
Assembly
- Sew the head to the body with the face pitched slightly forward, not vertical, so the seated silhouette reads correctly from a front view.
- Position the trunk centered between the eyes and sew it from the lower face upward, then add one small tack stitch beneath the tip to lift the curl.
- Place one cheek patch beneath each eye, slightly outside the trunk line, and stitch them on as flat circles rather than stuffed cheeks.
- Pin the ears first. Attach each ear across roughly six to seven head rounds, with the top edge pinched inward by about 1 cm.
- Sew the front legs to the lower head-body seam so they angle slightly inward. That inward angle is what gives the toy the tucked seated pose in the photo.
- Attach the back legs to the lower side seams of the body. Let the soles face slightly forward so the plush looks planted instead of splayed.
- Sew the cream sole pads to the front of each back foot. Add three cream toe pads to each front foot and three pink toe pads to each back foot.
- Stitch the moon applique on the upper right side of the head. Sew the flower just behind the moon so both pieces overlap slightly.
- Embroider short black brows, outer lashes, and tiny pastel stars inside the cream ear panels. Add a soft pink line beneath the front toe area if you want a closer photo match.
- Weave in all tails, test the toy on a flat surface, and shift body stuffing by hand until it sits upright without rocking.
The completed elephant should sit without external support and keep a clear trunk profile from the front.
7 Technical Tips
- Stitch marker drift: Marker drift usually shows up by round 6 of the body, when the increase line starts walking around the piece. Reset the marker every round and check that the base remains symmetrical before you add more stuffing.
- Stuffing firmness: The head should feel firmer than the body because the eye posts and trunk seam both pull against it. If a pinch test collapses the cheek area by more than about 1 cm, add more fill before closing.
- Invisible decrease control: Standard decreases leave a visible notch on pastel DK yarn, especially on head rounds 13, 15, and 17. Work every decrease through front loops only and tighten the final yarn-over with a small tug.
- Eye placement timing: Install the eyes before the head passes round 15. Waiting until the opening narrows makes the washers harder to seat and distorts the stitch columns around the face.
- Velvet tension substitution: If you swap the DK yarn for velvet or chenille, drop at least 0.5 mm below the label hook size. The trunk is the first part to gap when the fabric gets loose.
- Pinning the ears: Flat ear placement makes the elephant look round-faced rather than elephant-shaped. Pin the top of each ear with a 1 cm pinch before sewing so the double-lobe outline holds.
- Tail weaving on accessories: The moon and flower tails sit on a high-contact area and can work loose with one-pass weaving. Change direction at least three times when hiding those tails inside the head.
Conclusion
Next, choose the yarn palette first and decide whether you want the exact lavender version or a gray elephant with the same structure. Pin one front-view image to Pinterest so the ear span and trunk line are visible, then post one side-view shot to Instagram to show the seated balance. Save this elephant amigurumi crochet pattern with your nursery-animal files and keep the materials note attached, since the hook, eye size, and stuffing density all affect the final face. Use #LavenderMoonElephant when you share it. Did you keep the trunk tip softly lifted, or did you sew it lower for a longer baby-elephant profile?









