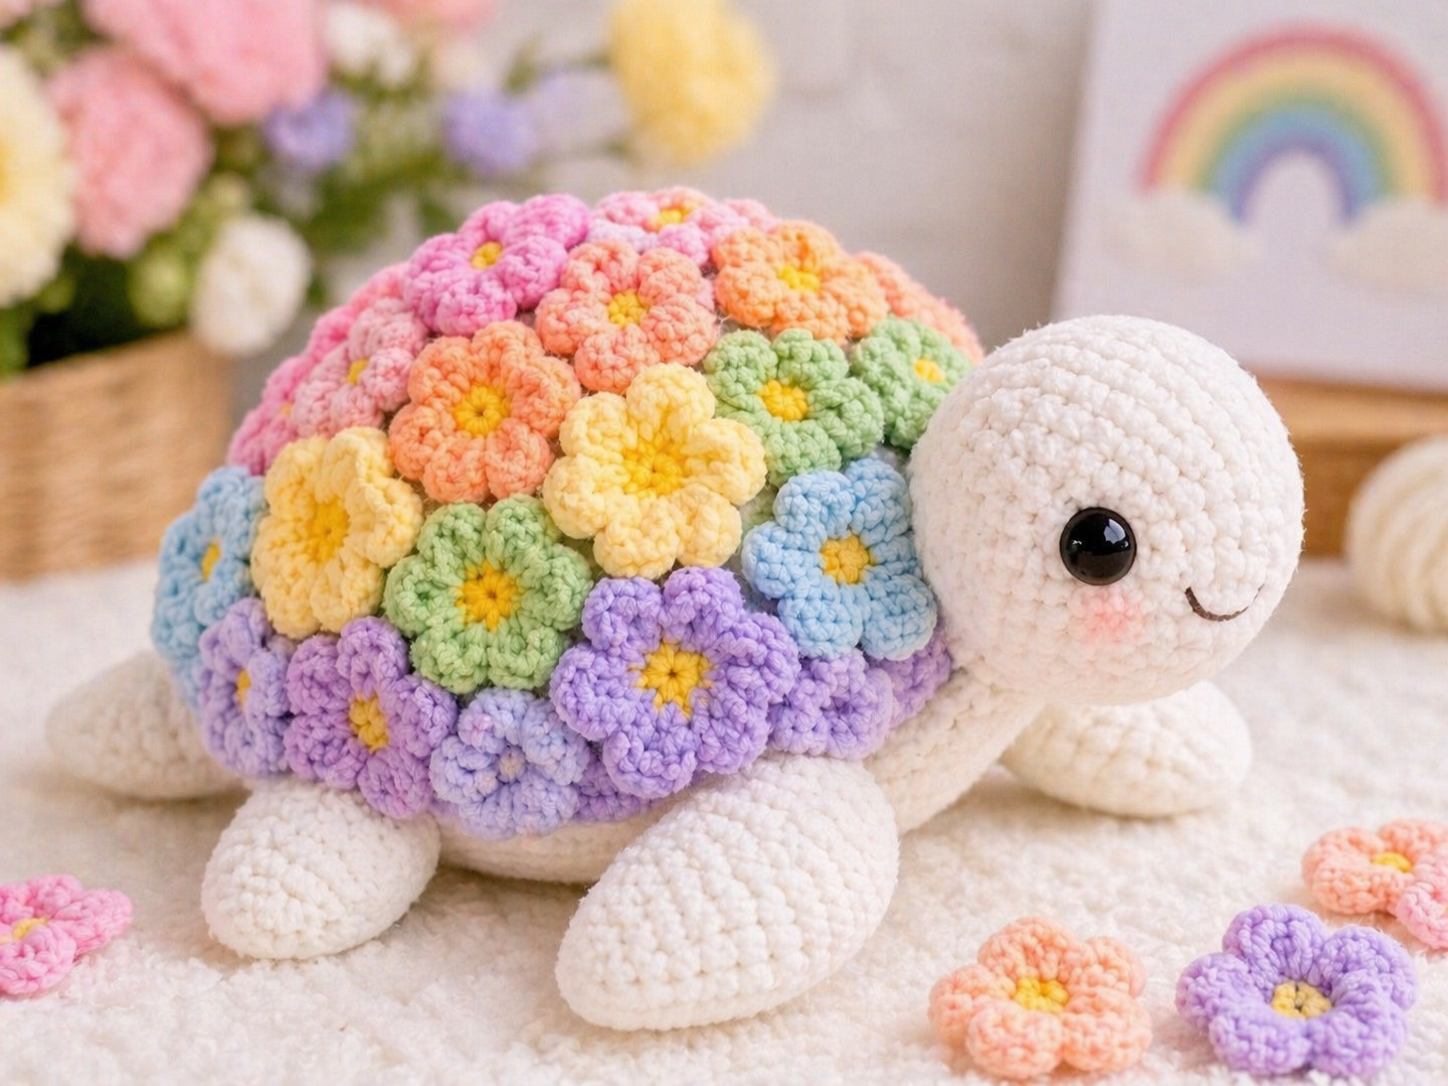
A flower-shell turtle fails at the neck long before the shell looks full enough. This flower turtle amigurumi crochet pattern uses super bulky plush yarn, a 5 mm hook, and a 22 cm target size for a confident beginner who can manage shaping and appliqué. You build the weight low and wide so the finished turtle works as a shelf plush, nursery prop, or market sample instead of tipping forward.
The Design: What Makes This Turtle Different
You are not shaping a flat sea turtle here. The photo shows a rounded tortoise-style body, a separate shell mass, and a face that sits low under the floral dome. That changes the engineering. First, the shell needs a stuffed upper dome rather than a thin appliqué panel, because the layered flowers add height and drag. Second, the back legs should be slightly larger than the front pair so the plush settles level once the shell is covered. Third, the flowers need staggered placement from crown to rim; random sewing creates bald gaps and a seam line that stays visible. Most current results emphasize a no-sew turtle or a rose-shell version, while the plush turtle with flowers style in this photo needs separate bloom planning and balance control.
Project Info at a Glance
| Skill Level | Time | Finished Size | Hook | Best For |
|---|---|---|---|---|
| Confident beginner to intermediate | 2–4 hours | 22 cm | 5 mm | Shelf display, gift sample, market display |
Materials and Tools
Yarn
- Cream — super bulky plush chenille — about 80 g — Himalaya Dolphin Baby or Premier Parfait Chunky
- Lavender — super bulky plush chenille — about 25 g — for the shell underlayer
- Yellow — super bulky plush chenille — about 10 g — for flower centers
- Pink — super bulky plush chenille — about 15 g — shell flowers
- Peach — super bulky plush chenille — about 15 g — shell flowers
- Butter Yellow — super bulky plush chenille — about 15 g — shell flowers
- Mint — super bulky plush chenille — about 15 g — shell flowers
- Baby Blue — super bulky plush chenille — about 15 g — shell flowers
- Soft Lilac — super bulky plush chenille — about 15 g — shell flowers
- Blush Pink — small amount — for cheek patches
Tools
- Hook 5 mm
- Safety eyes 12 mm
- Polyester stuffing
- Tapestry needle
- Stitch markers
- Brown or dark taupe embroidery thread for the smile
Abbreviations
MR / sc / inc / dec / sl st / ch / BLO / dc
Use invisible decrease through the front loops only on all visible shaping rounds so the cream body and round head stay clean.
Pattern — Step by Step
Continuous spiral unless noted.
Head (Make 1)
Yarn: cream
R1: 6 sc in MR (6)
R2: inc x6 (12)
R3: (sc, inc) x6 (18)
R4: (2 sc, inc) x6 (24)
R5: (3 sc, inc) x6 (30)
R6: (4 sc, inc) x6 (36)
R7: 36 sc (36)
R8: 36 sc (36)
R9: 36 sc (36)
R10: 36 sc (36)
R11: (4 sc, dec) x6 (30)
R12: (3 sc, dec) x6 (24)
R13: (2 sc, dec) x6 (18)
Place 12 mm eyes between R8 and R9, 10 stitches apart. Stuff firmly before the last two rounds.
R14: (sc, dec) x6 (12)
R15: dec x6 (6)
Fasten off. Leave a 35 cm tail.
Shell Dome (Make 1)
Yarn: lavender
R1: 6 sc in MR (6)
R2: inc x6 (12)
R3: (sc, inc) x6 (18)
R4: (2 sc, inc) x6 (24)
R5: (3 sc, inc) x6 (30)
R6: (4 sc, inc) x6 (36)
R7: (5 sc, inc) x6 (42)
R8: 42 sc (42)
R9: 42 sc (42)
R10: 42 sc (42)
Do not overstuff later. The shell should stay domed, not spherical.
Fasten off. Leave a 45 cm tail.
Body Base (Make 1)
Yarn: cream
R1: 6 sc in MR (6)
R2: inc x6 (12)
R3: (sc, inc) x6 (18)
R4: (2 sc, inc) x6 (24)
R5: (3 sc, inc) x6 (30)
R6: (4 sc, inc) x6 (36)
R7: (5 sc, inc) x6 (42)
R8: BLO 42 sc (42)
R9: 42 sc (42)
The BLO round gives a cleaner edge where the shell meets the underside.
Fasten off. Leave a 45 cm tail.
Front Legs (Make 2)
Yarn: cream
R1: 6 sc in MR (6)
R2: inc x6 (12)
R3: (sc, inc) x6 (18)
R4: 18 sc (18)
R5: 18 sc (18)
R6: (sc, dec) x6 (12)
Stuff lightly. Keep the last round soft so the leg can flatten against the body seam.
R7: dec x6 (6)
Fasten off. Leave a 25 cm tail.
Back Legs (Make 2)
Yarn: cream
R1: 6 sc in MR (6)
R2: inc x6 (12)
R3: (sc, inc) x6 (18)
R4: (2 sc, inc) x6 (24)
R5: 24 sc (24)
R6: 24 sc (24)
R7: (2 sc, dec) x6 (18)
R8: (sc, dec) x6 (12)
Stuff a little firmer than the front legs. The rear pair carries more shell weight in this build.
R9: dec x6 (6)
Fasten off. Leave a 25 cm tail.
Tail (Make 1)
Yarn: cream
R1: 6 sc in MR (6)
R2: 6 sc (6)
R3: 6 sc (6)
Pinch the piece into a short wedge before sewing so it reads as a tail, not a nub.
Fasten off. Leave a 15 cm tail.
Cheek Patches (Make 2)
Yarn: blush pink
R1: 6 sc in MR (6)
R2: inc x6 (12)
Fasten off. Leave a 15 cm tail.
Large Shell Flowers (Make 12)
Yarn: yellow centers with mixed pastel petals
R1: With yellow, 6 sc in MR (6)
Change to petal color.
R2: (sl st in next st, ch 2, 2 dc in same st, ch 2, sl st in same st) x6
Make 2 pink, 2 peach, 2 butter yellow, 2 mint, 2 baby blue, and 2 soft lilac. Keep tails long for sewing.
Fasten off. Leave a 20 cm tail.
Small Filler Flowers (Make 8)
Yarn: yellow centers with mixed pastel petals
R1: With yellow, 6 sc in MR (6)
Change to petal color.
R2: (sl st in next st, ch 1, dc in same st, ch 1, sl st in same st) x6
Use these to hide any visible shell base near the rim and between the larger blooms.
Fasten off. Leave a 18 cm tail.
Assembly
- Place the shell dome over the body base and check the silhouette from the side. The shell should sit high enough to cover the body seam but low enough that the head can attach just under the front rim.
- Sew the back legs to the underside first, spacing them about 8 stitches apart. Keep them slightly wider than the front pair so the plush settles backward instead of nose-heavy.
- Sew the front legs in line with the front third of the body. Test the stance on a flat surface before locking the tails.
- Add the tail at the center back seam. Pinch the tail into a wedge before stitching so it points outward and not downward.
- Lightly stuff the shell dome. Then sew the shell dome to the body base with the seam running just above the underside edge.
- Sew the head to the front of the body, slightly higher than center. That angle creates the lifted face seen in the photo and keeps the chin clear of the floor.
- Attach the cheek patches one stitch below the eye line and slightly outward from the smile path. Keep both patches small; oversized blush circles overpower the face.
- Embroider the smile with dark taupe or brown thread. Start near the lower side of the head and curve upward by only 3–4 stitches.
- Sew the large flowers onto the shell starting at the crown, then work outward in offset rows. Overlap petal edges just enough to hide the lavender base without stacking bulky knots in one spot.
- Fill the remaining gaps with the small flowers, especially along the lower rim and side transitions. Weave every tail into the shell layer, not the body underside, so the bottom stays flat.
The finished turtle should sit level, with the shell seam hidden under the lowest flower ring.
7 Technical Tips
- Marker drift on the shell dome: Plush yarn hides the first stitch fast. Move the marker every round or the flower rows will spiral and the crown flower will drift off center.
- Stuffing firmness in the head: Underfilled heads flatten under the shell overhang. Pack the lower half firmly, then reduce pressure in the top quarter so the round shape stays smooth.
- Invisible decrease visibility: Standard decreases in chenille leave pale bars on cream yarn. Work front-loop-only decreases and tighten the last pull-through after every decrease round.
- Eye placement timing: Insert eyes before the head closes past 24 stitches. Later insertion stretches the plush fabric and can leave a star-shaped stress ring around the washer.
- Flower pinning: Pin at least the crown flower, four side flowers, and the lower rim row before sewing. Without a placement map, one side gains bulk and the turtle starts leaning.
- Leg load balance: Make the back legs firmer than the front by one extra pinch of stuffing. A heavy floral shell shifts the center of gravity rearward, and soft back legs collapse first.
- Tail weaving: Do not weave the tail end into the same seam path used to close the shell. Separate those anchor points by at least 2 stitches or the back seam puckers upward.
Conclusion
This build works because the shell is treated as a weighted dome, not a flat decoration. Start with the head and shell first, then dry-fit the legs before you commit to the seam. That sequence keeps the stance level and stops the face from dropping under the floral mass. For sharing, pin a top-down photo so the flower placement reads clearly, then post a side view on Instagram to show the shell height and leg balance. Use #PastelFlowerTurtle when you publish the finished plush. Did you arrange your flowers in color bands, or did you scatter them across the shell like a garden cap?









