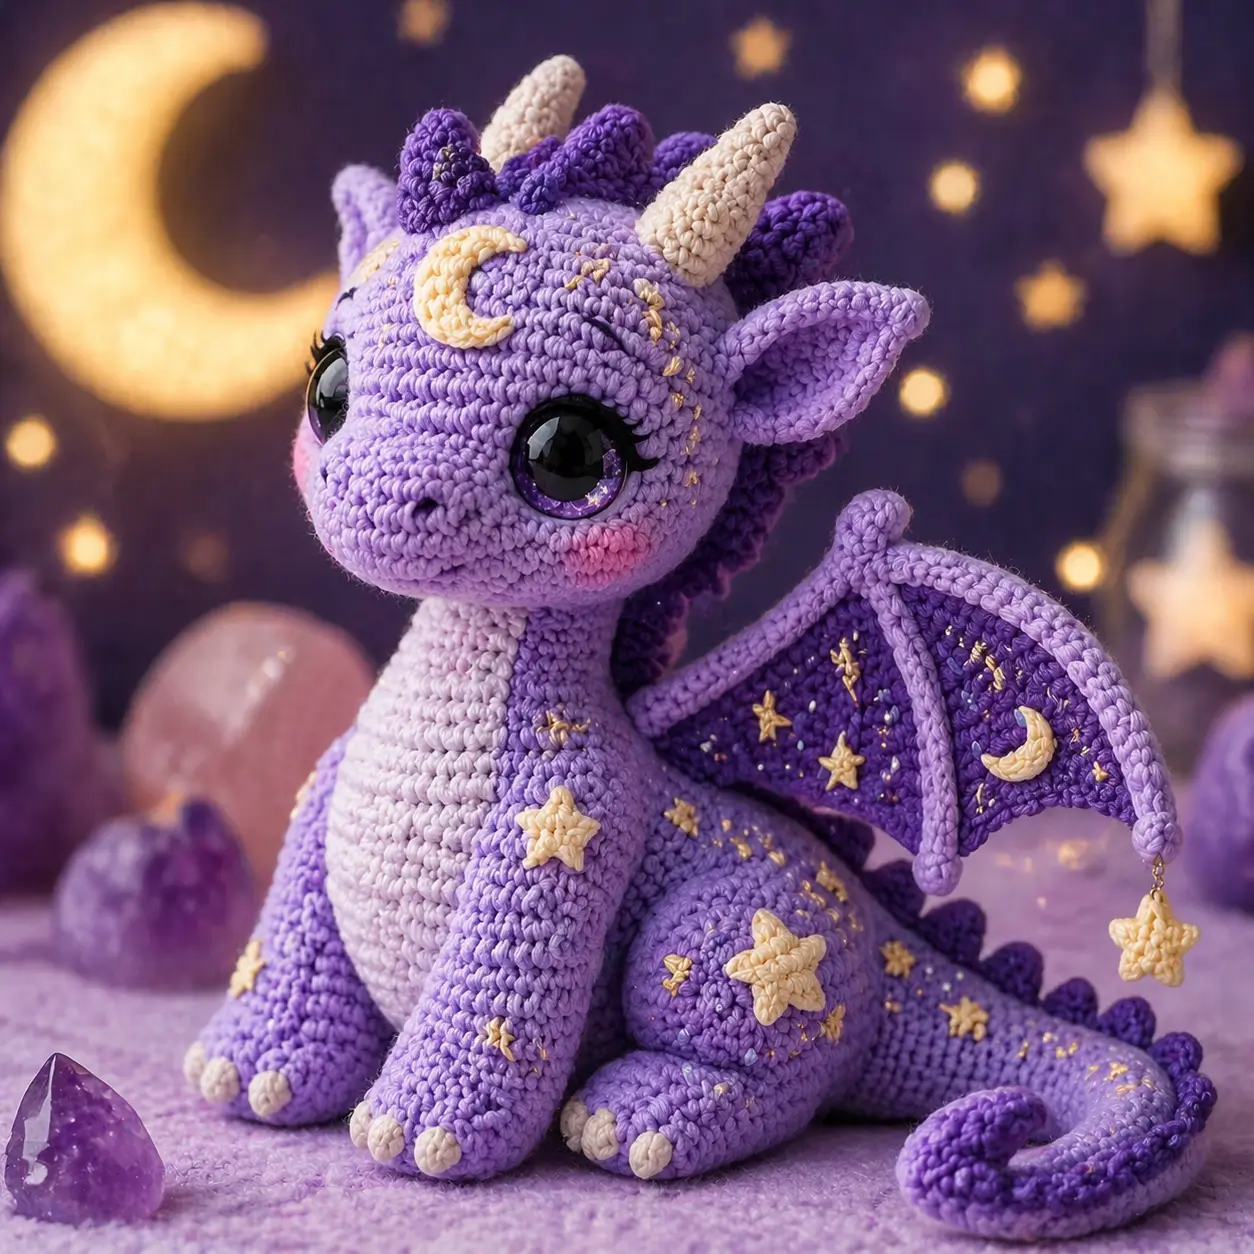
A dragon with a crescent stitched into its forehead needs the horns set back before the face can read cleanly. This dragon amigurumi crochet pattern uses DK cotton, a 2.5–2.75 mm hook, a 19–20 cm target size, and an intermediate build with separate wings, horns, and appliques. The seated body makes it useful as a shelf sample, nursery display piece, or surface-embroidery test project.
The Design: What Makes This Dragon Different
You are balancing three visual loads here: a blunt snout, tall horns, and wide wings. The dragon only reads correctly when the head stays oversized and the body remains compact, which is why this draft uses a 42-stitch head plateau and a 36-stitch body plateau. A separate belly panel keeps the chest smooth; that matters because the seated pose exposes the front of the body more than a standing fantasy dragon amigurumi does. Wing frames sit slightly behind the shoulder line so the crochet dragon wings do not pull the neck backward. Another structural choice is the raised forehead crescent, which pushes attention upward and makes eye placement more exact. The common maker failure with this character type is setting the eyes too wide on a long snout, then losing the baby-dragon proportions once the cheeks go on.
Project Info at a Glance
| Skill Level | Time | Finished Size | Hook | Best For |
|---|---|---|---|---|
| Intermediate to Advanced | 5–7 hours at intermediate speed | 19–20 cm | 2.5–2.75 mm | Shelf display / nursery decor |
Published comparison patterns in the review set span sport-weight cotton at 2.5 mm and DK at 2.75 mm, with finished dragons around 19–20 cm and published eye sizes from 6 mm to 12 mm. The photographed celestial version scales the eye look up on purpose, so the supply list below increases that feature for visual match rather than source match.
Materials and Tools
Yarn
- Lavender — DK cotton — about 140 g — Yarn and Colors Must Have, Catania, or similar
- Deep purple — DK cotton — about 30 g — for wings, spine, and trim
- Ivory — DK cotton — about 20 g — for horns, claws, moons, and stars
- Blush pink — DK cotton — about 8 g — for cheek patches
- Gold embroidery floss or metallic thread — small amount — for star speckles and accent stitches
Tools
- Hook 2.5 mm or 2.75 mm
- Safety eyes 18–20 mm or large glitter cabochons for the photographed look
- Polyester stuffing
- Tapestry needle
- Stitch markers
- Pins
- Fabric glue only if you are using decorative cabochons instead of locking eyes
Abbreviations
MR / sc / inc / dec / sl st / ch / BLO / FLO / hdc / dc / tr
Use invisible decrease wherever dec appears; it keeps the cheek line tighter and reduces the holes that show under large eyes and pale appliques.
Pattern — Step by Step
Continuous spiral unless noted.
Head (Make 1)
Yarn: lavender
R1: 6 sc in MR (6)
R2: inc ×6 (12)
R3: (sc, inc) ×6 (18)
R4: (2 sc, inc) ×6 (24)
R5: (3 sc, inc) ×6 (30)
R6: (4 sc, inc) ×6 (36)
R7: (5 sc, inc) ×6 (42)
R8–R13: sc around (42)
R14: (5 sc, dec) ×6 (36)
R15: (4 sc, dec) ×6 (30)
R16: (3 sc, dec) ×6 (24)
R17: (2 sc, dec) ×6 (18)
R18: (sc, dec) ×6 (12)
R19: dec ×6 (6)
Insert eyes between R10 and R11, spaced 10 stitches apart. Stuff firmly from R15 onward.
Fasten off. Leave 25 cm tail.
Body (Make 1)
Yarn: lavender
R1: 6 sc in MR (6)
R2: inc ×6 (12)
R3: (sc, inc) ×6 (18)
R4: (2 sc, inc) ×6 (24)
R5: (3 sc, inc) ×6 (30)
R6: (4 sc, inc) ×6 (36)
R7–R10: sc around (36)
R11: (4 sc, dec) ×6 (30)
R12–R14: sc around (30)
R15: (3 sc, dec) ×6 (24)
R16–R17: sc around (24)
R18: (2 sc, dec) ×6 (18)
R19–R20: sc around (18)
R21: (sc, dec) ×6 (12)
R22: sc around (12)
R23: dec ×6 (6)
Stuff the lower half firm and the upper half medium. That keeps the seated body round without making the neck seam rigid.
Fasten off. Leave 25 cm tail.
Snout (Make 1)
Yarn: lavender
R1: 6 sc in MR (6)
R2: inc ×6 (12)
R3: (sc, inc) ×6 (18)
R4: (2 sc, inc) ×6 (24)
R5–R6: sc around (24)
R7: (2 sc, dec) ×6 (18)
Lightly stuff only the front third. Embroider two small nostrils after sewing.
Fasten off. Leave 30 cm tail.
Front Legs (Make 2)
Yarn: ivory then lavender
R1: 6 sc in MR in ivory (6)
R2: inc ×6 (12)
R3: BLO sc around in lavender (12)
R4–R6: sc around (12)
R7: dec ×6 (6)
R8–R13: sc around (6)
Stuff the foot and lower leg only. Keep the upper half soft so the paws can angle inward toward the chest.
Fasten off. Leave 20 cm tail.
Back Legs (Make 2)
Yarn: ivory then lavender
R1: 6 sc in MR in ivory (6)
R2: inc ×6 (12)
R3: (sc, inc) ×6 in lavender (18)
R4–R5: sc around (18)
R6: (sc, dec) ×6 (12)
R7–R10: sc around (12)
R11: dec ×6 (6)
Stuff the front of the foot firmly and the thigh lightly. The rear edge should flatten when pinned to the body.
Fasten off. Leave 20 cm tail.
Ears (Make 2)
Yarn: lavender and deep purple
Outer ear
R1: 6 sc in MR (6)
R2: inc ×6 (12)
R3: (sc, inc) ×6 (18)
R4: sc around (18)
Inner ear insert
Row 1: ch 7, sc in 2nd ch from hook and across (6)
Row 2: ch 1, dec, 2 sc, dec (4)
Row 3: ch 1, sc across (4)
Do not stuff. Sew the inner insert into the outer ear, then pinch the base once before attaching.
Fasten off. Leave 18 cm tail on the outer ear.
Horns (Make 2)
Yarn: ivory
R1: 6 sc in MR (6)
R2–R5: sc around (6)
R6: inc ×6 (12)
R7–R8: sc around (12)
Stuff the base only. Keep the tip empty so the horn curves back slightly instead of standing vertical.
Fasten off. Leave 18 cm tail.
Wings (Make 2)
Yarn: lavender and deep purple
Wing long branch
R1: 6 sc in MR (6)
R2: inc ×6 (12)
R3–R9: sc around (12)
Wing short branch
R1: 6 sc in MR (6)
R2: inc ×6 (12)
R3–R5: sc around (12)
Wing membrane
Row 1: ch 10, sc in 2nd ch from hook and across (9)
Row 2: ch 1, dec, 5 sc, dec (7)
Row 3: ch 1, sc across (7)
Row 4: ch 1, dec, 3 sc, dec (5)
Row 5: ch 1, sc across (5)
Lightly stuff both branches. Sew the short branch to the long branch at about the midpoint, then join the membrane between them. Outline the membrane with lavender if you want a heavier frame.
Fasten off. Leave 25 cm tail on the long branch.
Tail (Make 1)
Yarn: lavender
R1: 6 sc in MR (6)
R2: inc ×6 (12)
R3–R6: sc around (12)
R7: (sc, inc) ×6 (18)
R8–R12: sc around (18)
R13: (2 sc, inc) ×6 (24)
R14–R24: sc around (24)
Stuff the base firmly and the tip lightly. Bend the tail into a loose curl before sewing so it supports the seated pose instead of fighting it.
Fasten off. Leave 30 cm tail.
Spine Spikes (Make 8 Small, 4 Medium)
Yarn: deep purple
Small spike
R1: 6 sc in MR (6)
R2: sc around (6)
R3: inc ×6 (12)
R4: sc around (12)
Medium spike
R1: 6 sc in MR (6)
R2: sc around (6)
R3: inc ×6 (12)
R4: sc around (12)
R5: inc ×6 (18)
R6: sc around (18)
Stuff very lightly, then flatten the base. Use the medium spikes on the head and upper back, and the small spikes down the tail.
Fasten off. Leave 12–15 cm tail.
Belly Panel (Make 1)
Yarn: pale lavender or ivory
Row 1: ch 8, sc in 2nd ch from hook and across (7)
Row 2: ch 1, inc, 5 sc, inc (9)
Row 3: ch 1, sc across (9)
Row 4: ch 1, inc, 7 sc, inc (11)
Row 5–Row 12: ch 1, sc across (11)
Block lightly if the panel curls. The lower edge should sit just above the tail join.
Fasten off. Leave 30 cm tail.
Cheek Patches (Make 2)
Yarn: blush pink
R1: 6 sc in MR (6)
R2: inc ×6 (12)
Do not stuff. Flatten completely before sewing so the patch reads as blush, not a muzzle pad.
Fasten off. Leave 15 cm tail.
Crescent Moon Applique (Make 2)
Yarn: ivory
Row 1: ch 10, sc in 2nd ch from hook and across (9)
Row 2: ch 1, dec, 5 sc, dec (7)
Row 3: ch 1, sc across (7)
Row 4: ch 1, dec, 3 sc, dec (5)
Curve the piece while sewing by pulling the inner edge slightly tighter than the outer edge. Make one for the forehead and one for the wing.
Fasten off. Leave 20 cm tail.
Mini Star Appliques (Make 8–10)
Yarn: ivory
R1: 6 sc in MR (6)
R2: (ch 3, sl st in 2nd ch from hook, sc in next ch, sl st in next base st) ×6
These read as starbursts rather than strict five-point stars, which suits the celestial surface effect in the photo.
Fasten off. Leave 10 cm tail.
Hanging Star Charm (Make 1)
Yarn: ivory
R1: 6 sc in MR (6)
R2: (ch 3, sl st in 2nd ch from hook, sc in next ch, sl st in next base st) ×6
R3: ch 12 for hanging loop, sl st back into one point
Use a doubled strand if the charm needs more swing control. Hang it from the lower wing tip or the outer frame.
Fasten off. Leave 20 cm tail.
Assembly
- Sew the head to the body with the head tipped slightly forward, not upright.
- Attach the snout centered on the face between head rounds 8 and 15, then embroider the nostrils.
- Place the cheek patches below the eye line and add the forehead moon above one eye rather than dead center.
- Sew the ears between head rounds 5 and 9, angling them outward.
- Attach the horns behind the moon applique with 4 stitches between their inner bases.
- Sew the front legs to the upper body so the paws touch or nearly touch the belly panel.
- Pin the back legs lower on the body, test the sit on a flat surface, then sew them in place.
- Attach the tail at the back center and let the curl rest on the work surface as a third support point.
- Sew on the medium spikes from forehead to upper back, then continue with small spikes down the tail.
- Attach both wings 6 stitches apart, add the second moon, scatter the stars, and finish with gold embroidery speckles and the hanging charm.
The finished dragon should sit on both back legs and the tail base without rolling forward.
7 Technical Tips
- Mark the first stitch of every head round. Lose one stitch before R7 and the eye gap shifts enough to crowd the snout seam.
- Pack the body in two densities. A firm lower half and a softer upper half keep the dragon seated without turning the neck seam into a hard cylinder.
- Use invisible decreases on the head, body, and back legs. Standard
sc2togleaves visible seam lines that show beside blush patches and under pale appliques. - Install the eyes before the final head decreases, but after you have dry-pinned the snout. On this shape, the inner eye edges should land about 10 stitches apart for the broad baby-dragon face.
- Substituting velvet changes the wing roots first. If the fabric spreads, move up only enough to keep motion in the hook, because loose velvet tension opens gaps where the branches join the body.
- Pin both wings and both horns before sewing any one of them permanently. A wing placed even one round higher than the other makes the neck look twisted in front-view photos.
- Weave every decorative tail back through at least 4 cm of stuffing path. Short buried tails can work loose around the hanging star, cheek patches, and moon applique after handling.
Conclusion
This build is complete once the wing tips clear the floor and the tail curl supports the body instead of pulling it backward. Photograph the finished piece from a three-quarter front angle, then pin that image to Pinterest and post a face close-up on Instagram with #CelestialDragon. The next step is practical: crochet one second sample in a lighter contrast palette and record the exact yardage after assembly. That comparison will show whether the moon applique needs thicker ivory yarn or a tighter sewing path. Keep the final listing labeled as a dragon amigurumi crochet pattern for search clarity. Would you keep the forehead crescent off-center, or move it to the wing only on the next version?









