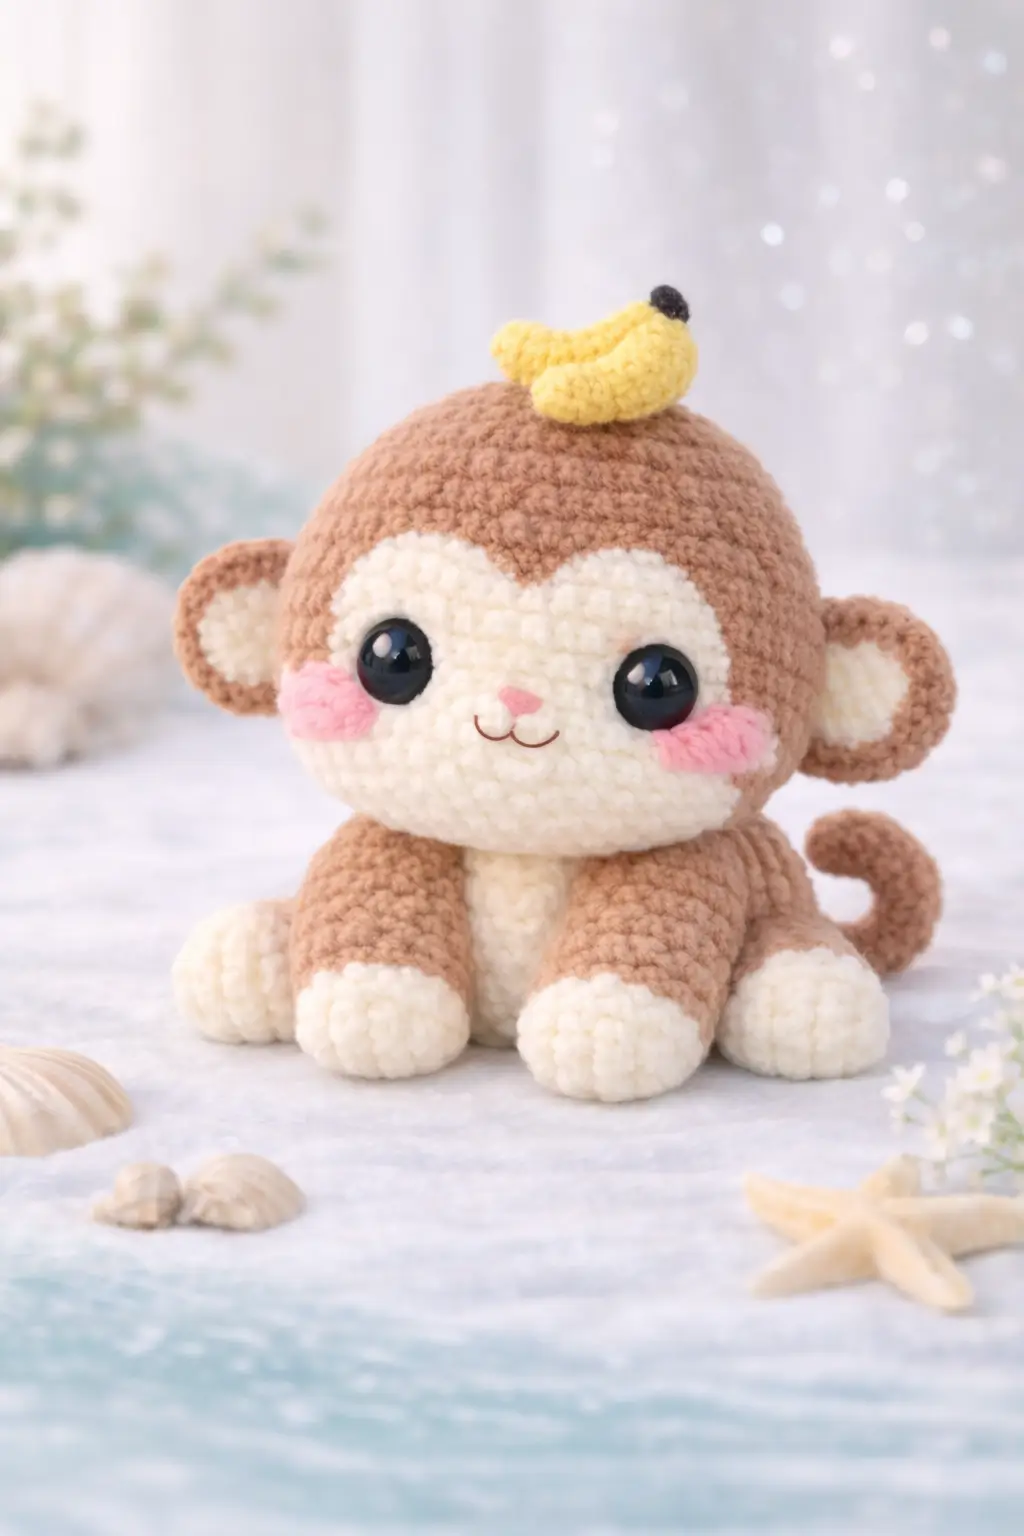
A monkey without a tail curl reads more like a bear, so the silhouette has to turn before the face does. This monkey amigurumi crochet pattern uses chunky chenille yarn, a 4.5 mm hook, and a seated build that finishes around 18 cm, which places it in the compact plush range seen in current monkey patterns. It suits an intermediate maker and works well for nursery shelf decor or a photo prop.
The Design: What Makes This Monkey Different
This monkey is built around proportion, not limb length. The head takes visual priority, so the sphere stays large and low on the body. That choice matches the photo and keeps the cream face panel broad enough for oversized eyes and blush placement. The second decision is the seated lower half. Instead of a standing tube body, the piece needs front paws that project forward and back legs that widen the base. Stability improves at once. Third comes the tail. A monkey plush without a visible curl loses species identity fast, which is why a short stuffed tube is shaped after sewing.
One common mistake with a plush monkey crochet pattern is shrinking the muzzle area too much. The result looks fox-like. Another is placing the ears too high, which makes the round head read as a cub. In a chenille monkey amigurumi, spacing matters more than extra detail.
Project Info at a Glance
| Skill Level | Time | Finished Size | Hook | Best For |
|---|---|---|---|---|
| Intermediate | 5–7 hours | 18 cm seated | 4.5 mm | Plush decor, gift toy, shelf styling |
Materials and Tools
Yarn
- Light brown — size 6 chenille — 180 g max reference budget — Premier Basix Chenille or similar
- Cream — size 6 chenille — 30 g max reference budget — Premier Basix Chenille or similar
- Pink — small amount — embroidery or brushed yarn for cheeks
- Yellow — small amount — banana topper
- Black — small amount — banana tip and facial embroidery
Tools
- Hook 4.5 mm
- 15 mm safety eyes
- Polyester stuffing
- Tapestry needle
- Stitch markers
- Pins
- Small scissors
The hook, chenille weight, and 15 mm eye size align with current plush monkey references.
Abbreviations
MR / sc / inc / dec / sl st / ch / BLO / FLO
Use invisible decrease for visible shaping rounds because chenille opens at the cut edges and a standard decrease leaves wider front gaps.
Pattern — Step by Step
Continuous spiral unless noted. This custom stitch map is drafted from the supplied monkey photo and standard amigurumi increase math.
Head (Make 1)
Yarn: light brown with cream face panel applied later — Custom build based on plush monkey proportions
R1: 6 sc in MR (6)
R2: inc x6 (12)
R3: (sc, inc) x6 (18)
R4: (2 sc, inc) x6 (24)
R5: (3 sc, inc) x6 (30)
R6: (4 sc, inc) x6 (36)
R7: (5 sc, inc) x6 (42)
R8-R13: sc around (42)
R14: (5 sc, dec) x6 (36)
R15: (4 sc, dec) x6 (30)
Insert safety eyes between R10 and R11, about 8 sts apart after face placement.
R16: (3 sc, dec) x6 (24)
Stuff firmly.
R17: (2 sc, dec) x6 (18)
R18: (sc, dec) x6 (12)
R19: dec x6 (6)
Fasten off. Leave a 15 cm tail.
Body (Make 1)
Yarn: light brown — Custom seated body with lower center opening for cream belly
R1: 6 sc in MR (6)
R2: inc x6 (12)
R3: (sc, inc) x6 (18)
R4: (2 sc, inc) x6 (24)
R5-R8: sc around (24)
R9: (3 sc, inc) x6 (30)
R10-R12: sc around (30)
R13: (3 sc, dec) x6 (24)
Stuff lower body firmly, especially front base.
R14: (2 sc, dec) x6 (18)
R15: sc around (18)
Fasten off. Leave a 20 cm tail.
Front Legs (Make 2)
Yarn: cream, then light brown — Custom from photo; short thick paws
R1: 6 sc in MR (6)
R2: inc x6 (12)
R3-R4: sc around (12)
Change to light brown.
R5: BLO sc around (12)
R6: (4 sc, dec) x2 (10)
R7-R11: sc around (10)
Stuff paw and lower arm only.
Flatten and sc through both sides across 5 sts (5)
Fasten off. Leave a 20 cm tail.
Back Legs (Make 2)
Yarn: cream, then light brown — Custom from photo; slightly longer than front legs
R1: 6 sc in MR (6)
R2: inc x6 (12)
R3: (sc, inc) x6 (18)
R4: sc around (18)
Change to light brown.
R5: BLO sc around (18)
R6: (4 sc, dec) x3 (15)
R7: (3 sc, dec) x3 (12)
R8-R12: sc around (12)
Stuff foot and lower leg. Keep top half softer for easy seating.
Flatten and sc through both sides across 6 sts (6)
Fasten off. Leave a 20 cm tail.
Ears (Make 2)
Yarn: outer light brown, inner cream — Ear layering follows monkey references that use separate inner and outer pieces.
Inner ear, cream
R1: 6 sc in MR (6)
R2: inc x6 (12)
R3: (sc, inc) x6 (18)
Fasten off.
Outer ear, light brown
R1: 6 sc in MR (6)
R2: inc x6 (12)
R3: (sc, inc) x6 (18)
R4: sc around (18)
Place inner ear on top of outer ear and crochet or sew together around edge for a shallow cup shape.
Fasten off. Leave a 15 cm tail.
Tail (Make 1)
Yarn: light brown — Tube construction follows common monkey tail references.
R1: 6 sc in MR (6)
R2-R18: sc around (6)
Stuff very lightly or insert a thin pipe cleaner only if the finished toy is decorative, not for children.
Fasten off. Leave a 20 cm tail.
Face Panel (Make 1)
Yarn: cream — Custom oval mask shaped for the photo’s broad muzzle area
Ch 7.
R1: Starting in 2nd ch from hook, sc 5, 3 sc in last ch, work on opposite side, sc 4, inc in last ch (14)
R2: inc, sc 4, inc x3, sc 4, inc x2 (20)
R3: sc, inc, sc 4, (sc, inc) x3, sc 4, (sc, inc) x2 (26)
R4: sc around (26)
Fasten off. Leave a 25 cm tail.
Cheek Patches (Make 2)
Yarn: pink — Flat circles
R1: 6 sc in MR (6)
R2: inc x6 (12)
Sl st to join.
Fasten off. Leave a 10 cm tail.
Belly Patch (Make 1)
Yarn: cream — Flat oval to break up the seated body
Ch 5.
R1: Starting in 2nd ch from hook, sc 3, 3 sc in last ch, work opposite side, sc 2, inc in last ch (10)
R2: inc, sc 2, inc x3, sc 2, inc x2 (16)
R3: sc around (16)
Fasten off. Leave a 20 cm tail.
Banana Topper (Make 1)
Yarn: yellow with black tip — Custom accessory based on the photo
R1: 4 sc in MR (4)
R2: (sc, inc) x2 (6)
R3-R6: sc around (6)
R7: (2 sc, inc) x2 (8)
R8-R9: sc around (8)
R10: (2 sc, dec) x2 (6)
Change to black.
R11: sc around (6)
Sl st, fasten off.
Stuff lightly, curve by hand, and stitch closed at the base so it sits like a small crescent.
Assembly
- Sew the head to the top center of the body. Tilt it slightly forward.
- Pin the face panel low on the head so the upper edge sits below the increase curve, then sew it in place.
- Insert or lock the 15 mm safety eyes through the face panel area before the final face stitches are tightened.
- Stitch the nose and mouth in dark brown or black thread at the lower center of the face panel.
- Sew the cheek patches under and slightly outside the eyes.
- Attach the ears to the sides of the head, roughly level with the eye line or one round above it.
- Sew the front legs to the body front so the paws project outward and help define the seated pose.
- Sew the back legs slightly wider apart, low on the sides, to widen the base.
- Stitch the belly patch between the front and back legs, then sew the tail at the rear and curl it upward.
- Attach the banana topper to the crown, slightly off center, with several passes through the base.
The finished piece should sit flat without additional support.
7 Technical Tips
- Use one stitch marker for the round start and a second pin at the center front of the head. A lost center line throws off the face panel and the monkey starts to read sideways.
- Stuff the head firmer than the body. Soft head fill makes 15 mm eyes sink inward and distorts the cream mask.
- Work invisible decreases only on the visible head rounds from R14 onward. Regular decreases on chenille leave wider slits that show stuffing.
- Place the eyes before the head is fully closed, ideally when 24 stitches remain. Waiting until 12 stitches makes the washer angle harder to control.
- Keep tail stuffing very light. Overfilled tails fight the curl and push the monkey backward when seated.
- Pin both ears before sewing either one permanently. A difference of even 2 rounds in height is obvious on a round plush head.
- Weave tails in at least 4 directional passes through the chenille core. Short back-and-forth burying slips out faster in velvet-style yarn.
Conclusion
This monkey amigurumi crochet pattern works because the species markers are handled in the right order: tail curl, broad face mask, round ears, and short seated limbs. The verified plush references point to an 18 cm class project in chenille yarn with large safety eyes, and that scale fits the supplied photo well. Crochet the head first, dry-pin every part before sewing, then adjust the ear line and paw angle before final assembly. Share the result on Pinterest and Instagram with #BananaTopMonkey. One practical question remains after finishing: did you place the tail high enough to keep the monkey silhouette readable from the side?









