Introduction
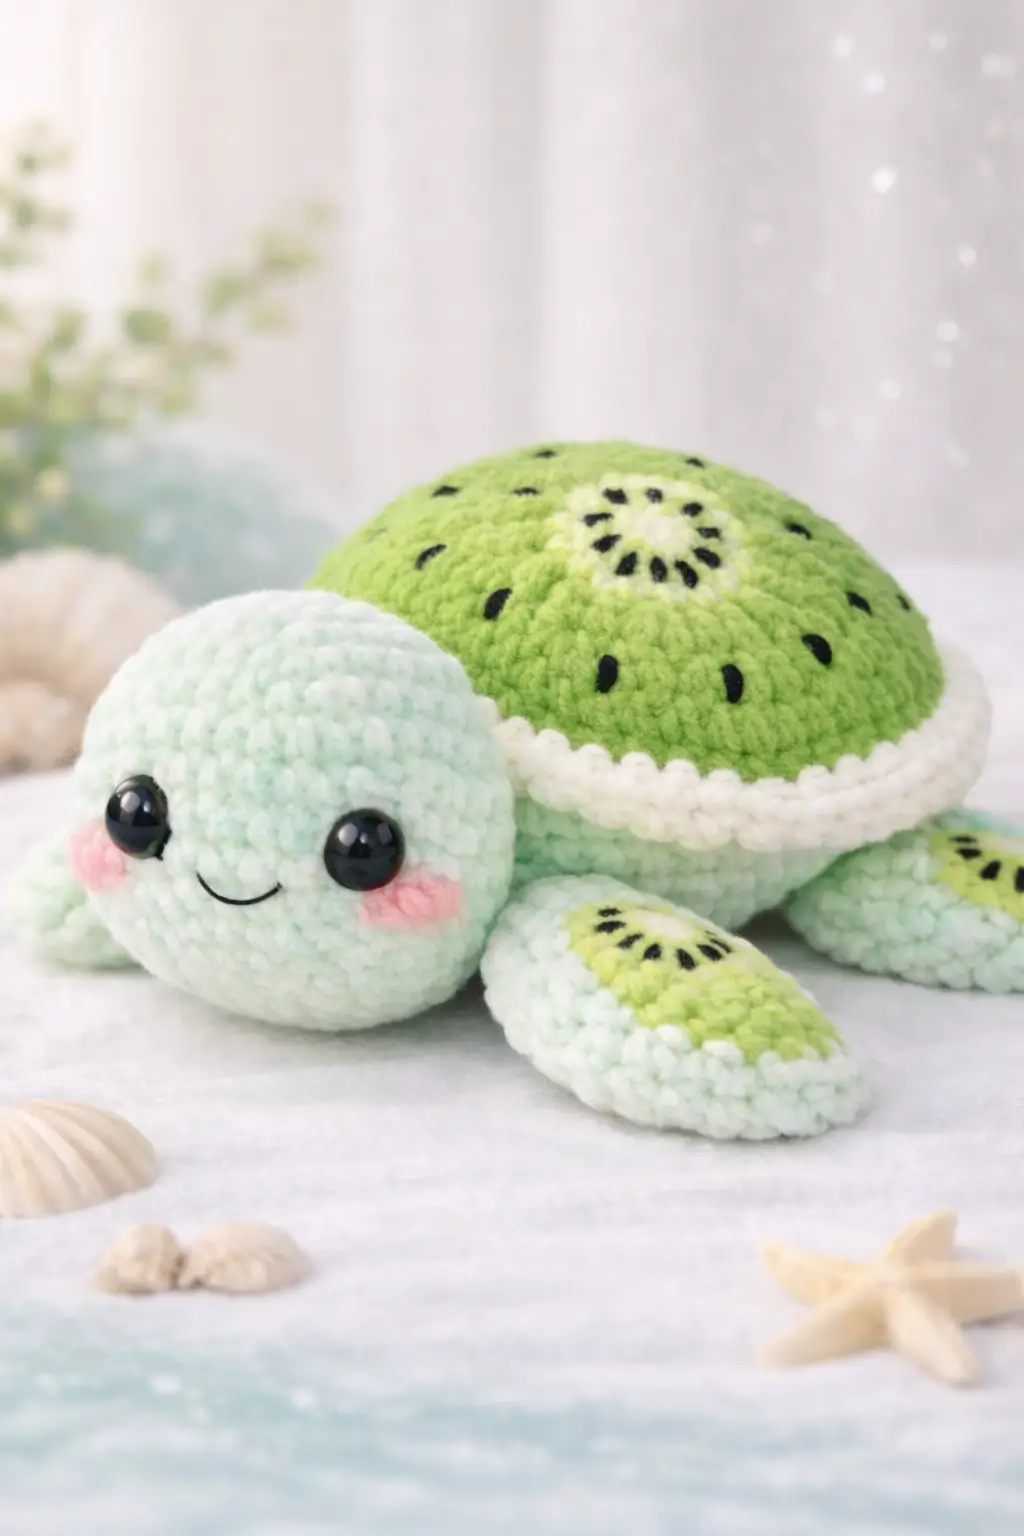
A kiwi turtle fails at the shell edge first; if that pale fruit ring sits flat, the whole design reads as a plain turtle. This kiwi turtle amigurumi uses plush yarn, a 5 mm hook, 12 mm eyes, and a compact body that lands close to the small-to-medium fruit-turtle range seen in current listings. You make it for a fast gift, desk plush, or market piece with a shape buyers recognize at a glance.
The Design: What Makes Kiwi Turtle Different
The shell carries the entire illusion. A standard turtle dome is not enough, because the kiwi read depends on three layers: pale center, black seeds, then a raised cream rind before the outer green edge. Miss one layer and the fruit reference weakens. You also need a flatter sea-turtle profile than a land turtle would use, since broad front flippers keep the body from tipping forward under a large head.
You will notice the head sits slightly oversized relative to the shell height. That is deliberate. In plush turtle work, a larger head pulls the face forward, which makes 12 mm eyes look balanced rather than crowded. The maker also needs a clean flipper spread. A common mistake in a fruit turtle crochet pattern is attaching all four flippers on the same angle, which makes the body look square instead of gliding. In better kiwi turtle crochet pattern builds, the front pair is wider and the back pair shorter.
Project Info at a Glance
| Skill Level | Time | Finished Size | Hook | Best For |
|---|---|---|---|---|
| Easy-intermediate | 3–4 hours | about 12–14 cm in plush yarn | 5.0 mm | gifts, markets, fruit-animal displays |
Verified market references for kiwi turtles range from 6 cm in small cotton versions to about 10 cm in a kiwi sea turtle listing; plush yarn scales the same silhouette upward.
Materials and Tools
Yarn
- Pale mint green plush yarn — bulky/velvet — 40–50 g — YarnArt Dolce or similar plush base is consistent with fruit-turtle listings.
- Kiwi green plush yarn — bulky/velvet — 20–25 g — for shell dome and flipper tops.
- Cream or white plush yarn — bulky/velvet — 10–15 g — for the kiwi rind.
- Pale yellow-green or off-white yarn — small amount — for kiwi center patch.
- Black embroidery thread or fine yarn — small amount — for seeds and smile.
- Pink blush yarn or soft pastel thread — small amount — for cheek patches.
Tools
- Hook 5.0 mm
- 12 mm safety eyes for plush scale
- Polyester stuffing
- Yarn needle
- Stitch markers
- Scissors
Abbreviations
MR = magic ring
sc = single crochet
inc = increase
dec = decrease
sl st = slip stitch
ch = chain
BLO = back loop only
FLO = front loop only
hdc = half double crochet
bobble = 5-dc bobble stitch
Invisible decrease keeps the front of the stitch smooth, which matters most around the head and underside where plush yarn can bulk at every closing round.
Pattern — Step by Step
Continuous spiral unless noted.
Head (Make 1)
Yarn: pale mint — Source: standard amigurumi math adapted to the plush kiwi-turtle proportions seen in current listings.
R1: 6 sc in MR (6)
R2: inc x6 (12)
R3: (sc, inc) x6 (18)
R4: (2 sc, inc) x6 (24)
R5: (3 sc, inc) x6 (30)
R6: (4 sc, inc) x6 (36)
R7–11: sc around (36)
R12: (4 sc, dec) x6 (30)
R13: (3 sc, dec) x6 (24)
Insert safety eyes between R8 and R9, about 8 sts apart. Add smile centered 2 rounds below.
R14: (2 sc, dec) x6 (18)
Stuff firmly, but do not over-pack the lower face.
R15: (sc, dec) x6 (12)
R16: dec x6 (6)
Fasten off. Leave a 20 cm tail.
Body Underside (Make 1)
Yarn: pale mint — Source: standard amigurumi math informed by no-sew turtle underside shaping.
R1: 6 sc in MR (6)
R2: inc x6 (12)
R3: (sc, inc) x6 (18)
R4: (2 sc, inc) x6 (24)
R5: (3 sc, inc) x6 (30)
R6: (4 sc, inc) x6 (36)
R7: sc around (36)
Fasten off. Leave a 35 cm tail for sewing to shell.
Front Flippers (Make 2)
Yarn: pale mint with kiwi top accent — Source: standard turtle flipper shaping based on broad front-flipper references.
R1: 6 sc in MR (6)
R2: inc x6 (12)
R3: (sc, inc) x6 (18)
R4: sc around (18)
Flatten lightly.
R5: sc 8, fold piece flat, sc 1 through both sides to close first point, hdc 1 through both sides, sc 1 through both sides, hdc 1 through both sides, sc 1 through both sides, sl st 1 through both sides to finish.
Fasten off. Leave a 20 cm tail.
For the photo look, embroider a small kiwi-center oval on the top of one front flipper after assembly, or crochet a tiny patch and sew it on.
Back Flippers (Make 2)
Yarn: pale mint
R1: 6 sc in MR (6)
R2: inc x6 (12)
R3: (sc, inc) x6 (18)
R4: sc around (18)
Flatten.
R5: sc through both sides across to close (9)
Fasten off. Leave a 15 cm tail.
Shell Dome (Make 1)
Yarn: kiwi green, cream, pale yellow-green — Source: standard amigurumi math with kiwi-specific edge treatment inspired by loop-worked turtle shell references.
R1: with pale yellow-green, 6 sc in MR (6)
R2: inc x6 (12)
Change to cream/off-white.
R3: (sc, inc) x6 (18)
Change to kiwi green.
R4: (2 sc, inc) x6 (24)
R5: (3 sc, inc) x6 (30)
R6: (4 sc, inc) x6 (36)
R7: (5 sc, inc) x6 (42)
R8–10: sc around (42)
Change to cream/white.
R11: BLO sc around (42)
R12: in both loops, bobble, sc 2 around repeat to end (42)
Fasten off. Leave a 35 cm tail.
The bobble round creates the raised rind. Keep bobbles facing outward.
Kiwi Center Patch (Make 1)
Yarn: pale yellow-green
R1: 6 sc in MR (6)
R2: inc x6 (12)
Fasten off. Leave a 20 cm tail.
Sew to the top center of the shell dome.
Seed Embroidery
Yarn: black — Source: image-derived detailing
Add 10–12 short satin stitches around the kiwi center patch. Add 8–10 more seeds spaced over the green shell top. Keep them radial near the center and scattered toward the outer shell.
Cheek Patches (Make 2)
Yarn: pink
R1: 6 sc in MR (6)
Sl st to first st.
Fasten off. Leave a 12 cm tail.
Tail (Make 1)
Yarn: pale mint
R1: 4 sc in MR (4)
R2: sc around (4)
Fasten off. Leave a 12 cm tail.
Optional Flipper Kiwi Patch (Make 1)
Yarn: pale yellow-green, kiwi green, black
R1: 6 sc in MR with pale yellow-green (6)
R2: change to kiwi green, inc x6 (12)
Fasten off. Embroider 5 small black seeds.
Sew onto one front flipper top.
Assembly
- Sew the head to the front of the body underside, centering it across about 10 stitches.
- Place the front flippers on each side just behind the head line, angled slightly forward.
- Attach the back flippers near the rear third of the body, angled slightly outward.
- Sew the tail at the center back between the back flippers.
- Position the shell dome over the body underside and pin it before stitching.
- Check the white bobble rind from the front; it should sit visibly proud of the green shell.
- Stitch the shell to the body, stuffing as you go until the turtle feels full but still low and flat.
- Sew the cheek patches below and slightly outside each eye.
- Add or adjust the smile embroidery so it curves gently upward between the cheeks.
- Sew the optional flipper kiwi patch in place and weave in all ends.
The finished kiwi turtle amigurumi should rest flat, with the shell centered and the front flippers carrying the visual width.
7 Technical Tips
- Mark the shell center before sewing the kiwi patch. If the patch sits even 5 mm off-center, the seed ring looks skewed from the front.
- Do not overstuff the head base. Too much fill under the eyes pushes the muzzle forward and changes the face from round to bulb-shaped.
- Use invisible decrease on R12 onward of the head. Plush yarn hides structure fast, but bulky front-loop decreases still leave ridges under bright light.
- Install the eyes before the head drops below 24 stitches. After that point, thick yarn makes washer placement awkward and can twist the eye posts.
- Keep the shell flatter than the head. A shell stuffed to the same firmness as the head tends to lift the turtle off the table and ruins the sea-turtle profile.
- Pin the flippers at four distinct angles before sewing. Front flippers should point slightly forward; back flippers should sit more laterally or the body reads boxy.
- Weave tails back through at least 3 direction changes. Chenille sheds under friction, and a single straight pass can work loose after handling.
Conclusion
This kiwi turtle amigurumi works because the shell reads like fruit before the eye registers turtle anatomy. The cream rind, pale center, and seed spacing do that job. Start with the shell first if you want to test color balance, then match the head size to the flipper spread before final assembly. Save the post to Pinterest, then share your finished toy on Instagram with #KiwiTurtlePattern so the shell detail stays visible in search. One last check matters: did your black seeds form a clean ring around the kiwi center, or do they drift too far into the outer green dome?









