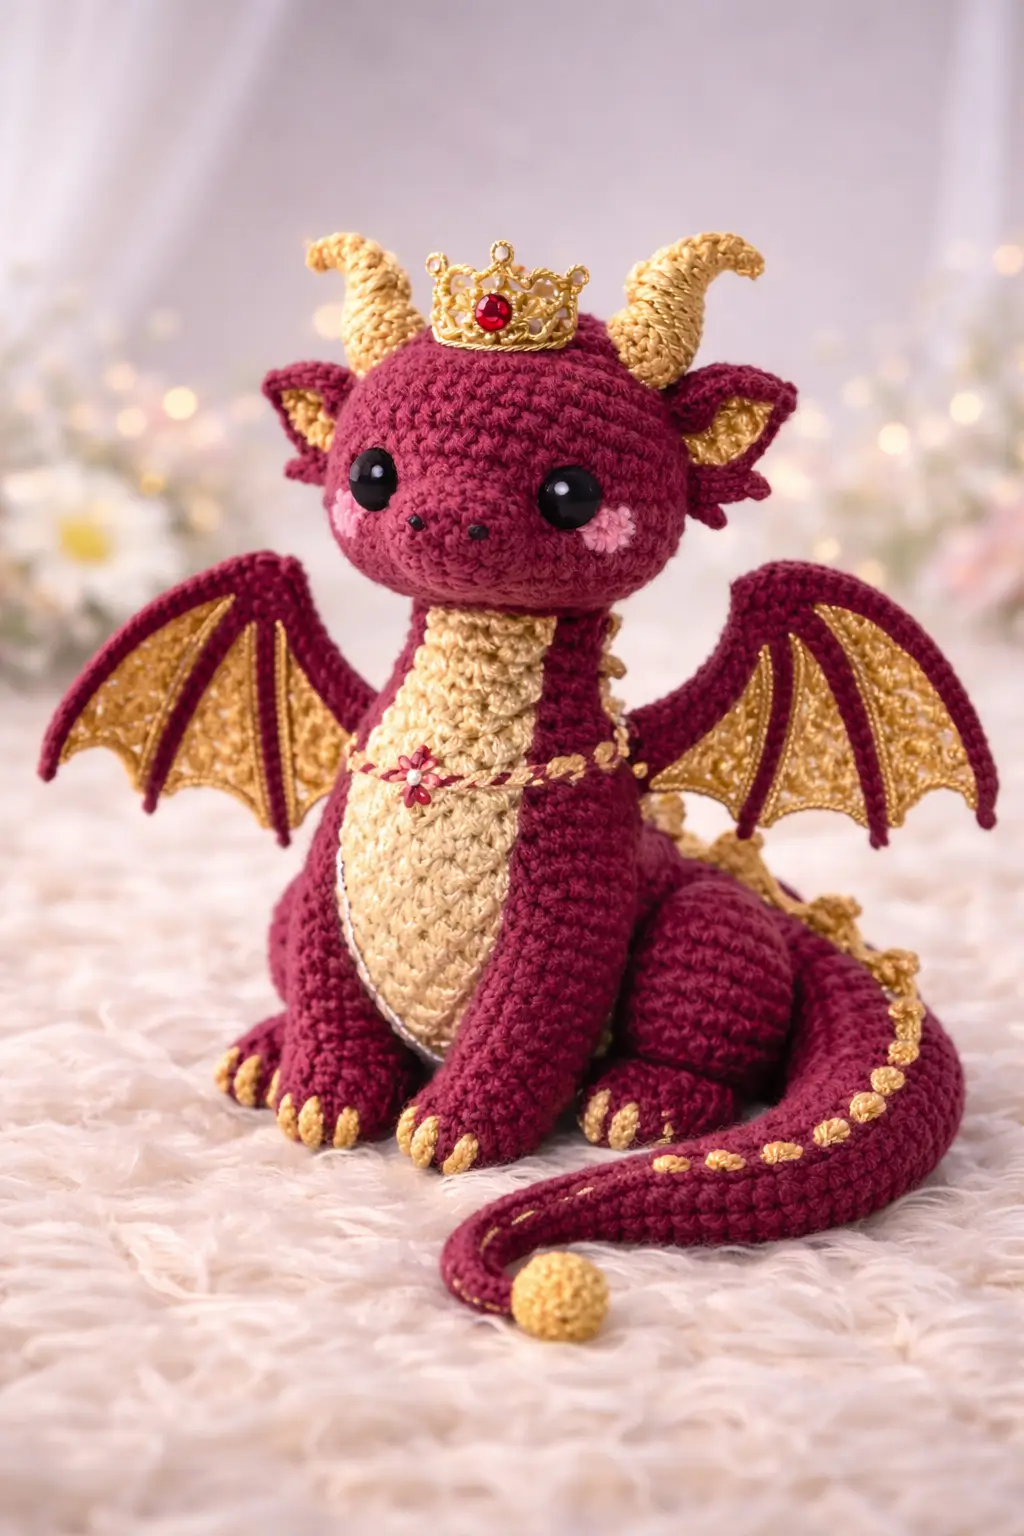
A crowned dragon needs wing clearance behind the jawline, or the silhouette fails before assembly even starts. This dragon amigurumi crochet pattern is built for a seated fantasy dragon with DK-to-light-worsted yarn, a 3.0 mm hook, 12 mm safety eyes, and a finished height close to 20 cm on comparable builds. It suits an intermediate maker who needs a display piece with stable posture and readable wing structure.
The Design: What Makes This Dragon Different
This dragon is not built like a rounded dinosaur with extra parts added later. The head has to project forward, because dragons read from profile first. Horns must sit high enough to clear the ears. Wings need to anchor behind the neck line rather than directly at shoulder center, otherwise the whole figure looks compressed.
The second decision is the belly panel. A long contrast insert visually lengthens the neck and chest, which helps a sitting dragon appear taller without increasing body bulk. That matters in a sitting dragon amigurumi, especially when the front legs are long and vertical.
The third decision is tail balance. A long curved tail counters the visual weight of the crown and wings. The common mistake with a dragon amigurumi free pattern adaptation is making the head too spherical and the neck too short. The toy then reads as generic instead of draconic.
Project Info at a Glance
| Skill Level | Time | Finished Size | Hook | Best For |
|---|---|---|---|---|
| Intermediate | 8–12 hrs | approx. 20 cm seated | 3.0 mm | Shelf decor, fantasy gifts, themed displays |
Comparable dragon patterns in current search results commonly sit around 18–20 cm with 2.5–3.0 mm hooks, depending on yarn and shaping.
Materials and Tools
Yarn
- Burgundy — DK/light worsted — 50–56 g — Stylecraft Special DK or similar smooth cotton/acrylic blend
- Gold — DK/light worsted — 20–25 g — for belly, horns, wing membranes, claws, tail tip
- Light pink — small amount — for cheek patches
- Black embroidery thread — small amount — nostrils
- Metallic gold thread or trim — small amount — optional decorative edging
- Optional stiff metallic thread or fine wire substitute for crown stability
Tools
- Hook 3.0 mm
- 12 mm safety eyes
- Polyfill stuffing
- Tapestry needle
- Stitch markers
- Pins
- Fabric glue or sewing thread for crown only, optional
Current comparable dragon listings and Ravelry records place this category mostly in DK/3-ply to medium yarn with 2.5–4.0 mm hooks and 6–12 mm eyes depending on the final size.
Abbreviations
MR / sc / inc / dec / sl st / ch / BLO / FLO
Use the invisible decrease for exposed shaping lines on the head and body; standard decreases leave a visible ridge on smooth dragon faces.
Pattern — Step by Step
Continuous spiral unless noted. This is a custom photo-based pattern using standard amigurumi stitch math.
Head (Make 1)
Yarn: Burgundy — Source: Standard amigurumi math
R1: 6 sc in MR (6)
R2: inc x6 (12)
R3: (sc, inc) x6 (18)
R4: (2 sc, inc) x6 (24)
R5: (3 sc, inc) x6 (30)
R6: (4 sc, inc) x6 (36)
R7–12: sc around (36)
R13: (4 sc, dec) x6 (30)
R14: (3 sc, dec) x6 (24)
Insert safety eyes between R9 and R10, 8 sts apart. Add stuffing gradually.
R15: (2 sc, dec) x6 (18)
R16: (sc, dec) x6 (12)
R17: dec x6 (6)
Flatten opening and close. Do not overstuff the lower muzzle line.
Fasten off. Leave 20 cm tail.
Snout (Make 1)
Yarn: Burgundy — Source: Standard amigurumi math
R1: 6 sc in MR (6)
R2: inc x6 (12)
R3: sc around (12)
R4: (4 sc, dec) x2 (10)
Embroider nostrils after sewing. Light stuffing only.
Fasten off. Leave 18 cm tail.
Body (Make 1)
Yarn: Burgundy and Gold — Source: Standard amigurumi math
With gold:
R1: 6 sc in MR (6)
R2: inc x6 (12)
R3: (sc, inc) x6 (18)
R4: (2 sc, inc) x6 (24)
R5: (3 sc, inc) x6 (30)
R6: (4 sc, inc) x6 (36)
R7–10: sc around (36)
Change to burgundy sides and back, keep gold center chest panel for front 12 sts if preferred.
R11: (4 sc, dec) x6 (30)
R12–14: sc around (30)
R15: (3 sc, dec) x6 (24)
R16: sc around (24)
R17: (2 sc, dec) x6 (18)
Stuff firmly at base, lighter at top for easier neck join.
Fasten off. Leave 25 cm tail.
Front Legs (Make 2)
Yarn: Burgundy with Gold claws — Source: Standard amigurumi math
With gold:
R1: 6 sc in MR (6)
R2: inc x6 (12)
Change to burgundy in BLO.
R3–9: sc around (12)
R10: (4 sc, dec) x2 (10)
R11–13: sc around (10)
Insert a little stuffing in paw only. Flatten top for sewing.
Fasten off. Leave 20 cm tail.
Back Legs (Make 2)
Yarn: Burgundy with Gold claws — Source: Standard amigurumi math
With gold:
R1: 6 sc in MR (6)
R2: inc x6 (12)
R3: (sc, inc) x6 (18)
Change to burgundy in BLO.
R4–6: sc around (18)
R7: (4 sc, dec) x3 (15)
R8: sc around (15)
R9: (3 sc, dec) x3 (12)
R10–11: sc around (12)
Stuff lower foot and hock area. Keep upper edge soft for seated shaping.
Fasten off. Leave 22 cm tail.
Horns (Make 2)
Yarn: Gold — Source: Standard amigurumi math
R1: 6 sc in MR (6)
R2: sc around (6)
R3: (2 sc, inc) x2 (8)
R4: sc around (8)
R5: (3 sc, inc) x2 (10)
R6–7: sc around (10)
Bend slightly while stuffing so the horn curves backward.
Fasten off. Leave 18 cm tail.
Ears (Make 2)
Yarn: Burgundy outer, Gold inner — Source: Standard amigurumi math
Outer ear:
R1: ch 5
R2: starting in 2nd ch from hook, sc 3, 3 sc in last ch, working on opposite side sc 2, inc (10)
R3: sc around (10)
Inner ear:
Repeat R1–2 only in gold.
Do not stuff. Sew inner ear onto outer ear before attaching to head.
Fasten off. Leave 15 cm tail.
Wings (Make 2)
Yarn: Burgundy frame, Gold membrane — Source inspiration: comparable dragon wings are commonly worked in rows rather than rounds.
With burgundy:
R1: ch 13
R2: starting in 2nd ch from hook, sc 12 (12)
R3: ch 1, turn, dec, sc 8, dec (10)
R4: ch 1, turn, sc 10 (10)
R5: ch 1, turn, dec, sc 6, dec (8)
R6: ch 1, turn, sc 8 (8)
R7: ch 1, turn, dec, sc 4, dec (6)
Wing fingers, work from base edge with burgundy:
Finger 1: ch 9, sl st back along chain
Finger 2: ch 7, sl st back
Finger 3: ch 6, sl st back
Finger 4: ch 5, sl st back
Membrane: fill each section with gold surface crochet, sc, or whipstitched felted crochet inserts.
Keep wings flat. Blocking helps symmetry.
Fasten off. Leave 22 cm tail.
Tail (Make 1)
Yarn: Burgundy with Gold tip — Source: Standard amigurumi math
With burgundy:
R1: 6 sc in MR (6)
R2–8: sc around (6)
R9: (2 sc, inc) x2 (8)
R10–14: sc around (8)
R15: (3 sc, inc) x2 (10)
R16–20: sc around (10)
R21: (4 sc, inc) x2 (12)
R22–28: sc around (12)
Tip in gold:
R29: change to gold, sc around (12)
R30: (4 sc, dec) x2 (10)
R31: (3 sc, dec) x2 (8)
R32: (2 sc, dec) x2 (6)
R33: dec x3 (3)
Stuff lightly through R20 only. Leave final gold tip rounded and firm.
Fasten off. Leave 24 cm tail.
Belly Panel (Make 1)
Yarn: Gold — Source: Standard amigurumi math
R1: ch 7
R2: starting in 2nd ch, sc 5, 3 sc in last ch, opposite side sc 4, inc (14)
R3: inc, sc 4, inc x3, sc 4, inc x2 (20)
R4: sc around (20)
R5: inc, sc 8, inc x2, sc 8, inc (24)
R6–9: sc around (24)
This piece should read as a long chest shield, not a circle.
Fasten off. Leave 25 cm tail.
Cheek Patches (Make 2)
Yarn: Light pink — Source: Standard amigurumi math
R1: 6 sc in MR (6)
R2: inc x6 (12)
Fasten off. Leave 12 cm tail.
Crown (Make 1)
Yarn: Gold thread or fine cotton — Source: photo-based accessory
R1: ch 18, sl st to ring
R2: ch 3, sl st in next 2 sts repeat around to create points
R3: Add a small bead or stitched center jewel if desired
Stiffen with diluted craft glue if using thread. This accessory is decorative, not structural.
Fasten off. Leave 15 cm tail.
Neck Garland (Make 1)
Yarn: Gold with small burgundy flower detail — Source: photo-based accessory
R1: ch 30
R2: sl st across
Optional flower:
R1: 5 sc in MR
R2: (ch 2, sl st in next st) repeat around
Fasten off. Leave 15 cm tail.
Assembly
- Sew the snout to the lower front of the head, centered below the eye line.
- Attach the cheek patches one stitch below and slightly outside each eye.
- Sew the horns to the top of the head between R3 and R6, angled outward and back.
- Attach the ears just below the horns so the outer points flare sideways.
- Sew the head to the body with the belly panel centered to the front.
- Attach the front legs vertically at the chest sides so the paws touch the ground evenly.
- Sew the back legs at the lower body sides, slightly forward enough to support the seated angle.
- Attach the wings high on the back, behind the neck line, not on the side seam.
- Sew the tail low at the back body and curve it around the front for balance.
- Add the crown and neck garland last, then weave in all tails and check that the dragon sits level.
The completed piece should rest on front paws, back legs, and tail curve without tipping.
7 Technical Tips
- Mark the first stitch of every round on the head. Losing the round start on a 36-stitch plateau shifts both eye placement and horn symmetry by one stitch.
- Stuff the head firmly, but stop before the lower face turns spherical. A dragon muzzle needs a flatter front than a bear or cat design.
- Use invisible decreases on visible shaping lines. Standard decreases form bumps that show clearly on smooth DK yarn.
- Install the eyes before the final head decrease rounds. On this scale, placing 12 mm eyes after closure distorts the cheek line and stretches nearby stitches.
- Pin the wings before sewing and check rear view symmetry. Even a 5 mm height mismatch makes the dragon look twisted from the back.
- Keep the front leg stuffing limited to the paw section. Overstuffed legs push the chest upward and break the seated posture.
- Weave tail ends back through at least 4 cm of internal stitches. Short tail weaving on a curved tail loosens fast because the piece is handled at that exact point.
Conclusion
This dragon amigurumi crochet pattern works because the structure is handled in the right order: profile first, seat balance second, accessories last. The horns, wings, crown, and tail all compete for visual space, so spacing matters more than extra detailing. Finish the sewing, then photograph the dragon from front, side, and three-quarter view before trimming or stiffening the crown. Share the result on Pinterest and Instagram with #CrownedDragonPattern. One question remains useful for future revisions: should this dragon keep the long curved tail, or would a spade-shaped tail tip suit the wing span better?









