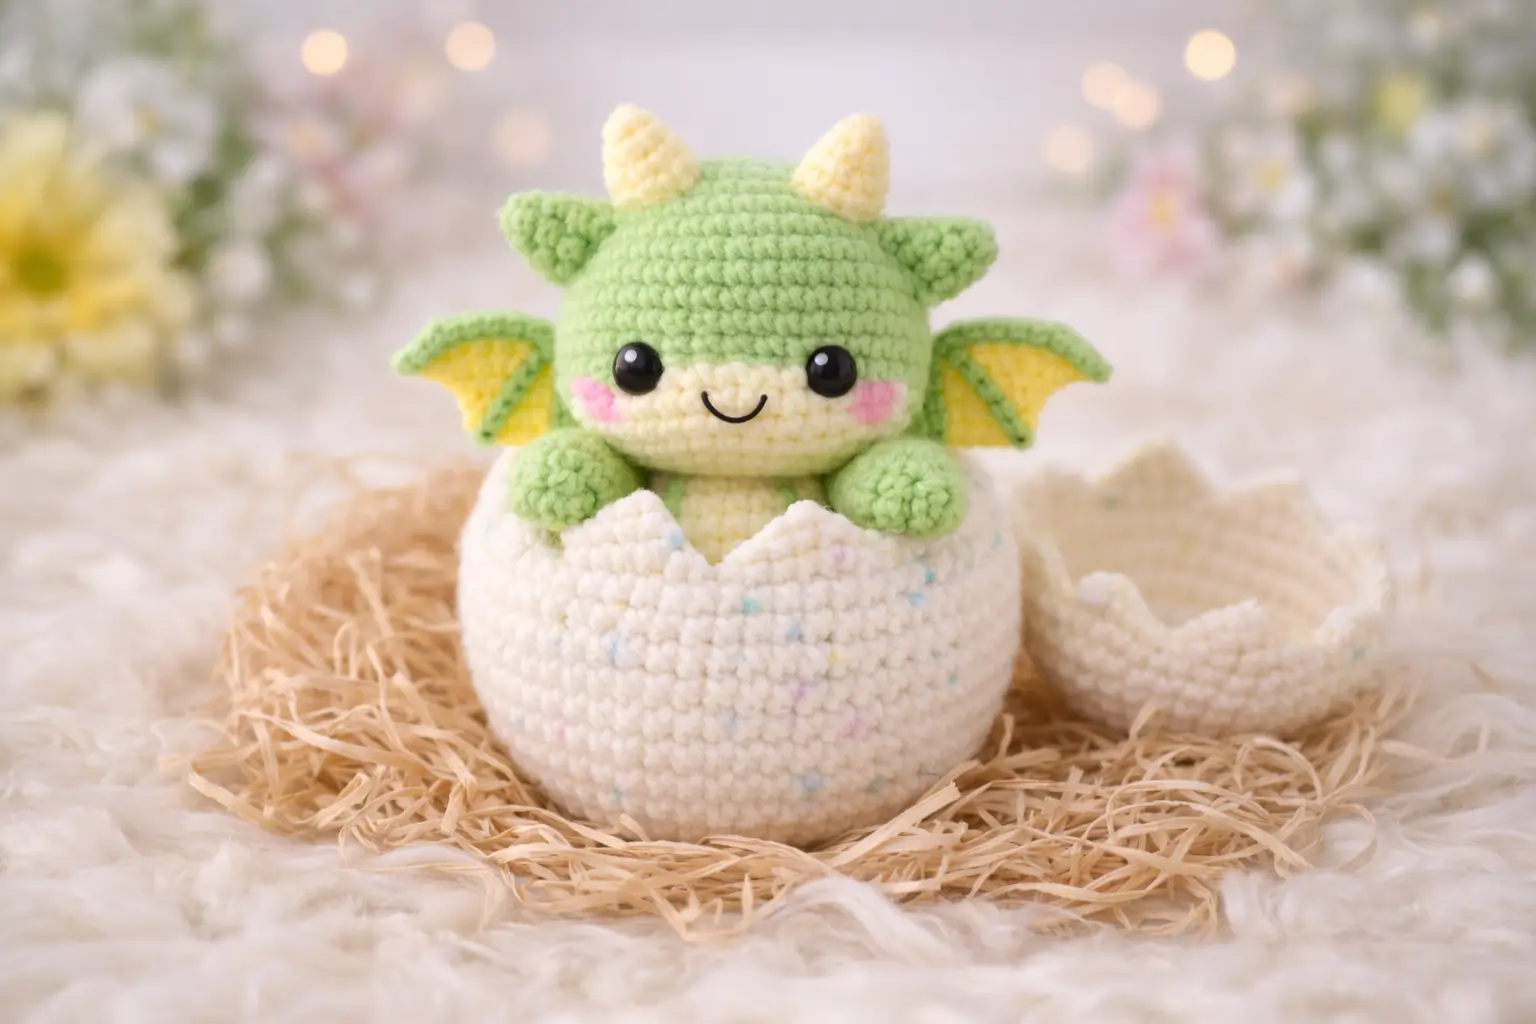
A baby dragon needs horns, wings, and a broken shell before the silhouette stops reading as a dinosaur. This baby dragon amigurumi crochet pattern builds all three with sport cotton, a 2.5 mm hook, and an 11 cm target size. The project fits an intermediate skill level and works well as nursery shelf decor because the egg base supports the pose.
The Design: What Makes This Baby Dragon Different
You need the head wider than the body here. That is the first structural decision, because the photographed dragon is a hatchling posed for frontal display, not a long reptilian creature. The second choice is a cream face band rather than a tiny separate snout. It gives the eyes a broad landing zone and keeps the face readable at small scale. Third comes the shell: a seated bowl with a jagged rim, not a closed egg. That stabilizes the piece and explains why the body can stay compact.
A common mistake with a baby dragon crochet pattern is pushing the wings too high on the head line. Then the toy reads like a bat with horns. In good hatching dragon amigurumi designs, the wings sit just behind the cheek line, and the horns stay short so the head remains juvenile.
Project Info at a Glance
| Skill Level | Time | Finished Size | Hook | Best For |
|---|---|---|---|---|
| Intermediate | 5–7 hours | 11 cm dragon, 13 cm egg scene | 2.5 mm | Shelf decor, baby gift, fantasy display |
Finished size, hook, and yarn references come from comparable verified baby dragon listings and hatching dragon patterns.
Materials and Tools
Yarn
- Pastel green — sport cotton — approx. 92 g available for main sections in comparable dragon builds — Schachenmayr Catania or Hobbii Friends/Rainbow Cotton 8/8 as comparable references
- Pale yellow — sport cotton — approx. 20 g accent range in comparable builds — same yarn family for horns, belly, and wing membranes
- Off-white speckled — sport cotton or light worsted cotton blend — egg shell
- Soft pink — small amount for cheek patches
- Black embroidery floss — smile
Tools
- Hook 2.5 mm
- Safety eyes 10 mm
- Polyester stuffing
- Tapestry needle
- Stitch markers
- Scissors
Abbreviations
MR / sc / inc / dec / sl st / ch / BLO / FLO
Use invisible decrease for all shaping rounds where a visible seam on the face or shell would break the surface line.
Pattern — Step by Step
Continuous spiral unless noted. Counts are verified round by round. Pattern proportions are drafted from the supplied photo and standard amigurumi math, with the head using a medium 36-st plateau to match the round hatchling look.
Head (Make 1)
Yarn: pastel green, then pale yellow face band
R1: 6 sc in MR (6)
R2: inc x6 (12)
R3: (sc, inc) x6 (18)
R4: (2 sc, inc) x6 (24)
R5: (3 sc, inc) x6 (30)
R6: (4 sc, inc) x6 (36)
R7–11: sc around (36)
R12: 10 sc in green, change to pale yellow, 16 sc, change to green, 10 sc (36)
R13–15: repeat color placement from R12 (36)
Insert 10 mm eyes between R10 and R11, spaced 8 sts apart across the pale yellow face band.
R16: (4 sc, dec) x6 (30)
R17: (3 sc, dec) x6 (24)
R18: (2 sc, dec) x6 (18)
Stuff firmly, especially the crown.
R19: (sc, dec) x6 (12)
R20: dec x6 (6)
Fasten off. Leave 20 cm tail.
Body (Make 1)
Yarn: pale yellow
R1: 6 sc in MR (6)
R2: inc x6 (12)
R3: (sc, inc) x6 (18)
R4: (2 sc, inc) x6 (24)
R5: (3 sc, inc) x6 (30)
R6–8: sc around (30)
R9: (3 sc, dec) x6 (24)
R10: sc around (24)
R11: (2 sc, dec) x6 (18)
Stuff lightly. The shell hides most of this section.
R12: sc around (18)
Fasten off. Leave 25 cm tail.
Arms / Front Legs (Make 2)
Yarn: pastel green
R1: 6 sc in MR (6)
R2: inc x6 (12)
R3–4: sc around (12)
R5: (sc, dec) x4 (8)
R6–7: sc around (8)
Stuff only the paw end.
Fasten off. Leave 18 cm tail.
Ears (Make 2)
Yarn: pastel green
R1: 4 sc in MR (4)
R2: (sc, inc) x2 (6)
R3: (2 sc, inc) x2 (8)
R4: sc around (8)
Flatten.
Fasten off. Leave 15 cm tail.
Horns (Make 2)
Yarn: pale yellow
R1: 4 sc in MR (4)
R2: sc around (4)
R3: (sc, inc) x2 (6)
R4–5: sc around (6)
Stuff lightly.
Fasten off. Leave 15 cm tail.
Wings (Make 2)
Yarn: pastel green frame, pale yellow membrane
Ch 9
Row 1: sc in 2nd ch from hook and across (8)
Row 2: ch 1, turn, dec, 4 sc, dec (6)
Row 3: change to pale yellow, ch 1, turn, sc across (6)
Row 4: ch 1, turn, dec, 2 sc, dec (4)
Row 5: ch 1, turn, sc across (4)
Do not fasten off. Switch to green and sc evenly around the outer edge, placing 2 sc in the top corner and 2 sc in the lower corner to frame the membrane.
Fasten off. Leave 20 cm tail.
Cheek Patches (Make 2)
Yarn: soft pink
R1: 6 sc in MR (6)
Sl st to first sc.
Fasten off. Leave 10 cm tail.
Egg Shell Base (Make 1)
Yarn: off-white speckled
R1: 6 sc in MR (6)
R2: inc x6 (12)
R3: (sc, inc) x6 (18)
R4: (2 sc, inc) x6 (24)
R5: (3 sc, inc) x6 (30)
R6: (4 sc, inc) x6 (36)
R7: (5 sc, inc) x6 (42)
R8: (6 sc, inc) x6 (48)
R9: BLO sc around (48)
R10–16: sc around (48)
R17: (6 sc, dec) x6 (42)
R18: sc around (42)
R19: work jagged rim: (sl st, ch 3, sc in 2nd ch, hdc in next ch, skip 1 st on shell, sl st in next st) repeat around
Fasten off. Weave in.
Egg Top Fragment (Make 1)
Yarn: off-white speckled
R1: 6 sc in MR (6)
R2: inc x6 (12)
R3: (sc, inc) x6 (18)
R4: (2 sc, inc) x6 (24)
R5–6: sc around (24)
R7: form jagged rim with the same sequence used on the shell base, but stop after covering roughly three quarters of the opening.
Fasten off. Leave 20 cm tail.
Assembly
- Sew the head to the body with the cream section centered at front.
- Place the horns on the crown, 4 stitches apart.
- Sew the ears slightly lower and wider than the horns.
- Attach the cheek patches below the eyes and slightly outward from the smile.
- Embroider the smile across the center of the pale yellow face band.
- Sew the arms to the upper body so the paws rest on the shell rim.
- Attach the wings to the back of the head-body join, angled slightly outward.
- Set the body into the shell base and tack the lower body in place with a few hidden stitches.
- Position the egg top fragment at the side or back as a fallen cap.
- Shape the rim points with your fingers and adjust stuffing so the dragon sits level.
The finished piece should stand upright without extra support if the shell wall and head stuffing are balanced.
7 Technical Tips
- Mark the first stitch of every round in the head and shell. Losing the start point by even one stitch shifts the face band and throws off eye symmetry.
- Stuff the head firmer than the body. A soft head collapses at the eye washers and makes 10 mm eyes tilt inward.
- Use invisible decreases on R16–R20 of the head. Front-loop dec marks are obvious on pale green yarn and flatten the cheeks.
- Insert eyes before the head drops below 24 stitches. Waiting until 18 stitches makes washer placement harder and increases distortion around the face band.
- Pin both wings before sewing. A difference of only 2 rounds in height makes the dragon look twisted from the front.
- Keep the shell base at 48 stitches through the wall section. Fewer stitches narrow the bowl and the body will ride too high above the crack line.
- Weave tails back through at least 4 directional changes. Short tail burying in sport cotton tends to creep out along the shell rim after handling.
Conclusion
This baby dragon amigurumi crochet pattern works because the proportions stay disciplined: broad head, short body, low wings, and a shell that acts as both prop and support. Start with the head and shell first, then test the pose before final sewing. For visibility, photograph the finished piece from the front and three-quarter angle, then post it to Pinterest and Instagram with #BabyDragonInEgg. One question remains useful during finishing: did your horns land far enough forward to read as dragon, or does the face still lean dinosaur?









