Introduction
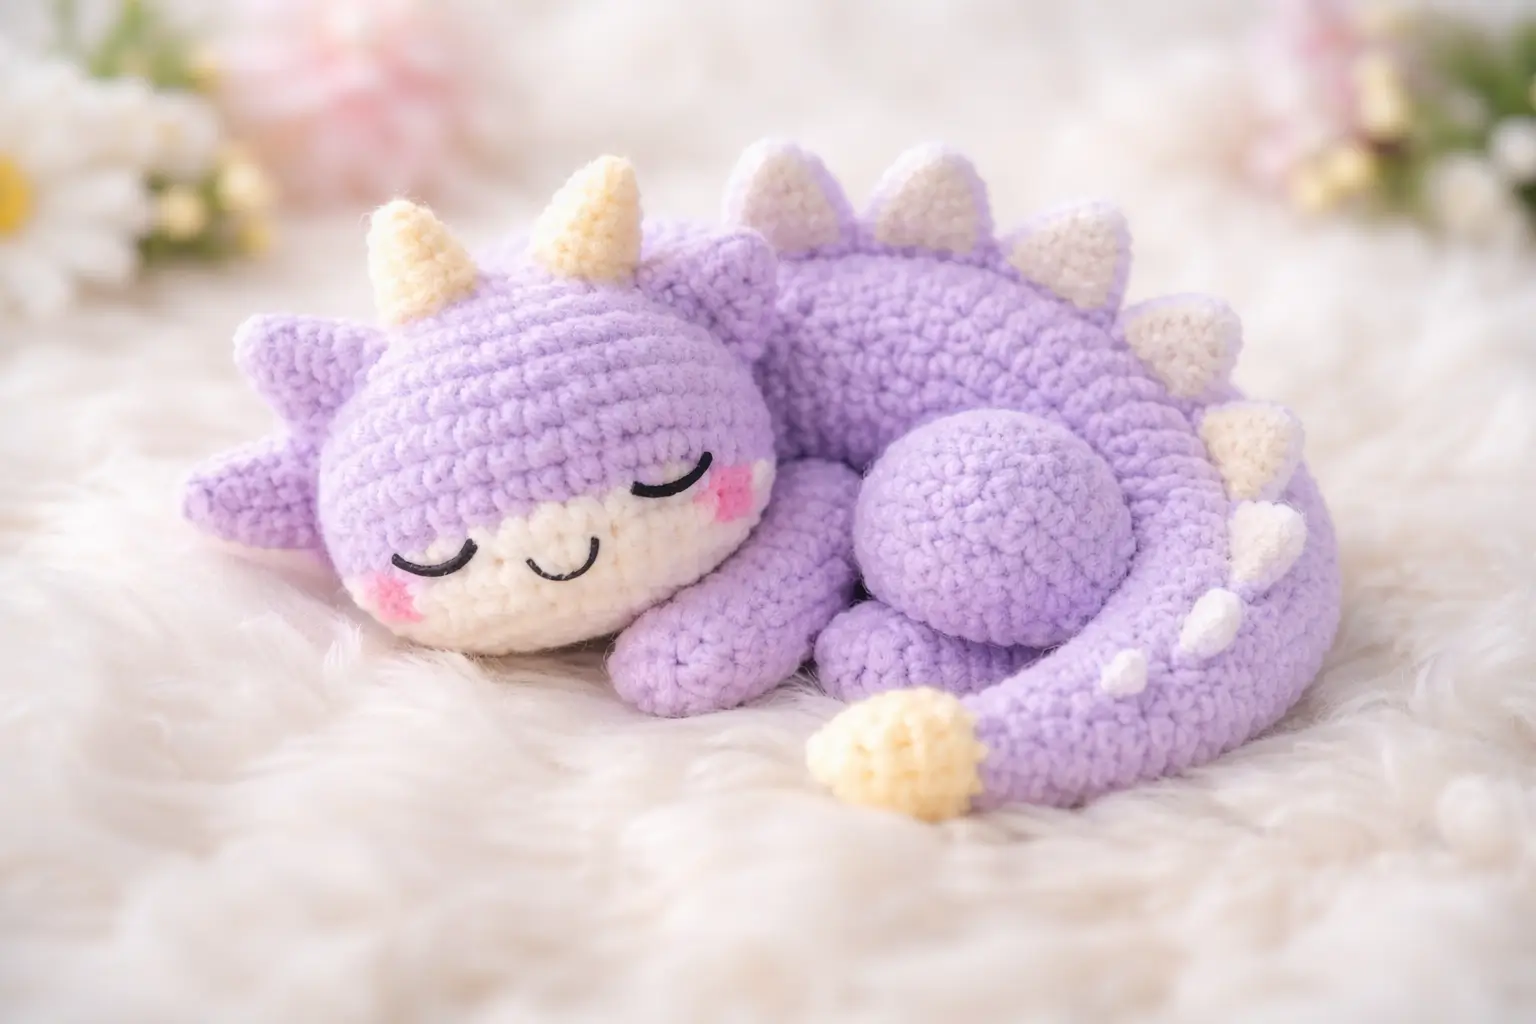
A sleeping dragon needs its back spikes to read through the curve of the coil, or it stops looking like a dragon from above. This dragon amigurumi crochet pattern uses plush yarn, simple shape stacking, embroidered facial details, and a medium body coil for an intermediate plush that works well as nursery decor, shelf display, or a photographed gift sample.
The Design: What Makes This Dragon Different
You are not building an upright mascot here. The entire read depends on three structural choices: a low head angle, a coil with enough depth to hold shape, and short spikes that do not collapse into the body. The lower face patch matters because it creates a clear muzzle break without adding a long snout. That keeps the silhouette juvenile rather than reptilian.
A second choice is the closed-eye face. In a sleeping dragon crochet pattern, embroidered lashes sit flatter than plastic eyes and remove the glare issue that often makes plush dragons look awake in photos. The third choice is the tail path. A baby dragon amigurumi with a loose tail looks unfinished; a tail wrapped into the curve gives the body a complete ring and makes the plush easier to stage.
The common failure is scale drift. Makers often increase the head, then leave the horns, spikes, and limbs too small. The result is a dragon that reads as a blob with accessories instead of a curled dragon crochet design.
Project Info at a Glance
| Skill Level | Time | Finished Size | Hook | Best For |
|---|---|---|---|---|
| Intermediate | 6–8 hours | 20 cm baseline from verified sport-weight sample; larger in chenille adaptation | 2.5 mm verified baseline; size up for plush yarn | nursery shelf, gift sample, content photography |
Verified baseline data for dragon patterns commonly lands around 20 cm in sport yarn with a 2.5 mm hook, while DK patterns often use 2.5–3.0 mm hooks. This photo-inspired version scales larger because the plush texture is thicker than those public references.
Materials and Tools
Yarn
- Lavender plush chenille — super bulky plush adaptation — about 120–160 g — Himalaya Dolphin Baby, Honey Bunny, or similar
- Cream plush chenille — super bulky plush adaptation — about 25–40 g — same line as main yarn
- White plush chenille — small amount for back spots — about 5–10 g
- Soft pink yarn or blush thread — very small amount for cheeks
- Black embroidery floss — for sleeping eyes and smile
Public dragon patterns that publish gram counts show a wide spread depending on yarn weight. This plush adaptation needs fewer meters but more bulk per stitch.
Tools
- Hook 4.5 mm to 5.5 mm for plush adaptation
- Tapestry needle
- Polyester stuffing
- Stitch markers
- Pins or clips
- Small scissors
Verified public baselines for dragon patterns commonly list 2.5 mm to 4.0 mm hooks and 12 mm safety eyes, but this sleeping version uses embroidery instead of eyes to match the photo.
Abbreviations
MR / sc / inc / dec / sl st / ch / BLO
Use invisible decrease instead of a standard two-stitch pull-through when closing visible curves; the seam line stays tighter and the plush fabric shows fewer holes.
Pattern — Step by Step
Continuous spiral unless noted.
Head (Make 1)
Yarn: lavender — Source: Standard amigurumi math adapted to photo
R1: 6 sc in MR (6)
R2: inc x6 (12)
R3: (sc 1, inc) x6 (18)
R4: (sc 2, inc) x6 (24)
R5: (sc 3, inc) x6 (30)
R6: (sc 4, inc) x6 (36)
R7: (sc 5, inc) x6 (42)
R8–R12: sc around (42)
R13: (sc 5, dec) x6 (36)
R14: (sc 4, dec) x6 (30)
R15: (sc 3, dec) x6 (24)
Stuff firmly. Keep the front full and the lower back slightly flatter so the head can rest against the coil.
R16: (sc 2, dec) x6 (18)
R17: (sc 1, dec) x6 (12)
R18: dec x6 (6)
Fasten off. Close. Leave 20 cm tail.
Face Patch (Make 1)
Yarn: cream — Source: Standard oval adaptation from photo
Ch 7.
R1: starting in 2nd ch from hook, sc 5, 3 sc in last ch, work on opposite side, sc 4, inc in last ch (14)
R2: inc, sc 4, inc x3, sc 4, inc x2 (20)
R3: sc 1, inc, sc 4, (sc 1, inc) x3, sc 4, (sc 1, inc) x2 (26)
R4: sc around (26)
Fasten off. Leave 25 cm tail.
Position low on the head so it wraps the front underside, not the center line.
Cheek Patches (Make 2)
Yarn: pink or blush yarn — Source: Standard flat circle
R1: 6 sc in MR (6)
R2: inc x6 (12)
Fasten off. Leave 10 cm tail.
Flatten lightly; these are blush pads, not raised cheeks.
Horns (Make 2)
Yarn: cream — Source: Public horn shaping aligns with common dragon cone logic and verified horn progression references.
R1: 6 sc in MR (6)
R2: sc around (6)
R3: (sc 2, inc) x2 (8)
R4: sc around (8)
R5: (sc 3, inc) x2 (10)
Fasten off. Leave 15 cm tail.
Do not stuff. Fold the base lightly into an oval before sewing.
Side Head Frills (Make 2)
Yarn: lavender — Source: Photo-based adaptation of small dragon head fins
Ch 5.
Row 1: starting in 2nd ch from hook, sc 4, ch 1 turn (4)
Row 2: dec, sc 2 (3), ch 1 turn
Row 3: dec, sc 1 (2)
Fasten off. Leave 12 cm tail.
These sit behind the face patch line and replace ears/wings for this sleeping silhouette.
Body (Make 1)
Yarn: lavender — Source: Standard amigurumi math adapted to photo; medium plateau at 36 stitches follows the brief
R1: 6 sc in MR (6)
R2: inc x6 (12)
R3: (sc 1, inc) x6 (18)
R4: (sc 2, inc) x6 (24)
R5: (sc 3, inc) x6 (30)
R6: (sc 4, inc) x6 (36)
R7–R15: sc around (36)
R16: (sc 4, dec) x6 (30)
R17–R24: sc around (30)
R25: (sc 3, dec) x6 (24)
R26–R27: sc around (24)
Fasten off. Leave 30 cm tail.
Stuff firmly through R18, then reduce stuffing in the last third so the body bends into a curl.
Before closing, bend the tube into a loose crescent and test the head placement.
Front Legs (Make 2)
Yarn: lavender — Source: Standard limb tube adapted to photo
R1: 6 sc in MR (6)
R2: (sc 1, inc) x3 (9)
R3–R5: sc around (9)
R6: (sc 1, dec) x3 (6)
R7–R9: sc around (6)
Fasten off. Leave 18 cm tail.
Stuff the paw section only. Flatten the upper edge.
Back Legs (Make 2)
Yarn: lavender — Source: Standard rear-leg shaping for seated plush base
R1: 6 sc in MR (6)
R2: inc x6 (12)
R3–R4: sc around (12)
R5: (sc 2, dec) x3 (9)
R6: sc around (9)
R7: (sc 1, dec) x3 (6)
Fasten off. Leave 18 cm tail.
Stuff the first half firmly. Leave the top soft so it compresses into the body curve.
Tail (Make 1)
Yarn: lavender — Source: Tail progression informed by common dragon tail shaping and photo silhouette; public dragon tails often open small and widen gradually.
R1: 6 sc in MR (6)
R2: sc around (6)
R3: (sc 2, inc) x2 (8)
R4: sc around (8)
R5: (sc 3, inc) x2 (10)
R6: sc around (10)
R7: (sc 4, inc) x2 (12)
R8–R16: sc around (12)
R17: (sc 2, dec) x3 (9)
R18–R19: sc around (9)
R20: (sc 1, dec) x3 (6)
Fasten off. Leave 30 cm tail.
Stuff lightly. The tail should flex around the body rather than stand out from it.
Tail Tip Cap (Make 1)
Yarn: cream — Source: Photo adaptation
R1: 6 sc in MR (6)
R2: inc x6 (12)
R3: sc around (12)
Fasten off. Leave 15 cm tail.
Sew over the tail end like a rounded cap.
Back Spikes (Make 7)
Yarn: cream for top pair, white for body ridge — Source: Photo adaptation
R1: 6 sc in MR (6)
R2: (sc 1, inc) x3 (9)
R3: sc around (9)
R4: (sc 1, dec) x3 (6)
Fasten off. Leave 12 cm tail.
Do not overstuff. The first two head spikes should be cream and slightly taller by adding one extra plain round at 9 stitches if needed.
Round Haunch Bump (Make 1)
Yarn: lavender — Source: Photo adaptation for the visible rounded hip
R1: 6 sc in MR (6)
R2: inc x6 (12)
R3: (sc 1, inc) x6 (18)
R4: (sc 2, inc) x6 (24)
R5–R7: sc around (24)
R8: (sc 2, dec) x6 (18)
R9: (sc 1, dec) x6 (12)
Stuff firmly.
R10: dec x6 (6)
Fasten off. Leave 18 cm tail.
Embroidered Face
Yarn: black and pink — Source: Photo-based finishing
Embroider each closed eye as a 4-stitch curved lash.
Place them on the face patch line, angled slightly downward toward the center.
Embroider a small “u” smile centered below.
Attach cheek patches or brush pink blush just below the eye line.
Assembly
- Sew the face patch to the lower front of the head. Keep the top edge just below the midline.
- Embroider the eyes and smile before attaching the head to the body. Add cheek patches last so placement can follow the lashes.
- Sew the horns to the crown, spaced about 3 stitches apart. Tilt them slightly back.
- Attach the side head frills behind the face patch edge, one per side.
- Shape the body into a crescent and stitch the head to one end with the muzzle angled down.
- Sew the front legs under the head joint so the paws tuck inward.
- Attach the back legs at the wider mid-body area, then add the round haunch bump over one outer side to build the raised sleeping curve.
- Sew the tail to the narrow end of the body and wrap it around the outer arc. Add the cream tail tip cap.
- Attach the back spikes from crown to tail, starting with the two cream spikes on the head and continuing with the smaller white spikes down the back.
- Adjust the coil, tack the tail lightly to the body at one hidden point if needed, then weave in all ends.
The completed plush should rest on the belly curve, haunch, and tail line without rolling.
7 Technical Tips
- Mark the first stitch of every round. Losing one increase on the head plateau shifts the face patch off center by a full stitch column.
- Stuff the head harder than the body. A soft head collapses into the coil and erases the dragon profile in side photos.
- Use invisible decreases on R13–R18 of the head. Standard decreases leave holes that show white stuffing through plush yarn.
- Embroider the eyes before body assembly. Once the head is attached at a low angle, matching both lash curves becomes harder by 2–3 mm.
- Keep the body stuffing gradient uneven on purpose. Dense stuffing in the first half and lighter stuffing in the last third gives a stable curve instead of a straight tube.
- Pin all spikes before sewing. A spacing drift of even one round makes the ridge look broken when viewed from above.
- Weave tails back through the seam path, not randomly into the body. Plush yarn sheds grip, and loose buried ends can work free after handling.
Conclusion
This dragon amigurumi crochet pattern works because the shape reads in three directions at once: side view, top view, and curled silhouette. The head stays oversized, the body holds a medium coil, and the spikes remain short enough to support the sleeping pose. For the next step, test the body curve with scrap yarn before final assembly, then photograph the finished dragon from above and from muzzle level. Share the result on Pinterest and Instagram with one flat lay and one profile shot. Hashtag: #SleepingDragonPattern. Which version fits this design better for your next sample: a longer tail coil or taller crown horns?









