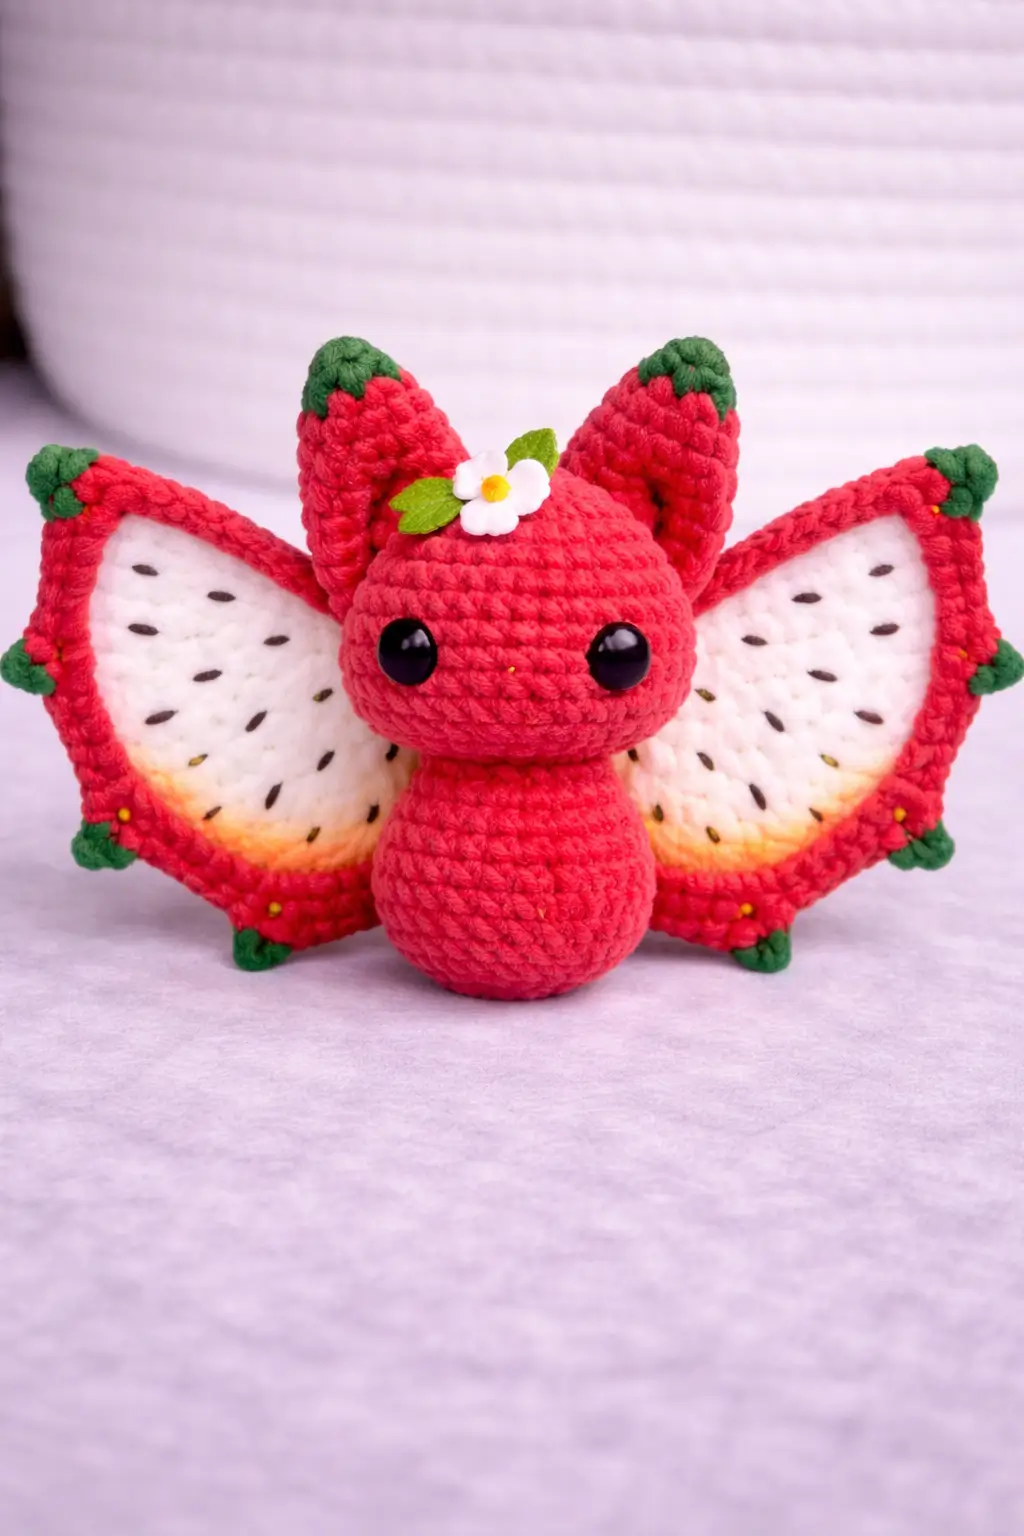
A bat with dragon-fruit wings changes the silhouette before a single stitch is worked. This strawberry bat amigurumi crochet pattern builds that shape with medium-weight yarn, a 3.0–3.25 mm hook, 9–12 mm eyes, and a compact finish around 15–16.5 cm tall. Skill level: intermediate. The result works as shelf decor, market stock, or a photo prop for fruit-themed drops.
The Design: What Makes Strawberry Bat Different
This bat is not a standard Halloween body with novelty color changes. The wings do most of the identification work. Their broad triangular profile reads closer to sliced dragon fruit than to the usual scalloped bat membrane, so the outer edge needs a firm red frame and a centered white panel with seed embroidery. That keeps the shape legible from a distance. A second decision sits at the head: the ears must stay narrow at the base and taller than usual, otherwise they disappear behind the wings. Third, the body should taper low and stay simple. Extra feet or a broad belly pull focus away from the wing panels.
A common mistake with a strawberry bat crochet pattern is stuffing the head too hard and letting the eye line bulge upward. Then the face stops reading cute and starts reading compressed. In fruit-bat crochet work, flatter face geometry matters more than heavy stuffing.
Project Info at a Glance
| Skill Level | Time | Finished Size | Hook | Best For |
|---|---|---|---|---|
| Intermediate | 5–7 hours | 15–16.5 cm tall | 3.0–3.25 mm | Shelf plush, market item, fruit-themed decor |
Verified size and hook ranges are consistent with current strawberry-bat and fruit-bat listings using medium/worsted yarn.
Materials and Tools
Yarn
- Strawberry red — medium / worsted — about 45–55 g for main body area — Red Heart With Love or similar weight reference
- White — medium / worsted — small contrast amount for wing centers
- Leaf green — medium / worsted — small contrast amount for ear tips, wing corners, leaves
- Soft yellow — scrap amount for flower center and light wing blush
- Brown or black embroidery thread — scrap amount for wing seeds
Tools
- Hook 3.0 mm or 3.25 mm
- 9–12 mm safety eyes
- Polyester stuffing
- Yarn needle
- Stitch markers
- Pins
- Optional fabric glue for flower center only
Abbreviations
- MR = magic ring
- sc = single crochet
- inc = increase
- dec = invisible decrease
- sl st = slip stitch
- ch = chain
- BLO = back loop only
- FO = fasten off
Invisible decrease keeps the outer surface flatter than a front-facing decrease and reduces visible gaps around the closing rounds.
Pattern — Step by Step
Continuous spiral unless noted.
Head (Make 1)
Yarn: strawberry red — Source: standard amigurumi math adapted to photo silhouette; medium-size plateau selected to fit verified 15–16.5 cm finish
- R1: 6 sc in MR (6)
- R2: inc x6 (12)
- R3: (sc, inc) x6 (18)
- R4: (2 sc, inc) x6 (24)
- R5: (3 sc, inc) x6 (30)
- R6: (4 sc, inc) x6 (36)
- R7–R12: sc around (36)
- R13: (4 sc, dec) x6 (30)
- R14: (3 sc, dec) x6 (24)
Insert 10–12 mm safety eyes between R8 and R9, 6 sts apart. Begin stuffing firmly at the lower cheeks, lighter at crown.
- R15: (2 sc, dec) x6 (18)
- R16: (sc, dec) x6 (12)
- R17: dec x6 (6)
Fasten off. Close opening. Leave 15 cm tail.
Body (Make 1)
Yarn: strawberry red — Source: standard amigurumi math adapted to the photo’s simple pear body; no separate leg join because the reference plush has a clean seated base
- R1: 6 sc in MR (6)
- R2: inc x6 (12)
- R3: (sc, inc) x6 (18)
- R4: (2 sc, inc) x6 (24)
- R5: (3 sc, inc) x6 (30)
- R6–R9: sc around (30)
- R10: (3 sc, dec) x6 (24)
- R11: sc around (24)
- R12: (2 sc, dec) x6 (18)
- R13: sc around (18)
Stuff base firmly so it can sit without rocking.
- R14: (sc, dec) x6 (12)
- R15: sc around (12)
Fasten off. Leave 25 cm tail.
Forepaws (Make 2, optional for structure)
Yarn: strawberry red — Source: standard amigurumi math; optional because the photo hides the forelimbs in the front view
- R1: 6 sc in MR (6)
- R2: (sc, inc) x3 (9)
- R3–R4: sc around (9)
Flatten lightly.
Fasten off. Leave 20 cm tail.
Ears (Make 2)
Yarn: strawberry red, then leaf green tip — Source: photo analysis plus public bat-ear shaping references that keep a narrow base and taller point
- R1: 6 sc in MR (6)
- R2: (sc, inc) x3 (9)
- R3: sc around (9)
- R4: (2 sc, inc) x3 (12)
- R5–R6: sc around (12)
- R7: change to green, sc around (12)
Flatten. Crochet through both layers: 5 sc across.
Fasten off. Leave 18 cm tail.
Dragon-Fruit Wings (Make 2)
Yarn: red border, white center, green corner leaves, yellow blush scrap, black seed embroidery — Source: flat-wing construction is consistent with published bat wing methods worked in rows and sewn to the body sides
White center panel
- Ch 2.
- Row 1: 1 sc in 2nd ch from hook, ch 1, turn (1)
- Row 2: inc, ch 1, turn (2)
- Row 3: sc, inc, ch 1, turn (3)
- Row 4: 2 sc, inc, ch 1, turn (4)
- Row 5: 3 sc, inc, ch 1, turn (5)
- Row 6: 4 sc, inc, ch 1, turn (6)
- Row 7: 5 sc, inc, ch 1, turn (7)
- Row 8: 6 sc, inc, ch 1, turn (8)
- Row 9: 7 sc, inc, ch 1, turn (9)
- Row 10: 8 sc, inc, ch 1, turn (10)
- Row 11: 9 sc, inc, ch 1, turn (11)
- Row 12: sc across (11)
FO white.
Red outer round
Join red at one lower corner. Work evenly around entire wing: 3 sc in top point, 2 sc in each row-end space where needed, 1 sc in each stitch across base, adjusting so the edge lies flat.
FO red.
Green corner leaves
At top point and both lower corners: (sl st, ch 2, hdc, sl st in same corner).
Repeat until each wing has 3 small leafy points.
FO green.
Yellow blush line
With pale yellow, surface sl st or embroider 5–6 cm along the lower inner white edge.
FO.
Black seeds
Embroider 7–9 short dash stitches over white panel. Keep spacing irregular.
Leave no long floats on back.
Cheek Patches (Make 2)
Yarn: soft yellow or pale pink scrap — Source: mandatory finishing element, adapted as low-profile blush circles to suit kawaii bat styling
- R1: 6 sc in MR (6)
Sl st to first sc.
Fasten off. Leave 12 cm tail.
Leaf Crown (Make 2 leaves)
Yarn: leaf green — Source: photo accessory
- Ch 5.
Work around chain: sl st in 2nd ch, sc, hdc, sc.
FO. Leave 10 cm tail.
Flower (Make 1)
Yarn: white petals, yellow center — Source: photo accessory
With white:
- R1: 5 sc in MR.
Form petals into same ring: (ch 2, 2 dc, ch 2, sl st) x5.
FO white.
With yellow: embroider or glue a tiny center knot/circle.
Leave 10 cm tail for sewing.
Snout Ridge (Make 1)
Yarn: strawberry red — Source: photo face line
- Ch 7.
Row 1: starting in 2nd ch from hook, sc 6 (6)
FO. Leave 15 cm tail.
Assembly
- Sew the head to the body with the body centered under the face.
- Pin the ears first. Place them on the upper head, 7–8 stitches apart, with the green tips angling slightly outward.
- Sew the snout ridge horizontally across the lower third of the face. Keep it shallow. It should read as a muzzle break, not a nose tube.
- Attach the cheek patches one stitch below the eye line and slightly outward from the snout ridge.
- Pin each wing to the back sides of the body. The top inner corner should begin just below the head seam.
- Sew the wings down a vertical line of about 6 stitches so the panels flare outward instead of collapsing backward.
- If using forepaws, sew them low on the front body, tucked under the head line.
- Sew the two green leaves on the crown between the ears.
- Attach the flower over the leaf base. Keep it slightly off-center, not perfectly centered.
- Weave in all ends internally, adjust stuffing at the neck if needed, and square the seated base with finger pressure.
The finished plush should stand at about the published small strawberry-bat range when worked in medium/worsted yarn with a tight hook.
7 Technical Tips
- Mark the first stitch of every round on the head. Missing one increase before the 36-stitch plateau will throw the eye spacing off by round 8.
- Stuff the body base harder than the top third. A soft lower base causes forward pitching once the wings are attached.
- Use invisible decreases only on the head closing rounds. Standard decreases leave a ridge that catches light across the forehead.
- Install eyes before round 15. At that stage, the opening is still large enough to lock washers cleanly without distorting the face.
- Pin both wings and check front view symmetry before sewing. A difference of even 2 stitches in attachment height makes one wing look dropped.
- Keep seed embroidery short. Long satin stitches on the white wing panel snag and twist the wing surface.
- Weave tails back through at least 3 direction changes. A single straight pass is not enough when broad wings act like handles during play or packing.
Conclusion
The main build problem here is shape control, not novelty color. That is why the wing panel, ear height, and restrained body taper matter more than extra detail. This strawberry bat amigurumi crochet pattern stays within the published small fruit-bat size range, uses the common medium-yarn setup seen in current listings, and gives you a version that matches the photo rather than a generic bat with berry colors. Next step: swatch your red and white together, then test one wing before starting the head. Share the finished piece on Pinterest and Instagram with #StrawberryBatPattern. One question remains useful for makers: did your wings hold their angle better with a tighter border round or with lighter stuffing at the body seam?









