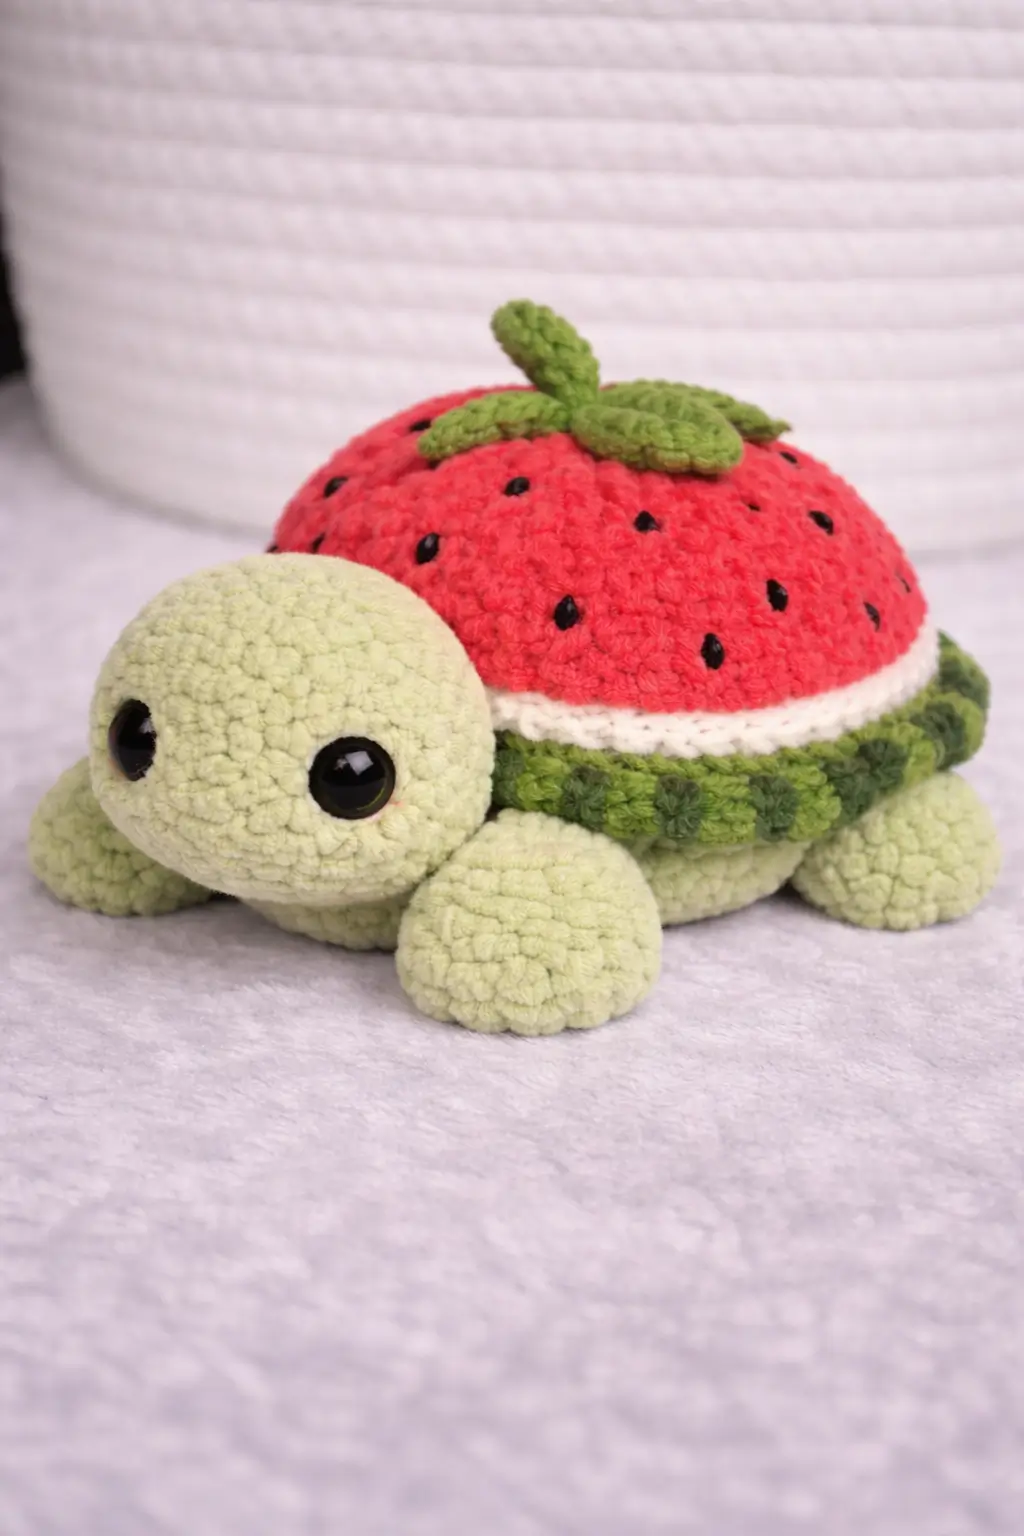
A turtle is one of the few amigurumi shapes that can carry a strawberry shell without looking top-heavy. This strawberry turtle crochet pattern uses plush yarn, a 5 mm hook, and medium-density stuffing to build a stable turtle about 25 cm long, suited to confident beginners who want a giftable desk plush with a readable fruit silhouette.
The Design: What Makes Strawberry Turtle Different
The shell has to read as fruit first, turtle second. That changes the structure. A normal turtle shell can stay domed and generic, but a strawberry turtle needs three clear layers: red cap, pale divider, and green edge. Without that contrast, the plush reads as a red turtle with leaves glued on later. Published patterns also show how much hook and yarn choices shift the final scale, from compact DK builds to super bulky plush versions.
Proportion matters more here than detail count. The head should sit low and forward. The shell rim needs enough drop to cast a visible edge. The leaf cluster must stay flat, not spike upward, or the design starts reading like a tomato. One common mistake in this character type is making the shell too tall for the body base. Then the strawberry turtle amigurumi loses its crawl posture and rolls backward. Another problem appears when makers skip a crisp white transition row, which weakens the strawberry read in a fruit turtle amigurumi build.
Project Info at a Glance
| Skill Level | Time | Finished Size | Hook | Best For |
|---|---|---|---|---|
| Confident beginner | 3–5 hours | 25 cm / 10 in long | 5.0 mm | Plush gifts, market tables, desk decor |
The size and hook above reflect a published chunky version; compact variants in bulky or DK yarn also exist.
Materials and Tools
Yarn
Published strawberry turtle patterns span bulky weight 5 through size 6 plush yarn, with compact DK versions also available. For the photographed look, plush chenille is the closest match.
- Pale mint green — plush/chenille — about 80–100 g — Himalaya Dolphin Baby or similar
- Strawberry red — plush/chenille — about 70–90 g — any size 6 chenille
- White — plush/chenille — about 15–20 g — same base yarn family
- Leaf green — plush/chenille — about 20–30 g — same base yarn family
- Pink blush — optional scrap yarn or felt circles
- Black embroidery thread — for seeds and smile details
Tools
- Hook 5.0 mm
- Safety eyes 12 mm
- Polyfill stuffing
- Tapestry needle
- Stitch markers
- Small scissors
Those hook and eye dimensions align with a published large plush version, while smaller patterns use 3–4 mm hooks and 8–16 mm eyes depending on scale.
Abbreviations
MR = magic ring
sc = single crochet
inc = increase
dec = invisible decrease
sl st = slip stitch
ch = chain
BLO = back loop only
FLO = front loop only
Invisible decrease reduces bulk on plush yarn and keeps the decrease line tighter than a standard two-together.
Pattern — Step by Step
Continuous spiral unless noted.
Head (Make 1)
Yarn: pale mint green — Source: standard amigurumi math
R1: 6 sc in MR (6)
R2: inc x6 (12)
R3: (sc, inc) x6 (18)
R4: (2 sc, inc) x6 (24)
R5: (3 sc, inc) x6 (30)
R6: (4 sc, inc) x6 (36)
R7-R10: sc around (36)
R11: (4 sc, dec) x6 (30)
R12: (3 sc, dec) x6 (24)
Insert 12 mm eyes between R8 and R9, 10 sts apart. Add stuffing firmly but do not overpack the lower front.
R13: (2 sc, dec) x6 (18)
R14: (sc, dec) x6 (12)
R15: dec x6 (6)
Fasten off. Leave a 20 cm tail.
Body Underside (Make 1)
Yarn: pale mint green — Source: standard amigurumi math
R1: 6 sc in MR (6)
R2: inc x6 (12)
R3: (sc, inc) x6 (18)
R4: (2 sc, inc) x6 (24)
R5: (3 sc, inc) x6 (30)
R6: (4 sc, inc) x6 (36)
R7-R9: sc around (36)
Fasten off. Leave a long joining tail.
Strawberry Shell Top (Make 1)
Yarn: strawberry red — Source: standard amigurumi math with published strawberry turtle shell references for layered construction.
R1: 6 sc in MR (6)
R2: inc x6 (12)
R3: (sc, inc) x6 (18)
R4: (2 sc, inc) x6 (24)
R5: (3 sc, inc) x6 (30)
R6: (4 sc, inc) x6 (36)
R7-R10: sc around (36)
Fasten off.
White Shell Band (Make 1)
Yarn: white — Source: standard amigurumi math
Join white yarn to shell.
R1: BLO sc around shell base (36)
R2: sc around (36)
Fasten off.
Green Ruffle Rim (Make 1)
Yarn: leaf green — Source: standard amigurumi math inspired by strawberry-edge treatment seen in published versions.
Join green yarn to front loops of the white band.
R1: (2 sc, inc) x12 (48)
R2: sc around (48)
Fasten off. Leave 18 cm tail.
Front Legs (Make 2)
Yarn: pale mint green — Source: standard amigurumi math
R1: 6 sc in MR (6)
R2: inc x6 (12)
R3: (sc, inc) x6 (18)
R4-R5: sc around (18)
R6: (sc, dec) x6 (12)
Light stuffing only in the front half.
Fasten off. Leave 18 cm tail.
Back Legs (Make 2)
Yarn: pale mint green — Source: standard amigurumi math
R1: 6 sc in MR (6)
R2: inc x6 (12)
R3: (sc, inc) x6 (18)
R4: sc around (18)
R5: (sc, dec) x6 (12)
Flatten slightly before sewing.
Fasten off. Leave 18 cm tail.
Tail Nub (Make 1)
Yarn: pale mint green — Source: standard amigurumi math
R1: 6 sc in MR (6)
R2: sc around (6)
Fasten off. Leave 10 cm tail.
Leaf Petal (Make 3)
Yarn: leaf green — Source: published strawberry turtle leaf references plus standard leaf shaping.
Ch 6.
Row 1: Starting in 2nd ch from hook, sc, hdc, dc, hdc, sc.
Work 1 sl st along the opposite side if needed to flatten.
Fasten off. Leave 12 cm tail on each.
Stem (Make 1)
Yarn: leaf green — Source: standard amigurumi math with published stem tutorial references.
Ch 5.
Row 1: Starting in 2nd ch from hook, sl st in each ch across (4).
Fasten off. Leave 12 cm tail.
Cheek Patches (Make 2)
Yarn: blush pink or light pink — Source: standard amigurumi math
R1: 6 sc in MR (6)
Join with sl st.
Fasten off. Leave 8 cm tail.
Seed Embroidery
Yarn: black embroidery thread — Source: visual styling from strawberry turtle listings and tutorials.
Embroider short diagonal satin stitches across the red shell. Keep spacing irregular but balanced. Use about 18–24 seeds.
Assembly
- Sew the head to the front third of the body underside, angled slightly downward.
- Attach the front legs level with the widest point of the head.
- Sew the back legs near the rear quarter of the body underside.
- Add the tail nub centered between the back legs.
- Place the strawberry shell top over the body underside and pin at four compass points.
- Stitch the shell to the body through matching 36-stitch edges, stuffing the cavity as you close.
- Sew the white band so it sits visibly between red shell and green rim.
- Attach the green ruffle rim around the shell base, letting it flare outward instead of down.
- Sew the three leaf petals flat on top, slightly overlapped, then secure the stem upright in the center.
- Add cheek patches below the eyes and embroider the shell seeds last.
The finished piece should sit flat on all four limbs with the shell centered over the body.
7 Technical Tips
- Mark round 1 on both shell pieces. Misaligned start points shift the red-white-green transition and the turtle looks twisted from the front.
- Do not overstuff the head. Too much fill pushes the eyes outward and creates a bulge that lifts the chin off the floor.
- Use invisible decreases on plush yarn only through front loops. A regular decrease leaves a hard ridge that catches light on chenille.
- Install eyes before the final two decrease rounds. Waiting longer makes the safety washers harder to seat and can stretch the face fabric.
- Keep stuffing firmer in the shell than in the legs. Soft legs and a dense shell help the body settle low instead of bouncing upward.
- Pin the shell at front, back, left, and right before sewing. One missing anchor point is enough to pull the berry cap off-center by 5–8 mm.
- Weave tails back through at least three direction changes. Plush yarn slips more than cotton, especially on leaf petals and rim joins.
Conclusion
The success of a strawberry turtle crochet pattern depends less on novelty and more on proportion control. Keep the head low, keep the shell broad, and make the white band visible from the side. That is what sells the hybrid design. Next step: crochet the shell and body first, pin them together, and check the silhouette before sewing any top leaves. When you publish the result, use a top view for Pinterest and a low side view for Instagram. Hashtag: #StrawberryTurtlePattern. One useful question remains: did you keep your leaf cluster flat enough that the shell still reads as strawberry at arm’s length?









