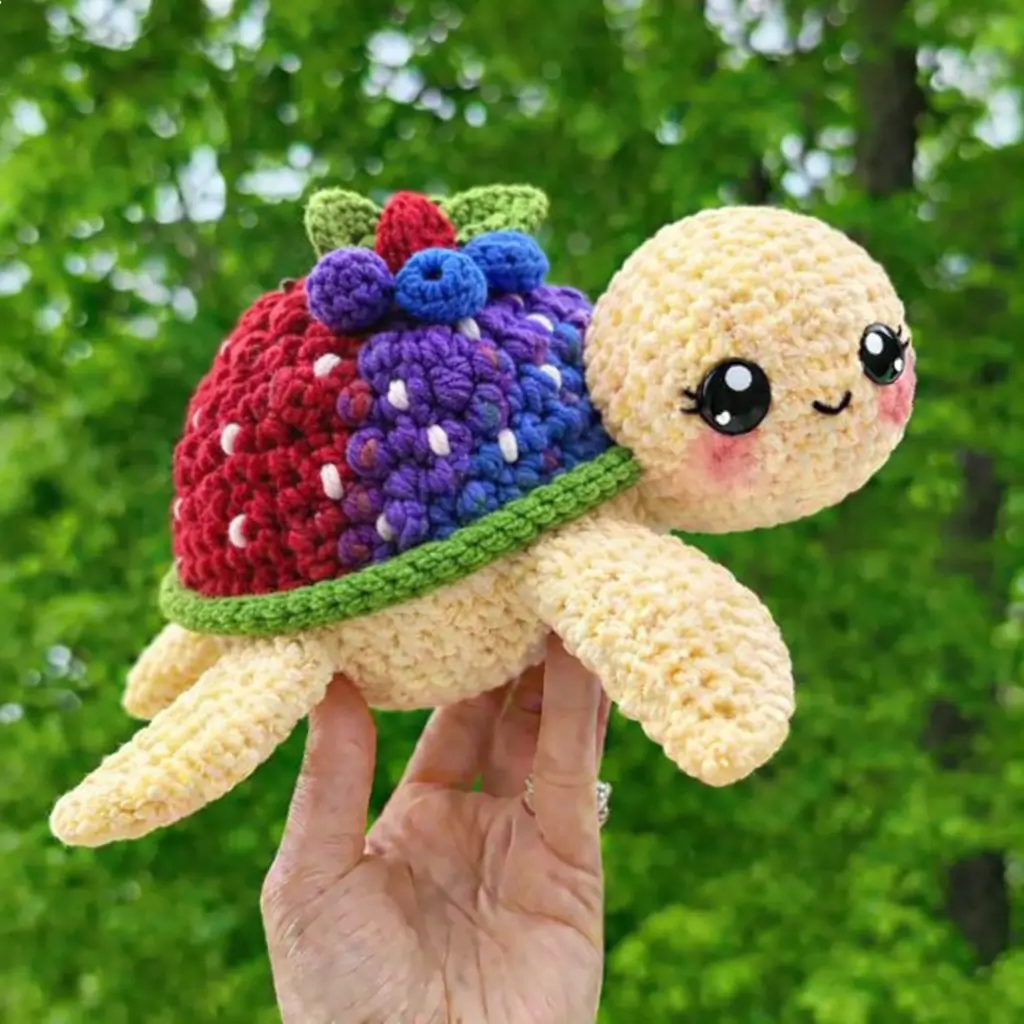
A turtle shell rarely has to suggest both strawberry seeds and clustered berries, but this one does. This fruit turtle amigurumi crochet pattern uses super bulky chenille, a 4.5 mm hook, and large safety eyes to build a plush about 20 cm long. The project suits an intermediate maker because the shell is layered. It works well as a market plush because the silhouette reads clearly from a distance.
The Design: What Makes This Turtle Different
The head is oversized on purpose. That choice shifts the toy toward a kawaii proportion, and the larger face gives enough room for 24 mm eyes without crowding the smile. The shell also cannot behave like a standard dome. One side needs a red strawberry field with visible seed stitches, while the center and opposite side need raised berry clusters that break the surface line.
A second structural choice sits at the shell edge. The green rim is not decorative trim alone; it hides the join between the shell cap and the body while sharpening the fruit-slice effect. Most plain turtle plush crochet pattern tutorials stop at a smooth shell. A strawberry turtle amigurumi variation often handles only one fruit idea at a time. The common mistake is overstuffing the shell until the berry bumps flatten outward. That removes the layered look and makes the turtle read as a plain oval.
Project Info at a Glance
| Skill Level | Time | Finished Size | Hook | Best For |
|---|---|---|---|---|
| Intermediate | 4–6 hours | approx. 20 cm long × 9 cm tall | 4.5 mm | Market plush, gift plush, display toy |
Finished size and hook reflect current fruit turtle product references in super bulky yarn, adapted to the photographed plush scale.
Materials and Tools
Yarn
- Cream — super bulky chenille — 35–40 g — Himalaya Dolphin Baby or YarnArt Dolce style plush yarn
- Deep red — super bulky chenille — 10–12 g — for strawberry shell side
- Purple — super bulky chenille — 6–8 g — for grape clusters
- Blue — super bulky chenille — 6–8 g — for blueberry clusters
- Green — super bulky chenille or smooth acrylic — 5–7 g — for shell rim and leaves
- White — small scrap — seed stitches
- Black embroidery floss — small scrap — smile and lashes
- Pink blush or pastel yarn — small scrap — cheek patches
Tools
- Hook 4.5 mm
- 24 mm safety eyes
- Poly-fil stuffing
- Tapestry needle
- Stitch markers
- Pins or clips
- Small scissors
Abbreviations
MR / sc / inc / dec / sl st / ch / BLO / FLO / bobble
Use invisible decrease for all closing rounds because standard decreases leave wider gaps in chenille plush heads and flippers.
Pattern — Step by Step
Continuous spiral unless noted.
Head (Make 1)
Yarn: Cream
R1: 6 sc in MR (6)
R2: inc x6 (12)
R3: (sc, inc) x6 (18)
R4: (2 sc, inc) x6 (24)
R5: (3 sc, inc) x6 (30)
R6: (4 sc, inc) x6 (36)
R7–11: sc around (36)
Place 24 mm safety eyes between R8 and R9, about 9 sts apart. Add embroidered lashes before closing if wanted.
R12: (4 sc, dec) x6 (30)
R13: (3 sc, dec) x6 (24)
R14: (2 sc, dec) x6 (18)
Stuff firmly, with extra fill in the cheeks.
R15: (sc, dec) x6 (12)
R16: dec x6 (6)
Fasten off. Leave a 25 cm tail.
Body (Make 1)
Yarn: Cream
R1: 6 sc in MR (6)
R2: inc x6 (12)
R3: (sc, inc) x6 (18)
R4: (2 sc, inc) x6 (24)
R5: (3 sc, inc) x6 (30)
R6: (4 sc, inc) x6 (36)
R7–10: sc around (36)
R11: (4 sc, dec) x6 (30)
R12: (3 sc, dec) x6 (24)
R13–14: sc around (24)
Stuff the center firmly but keep the upper back slightly flatter so the shell sits low.
R15: (2 sc, dec) x6 (18)
R16: sc around (18)
Fasten off. Leave a 30 cm tail.
Front Flippers (Make 2)
Yarn: Cream
R1: 6 sc in MR (6)
R2: inc x6 (12)
R3: sc around (12)
R4: (4 sc, inc) x2 (14)
R5–9: sc around (14)
R10: (5 sc, dec) x2 (12)
R11: sc around (12)
Stuff lightly at the shoulder only. Keep the tip flat.
Fasten off. Leave a 20 cm tail.
Back Flippers (Make 2)
Yarn: Cream
R1: 6 sc in MR (6)
R2: inc x6 (12)
R3: sc around (12)
R4: (sc, inc) x6 (18)
R5–7: sc around (18)
R8: (sc, dec) x6 (12)
R9–10: sc around (12)
Stuff lightly in the top half only.
Fasten off. Leave a 20 cm tail.
Shell Base Dome (Make 1)
Yarn: Red for first half, then purple and blue sections added as surface pieces
R1: 6 sc in MR (6)
R2: inc x6 (12)
R3: (sc, inc) x6 (18)
R4: (2 sc, inc) x6 (24)
R5: (3 sc, inc) x6 (30)
R6: (4 sc, inc) x6 (36)
R7–10: sc around (36)
R11: FLO sc around (36)
Fasten off. Leave a 35 cm tail.
Shell Rim (Make 1)
Yarn: Green
Ch 32.
Row 1: Starting in 2nd ch from hook, sl st across (31)
Fasten off. Leave a 35 cm tail.
Strawberry Shell Panel (Make 1)
Yarn: Deep red
Ch 6.
R1: Starting in 2nd ch from hook, 4 sc, 3 sc in last ch, work on opposite side, 3 sc, inc in last st (12)
R2: inc, 3 sc, inc x3, 3 sc, inc x2 (18)
R3: sc, inc, 3 sc, (sc, inc) x3, 3 sc, (sc, inc) x2 (24)
R4: sc around (24)
R5: (3 sc, inc) x6 (30)
Fasten off. Leave a 25 cm tail.
Berry Clusters (Make 9 total)
Yarn: Purple x5, Blue x4
R1: 6 sc in MR (6)
R2: inc x6 (12)
R3: sc around (12)
R4: dec x6 (6)
Stuff with a pinch only if desired.
Fasten off. Leave a 15 cm tail.
Leaf Pair (Make 2)
Yarn: Green
Ch 6.
Row 1: Starting in 2nd ch from hook, sl st, sc, hdc, sc, sl st (5)
Fasten off. Leave a 12 cm tail.
Center Berry Stem (Make 1)
Yarn: Red
R1: 4 sc in MR (4)
R2: sc around (4)
R3: (sc, inc) x2 (6)
Fasten off. Leave a 12 cm tail.
Cheek Patches (Make 2)
Yarn: Pink or blush thread
R1: 6 sc in MR (6)
sl st to join.
Fasten off. Leave a 10 cm tail.
Eye Shine Embroidery (Make 2)
Yarn: White scrap
No rounds. Add one short straight stitch near the lower outer side of each eye if you want extra highlight.
Seed Stitches on Strawberry Panel
Yarn: White scrap
No rounds. Add 6–8 small vertical satin stitches spaced over the red panel.
Assembly
- Sew the head to the front third of the body so the chin sits level with the body midpoint.
- Attach the front flippers on each side just below the head seam, angled slightly forward.
- Sew the back flippers near the rear underside, spread wider than the front pair.
- Place the strawberry shell panel on the left side of the shell dome and stitch it down flat.
- Sew the berry clusters across the top and right side of the shell dome, alternating purple and blue.
- Attach the small red center berry stem between the two upper leaves.
- Sew the two green leaves behind the center berry stem, tilted outward.
- Place the completed shell on the body back and sew around the base, keeping the shell slightly overhanging the sides.
- Wrap the green shell rim around the lower shell edge and stitch it over the join line.
- Add the cheek patches below the eyes, embroider the smile, then weave in all tails inside the body.
The finished plush should hold a low shell profile with a forward-heavy head and four flippers resting below the rim.
7 Technical Tips
- Mark the first stitch of every round on the head and body. Lose that marker once, and the eye line drifts by 1–2 stitches.
- Stuff the head firmer than the body. A soft head collapses around 24 mm eyes and pulls the embroidered smile upward.
- Use invisible decreases on rounds 12–16 of the head. Standard decreases leave visible ladder gaps in chenille, especially near the face.
- Insert the eyes before the head drops below 24 stitches. Trying to force washers in later can distort rounds 13 and 14.
- Keep shell stuffing lighter than body stuffing. Overfilling the dome makes the berry clusters sit flat instead of raised.
- Pin the shell before sewing and check side overhang on both flanks. A difference of even 0.5 cm makes the turtle look twisted from the front.
- Weave berry-cluster tails back through two internal stitches after knotting. Single-pass tail hiding tends to slip out of plush yarn after repeated handling.
Conclusion
This fruit turtle amigurumi crochet pattern works because the base turtle stays simple while the shell carries the visual complexity. The body shape, large eyes, green rim, and clustered berries do most of the identification work. Keep the shell low, the face wide, and the berry pieces slightly raised. Next, test one version in a single fruit theme before repeating the mixed-berry shell shown here. Share the finished turtle on Pinterest and Instagram with the tag #FruitTurtlePattern. Which shell reads better on your version: more strawberry seeds on the red side, or more grape clusters across the crown?









