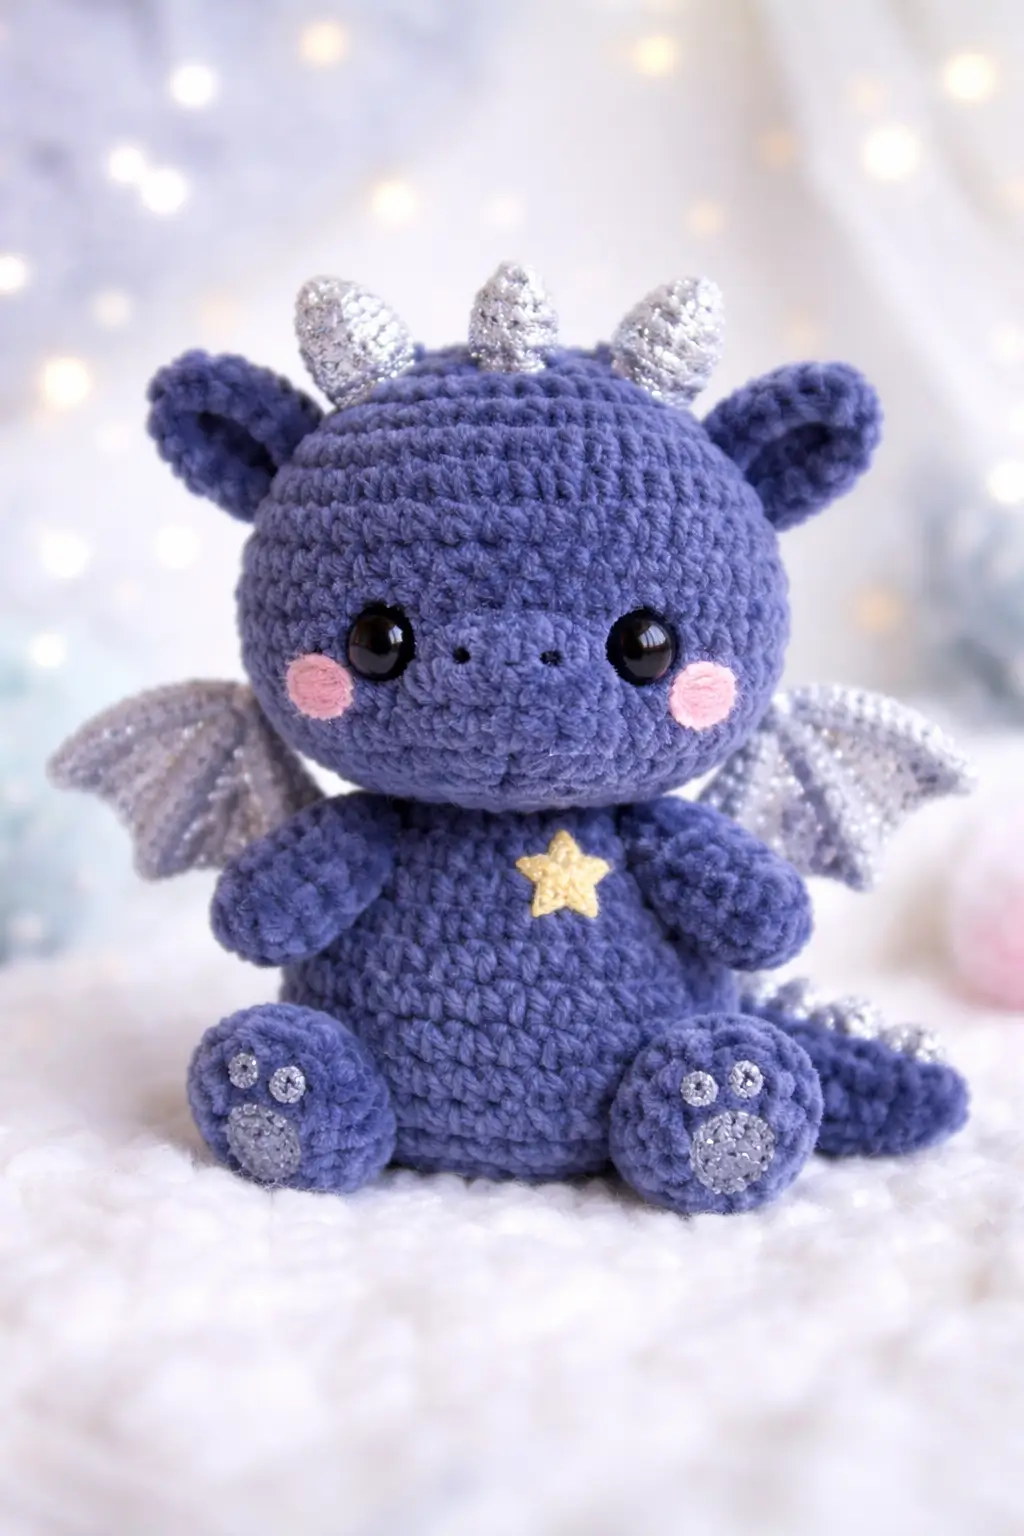
Wings sit lower than the horn line on this baby dragon. That single proportion keeps a dragon amigurumi crochet pattern from reading as a goat, a dinosaur, or a generic monster. This version uses plush yarn, a 4 mm hook, sits around 16 cm tall, suits an intermediate maker, and works well as a shelf mascot or small handmade gift.
The Design: What Makes This Dragon Different
A seated baby dragon needs three structural decisions handled early. First, the head must stay wider than the body for a juvenile look; several dragon patterns widen the head aggressively before dropping into a narrower torso, and that ratio is what gives the toy its compact fantasy silhouette. Second, the wings need to sit behind the shoulder line rather than on the neck. Place them too high and the profile turns crowded. Place them too low and the figure loses lift. Third, the horns should stay short and slightly inward. Long upright horns pull the design older and sharper.
One frequent mistake in a baby dragon amigurumi is overbuilding the snout. Many dragon plush patterns use a separate muzzle, but the photographed toy reads softer because the face stays almost spherical. That choice also helps with velvet yarn, where added seams can thicken the front of the head. Search competition covers free dragon amigurumi pattern options well, but written text often skips these proportion calls.
Project Info at a Glance
| Skill Level | Time | Finished Size | Hook | Best For |
|---|---|---|---|---|
| Intermediate | 5–7 hours | 16 cm seated | 4 mm | Display plush, gift, fantasy nursery decor |
Verified size, hook, and yarn-weight references for comparable dragon builds fall in the seated 16 cm, 4 mm, worsted/aran range.
Materials and Tools
Yarn
- Periwinkle / blue-violet — worsted or plush equivalent — about 56 g main color — brand suggestion: chenille-style plush yarn for the photo look, or worsted/aran acrylic for firmer stitch definition
- Silver — accent — about 12 g — for wings, horns, paw pads
- Pale pink — scrap amount — for cheek patches
- Soft yellow — scrap amount — for chest star
Verified dragon references in this size class commonly use worsted/aran yarn at 4 mm, with main-color use around 56 g and accents around 12 g each. Plush chenille can be swapped in for the same silhouette with a softer finish.
Tools
- Hook 4 mm
- Safety eyes 8 mm
- Polyester stuffing
- Yarn needle
- Stitch markers
- Pins
- Small embroidery needle for nostrils
Comparable 16 cm seated dragons often use 8 mm eyes, while smaller cotton dragons drop to 6 mm and larger display dragons rise to 12 mm.
Abbreviations
MR / sc / inc / dec / sl st / ch / BLO / FO = fasten off.
Use invisible decrease on visible shaping rounds so the head and body taper without gaps; this matters more in plush yarn because loose front-facing decreases leave deep shadows.
Pattern — Step by Step
Continuous spiral unless noted.
Head (Make 1)
Yarn: main color — Source: Standard amigurumi math, scaled to a medium 36-stitch plateau using verified dragon size references.
- R1: 6 sc in MR (6)
- R2: inc x6 (12)
- R3: (sc, inc) x6 (18)
- R4: (2 sc, inc) x6 (24)
- R5: (3 sc, inc) x6 (30)
- R6: (4 sc, inc) x6 (36)
- R7-R12: sc around (36)
Insert safety eyes between R9 and R10, 7 sts apart. Add light stuffing as you work.
- R13: (4 sc, dec) x6 (30)
- R14: (3 sc, dec) x6 (24)
- R15: (2 sc, dec) x6 (18)
- R16: (sc, dec) x6 (12)
Stuff firmly. The lower face should stay rounded, not pointed.
FO. Leave a 25 cm tail.
Body (Make 1)
Yarn: main color — Source: Standard amigurumi math, adjusted for seated pear shape and 16 cm target size.
- R1: 6 sc in MR (6)
- R2: inc x6 (12)
- R3: (sc, inc) x6 (18)
- R4: (2 sc, inc) x6 (24)
- R5: (3 sc, inc) x6 (30)
- R6-R10: sc around (30)
- R11: (3 sc, dec) x6 (24)
- R12-R13: sc around (24)
- R14: (2 sc, dec) x6 (18)
- R15: sc around (18)
Stuff lower body more firmly than upper body so the toy sits without collapsing forward.
FO. Leave a 30 cm tail.
Arms / Front Legs (Make 2)
Yarn: main color — Source: Standard amigurumi limb math; compact arm sizing matches seated dragon references.
- R1: 6 sc in MR (6)
- R2: (sc, inc) x3 (9)
- R3-R5: sc around (9)
- R6: (sc, dec) x3 (6)
Stuff only the hand end.
FO. Leave a 20 cm tail.
Back Legs / Feet (Make 2)
Yarn: main color — Source: Standard amigurumi math with a wider front pad for seated pose; comparable dragon legs often open at 12 sts.
- R1: 6 sc in MR (6)
- R2: inc x6 (12)
- R3-R5: sc around (12)
- R6: dec x6 (6)
Flatten lightly.
FO. Leave a 22 cm tail.
Ears (Make 2)
Yarn: main color — Source: Ear shaping adapted from common dragon ear builds.
- R1: 4 sc in MR (4)
- R2: (sc, inc) x2 (6)
- R3: (2 sc, inc) x2 (8)
- R4: (3 sc, inc) x2 (10)
- R5: sc around (10)
Flatten.
FO. Leave a 15 cm tail.
Horns (Make 3)
Yarn: silver — Source: Small horn builds in dragon patterns often start at 4 sts and stay narrow.
- R1: 4 sc in MR (4)
- R2: (sc, inc) x2 (6)
- R3-R4: sc around (6)
Do not stuff.
FO. Leave a 12 cm tail.
Wings (Make 2)
Yarn: silver — Source: Row-based dragon wing construction is standard in multiple written patterns.
- Ch 8.
- Row 1: sc in 2nd ch from hook and across (7)
- Row 2: ch 1, turn, sc across (7)
- Row 3: ch 1, turn, dec, 3 sc, dec (5)
- Row 4: ch 1, turn, sc across (5)
- Row 5: ch 1, turn, dec, sc, dec (3)
- Row 6: ch 1, turn, sc across (3)
FO first panel.
Make 3 panels for each wing. Join the long edges of the three panels with sc. Then edge the full wing:
- Edge round: sc evenly around outer edge, placing 3 sc in each lower point and 1 sl st at each join valley.
FO. Leave a 25 cm tail.
Tail (Make 1)
Yarn: main color — Source: Growing cylinder tail math, consistent with dragon tail shaping in written patterns.
- R1: 4 sc in MR (4)
- R2: (inc, 3 sc) (5)
- R3: (2 sc, inc, 2 sc) (6)
- R4: sc around (6)
- R5: (inc, 5 sc) (7)
- R6: sc around (7)
- R7: (3 sc, inc, 3 sc) (8)
- R8-R10: sc around (8)
Stuff lightly at the base only.
FO. Leave a 22 cm tail.
Cheek Patches (Make 2)
Yarn: pale pink — Source: Flat applique circle, standard amigurumi math.
- R1: 6 sc in MR (6)
- R2: inc x6 (12)
Sl st to close.
FO. Leave a 10 cm tail.
Paw Pads (Make 2 large, 4 small)
Yarn: silver — Source: Flat applique circles.
Large pad:
- R1: 6 sc in MR (6)
- R2: inc x6 (12)
Sl st to close. FO.
Small toe pad:
- R1: 4 sc in MR (4)
Sl st to close. FO.
Chest Star (Make 1)
Yarn: soft yellow — Source: Simple applique for visible accessory from photo.
- Ch 5, join to form ring.
- Into ring work: (sl st, ch 2, dc, ch 2, sl st) x5.
FO. Leave a 12 cm tail.
Assembly
- Sew the head to the body, centering it slightly forward so the dragon looks seated rather than upright.
- Attach the cheek patches just below the eyes, one on each side of the muzzle area.
- Embroider two small nostrils between the eyes and lower face using dark thread.
- Sew the arms to the upper sides of the body, one round below the neck join.
- Sew the feet to the lower front body so the toy balances in a sitting pose.
- Attach the ears to the upper side head, slightly below the horn line.
- Sew the three horns across the crown, with the center horn aligned to the face midpoint.
- Attach the wings to the upper back, with the inner edges beginning just behind the arm line.
- Sew the tail to the lower back seam and angle it to one side.
- Stitch on the chest star, then glue or sew the silver paw pads in place.
The completed dragon should sit unaided with the tail acting as a rear visual counterweight.
7 Technical Tips
- Mark round 1 on every piece. Losing the start point on plush yarn shifts decreases and makes one horn or foot twist off-axis.
- Do not overstuff the head. A face this wide needs firm side stuffing and lighter stuffing at the lower muzzle, or the eyes start to bulge outward.
- Use invisible decreases on R13-R16 of the head. Standard dec stitches leave visible ladders, which stand out under bright photography and front lighting.
- Install the eyes before the head closes past 24 stitches. Waiting longer on chenille yarn makes the backing washers harder to seat cleanly.
- Keep wing fabric slightly tighter than body fabric. Loose wing rows curl at the points and lose the bat-wing outline.
- Pin the feet first and check the sit angle on a flat table. Even a 3–5 mm height difference between feet will tilt the whole dragon.
- Weave tails back through at least 4 cm of interior stitches. Short tail burial inside plush yarn can slip free after repeated handling.
Conclusion
A good dragon amigurumi crochet pattern depends less on surface detail than on proportion. Keep the head broad, the body shorter, the horns compact, and the wings set behind the shoulder line. That is the next move to focus on before changing colors or adding extras. For publishing, pair the finished toy with one front photo, one side photo, and one close-up of the wing join, then post it to Pinterest and Instagram with #BabyDragonPattern. One question remains useful for makers working from this exact shape: would you keep the three-horn crown, or switch the center horn to a small ridge for a softer profile?









