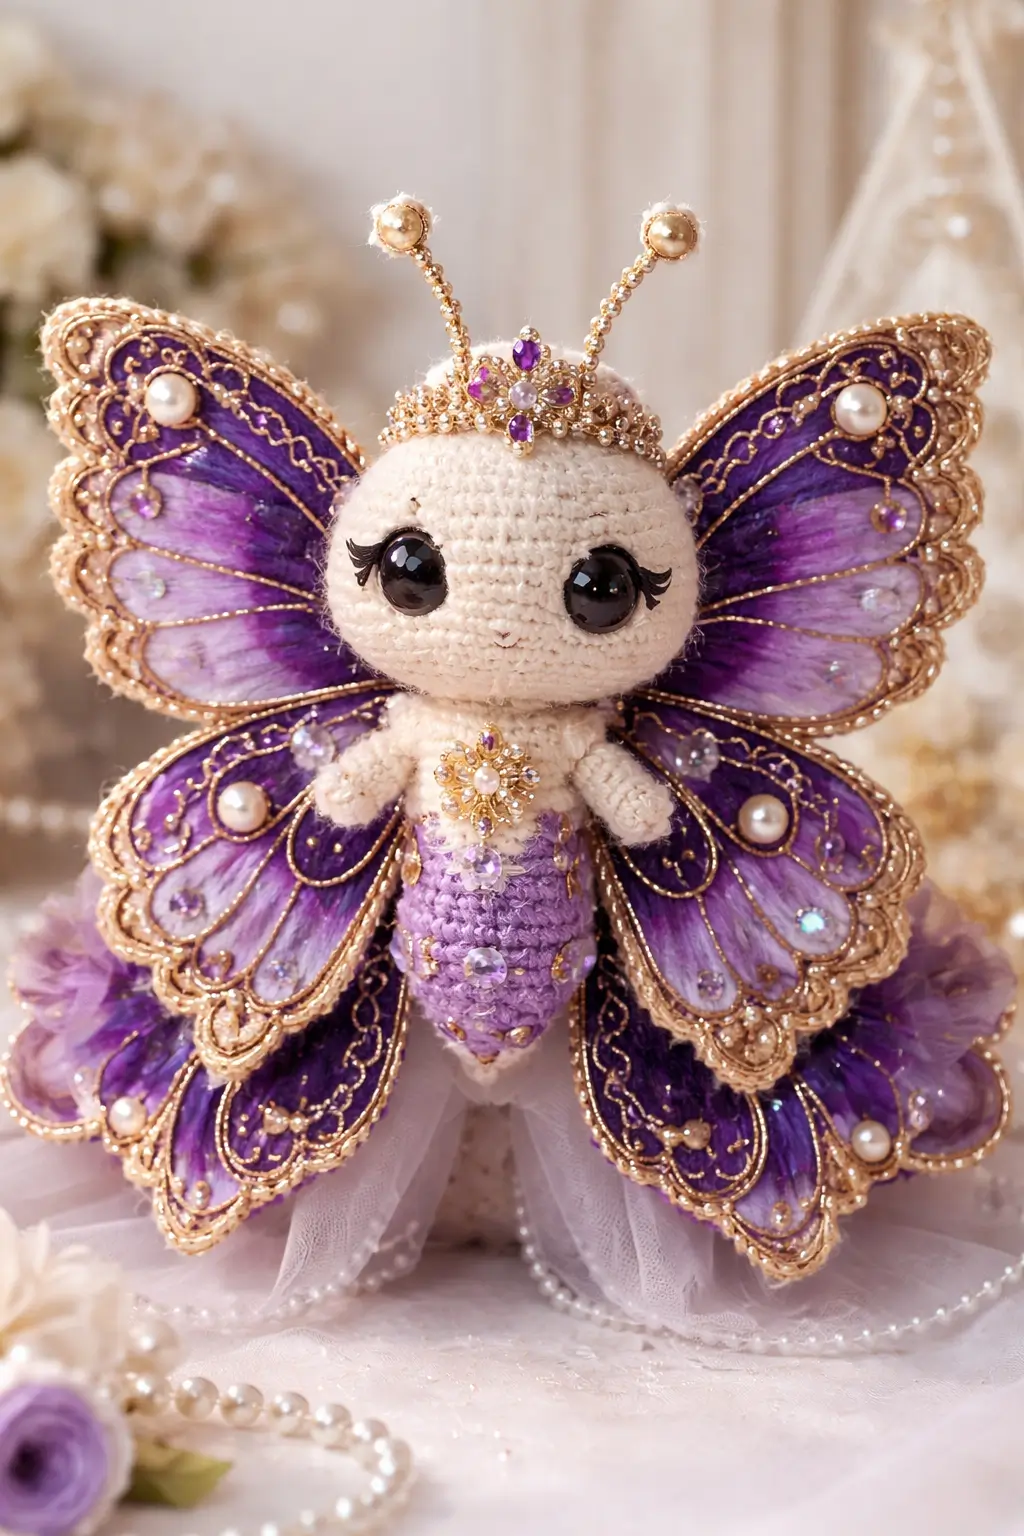
Butterfly antennae sit wider than they look in the photo. That is the first proportion problem this butterfly fairy amigurumi crochet pattern has to solve. This build uses fine cotton yarn, a 2.5–3.0 mm hook, a medium 23 cm target size, and intermediate shaping. It works well as a display doll because the layered wings and crown give the project visual height without adding much body bulk.
The Design: What Makes This Butterfly Fairy Different
A standard butterfly plush can get away with a single oval body and flat wings. Not this one. The photo shows a doll-style head, a narrow thorax, and a tapered insect abdomen, so the shaping has to shift from humanoid to insect in one silhouette. That transition is what makes the form readable.
Wing scale matters even more. The upper wings are broad and high-set, while the lower wings hang lower and add width. That layered placement keeps the figure from reading as a fairy with random leaf panels. In a crochet butterfly fairy doll, the head also needs a short neck or reinforced join; otherwise the wings visually overpower the center line. One common mistake with a butterfly doll crochet pattern is making the abdomen too short. Then the doll loses the species cue and starts looking like a winged child instead of a butterfly fairy.
Project Info at a Glance
| Skill Level | Time | Finished Size | Hook | Best For |
|---|---|---|---|---|
| Intermediate | 10–14 hours | 23 cm | 2.5–3.0 mm | Display doll, gift, decor |
Materials and Tools
Yarn
- Ivory/cream — fine #2 cotton — 50 g — Schachenmayr Catania or similar
- Lavender — fine #2 cotton — 30 g — Catania/Catona-style cotton
- Deep purple — fine #2 cotton — 20 g — for wing edging and details
- Gold embroidery thread or metallic crochet thread — small amount
- White or blush pink — 10 g — for cheek circles and small trim
Tools
- Hook 2.5 mm or 3.0 mm
- Safety eyes — 8 mm verified market size; larger eyes may be substituted for the photo style
- Stuffing
- Tapestry needle
- Stitch markers
- Thin craft wire for antennae and wing support
- Tulle, beads, or faux pearls for the photo-inspired finish
Abbreviations
MR = magic ring, sc = single crochet, inc = increase, dec = decrease, sl st = slip stitch, ch = chain, BLO = back loop only, FLO = front loop only.
Use invisible decrease on visible body shaping rounds because paired front loops reduce the notch that standard dec leaves on fine cotton fabric.
Pattern — Step by Step
Continuous spiral unless noted.
Head (Make 1)
Yarn: ivory
R1: 6 sc in MR (6)
R2: inc x6 (12)
R3: (sc, inc) x6 (18)
R4: (2 sc, inc) x6 (24)
R5: (3 sc, inc) x6 (30)
R6: (4 sc, inc) x6 (36)
R7–12: sc around (36)
Place eyes between R9 and R10, 8–10 sts apart depending on eye size.
R13: (4 sc, dec) x6 (30)
R14: (3 sc, dec) x6 (24)
R15: (2 sc, dec) x6 (18)
Stuff firmly.
R16: (sc, dec) x6 (12)
R17: dec x6 (6)
Fasten off. Leave 20 cm tail.
Body / Thorax (Make 1)
Yarn: ivory
R1: 6 sc in MR (6)
R2: inc x6 (12)
R3: (sc, inc) x6 (18)
R4: (2 sc, inc) x6 (24)
R5–8: sc around (24)
R9: (2 sc, dec) x6 (18)
R10: sc around (18)
Fasten off. Leave 25 cm tail.
Abdomen (Make 1)
Yarn: lavender
R1: 6 sc in MR (6)
R2: inc x6 (12)
R3: (sc, inc) x6 (18)
R4: (2 sc, inc) x6 (24)
R5–8: sc around (24)
R9: (2 sc, dec) x6 (18)
R10–11: sc around (18)
R12: (sc, dec) x6 (12)
R13–14: sc around (12)
R15: dec x6 (6)
Stuff lightly at the top, less at the tip.
Fasten off. Leave 20 cm tail.
Arms (Make 2)
Yarn: ivory
R1: 6 sc in MR (6)
R2: (sc, inc) x3 (9)
R3–6: sc around (9)
R7: (sc, dec) x3 (6)
R8–10: sc around (6)
Stuff only the hand end.
Fasten off. Leave 18 cm tail.
Lower Wings — Outer Layer (Make 2)
Yarn: deep purple with gold edging
R1: 6 sc in MR (6)
R2: inc x6 (12)
R3: (sc, inc) x6 (18)
R4: (2 sc, inc) x6 (24)
R5: (3 sc, inc) x6 (30)
R6–8: sc around (30)
R9: (3 sc, dec) x6 (24)
R10: sc around (24)
R11: (2 sc, dec) x6 (18)
Flatten.
Edging: ch 1, work sc evenly around, adding 3 sc in each corner point.
Fasten off. Leave 25 cm tail.
Lower Wings — Inner Layer (Make 2)
Yarn: lilac
R1: 6 sc in MR (6)
R2: inc x6 (12)
R3: (sc, inc) x6 (18)
R4: (2 sc, inc) x6 (24)
R5–6: sc around (24)
R7: (2 sc, dec) x6 (18)
Flatten.
Fasten off. Leave 20 cm tail.
Upper Wings — Outer Layer (Make 2)
Yarn: deep purple with gold edging
R1: 6 sc in MR (6)
R2: inc x6 (12)
R3: (sc, inc) x6 (18)
R4: (2 sc, inc) x6 (24)
R5: (3 sc, inc) x6 (30)
R6: (4 sc, inc) x6 (36)
R7–9: sc around (36)
R10: (4 sc, dec) x6 (30)
R11: sc around (30)
R12: (3 sc, dec) x6 (24)
Flatten.
Edging: sc evenly around; add picot or metallic whipstitch after sewing.
Fasten off. Leave 25 cm tail.
Upper Wings — Inner Layer (Make 2)
Yarn: lilac
R1: 6 sc in MR (6)
R2: inc x6 (12)
R3: (sc, inc) x6 (18)
R4: (2 sc, inc) x6 (24)
R5: (3 sc, inc) x6 (30)
R6–7: sc around (30)
R8: (3 sc, dec) x6 (24)
Flatten.
Fasten off. Leave 20 cm tail.
Antennae (Make 2)
Yarn: gold or ivory over wire
R1: 6 sc in MR (6)
R2–4: sc around (6)
Insert thin wire if needed.
Fasten off. Leave 15 cm tail.
Cheek Patches (Make 2)
Yarn: blush pink or pearl white
R1: 6 sc in MR (6)
R2: inc x6 (12)
sl st to close.
Fasten off. Leave 12 cm tail.
Crown Base (Make 1)
Yarn: gold thread or metallic crochet cotton
Ch 18, join without twisting.
Rnd 1: sc around (18)
Rnd 2: ch 3, sl st in next 2 sts repeated around for points.
Fasten off. Leave 15 cm tail.
Chest Brooch / Special Feature (Make 1)
Yarn: gold with bead center
R1: 6 sc in MR (6)
R2: inc x6 (12)
Edging: ch 3, sl st in next st around.
Fasten off. Leave 15 cm tail.
Tulle Skirt / Accessory (Make 1)
Cut a strip of soft tulle about 30 x 6 cm. Gather the top edge with thread and tie around the lower thorax/upper abdomen seam. This is not a crocheted part, but the photo reads as couture fairy styling rather than a plain insect plush.
Assembly
- Sew the head to the thorax with the face centered over the narrowest front point.
- Sew the abdomen under the thorax so the taper points down and slightly forward.
- Attach the cheek patches just below the eye line.
- Stitch a small mouth between the eyes with one short horizontal stitch and one tiny anchor stitch.
- Sew the arms to each side of the thorax, one round below the head join.
- Layer each inner wing on its matching outer wing and tack in place with invisible stitches.
- Sew the upper wing pair high on the back seam; place the lower wing pair one to two rounds lower.
- Add the antennae on top of the head, spaced wider than the eye width.
- Sew the crown base between the antennae and add the chest brooch at the front center.
- Tie on the tulle skirt, add beads or pearls, and weave in every tail on the body side only.
The piece is complete when it stands or props upright with the upper wings visually higher than the crown band.
7 Technical Tips
- Mark the first stitch of every round on the head. Losing the round start by even one stitch will shift the eye line off center.
- Stuff the head firmly and the abdomen lightly. Overstuffing the abdomen removes the tapered insect profile.
- Use invisible decreases on the last three body shaping rounds. Standard decreases leave a visible ladder on fine cotton.
- Install the eyes before the head drops below 24 stitches. Waiting until 18 stitches makes washer placement awkward.
- Keep metallic edging looser than the cotton body tension. Tight metallic whipstitch can curl the wings inward.
- Pin all four wings before sewing. The lower wing top edge should begin about 1–2 rounds below the upper wing join.
- Weave tails back through at least 4–5 stitches inside the torso. Short tail burying can pop loose under the weight of embellished wings.
Conclusion
This butterfly fairy amigurumi crochet pattern works because the silhouette does not rely on wings alone. The head stays compact, the thorax stays narrow, and the abdomen carries the species cue all the way to the tip. Keep the upper wings high, keep the antennae wide, and do not shorten the lower wing layer. The next step is to build the body first, then pin paper templates behind it before committing to final wing size. Share the finished doll on Pinterest and Instagram with #ButterflyFairyPattern. One question matters for this character more than most: did you angle the antennae outward enough to clear the crown?









