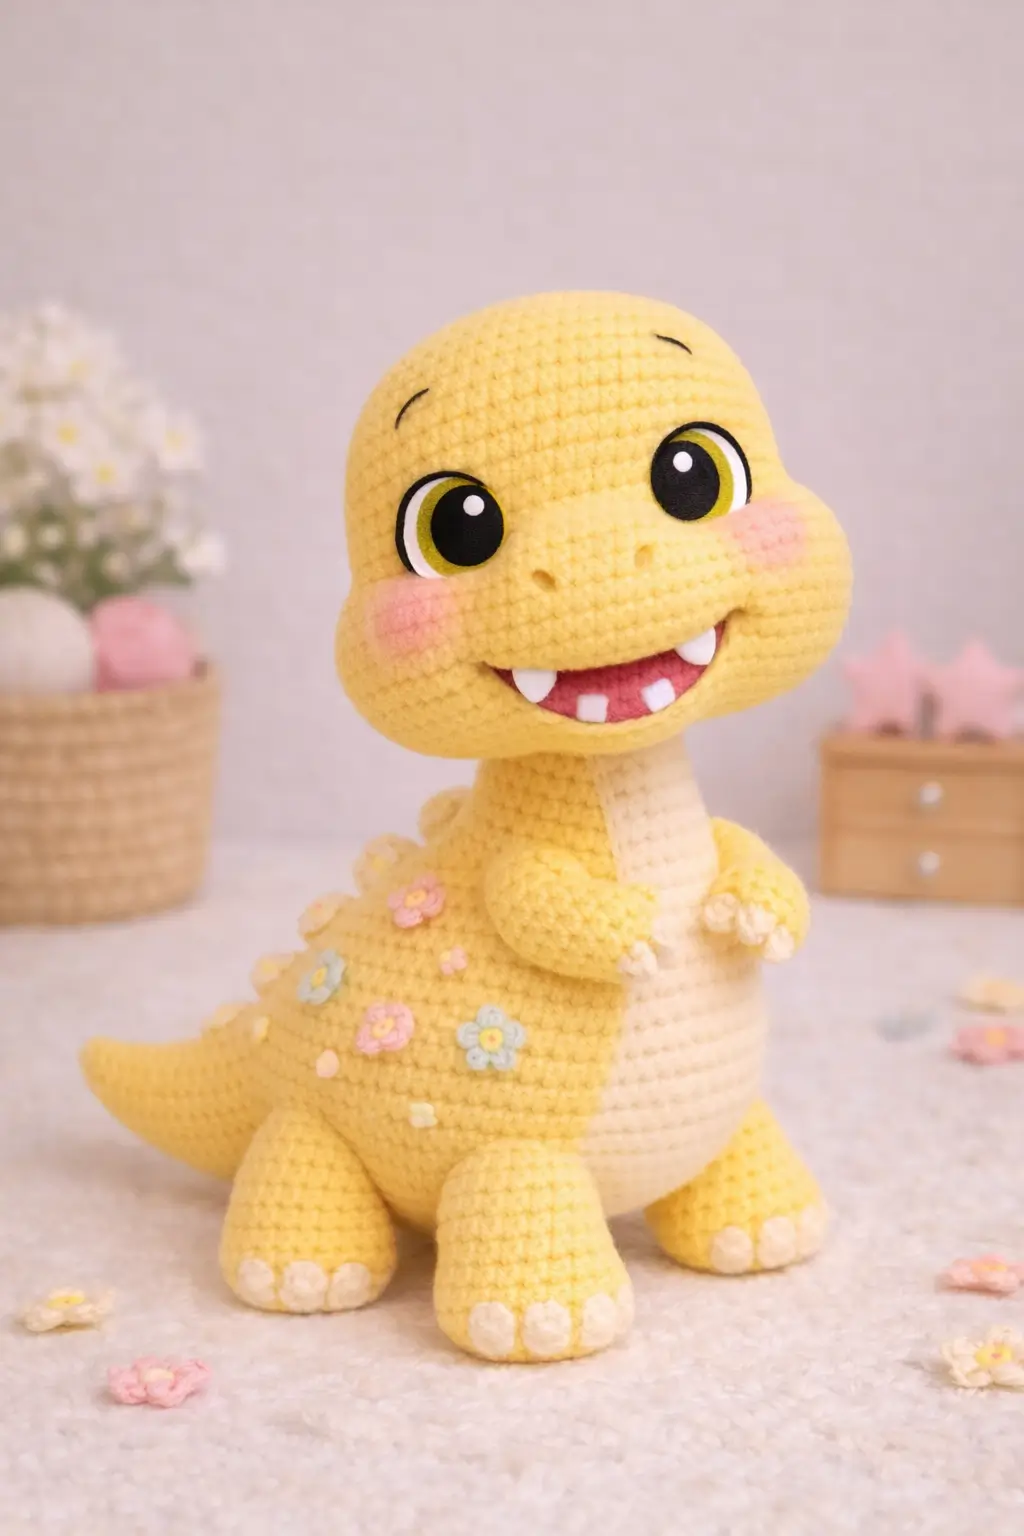
A baby dinosaur only works when the head reads heavy and the tail still keeps it upright. This dinosaur amigurumi crochet pattern uses worsted yarn, a 3.75 mm hook, and a 24 cm target size, with intermediate shaping for the cheeks, belly panel, teeth, and flower appliqués. You make it for shelf display, nursery decor, or a photo prop with a stable seated base.
The Design: What Makes This Dinosaur Different
You are not building a generic upright dino here. The reference toy has three structural priorities: a wide smile, cheek volume that extends past the eye line, and feet large enough to stop the body from pitching forward. In this version, the maker works the head as a medium plateau sphere, then adds a separate snout and inset mouth so the face reads soft instead of flat. The body stays barrel-shaped rather than pear-shaped because a baby dinosaur amigurumi needs a low center of gravity. A long tail matters too. Dinosaur patterns with short tails often sit badly or twist after stuffing, which is why separate-tail construction shows up so often in established designs. A common error in a sitting dinosaur amigurumi is placing the eyes too high, which makes the snout disappear and the mouth look detached.
Project Info at a Glance
| Skill Level | Time | Finished Size | Hook | Best For |
|---|---|---|---|---|
| Intermediate | Multi-session | 24 cm | 3.75 mm | Display plush, nursery shelf, gift topper |
Materials and Tools
Yarn
- Pastel yellow — worsted — about 50 g minimum for the main body; buy extra because this version includes a larger head and four feet — Lion Brand Mandala Tweed is one published worsted reference, though any smooth worsted cotton/acrylic blend works.
- Cream — worsted — small contrast amount for belly, neck front, toe pads
- Blush pink — small amount for cheek patches and flower petals
- White — small amount for teeth and eye whites
- Black — small amount for pupil outline or embroidery
- Pale blue / pale peach / pale yellow — scraps for flower appliqués
Tools
- Hook 3.75 mm
- 15 mm safety eyes if converting to standard eyes, or felt/appliqué eyes at about 20–22 mm to match the photo style more closely
- Stuffing
- Yarn needle
- Stitch markers
- Small sharp scissors
- Fabric glue optional for eye layers only
Abbreviations
MR / sc / inc / dec / sl st / ch / BLO / hdc / dc
Invisible decrease joins the front loops of the next two stitches before pulling through, which keeps the dinosaur face and belly cleaner than a standard decrease.
Pattern — Step by Step
Continuous spiral unless noted.
Head (Make 1)
Yarn: pastel yellow — Source: Standard amigurumi math, sized to match the photo and medium 36-stitch plateau.
R1: 6 sc in MR (6)
R2: inc x6 (12)
R3: (sc, inc) x6 (18)
R4: (2 sc, inc) x6 (24)
R5: (3 sc, inc) x6 (30)
R6: (4 sc, inc) x6 (36)
R7–R12: sc around (36)
R13: (4 sc, dec) x6 (30)
R14: (3 sc, dec) x6 (24)
Stuff firmly. Keep the lower face slightly softer than the crown.
R15: (2 sc, dec) x6 (18)
R16: (sc, dec) x6 (12)
R17: dec x6 (6)
Fasten off. Leave a 25 cm tail.
Snout (Make 1)
Yarn: pastel yellow — Source: Standard amigurumi math adapted for the broad muzzle in the photo.
R1: 6 sc in MR (6)
R2: inc x6 (12)
R3: (sc, inc) x6 (18)
R4: BLO sc around (18)
R5–R6: sc around (18)
R7: (sc, dec) x6 (12)
Lightly stuff. The top edge should stay flat for sewing under the eyes.
Fasten off. Leave a 20 cm tail.
Mouth Inset (Make 1)
Yarn: dark pink — Source: Standard shaping for an open smile insert.
Ch 9.
R1: Starting in 2nd ch from hook, sc 7, 3 sc in last ch, working on opposite side sc 6, inc in last ch (18)
R2: sc 7, inc x3, sc 6, inc x2 (23)
Fasten off. Leave a 20 cm tail.
Teeth (Make 4)
Yarn: white — Source: Standard tooth tabs, inspired by separate-teeth dinosaur patterns.
For each tooth:
Ch 3, sc in 2nd ch from hook, dc in next ch.
Fasten off. Leave a short sewing tail.
Body (Make 1)
Yarn: pastel yellow — Source: Standard amigurumi math with medium 36-stitch plateau for a seated dinosaur.
R1: 6 sc in MR (6)
R2: inc x6 (12)
R3: (sc, inc) x6 (18)
R4: (2 sc, inc) x6 (24)
R5: (3 sc, inc) x6 (30)
R6: (4 sc, inc) x6 (36)
R7–R11: sc around (36)
R12: (4 sc, dec) x6 (30)
R13: sc around (30)
R14: (3 sc, dec) x6 (24)
Stuff the lower body well. Pack the back half firmer than the chest so the toy sits upright.
R15: (2 sc, dec) x6 (18)
R16: (sc, dec) x6 (12)
R17: dec x6 (6)
Fasten off. Leave a 25 cm tail.
Belly Panel (Make 1)
Yarn: cream — Source: Flat oval insert to recreate the light tummy from the photo.
Ch 7.
R1: Starting in 2nd ch from hook, sc 5, 3 sc in last ch, working on opposite side sc 4, inc in last ch (14)
R2: inc, sc 4, inc x3, sc 4, inc x2 (20)
R3: sc, inc, sc 4, (sc, inc) x3, sc 4, (sc, inc) x2 (26)
R4: sc around (26)
Fasten off. Leave a 30 cm tail.
Front Arms (Make 2)
Yarn: pastel yellow — Source: Standard arm tube scaled to the photo’s short forelimbs.
R1: 6 sc in MR (6)
R2: inc x6 (12)
R3–R4: sc around (12)
R5: (2 sc, dec) x3 (9)
R6–R7: sc around (9)
Stuff only the lower half.
Flatten opening. Sl st closed through both layers with 4 stitches.
Fasten off. Leave a 20 cm tail.
Back Legs (Make 2)
Yarn: pastel yellow — Source: Standard seated-leg cylinder with broad foot.
R1: 6 sc in MR (6)
R2: inc x6 (12)
R3: (sc, inc) x6 (18)
R4–R6: sc around (18)
R7: (sc, dec) x6 (12)
R8–R10: sc around (12)
Stuff firmly at the foot, lightly at the top. Flatten the opening.
Sl st closed through both layers with 5 stitches.
Fasten off. Leave a 25 cm tail.
Front Feet (Make 2)
Yarn: pastel yellow — Source: Separate front-foot forms to match the heavier stance in the photo.
R1: 6 sc in MR (6)
R2: inc x6 (12)
R3: (sc, inc) x6 (18)
R4: sc around (18)
R5: (sc, dec) x6 (12)
R6: sc around (12)
Stuff firmly. Flatten.
Fasten off. Leave a 20 cm tail.
Tail (Make 1)
Yarn: pastel yellow — Source: Standard tapered tail; separate tail construction is common in stable dinosaur patterns.
R1: 6 sc in MR (6)
R2: (sc, inc) x3 (9)
R3: sc around (9)
R4: (2 sc, inc) x3 (12)
R5: sc around (12)
R6: (3 sc, inc) x3 (15)
R7: sc around (15)
R8: (4 sc, inc) x3 (18)
R9–R10: sc around (18)
Stuff from wide end only. Keep the tip light so it curves slightly.
Fasten off. Leave a 25 cm tail.
Cheek Bulges (Make 2)
Yarn: pastel yellow — Source: Small domes to recreate the side-heavy face in the photo.
R1: 6 sc in MR (6)
R2: inc x6 (12)
R3: sc around (12)
Stuff lightly.
Fasten off. Leave a 20 cm tail.
Brow Arcs (Make 2)
Yarn: black or dark gray — Source: Embroidered facial detail represented as paired pieces because the photo shows two distinct brows.
Ch 4.
Starting in 2nd ch from hook: sl st, sc, sl st.
Fasten off. Leave sewing tails.
Cheek Patches (Make 2)
Yarn: blush pink — Source: Flat circles for blush areas.
R1: 6 sc in MR (6)
R2: inc x6 (12)
Fasten off. Leave a 15 cm tail.
Toe Pads (Make 12)
Yarn: cream — Source: Tiny flat circles for the pale toe details visible on all four feet.
For each pad:
R1: 6 sc in MR (6)
Fasten off. Leave a short tail.
Back Bumps (Make 5)
Yarn: pastel yellow or cream — Source: Small nubs for the spine silhouette visible in the photo.
R1: 6 sc in MR (6)
R2: sc around (6)
Do not stuff.
Fasten off. Leave a 12 cm tail.
Flower Appliqués (Make 6–8)
Yarn: blush pink, pale blue, pale peach, pale yellow — Source: Surface embellishment based directly on the photo.
For each flower center:
R1: 5 sc in MR (5)
Sl st to first st.
Petals: ch 3, sl st in next st x5 around.
Fasten off. Leave a tail for sewing.
Assembly
- Sew the snout to the lower front of the head, centered between R8 and R13.
- Sew the mouth inset into the lower opening of the snout, then stitch two teeth to the upper edge and two to the lower edge.
- Attach the cheek bulges to each side of the snout so they sit slightly below the eye line.
- Add the eye appliqués or safety eyes; for standard eyes, place them between R8 and R10 of the head, about 8 stitches apart.
- Sew the blush cheek patches just below and slightly outward from the eyes. Add two tiny nostril indents and attach the brow arcs above the eyes.
- Sew the belly panel to the front of the body, then stitch the head to the body with extra stuffing packed into the neck join.
- Attach the back legs low on the body sides, then sew the separate front feet slightly forward so the toy rests on four contact points.
- Sew the front arms high on the chest, angled inward. Attach the tail to the back center so it touches the surface when the toy is seated.
- Stitch the five back bumps along the neck-to-tail line.
- Sew the flower appliqués mostly on one side of the body and add the toe pads to each foot front.
The completed toy should sit upright with the tail acting as a rear stabilizer.
7 Technical Tips
- Mark every round on the head after R6. Losing the round start on a 36-stitch plateau shifts the eye line and throws the smile off-center by 1–2 stitches.
- Stuff the crown firmly but keep the snout softer. A rock-hard muzzle makes the mouth inset buckle instead of curving.
- Use invisible decreases on the head and body only. Standard decreases leave a ridge that shows under smooth worsted yarn, especially across the cheeks.
- Insert or place the eyes before the head is fully closed. Waiting until after R15 on a 36-stitch head makes the washer angle awkward and compresses the face.
- Pin all four feet before sewing. A difference of even 3 mm in foot height changes whether the dinosaur rocks forward.
- Keep the tail lightly stuffed near the tip and firm at the base. Overstuffing the tip forces the tail outward and lifts it off the table, which removes rear support.
- Weave flower tails through at least two stitch columns on the body interior. Short tail weaving under surface appliqués comes loose fast because the flowers sit on a curved barrel, not a flat panel.
Conclusion
This build focuses on proportion first: broad head, compact torso, planted feet, and a tail that actually does structural work. That is what makes this dinosaur amigurumi crochet pattern read like the reference toy instead of a generic plush reptile. The next step is practical. Make the head and one foot first, check your scale, then commit to the full set of limbs and appliqués. When yours is finished, post one side profile on Pinterest and one front view on Instagram so the cheek shaping and flower placement are both visible. Use #SunnyFlowerDino and note whether you kept the flowers on one flank or wrapped them across the back.










very cute love this pattern.