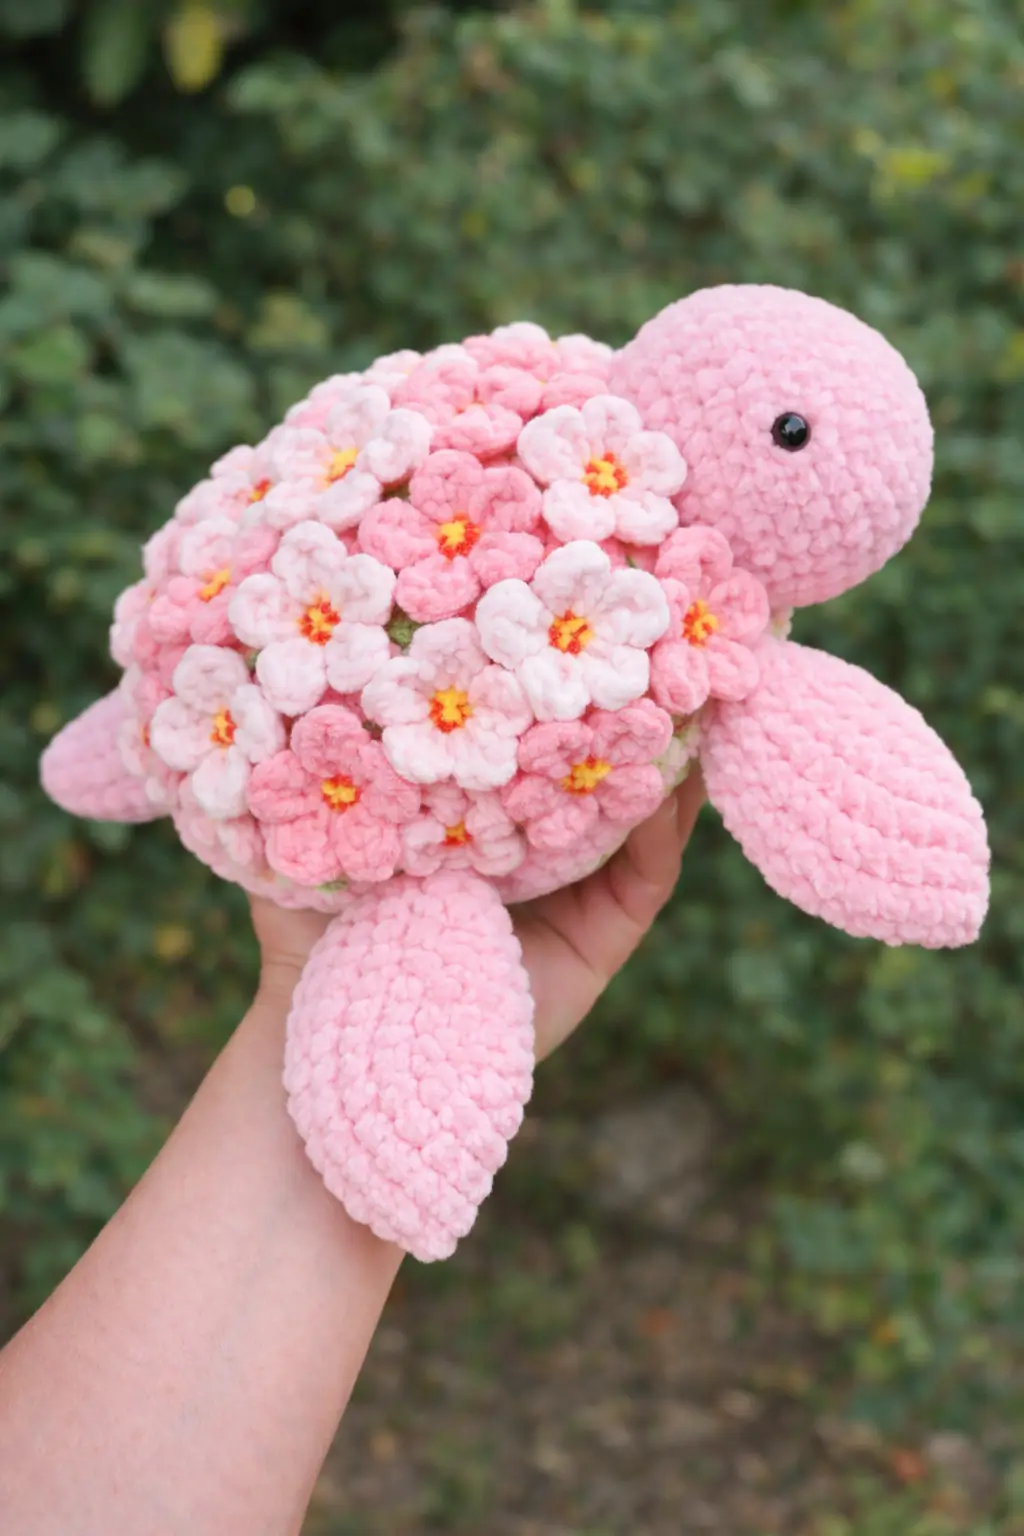
A turtle is one of the few amigurumi shapes where the widest mass sits on the shell instead of the belly. This flower turtle amigurumi crochet pattern builds that width with plush yarn, a 4 mm hook, and a large floral shell, then keeps the project in the easy-to-advanced-beginner range at roughly 21 x 17 cm. It suits spring market stock, nursery decor, or a themed gift.
The Design: What Makes This Turtle Different
A flower-shell turtle works only when the base silhouette stays low and broad. The head must project forward without lifting the front edge. The flippers need enough spread to stop roll. The shell decoration needs vertical texture, but not so much height that the toy tips backward. That is the structural problem.
This version solves it with an oval shell body, tapered front flippers, and separate flat blossoms stitched across the top shell after the base is assembled. That differs from a standard crochet flower turtle pattern, where petals are sometimes built directly into a spiral shell. Here, separate motifs give better color control and cleaner spacing. Another common issue in floral turtle amigurumi builds is overcrowding the shell center, which compresses the plush and hides the turtle outline. Leave visible shell edges. The turtle should still read as turtle first, flower cluster second. Current flower turtle references also show plush chenille yarn, large eyes, and a finished size around 20–21 cm, which fits the proportions seen in the photo.
Project Info at a Glance
| Skill Level | Time | Finished Size | Hook | Best For |
|---|---|---|---|---|
| Easy / Advanced Beginner | 3–5 hours | approx. 21 x 17 cm | 4 mm | Gift plush, spring decor, market prep |
Benchmarked against current flower turtle pattern listings and tutorials.
Materials and Tools
Yarn
- Main body pink — super bulky velvet/chenille — about 70 g — Premier Parfait Chunky or similar benchmark yarn
- Light pink — super bulky velvet/chenille — about 25 g — for flower petals
- Pale pink or blush — super bulky velvet/chenille — about 25 g — for alternate flower petals
- Yellow — super bulky velvet/chenille — about 5 g — for flower centers
- Green — super bulky velvet/chenille — about 10 g — for shell peeks and tail
Current flower turtle references use super bulky chenille/velvet yarn and list a flower turtle palette in pinks, plus measured gram amounts for rose/daisy variants.
Tools
- Hook 4 mm
- Safety eyes 20 mm for a photo-matched look; larger pattern references also use 25 mm or 30 mm
- Polyfill stuffing
- Yarn needle
- Stitch markers
- Pins or clips
These tool specs align with active flower turtle tutorials and listings.
Abbreviations
MR / sc / inc / dec / sl st / ch / BLO / hdc / dc
Invisible decrease joins the front loops of two stitches before drawing through, which keeps the closing rounds cleaner on plush yarn.
Pattern — Step by Step
Continuous spiral unless noted. The pattern below is an original image-based draft built with standard amigurumi math and proportions benchmarked against current flower turtle tutorials and listings.
Head (Make 1)
Yarn: main body pink — Source: Standard amigurumi math
R1: 6 sc in MR (6)
R2: inc x6 (12)
R3: (sc, inc) x6 (18)
R4: (2 sc, inc) x6 (24)
R5: (3 sc, inc) x6 (30)
R6: (4 sc, inc) x6 (36)
R7-R11: sc around (36)
R12: (4 sc, dec) x6 (30)
R13: (3 sc, dec) x6 (24)
Insert safety eyes between R8 and R9, spaced 10 sts apart. Stuff firmly at the snout and lightly at the back.
R14: (2 sc, dec) x6 (18)
R15: (sc, dec) x6 (12)
R16: dec x6 (6)
Fasten off. Close the hole. Leave a 25 cm tail.
Body / Lower Shell (Make 1)
Yarn: main body pink — Source: Standard amigurumi math
R1: 6 sc in MR (6)
R2: inc x6 (12)
R3: (sc, inc) x6 (18)
R4: (2 sc, inc) x6 (24)
R5: (3 sc, inc) x6 (30)
R6: (4 sc, inc) x6 (36)
R7: (5 sc, inc) x6 (42)
R8-R11: sc around (42)
Fasten off. Leave a 30 cm tail for joining.
Top Shell Base (Make 1)
Yarn: pale pink or blush — Source: Standard amigurumi math
R1: 6 sc in MR (6)
R2: inc x6 (12)
R3: (sc, inc) x6 (18)
R4: (2 sc, inc) x6 (24)
R5: (3 sc, inc) x6 (30)
R6: (4 sc, inc) x6 (36)
R7: (5 sc, inc) x6 (42)
R8: sc around in BLO (42)
Fasten off. Leave a 40 cm tail for sewing to the lower shell.
Front Flippers (Make 2)
Yarn: main body pink — Source: Standard amigurumi math
R1: 6 sc in MR (6)
R2: inc x6 (12)
R3: (sc, inc) x6 (18)
R4-R7: sc around (18)
R8: (sc, dec) x6 (12)
R9-R11: sc around (12)
Flatten. Crochet 6 sc through both layers.
Fasten off. Leave a 20 cm tail.
Back Flippers (Make 2)
Yarn: main body pink — Source: Standard amigurumi math
R1: 6 sc in MR (6)
R2: inc x6 (12)
R3: (sc, inc) x6 (18)
R4-R5: sc around (18)
R6: (sc, dec) x6 (12)
R7-R8: sc around (12)
Flatten. Crochet 6 sc through both layers.
Fasten off. Leave a 20 cm tail.
Tail (Make 1)
Yarn: green — Source: Standard amigurumi math, shaped to match the photo
Ch 4.
Row 1: sc in 2nd ch from hook, hdc in next, dc in last.
Fasten off. Leave a 10 cm tail.
Flower Motif A — Pale Blossom (Make 8)
Yarn: pale pink petals, yellow center — Source: Standard amigurumi math
With yellow:
R1: 6 sc in MR (6)
Change to pale pink.
R2: (sl st, ch 2, 2 dc, ch 2, sl st) in next st x6
Fasten off. Leave a 15 cm tail.
Flower Motif B — Blush Blossom (Make 8)
Yarn: blush pink petals, yellow center — Source: Standard amigurumi math
With yellow:
R1: 6 sc in MR (6)
Change to blush pink.
R2: (sl st, ch 2, 2 dc, ch 2, sl st) in next st x6
Fasten off. Leave a 15 cm tail.
Flower Motif C — Main Pink Blossom (Make 6)
Yarn: main pink petals, yellow center — Source: Standard amigurumi math
With yellow:
R1: 6 sc in MR (6)
Change to main pink.
R2: (sl st, ch 2, 2 dc, ch 2, sl st) in next st x6
Fasten off. Leave a 15 cm tail.
Cheek Patches (Make 2, optional)
Yarn: pale pink — Source: Standard amigurumi math
R1: 6 sc in MR (6)
R2: inc x6 (12)
Fasten off. Leave a 12 cm tail.
The reference turtle does not visibly use cheek patches, so skip in assembly unless you want added face detail.
Assembly
- Sew the head to the front third of the lower shell, slightly above centerline.
- Sew the front flippers on each side of the head, angled forward.
- Sew the back flippers near the rear quarter of the lower shell, angled slightly outward.
- Sew the tail between the back flippers.
- Place the top shell base over the lower shell and pin at four points.
- Stitch the shell pieces together around the edge, stuffing as you go.
- Add extra stuffing under the center dome only; keep the side edges flatter.
- Arrange the flowers on the top shell before sewing: largest concentration at center, fewer motifs near the shell edge.
- Sew the flowers down through their centers and two petal points each so they stay flat but dimensional.
- Add optional cheek patches below the eyes if used, then weave in all ends.
The finished turtle should sit low, with the shell carrying the width and the flippers preventing forward roll.
7 Technical Tips
- Mark the shell center before adding flowers. Off-center placement by even 1.5 cm makes the turtle look lopsided from above.
- Do not overstuff the shell edge. Puffy sides push the flippers downward and reduce stability on a flat surface.
- Use invisible decreases on the head. Plush yarn shows standard decreases as shallow dents, especially around rounds 12 to 16.
- Install the eyes before the last head decrease rounds. Waiting until the head closes too far makes 20 mm eyes difficult to seat cleanly in chenille fabric.
- Keep flower tails short but secure. Long buried tails can create shell lumps under the top layer.
- Pin every flipper before sewing. A difference of one round in height is visible immediately on a turtle because the body sits so low.
- Anchor each flower in at least three points. Center-only stitching makes petals curl upward after handling or shelf compression.
Conclusion
This flower turtle amigurumi crochet pattern works because the shell decoration stays subordinate to the turtle outline. The body remains broad, the head projects forward, and the flippers hold the toy level while the blossoms add depth across the top surface. Use the verified hook, yarn category, and size benchmarks as the starting point, then adjust color placement to match your stash or market palette. For publishing, add step photos of shell layout and eye placement first. Share the finished turtle on Pinterest and Instagram with #FlowerTurtlePattern. One practical question remains: did you cluster more blossoms toward the shell center, or did you keep a visible border around the rim?









