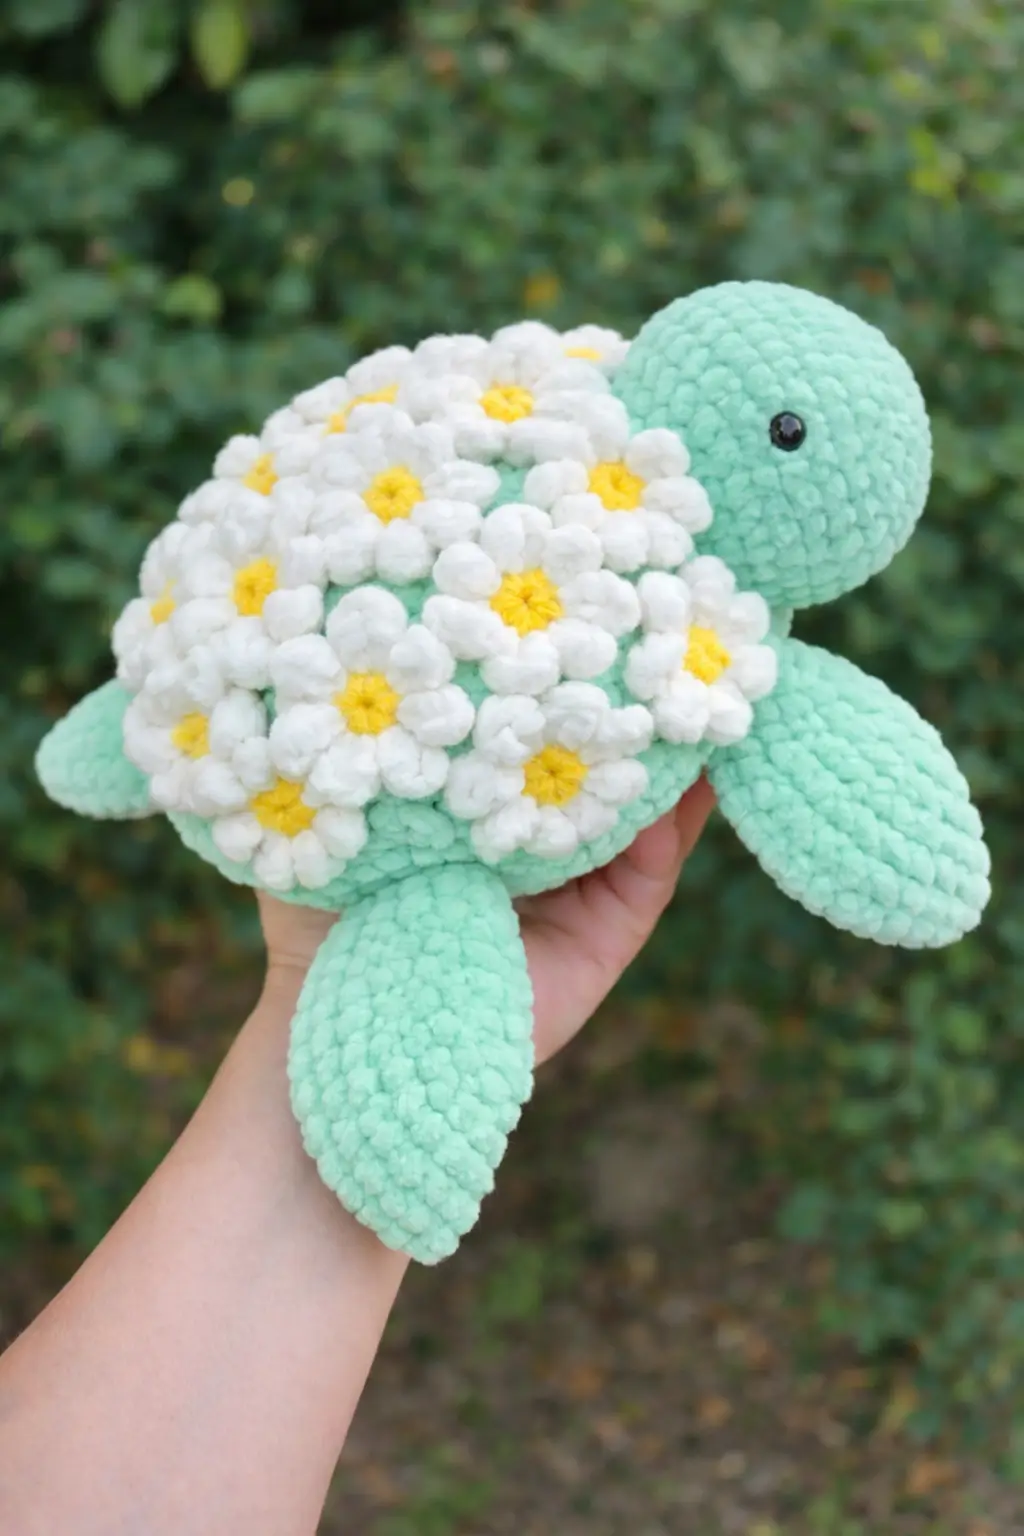
A turtle shell covered in daisies changes the geometry before the first stitch is made. This daisy turtle amigurumi crochet pattern uses plush chenille yarn, a 4.0 mm hook, large safety eyes, and simple rounded shaping to produce a medium-sized turtle at roughly 20 to 25 cm, suited to an advanced beginner. The practical advantage is obvious: it reads as spring décor and toy in the same piece.
The Design: What Makes Daisy Turtle Different
A standard turtle plush hides most shell shaping inside color changes or hexagon panels. Not this one. Here, the shell becomes surface structure. The yellow base sets the flower centers first, then a white round creates the daisy ring, and the green body round frames the shell so the flowers stay dominant from top view. That sequence matters because a flat shell edge disappears under plush petals if the last body round is too narrow. Another structural choice is the long paddle flipper. It pushes the silhouette toward sea turtle rather than tortoise, which suits the low, oval profile seen in many flower turtle crochet pattern listings. The common mistake is overstuffing the body center. When that happens, the daisies tilt outward and the head rides too high, which breaks the broad, resting posture expected from a crochet turtle with daisies.
Project Info at a Glance
| Skill Level | Time | Finished Size | Hook | Best For |
|---|---|---|---|---|
| Advanced beginner | 1–2 hours | 20–25 cm | 4.0 mm | Plush gifts, market stock, spring décor |
Materials and Tools
Yarn
- Mint green — bulky to super bulky chenille/velvet — 35 g — Premier Parfait Chunky or similar plush yarn
- White — same weight — 15 g — matching chenille/velvet
- Yellow — same weight — 15 g — matching chenille/velvet
Tools
- Hook 4.0 mm
- Safety eyes 20 mm
- Polyfill stuffing
- Tapestry needle
- Stitch markers
- Small scissors
Abbreviations
MR / sc / inc / dec / sl st / ch / BLO / hdc / dc / tr
Invisible decrease is preferable on the closing rounds because chenille yarn exaggerates any front-loop gaps left by a standard decrease.
Pattern — Step by Step
Continuous spiral unless noted.
Head (Make 1)
Yarn: mint green
R1: 6 sc in MR (6)
R2: inc x6 (12)
R3: (sc, inc) x6 (18)
R4: (2 sc, inc) x6 (24)
R5: (3 sc, inc) x6 (30)
R6-R9: sc around (30)
R10: (3 sc, dec) x6 (24)
R11: sc around (24)
Insert 20 mm eyes between R7 and R8, spaced 9 sts apart. Stuff firmly but keep the lower half slightly flatter than the crown.
R12: (2 sc, dec) x6 (18)
Flatten lightly. Crochet 9 sc through both sides to close.
Fasten off. Leave a 20 cm tail.
Body / Shell Base (Make 1)
Yarn: yellow, then white, then mint green
R1: 6 sc in MR (6)
R2: inc x6 (12)
R3: (sc, inc) x6 (18)
R4: (2 sc, inc) x6 (24)
R5: (3 sc, inc) x6 (30)
R6: BLO (4 sc, inc) x6 (36) with yellow
Change to white
R7: sc around (36)
Change to mint green
R8: sc around (36)
Do not fasten off if you want to attach parts as you crochet. This 36-stitch plateau gives enough shell width for the daisy layer without pushing the body into a dome.
Front Flippers (Make 2)
Yarn: mint green
R1: 6 sc in MR (6)
R2: inc x6 (12)
R3: (sc, inc) x6 (18)
R4-R8: sc around (18)
R9: (7 sc, dec) x2 (16)
R10: sc around (16)
Flatten. Crochet 8 sc through both sides.
Fasten off. Leave a 15 cm tail.
Back Flippers (Make 2)
Yarn: mint green
R1: 6 sc in MR (6)
R2: inc x6 (12)
R3: (sc, inc) x6 (18)
R4-R6: sc around (18)
R7: (7 sc, dec) x2 (16)
Flatten. Crochet 8 sc through both sides.
Fasten off. Leave a 15 cm tail.
Tail (Make 1)
Yarn: mint green
Ch 4.
Row 1: sc in 2nd ch from hook, hdc in next, dc in last.
Fasten off. Leave a 10 cm tail.
Daisy Petals Ring A (Make 5)
Yarn: white
Ch 5.
Round 1: Starting in 2nd ch from hook, sc, hdc, dc, sl st in first ch to close a petal loop.
Make 5 petals into a small ring.
Fasten off. Leave a 15 cm tail.
Daisy Petals Ring B (Make 4)
Yarn: white
Ch 5.
Round 1: Starting in 2nd ch from hook, sc, hdc, dc, sl st in first ch to close a petal loop.
Make 5 petals into a small ring.
Fasten off. Leave a 15 cm tail.
Daisy Petals Ring C (Make 3)
Yarn: white
Ch 5.
Round 1: Starting in 2nd ch from hook, sc, hdc, dc, sl st in first ch to close a petal loop.
Make 5 petals into a small ring.
Fasten off. Leave a 15 cm tail.
Daisy Centers (Make 12)
Yarn: yellow
R1: 6 sc in MR (6)
Sl st to first sc.
Fasten off. Leave a 12 cm tail.
Cheek Patches (Make 2)
Yarn: white
R1: 6 sc in MR (6)
Sl st to first sc.
Fasten off. Leave an 8 cm tail.
Belly Panel (Make 1)
Yarn: mint green
R1: 6 sc in MR (6)
R2: inc x6 (12)
R3: (sc, inc) x6 (18)
R4: (2 sc, inc) x6 (24)
R5: (3 sc, inc) x6 (30)
R6: (4 sc, inc) x6 (36)
Fasten off. Leave a 30 cm tail.
Assembly
- Sew the head to the front third of the shell base, aligning the flat closure edge with the shell underside.
- Attach the front flippers one round below the shell edge, angled slightly forward at about 30 degrees.
- Attach the back flippers near the widest point of the body, angled slightly backward.
- Sew the tail centered at the rear between the back flippers.
- Add the belly panel to the underside with a whip stitch, stuffing the body before the final 6 cm of seam.
- Place the largest daisy ring at shell center and tack it down at five points only so the petals keep lift.
- Arrange the remaining daisy rings around that center piece, overlapping them enough to hide most of the white shell round.
- Sew one yellow center into each daisy.
- Add the cheek patches low on the face only if you want a more stylized version than the reference photo.
- Weave all tails into the body core, not sideways under plush stitches, then brush the petals lightly with fingers to reopen the flower shape.
The finished turtle should rest low, with the shell wider than the head and the daisy layer reading as a continuous floral cap.
7 Technical Tips
- Mark the shell quarter points before attaching flippers. If the front pair sits even 1 stitch too far back, the turtle reads as squat and the head projection looks shortened.
- Keep body stuffing softer than head stuffing. A firm shell center forces the daisy appliqués to flare upward instead of lying in a shallow dome.
- Use invisible decreases on head and body closure rounds. Plush yarn makes standard decreases look like notches, especially on mint shades.
- Install eyes before the final head decrease section. In chenille yarn, pushing posts through later can strip the pile and widen the eye holes.
- Pin every daisy before sewing any of them down. The shell needs balanced overlap or one side will show too much white foundation round.
- Do not flatten the flippers too hard. A compressed paddle loses edge definition and starts to look like a rounded tab instead of a sea-turtle limb.
- Weave tails toward the stuffing core for at least 5 cm. Short tail burying slips out faster in velvet yarn because the pile reduces friction.
Conclusion
The floral shell is the whole point. That is why this daisy turtle amigurumi crochet pattern works best when the body stays low, the flippers stay long, and the appliqués overlap enough to read as one field of daisies rather than separate flowers. Next step: crochet the shell first, pin every flower in place, and check the top view before permanent sewing. Share the finished turtle on Pinterest and Instagram with #DaisyTurtlePattern so the shell layout is visible from above. One question matters here: did you place your front flippers far enough forward to keep the head from disappearing under the daisy shell?









