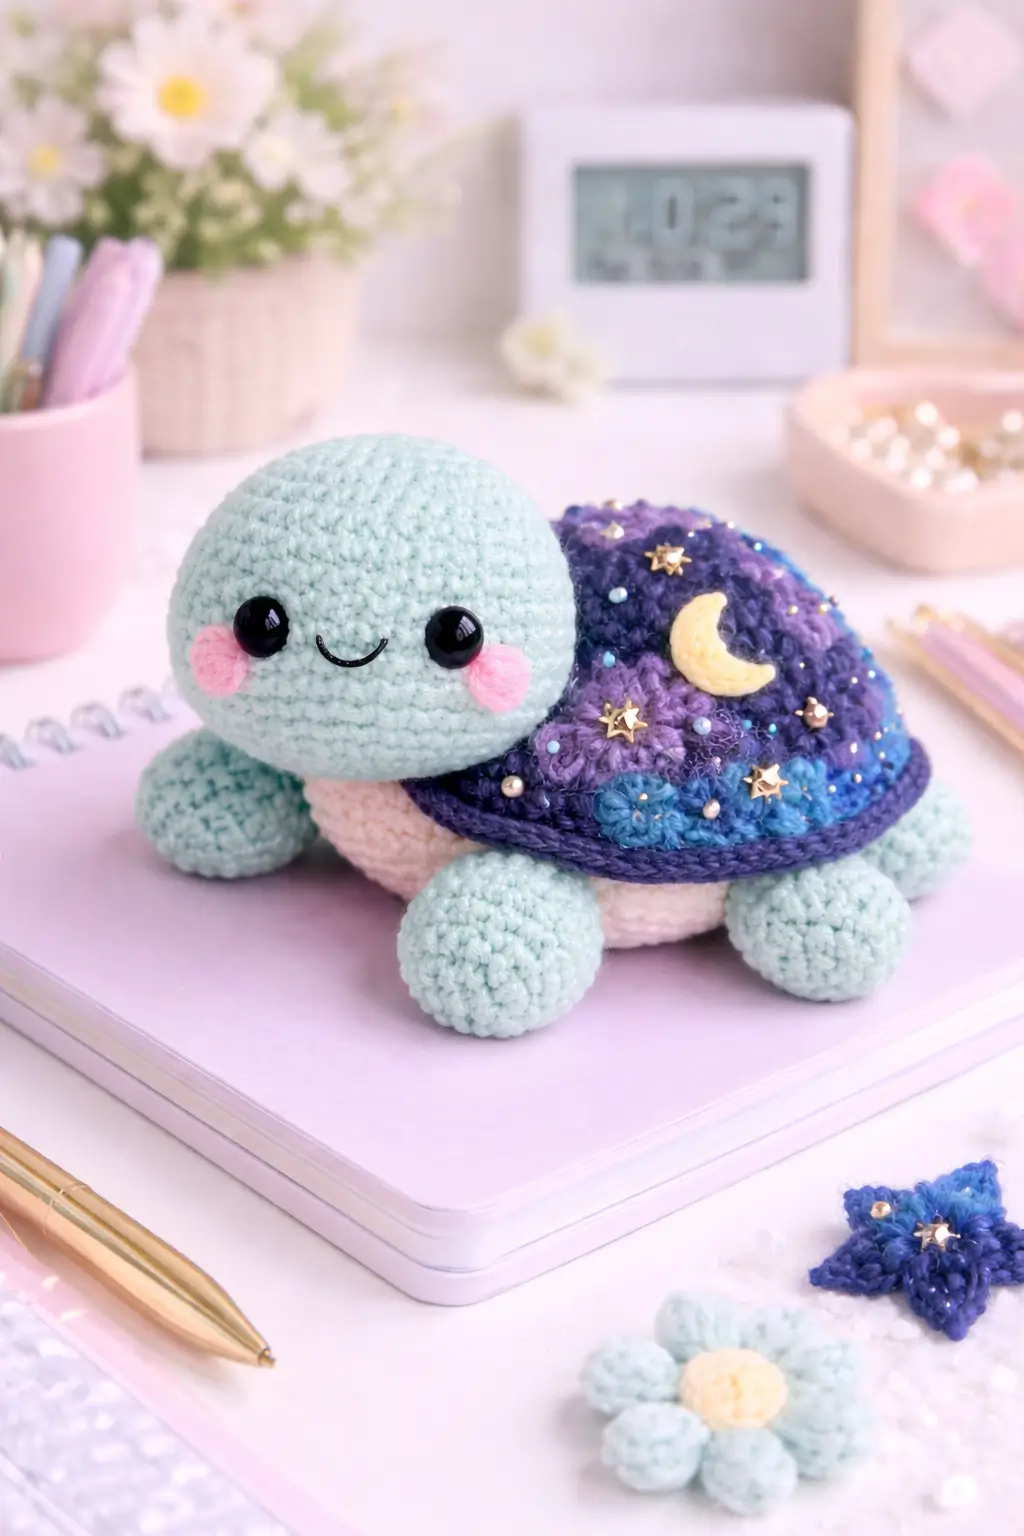
The shell is the problem first, not the head. A celestial turtle amigurumi pattern only reads as a night turtle when the dome stays low, the moon sits off-center, and the legs keep the body from looking like a sphere on four stumps. This version uses plush yarn, a medium build, and intermediate shaping. The result works as desk decor, nursery styling, or a gift with a clear theme.
The Design: What Makes This Turtle Different
A celestial turtle needs three structural choices. First, the head is oversized and round, because the photo shows a face-led design rather than a realistic turtle profile. That wider face gives enough spacing for large safety eyes and blush patches without crowding the mouth line. Second, the shell stays broad and shallow. A high dome would hide too much of the cream underside and shorten the silhouette. Third, the legs are compact balls instead of flat flippers. That keeps the piece upright on a desk and supports the shell visually.
The main error with this character type is building a shell that is too tall or too narrow. That shifts the piece toward tortoise styling and weakens the moon turtle crochet pattern look. Another common problem is placing the crescent at dead center. Offset placement reads more like a decorated sky dome. In that sense, the shell does most of the storytelling, while the galaxy turtle amigurumi palette finishes the effect.
Project Info at a Glance
| Skill Level | Time | Finished Size | Hook | Best For |
|---|---|---|---|---|
| Intermediate | 4–6 hours | Approx. 16–18 cm long | 4.0 mm for plush yarn | Decor, themed gifts, photo props |
Materials and Tools
Yarn
- Pale mint — chunky chenille/plush — main head and legs — about 40–60 g
- Cream — chunky chenille/plush — underside body — about 20–30 g
- Deep violet — textured or plush yarn — shell outer rounds — about 15 g
- Purple — textured or plush yarn — shell mid rounds — about 10 g
- Blue — textured or plush yarn — shell lower accents — about 10 g
- Pink — DK or plush scrap — cheek patches — small amount
- Pale yellow — DK scrap — crescent moon applique — small amount
Tools
- 4.0 mm hook
- 10 mm safety eyes
- Polyester stuffing
- Tapestry needle
- Stitch markers
- Black embroidery thread for the smile
- Optional: star beads, small pearl beads, sewing thread
Abbreviations
MR = magic ring, sc = single crochet, inc = increase, dec = decrease, sl st = slip stitch, ch = chain, BLO = back loop only. Use invisible decrease on all shaping rounds that close the head and body so the surface stays clean.
Pattern — Step by Step
Work in a continuous spiral unless noted.
Head (Make 1)
Yarn: pale mint
R1: 6 sc in MR (6)
R2: inc x6 (12)
R3: (sc 1, inc) x6 (18)
R4: (sc 2, inc) x6 (24)
R5: (sc 3, inc) x6 (30)
R6: (sc 4, inc) x6 (36)
R7–12: sc around (36)
R13: (sc 4, dec) x6 (30)
R14: (sc 3, dec) x6 (24)
Insert eyes between R8 and R9, 8 stitches apart. Add stuffing as you go.
R15: (sc 2, dec) x6 (18)
R16: (sc 1, dec) x6 (12)
R17: dec x6 (6)
Fasten off. Close opening. Leave a 20 cm tail for sewing.
Body Underside (Make 1)
Yarn: cream
R1: 6 sc in MR (6)
R2: inc x6 (12)
R3: (sc 1, inc) x6 (18)
R4: (sc 2, inc) x6 (24)
R5: (sc 3, inc) x6 (30)
R6: (sc 4, inc) x6 (36)
R7–9: sc around (36)
R10: BLO sc around (36)
Fasten off. Leave a long tail for assembly.
Shell Dome (Make 1)
Yarn: start deep violet, then change colors to purple and blue in irregular blocks
R1: 6 sc in MR (6)
R2: inc x6 (12)
R3: (sc 1, inc) x6 (18)
R4: (sc 2, inc) x6 (24)
R5: (sc 3, inc) x6 (30)
R6: (sc 4, inc) x6 (36)
R7: BLO sc around (36)
R8–11: sc around (36)
Stuff very lightly only if you want a firmer shell. Most of the height should come from the side wall, not dense filling.
Fasten off. Leave a long tail.
Shell Rim (Make 1)
Yarn: dark purple
Ch 40. Join without twisting.
R1: sc around chain ring (40)
R2: sl st around (40)
Fasten off. Stretch lightly around shell edge before sewing in place.
Front Legs (Make 2)
Yarn: pale mint
R1: 6 sc in MR (6)
R2: inc x6 (12)
R3: (sc 1, inc) x6 (18)
R4–5: sc around (18)
R6: (sc 1, dec) x6 (12)
Stuff firmly. Flatten opening. Fasten off. Leave a 20 cm tail.
Back Legs (Make 2)
Yarn: pale mint
R1: 6 sc in MR (6)
R2: inc x6 (12)
R3: (sc 1, inc) x6 (18)
R4–5: sc around (18)
R6: (sc 1, dec) x6 (12)
Stuff firmly. Flatten opening. Fasten off. Leave a 20 cm tail.
Tail (Make 1)
Yarn: pale mint
R1: 4 sc in MR (4)
R2: sc around (4)
R3: (sc 1, inc) x2 (6)
R4: sc around (6)
Do not overstuff. Fasten off. Leave a tail for sewing.
Cheek Patches (Make 2)
Yarn: pink
R1: 6 sc in MR (6)
R2: inc x6 (12)
Fasten off. Leave a short tail.
Crescent Moon Applique (Make 1)
Yarn: pale yellow
Ch 8.
Row 1: sc in 2nd ch from hook and across (7)
Row 2: ch 1, turn, dec, sc 3, dec (5)
Row 3: ch 1, turn, sc 5 (5)
Row 4: ch 1, turn, dec, sc 1, dec (3)
Row 5: ch 1, turn, sc 3 (3)
Fasten off. Curve slightly while sewing so the inner edge reads as a crescent.
Star Embellishments (Optional)
Use small metallic star beads, embroidered French knots, or tiny crocheted stars. Keep the cluster heavier near the upper shell quadrant, not evenly distributed.
Assembly
- Sew the head to the front third of the cream body underside.
- Sew the front legs to the left and right sides below the head line.
- Sew the back legs to the rear corners of the underside.
- Sew the tail at the center back between the rear legs.
- Embroider the smile one to two rounds below the eyes.
- Sew the pink cheek patches under the eyes, slightly outward from the mouth curve.
- Pin the shell dome over the body underside and adjust until the cream edge still shows at the front.
- Sew the shell dome to the body underside all the way around.
- Attach the shell rim over the seam to create the raised border visible in the photo.
- Sew on the crescent moon and add stars and pearls across the shell surface.
The piece is complete when the shell sits low, the head angles forward slightly, and all four legs contact the surface evenly.
7 Technical Tips
- Mark the first stitch of every round. Losing one stitch in a 36-stitch plateau will skew the shell seam and pull the moon applique off-axis.
- Do not pack the shell like the head. A hard shell dome lifts too high and hides the cream body band from side view.
- Use invisible decreases on R13–R17 of the head. Standard decreases leave ridges that show under plush yarn when the face is photographed close up.
- Place the eyes before the final two decrease rounds. Trying to insert 10 mm eyes after R15 distorts the face and can split chenille backing.
- Pin all four legs before sewing. Even a 5 mm height difference will make the turtle rock instead of sit flat.
- Keep cheek patches small. If they exceed 12 stitches in the final round, they crowd the mouth and shorten the visible snout area.
- Weave tails back through stuffing, then through a second wall. Plush yarn slips more than cotton, so a single pass can loosen after handling.
Conclusion
This build works because the shell carries the theme while the body stays simple. The head uses standard round amigurumi math, the legs stay compact, and the finishing details do the visual work. For a cleaner result, crochet all structural parts first, test the shell placement dry, then add the moon and star layer last. That order keeps the proportions under control. Share the finished celestial turtle amigurumi pattern version on Pinterest and Instagram with #CelestialTurtlePattern. One question remains useful during finishing: did you offset the crescent enough for the shell to read like a sky, not a badge?









