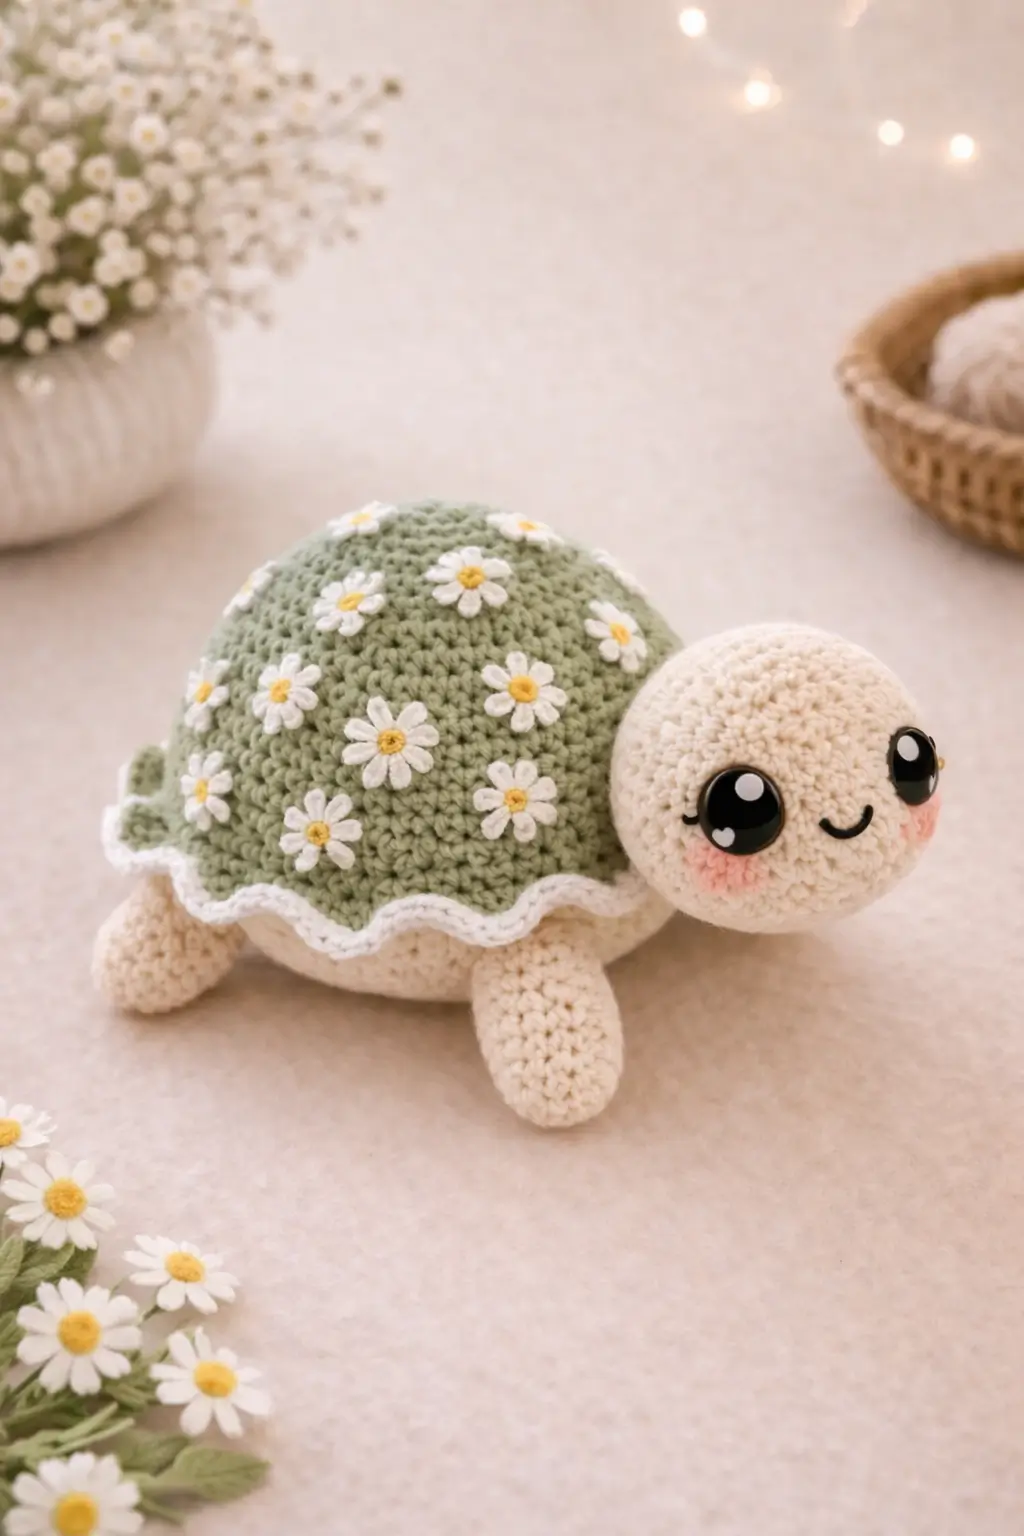
A turtle shell cannot dip at the rim and still read as a turtle. This daisy turtle amigurumi crochet pattern solves that first, then builds the floral shell, cream body, and oversized head into a compact plush about 14–18 cm tall, using DK or light worsted cotton and an intermediate stitch set. It suits spring market stock because the shape is giftable and the daisies photograph well.
The Design: What Makes This Turtle Different
This version depends on proportion more than surface detail. The head is intentionally larger than anatomical scale because kawaii turtle designs read better when the face projects past the shell edge. The shell stays low and broad rather than steep, which keeps the toy from rocking backward during display. A separate scalloped trim breaks the line between upper shell and underside, so the dome looks finished instead of cut off. That choice matters.
Another structural decision is the use of flat daisy appliqués rather than embroidered flowers. Separate petals stand off the shell slightly, which gives the flower turtle crochet pattern its definition in photos. One common mistake with this character type is placing the eyes too high on the head. That compresses the forehead and makes the turtle look seal-like instead of turtle-shaped. In most turtle amigurumi pattern examples, eye placement sits on the front half of the sphere rather than near the crown.
Project Info at a Glance
| Skill Level | Time | Finished Size | Hook | Best For |
|---|---|---|---|---|
| Intermediate | 4–6 hours | 14–18 cm | 2.5–3.0 mm | Spring gifts, nursery shelf decor, market tables |
Finished-size and hook benchmarks are based on published turtle patterns in DK/sport ranges; the pattern below is an original draft sized to the photographed style.
Materials and Tools
Yarn
- Sage green — DK cotton or light worsted cotton — 15–20 g — Paintbox Cotton DK or similar
- Cream — DK cotton or light worsted cotton — 20–25 g — Paintbox Cotton DK or similar
- White — DK cotton — 8–10 g — any smooth cotton for trim and petals
- Yellow — DK cotton — small amount, under 5 g — for flower centers
- Blush pink — DK cotton — small amount, under 5 g — for cheek patches
Published turtle examples commonly use DK cotton with a 2.5 mm hook, while sport versions use 1.75–2.0 mm. Small turtle listings also show low gram usage for each color, which aligns with this compact floral build.
Tools
- Hook 2.5 mm or 3.0 mm
- 8 mm safety eyes for DK scale; move to 10–12 mm only if using thicker yarn
- Stuffing
- Yarn needle
- Stitch markers
- Black embroidery thread for mouth
Safety-eye benchmarks range from 8 mm in DK builds to 12 mm in chenille builds and 14 mm in finer but larger-headed turtles. For the photographed proportion, 8 mm in cotton gives the cleanest result.
Abbreviations
MR / sc / inc / dec / sl st / ch / BLO / FLO / hdc / dc
Invisible decrease: work the front loops of the next two stitches together to reduce bulk at the taper.
Pattern — Step by Step
Continuous spiral unless noted. This is an original pattern drafted from standard 6-stitch amigurumi increase/decrease math and sized to the flower-shell turtle shown in the photo; sizing benchmarks were checked against published turtle patterns.
Head (Make 1)
Yarn: Cream
R1: 6 sc in MR (6)
R2: inc x6 (12)
R3: (sc, inc) x6 (18)
R4: (2 sc, inc) x6 (24)
R5: (3 sc, inc) x6 (30)
R6: (4 sc, inc) x6 (36)
R7–11: sc around (36)
Insert safety eyes between R9 and R10, 8 sts apart. Add mouth after eye placement.
R12: (4 sc, dec) x6 (30)
R13: (3 sc, dec) x6 (24)
Stuff firmly across the cheeks, lighter at the neck end.
R14: (2 sc, dec) x6 (18)
R15: (sc, dec) x6 (12)
R16: dec x6 (6)
Fasten off. Leave 20 cm tail.
Body Underside (Make 1)
Yarn: Cream
R1: 6 sc in MR (6)
R2: inc x6 (12)
R3: (sc, inc) x6 (18)
R4: (2 sc, inc) x6 (24)
R5: (3 sc, inc) x6 (30)
R6: (4 sc, inc) x6 (36)
R7–9: sc around (36)
Fasten off. Leave 25 cm tail for joining.
Shell Top (Make 1)
Yarn: Sage green
R1: 6 sc in MR (6)
R2: inc x6 (12)
R3: (sc, inc) x6 (18)
R4: (2 sc, inc) x6 (24)
R5: (3 sc, inc) x6 (30)
R6: (4 sc, inc) x6 (36)
R7–10: sc around (36)
Fasten off.
Shell Edge Trim (Make 1 round)
Yarn: White
Join white to FLO of R10 on shell top.
Round trim: (sl st, hdc, dc, hdc, sl st) in next 3 sts, sl st in next 2 sts repeat around.
Fasten off. Weave in ends.
Front Flippers (Make 2)
Yarn: Cream
R1: 6 sc in MR (6)
R2: inc x6 (12)
R3–5: sc around (12)
R6: (4 sc, dec) x2 (10)
R7–9: sc around (10)
Flatten lightly. Do not overstuff.
Fasten off. Leave 18 cm tail.
Back Flippers (Make 2)
Yarn: Cream
R1: 6 sc in MR (6)
R2: inc x6 (12)
R3–4: sc around (12)
R5: (4 sc, dec) x2 (10)
R6–7: sc around (10)
Flatten lightly.
Fasten off. Leave 18 cm tail.
Tail (Make 1)
Yarn: Sage green
R1: 4 sc in MR (4)
R2: sc around (4)
R3: (sc, inc) x2 (6)
R4: sc around (6)
Fasten off. Leave 12 cm tail.
Cheek Patches (Make 2)
Yarn: Blush pink
R1: 6 sc in MR (6)
R2: inc x6 (12)
Sl st to first st.
Fasten off. Leave 10 cm tail.
Daisy Appliqués (Make 10–12)
Yarn: White and yellow
With yellow:
R1: 6 sc in MR (6), sl st to first st, switch to white.
In each stitch work: (ch 3, sl st in 2nd ch from hook, sl st in next ch, sl st in same base st).
Repeat 6 times for 6 petals.
Fasten off. Leave 10 cm tail.
Optional Mini Daisy for Crown Placement (Make 1)
Work as above, but use 5 petals by starting with 5 sc in MR.
Fasten off.
Assembly
- Sew the head to the front of the body underside across 8–10 stitches, centered.
- Pin the two front flippers slightly below the head line, then sew them to the underside sides.
- Pin the back flippers opposite the front pair, angled slightly outward, then sew in place.
- Attach the tail directly opposite the head at the back center.
- Sew the shell top onto the body underside through the back loops only, leaving a 5 cm gap.
- Stuff the body cavity evenly, with more fill over the shoulder area than the rear.
- Close the remaining shell seam and shape the dome with both thumbs before knotting off.
- Sew the cheek patches one stitch-width below and outward from each eye.
- Arrange 10–12 daisies across the shell, denser at the crown and lighter near the edge, then stitch each center securely.
- Add the small embroidered mouth and weave in every tail inside the shell cavity.
The finished turtle should sit flat with the head extending slightly beyond the shell rim.
7 Technical Tips
- Use a marker on every round start. Missing one round in a 36-stitch head shifts eye placement by several millimeters and the face will tilt.
- Stuff the head in layers, not one wad. A single lump leaves hollow cheeks and pushes the safety-eye washers forward.
- Keep invisible decreases on the underside of the taper. Regular decreases create a ridge that shows on pale yarn, especially on the head and flippers.
- Install eyes before the final third of the head closing. Waiting until R14 in a 36-stitch sphere reduces finger access and increases washer misalignment.
- Do not pack the flippers hard. Overfilled flippers stand straight down and stop the turtle from resting low like the photographed sample.
- Pin all daisies before sewing any of them. Random placement tends to crowd one side of the shell and leaves a blank zone at the rear curve.
- Weave tails through at least 4 cm of internal path. Short cut tails can work loose when the shell is pressed during display or shipping.
Conclusion
The daisy turtle amigurumi crochet pattern works because the shell profile, flipper angle, and flower placement all support the same read: low, rounded, and clean from every side. Build the head first, test the eye spacing, then pin the shell flowers before the final stitching pass. That order prevents most proportion errors. Once finished, photograph the turtle from a three-quarter front angle for Pinterest and from overhead for Instagram. Use #DaisyTurtlePattern when you post it. For this character, one detail matters more than it seems: did you cluster the daisies near the shell crown or spread them evenly edge to edge?









