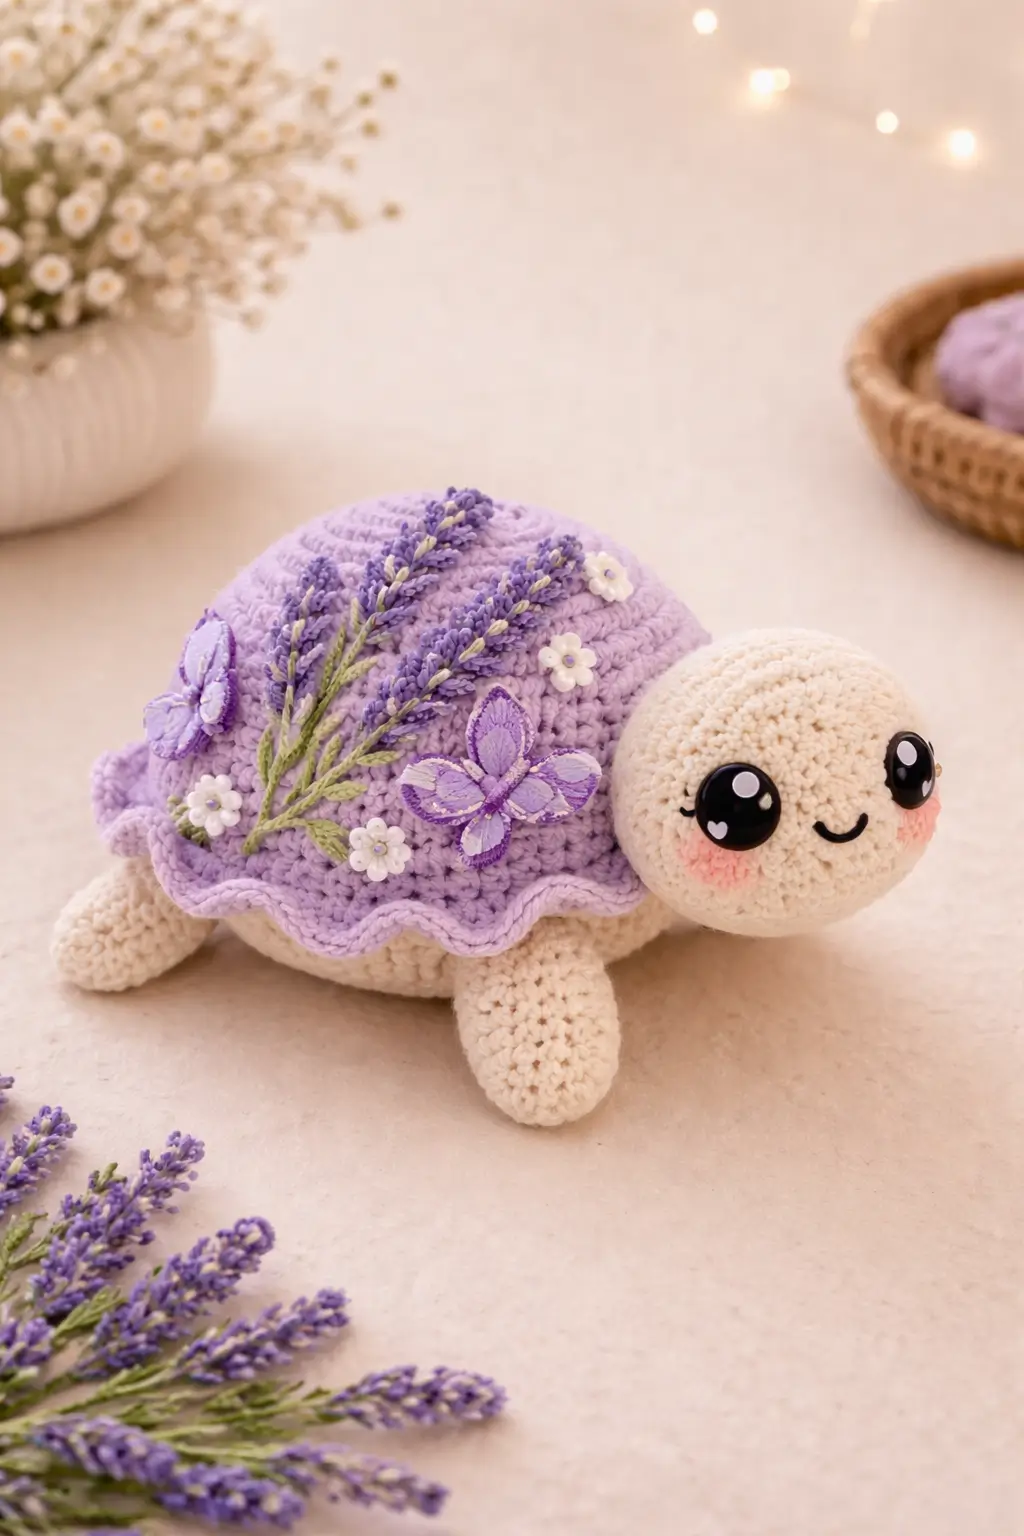
A turtle shell has to hold decoration without losing its dome. That is the real problem in this lavender turtle amigurumi crochet pattern. You are building a medium worsted-weight project with a 3.75 mm hook, a finished height close to 15 cm, and beginner-intermediate shaping. The result works as spring shelf décor or a photo-prop plush with a stable base.
The Design: What Makes Lavender Turtle Different
This turtle relies on three structural choices. First, the head stays oversized and nearly spherical, because the photo shows a face-forward style where the expression carries the piece. Second, the lower shell and upper shell are treated as separate visual zones. That split lets the lavender shell read as a cap instead of a flat blanket. Third, the edge needs a ruffle, not a hard ridge, because the original has a soft floral profile rather than a realistic scute line.
Most turtle amigurumi pattern tutorials stop at a plain shell. That is the gap. Decorative turtle builds need a shell that can carry appliqué without sagging, so the cover must hold a medium plateau before edging. A common mistake is placing the head too low. The turtle then looks stretched instead of compact, and the shell decoration starts to dominate the proportions. Search results across current turtle pattern listings also show that medium builds often pair worsted yarn with a 3.75 mm hook and 12 mm eyes, which suits this floral turtle crochet pattern well.
Project Info at a Glance
| Skill Level | Time | Finished Size | Hook | Best For |
|---|---|---|---|---|
| Beginner-intermediate | 4–6 hours | 15.24 cm | 3.75 mm | Spring décor, nursery shelf, handmade gift |
Data benchmarked from current turtle pattern listings using worsted yarn and 12 mm eyes.
Materials and Tools
Yarn
- Cream — worsted — 35 g — KnitPal Tweed Twinkles, Paintbox Cotton Aran, or similar
- Lavender — worsted — 25 g — same yarn line for shell cover
- Soft green — worsted — 8 g — for sprigs
- Deep violet — worsted — 8 g — for butterfly edging and detail
- White — worsted — 5 g — for flowers
- Pink — worsted — scrap amount — for cheeks
Tools
- Hook 3.75 mm
- 12 mm safety eyes
- Stuffing
- Tapestry needle
- Stitch markers
- Sewing pins
- Black embroidery thread for smile
The hook, yarn weight, finished size, and eye size line up with current medium turtle pattern data. Yarn gram estimates are adapted from recent turtle supply listings that use roughly 25 g and 35 g color splits for comparable builds.
Abbreviations
MR / sc / inc / dec / sl st / ch / BLO / FLO / hdc / dc / picot
Invisible decrease joins the front loops of two stitches first, which reduces bulk on curved areas such as the head and shell underside.
Pattern — Step by Step
Continuous spiral unless noted.
Head (Make 1)
Yarn: Cream — Source: Standard amigurumi math adapted to photo proportions
R1: 6 sc in MR (6)
R2: inc x6 (12)
R3: (sc, inc) x6 (18)
R4: (2 sc, inc) x6 (24)
R5: (3 sc, inc) x6 (30)
R6: (4 sc, inc) x6 (36)
R7-10: sc around (36)
Insert 12 mm safety eyes between R8 and R9, 8 sts apart. Add light stuffing as you go.
R11: (4 sc, dec) x6 (30)
R12: (3 sc, dec) x6 (24)
R13: (2 sc, dec) x6 (18)
R14: (sc, dec) x6 (12)
Finish stuffing firmly; keep the front smooth.
R15: dec x6 (6)
Fasten off. Leave 20 cm tail.
Body / Lower Shell (Make 1)
Yarn: Cream — Source: Standard amigurumi math with verified medium turtle body plateau at 36 sts as benchmarked against current turtle patterns
R1: 6 sc in MR (6)
R2: inc x6 (12)
R3: (sc, inc) x6 (18)
R4: (2 sc, inc) x6 (24)
R5: (3 sc, inc) x6 (30)
R6: (4 sc, inc) x6 (36)
R7-9: sc around (36)
R10: BLO sc around (36)
R11: (4 sc, dec) x6 (30)
R12: (3 sc, dec) x6 (24)
Stuff the center only lightly for a flatter belly line.
R13: (2 sc, dec) x6 (18)
R14: (sc, dec) x6 (12)
R15: dec x6 (6)
Fasten off. Leave 25 cm tail.
Front Legs (Make 2)
Yarn: Cream — Source: Standard amigurumi math adapted from compact turtle limb shapes
R1: 6 sc in MR (6)
R2: inc x6 (12)
R3-5: sc around (12)
R6: (sc, dec) x4 (8)
R7-8: sc around (8)
Stuff only the lower half.
Fasten off. Leave 18 cm tail.
Back Legs (Make 2)
Yarn: Cream — Source: Standard amigurumi math adapted to shorter rear-leg profile
R1: 6 sc in MR (6)
R2: inc x6 (12)
R3-4: sc around (12)
R5: (sc, dec) x4 (8)
R6: sc around (8)
Stuff lightly.
Fasten off. Leave 18 cm tail.
Tail (Make 1)
Yarn: Cream — Source: Mariska Vos tail structure adapted from 4-stitch turtle tail baseline
R1: 6 sc in MR (6)
R2: sc around (6)
R3: sc around (6)
Flatten.
Fasten off. Leave 12 cm tail.
Shell Cover (Make 1)
Yarn: Lavender — Source: Standard amigurumi math sized to match 36-stitch body plateau
R1: 6 sc in MR (6)
R2: inc x6 (12)
R3: (sc, inc) x6 (18)
R4: (2 sc, inc) x6 (24)
R5: (3 sc, inc) x6 (30)
R6: (4 sc, inc) x6 (36)
R7: BLO sc around (36)
R8-9: sc around (36)
Do not stuff.
Fasten off. Leave 40 cm tail.
Shell Ruffle (Work onto Shell Cover)
Yarn: Lavender — Source: Photo-based edging adaptation
Join yarn in free front loop of R7.
R10: (dc, hdc, sc) in next st, sl st in next st x18 (72 worked sts)
Fasten off. Weave in tail.
Cheek Patches (Make 2)
Yarn: Pink — Source: Standard flat circle math
R1: 6 sc in MR (6)
R2: inc x6 (12)
Fasten off. Leave 10 cm tail.
Butterfly Appliqué (Make 2)
Yarn: Lavender with Deep Violet edging — Source: Photo-based accessory adaptation
Ch 10. Join with sl st to first ch to form ring.
Round 1: (ch 3, 3 dc, ch 3, sl st in ring) x4 (4 wings)
Fasten off lavender.
Join deep violet and sl st evenly around edges for definition.
Fasten off. Leave 15 cm tail.
Flower Appliqué (Make 4)
Yarn: White — Source: Photo-based accessory adaptation
R1: 6 sc in MR (6)
R2: (ch 2, 2 dc in next st, ch 2, sl st in same st) x6 (6 petals)
Fasten off. Leave 12 cm tail.
Lavender Sprigs (Make 3)
Yarn: Soft green stems, lavender buds — Source: Photo-based accessory adaptation
Stem: ch 18.
Row 1: sl st in 2nd ch from hook and across (17)
Attach lavender yarn at one end.
Make 5 bud clusters along one side as: (ch 3, sl st in same stem st).
Repeat on opposite side with 4 smaller clusters.
Fasten off. Leave 15 cm tail.
Optional Mini Shell Flower Cluster (Make 1)
Yarn: White + lavender center — Source: Photo-based accessory adaptation
R1: 6 sc in MR (6)
R2: (ch 3, 2 dc, ch 3, sl st in next st) x6 (6 petals)
Fasten off. Leave 12 cm tail.
Assembly
- Sew the head to the front of the body, centered over R9-R11 of the lower shell.
- Sew the front legs slightly forward of center, one on each side.
- Sew the back legs one round behind the front pair so the turtle rests level.
- Sew the tail at the back seam line, centered between the back legs.
- Position the lavender shell cover on top of the body and stitch it down through the back-loop ridge created on the belly piece.
- Add the pink cheek patches just below the eyes, then trim or flatten slightly so they read as blush rather than circles.
- Embroider the smile midway between the cheeks with a shallow curve.
- Pin the three lavender sprigs across the shell on a diagonal, then sew them down through the stem only.
- Sew on the butterflies and flower appliqués after the sprigs are fixed, keeping weight balanced across the dome.
- Add the optional mini shell flower cluster to fill any open gap near the shell edge.
The piece is complete when the shell remains domed on a flat surface without the appliqués pulling it off center.
7 Technical Tips
- Use one stitch marker on the first stitch of every round and a second marker at the side seam. Turtle bodies drift visually when the shell cover is off by even 2 stitches.
- Pack the head firmer than the body. A soft head collapses under 12 mm eyes and makes the face tilt downward.
- Work invisible decreases only on visible curves. Standard decreases on the front half of the head create a dotted line that shows in light yarn.
- Insert the safety eyes before the head drops below 24 stitches. Waiting until 18 stitches makes washer placement tight and can stretch the eye spacing.
- Pin the shell cover in four compass points first. Decorative appliqué hides mistakes later, so the shell must already be centered before sewing begins.
- Keep the body stuffing at medium firmness. Overstuffing flattens the scalloped edge and makes the turtle sit too high.
- Weave floral accessory tails through the shell in at least three directions. One back-and-forth pass is not enough once sprigs and butterflies add drag.
Conclusion
This lavender turtle amigurumi crochet pattern works because the shell is treated as a structured base first and a decorative surface second. That order matters. Crochet the body and shell cover, test the dome, then place the sprigs and butterflies only after the top is stable. Post the finished turtle to Pinterest and Instagram with one overhead shot and one side profile so the scalloped edge reads clearly. Use #LavenderTurtlePattern. For this specific turtle, the most useful next variation is changing the shell bouquet angle. Would you place the lavender sprigs straight across the dome or keep the diagonal sweep from back left to front right?









