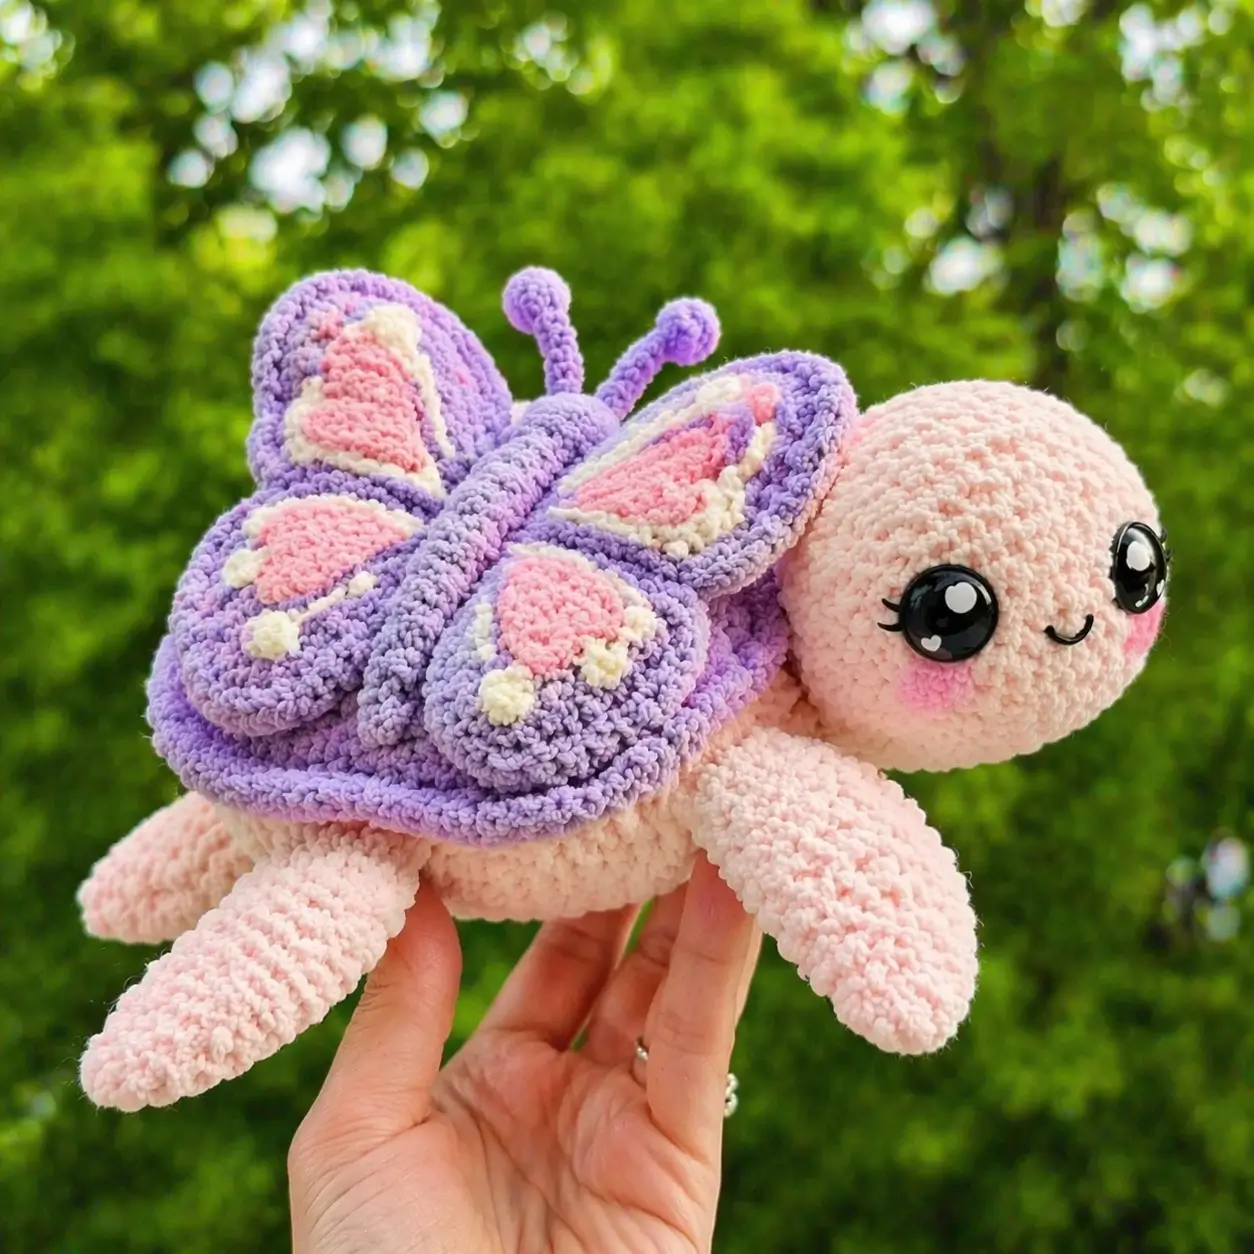
A turtle does not grow antennae or carry four petal-marked wings, so the shell has to solve both jobs at once. This butterfly turtle amigurumi crochet pattern uses plush yarn, a 5 mm hook, a medium-size 36-stitch shaping plan, and layered shell pieces to build a stable hybrid toy that lands around the common 19 cm plush-turtle range. It works well as a display plush or nursery shelf piece.
The Design: What Makes Butterfly Turtle Different
The first structural decision is the shell. A standard turtle shell can sit low and rounded, but a butterfly turtle needs lift at the center so the four wing panels angle outward instead of collapsing across the head. That is why this version uses a separate shell base, a raised center ridge, and attached wing panels rather than a flat appliqué top. Similar plush turtle patterns rely on bulky chenille and compact hooks for shape retention, and the same logic applies here.
The second decision is proportion. You want the head large enough for oversized safety eyes, yet not so large that the wings look undersized. In practice, the crochet butterfly turtle reads best when the head and body stay in the medium plush range and the shell becomes the visual focal point. Most makers miss this and make the wing shell too thin or too narrow. Then the plush stops reading as a butterfly turtle plush and starts looking like a normal turtle with decorations sewn on. Comparable turtle references also show that chenille yarn can hide missed stitches, so symmetry must be checked as each shell panel is placed.
Project Info at a Glance
| Skill Level | Time | Finished Size | Hook | Best For |
|---|---|---|---|---|
| Intermediate | 5–7 hours | approx. 19 x 16 cm | 5.0 mm | Display plush, nursery décor, gift make |
Materials and Tools
Yarn
- Pale blush pink — weight 6 plush yarn — about 30 g for head, body, and legs — Parfait Chunky or similar chenille baseline
- Lavender — weight 6 plush yarn — about 20 g for shell border, shell ridge, and outer wings
- Pastel pink — weight 6 plush yarn — about 20 g for inner wing panels and cheek circles
- Cream — weight 6 plush yarn — small amount for wing dots and wing edging accents
- Black embroidery yarn — small amount for smile
Tools
- Hook 5.0 mm
- Safety eyes 18 mm for the closest plush proportion match; 20 mm also fits the look in the photo
- Polyfil stuffing
- Yarn needle
- Stitch markers
- Pins or clips for wing alignment
Abbreviations
MR / sc / inc / dec / sl st / ch / BLO / FLO / hdc
Use invisible decrease for all closing rounds on the head and body so the plush yarn keeps a cleaner curve and the stuffing does not peek through the decrease line.
Pattern — Step by Step
Continuous spiral unless noted.
Head (Make 1)
Yarn: pale blush pink
R1: 6 sc in MR (6)
R2: inc x6 (12)
R3: (sc, inc) x6 (18)
R4: (2 sc, inc) x6 (24)
R5: (3 sc, inc) x6 (30)
R6: (4 sc, inc) x6 (36)
R7-R11: sc around (36)
Insert safety eyes between R8 and R9, 12 sts apart. Add blush cheeks slightly below outer eye corners.
R12: (4 sc, dec) x6 (30)
R13: (3 sc, dec) x6 (24)
R14: (2 sc, dec) x6 (18)
Stuff firmly, especially the snout area.
R15: (sc, dec) x6 (12)
R16: dec x6 (6)
Fasten off. Leave a 20 cm tail.
Body (Make 1)
Yarn: pale blush pink
R1: 6 sc in MR (6)
R2: inc x6 (12)
R3: (sc, inc) x6 (18)
R4: (2 sc, inc) x6 (24)
R5: (3 sc, inc) x6 (30)
R6: (4 sc, inc) x6 (36)
R7-R10: sc around (36)
R11: (4 sc, dec) x6 (30)
R12: (3 sc, dec) x6 (24)
R13: (2 sc, dec) x6 (18)
Stuff to a low oval, not a ball.
R14: (sc, dec) x6 (12)
R15: dec x6 (6)
Fasten off. Leave a 20 cm tail.
Front Legs (Make 2)
Yarn: pale blush pink
R1: 6 sc in MR (6)
R2: inc x6 (12)
R3-R8: sc around (12)
R9: (4 sc, dec) x2 (10)
R10-R12: sc around (10)
Light stuffing only in lower half.
Flatten opening and sc 5 through both layers.
Fasten off. Leave a 15 cm tail.
Back Legs (Make 2)
Yarn: pale blush pink
R1: 6 sc in MR (6)
R2: inc x6 (12)
R3-R6: sc around (12)
R7: (4 sc, dec) x2 (10)
R8-R10: sc around (10)
Light stuffing only at the tip.
Flatten opening and sc 5 through both layers.
Fasten off. Leave a 15 cm tail.
Shell Base (Make 1)
Yarn: lavender
R1: 6 sc in MR (6)
R2: inc x6 (12)
R3: (sc, inc) x6 (18)
R4: (2 sc, inc) x6 (24)
R5: (3 sc, inc) x6 (30)
R6: (4 sc, inc) x6 (36)
R7: BLO sc around (36)
R8: sc around (36)
R9: (5 sc, inc) x6 (42)
R10: BLO sc around (42)
R11: sc around (42)
Fasten off. Leave a 25 cm tail.
Shell Frill (Make 1)
Yarn: lavender
Join yarn in front loop of R10 from shell base.
R1: (sl st, hdc, 2 dc, hdc, sl st) in next 3 sts, sl st in next st repeat around
Fasten off. Weave in ends.
Center Shell Ridge (Make 1)
Yarn: lavender
Ch 15.
Row 1: Starting in 2nd ch from hook, sc 14, ch 1, turn (14)
Row 2-4: sc 14, ch 1, turn (14)
Fasten off. Leave a 20 cm tail.
Upper Wings (Make 2)
Yarn: lavender outer, pastel pink inner
With lavender:
R1: 6 sc in MR (6)
R2: inc x6 (12)
R3: (sc, inc) x6 (18)
R4: (2 sc, inc) x6 (24)
R5: (3 sc, inc) x6 (30)
Flatten into a soft teardrop. Sl st 10 across one side to shape the lower edge. Fasten off.
With pastel pink, embroider or surface-crochet an inner teardrop panel centered on the wing. Add cream accent stitches around the pink panel.
Leave a 20 cm tail for sewing.
Lower Wings (Make 2)
Yarn: lavender outer, pastel pink inner
With lavender:
R1: 6 sc in MR (6)
R2: inc x6 (12)
R3: (sc, inc) x6 (18)
R4: (2 sc, inc) x6 (24)
Flatten slightly into an oval petal. Fasten off.
With pastel pink, embroider or surface-crochet an inner oval panel. Add 2 cream bobble-style dots or French-knot style spots near the outer lower edge.
Leave a 20 cm tail for sewing.
Antennae (Make 2)
Yarn: lavender
R1: 6 sc in MR (6)
R2: inc x6 (12)
R3: dec x6 (6)
R4-R8: sc around (6)
Fasten off. Leave a 15 cm tail.
Cheek Patches (Make 2)
Yarn: pastel pink
R1: 6 sc in MR (6)
R2: inc x6 (12)
Sl st to finish.
Fasten off. Leave a 10 cm tail.
Wing Dots (Make 4 small, 2 medium)
Yarn: cream
Small dots x4
R1: 6 sc in MR (6)
Sl st to finish.
Medium dots x2
R1: 6 sc in MR (6)
R2: inc x6 (12)
Sl st to finish.
Fasten off. Leave short tails.
Assembly
- Sew the head to the front third of the body, slightly angled upward.
- Attach the front legs level with the lower body seam, one on each side of the head.
- Sew the back legs farther apart than the front pair so the plush sits flatter.
- Stitch the shell base to the top of the body only after pinning the center point front to back.
- Sew the center shell ridge along the middle of the shell base from neck edge to rear edge.
- Attach the two upper wings behind the head, one to each side of the ridge, tilting them out at matching angles.
- Sew the two lower wings beneath the upper pair, overlapping each top wing by about 1.5 cm.
- Add the cream wing dots and secure all decorative stitching before closing any loose shell tails.
- Sew the antennae at the front shell edge behind the head, spacing them about 2 cm apart.
- Add the cheek patches, embroider the smile, then check all seams and weave tails deep into the stuffing.
The completed plush should hold a rounded turtle body with a lifted butterfly shell silhouette.
7 Technical Tips
- Mark the center ridge line before sewing the shell. If the ridge drifts even 5 mm off center, the wing panels will read crooked from the front view.
- Do not overstuff the body. A body packed like a ball pushes the shell upward and makes the wings flare too wide.
- Use invisible decreases on the head only when the piece is at least half stuffed. Closing an empty plush head first creates a wrinkled chin line in chenille yarn.
- Insert the eyes before R12 of the head closure. Waiting until the opening is smaller makes 18 mm or 20 mm eyes hard to seat evenly.
- Pin all four wings before sewing any one of them. A lower wing stitched early often ends up 1 row higher than its mate on the opposite side.
- Keep antennae lightly stuffed or unstuffed. Dense stuffing makes the stalks stand like horns instead of curving softly backward.
- Weave each tail at least 4 cm through the body interior. Plush yarn sheds grip, and short buried ends can work loose after handling.
Conclusion
This butterfly turtle amigurumi crochet pattern works because the shell is treated as structure, not surface trim. The plush turtle base stays in a proven medium range, while the layered wings, center ridge, and antennae carry the hybrid read from every angle. Next, crochet the head and one upper wing first, then compare scale before committing to the full set. Save your finished make to Pinterest, post the result on Instagram, and tag it with #ButterflyTurtlePattern. One detail matters most here: did you place your lower wings low enough that the shell still looks like a turtle from the side view?









