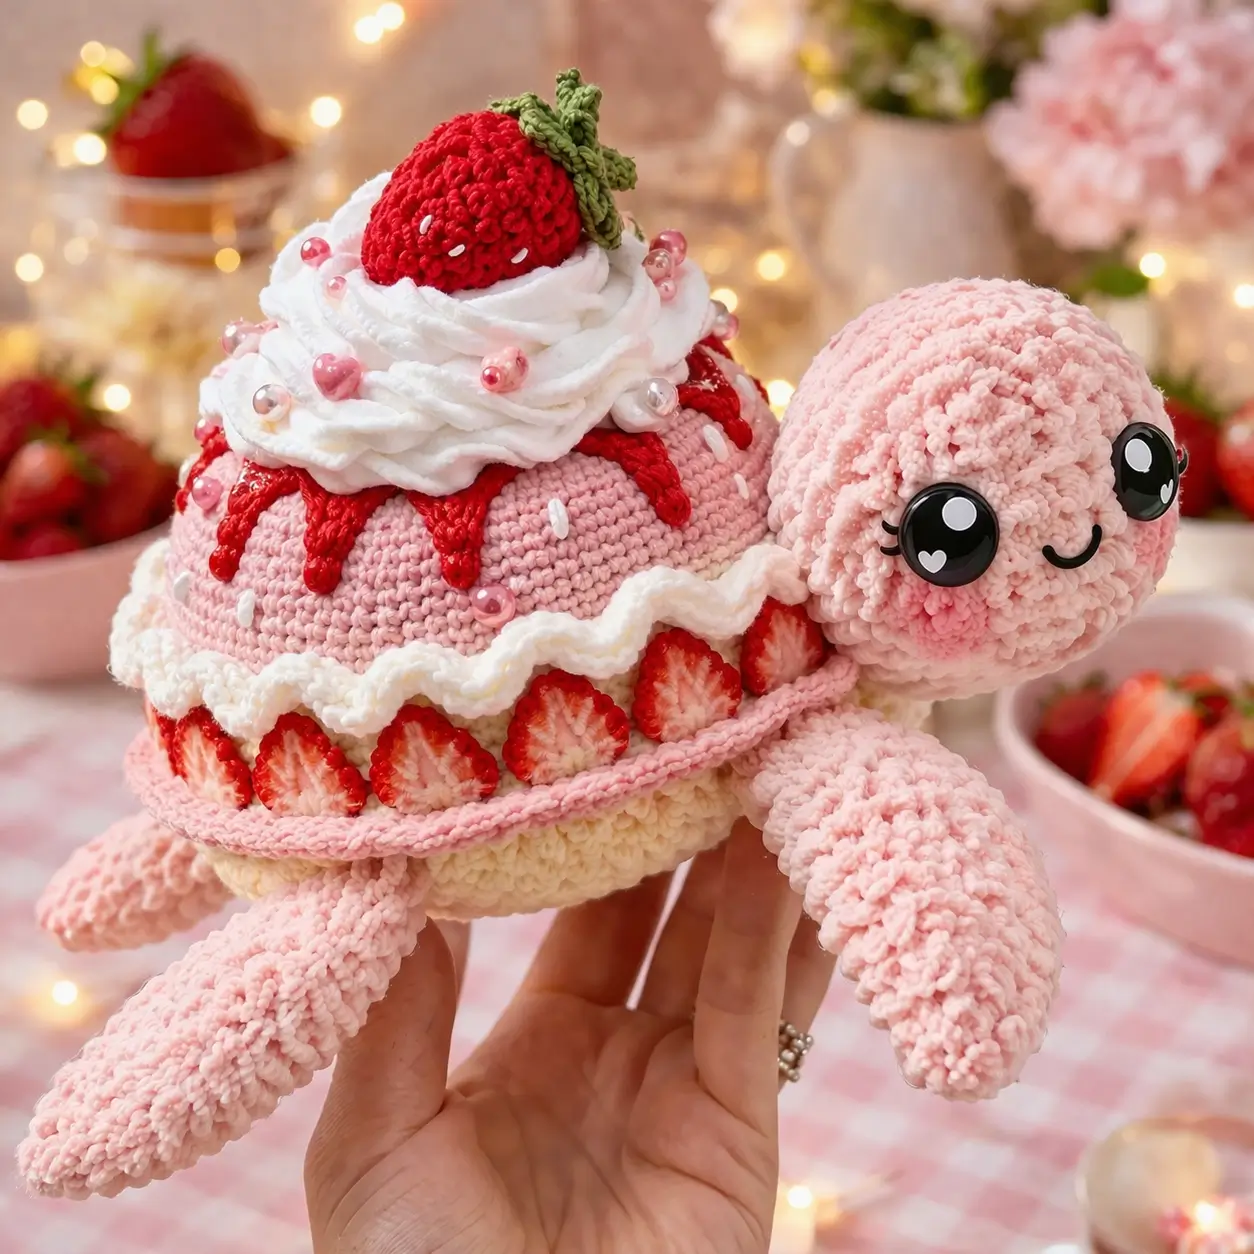
A turtle is one of the few amigurumi animals whose shell can carry a cake tier without looking structurally wrong. This strawberry turtle amigurumi crochet pattern adapts that advantage into a plush build with size-6 yarn, a 5 mm hook, 12 mm safety eyes, and a finished height that suits the 20–24 cm range seen in bulky strawberry turtle patterns. It works best for an intermediate maker building a display plush or gift piece.
The Design: What Makes This Turtle Different
This version is not a standard fruit shell with a leaf on top. The shell is treated as a short cake dome, then widened with a visible rim so the strawberry slices can sit in a neat band instead of drifting upward. That rim matters because the eye reads the shell as dessert first, turtle shell second.
The second decision is vertical layering. A red drip band sits below the whipped cream, not above it, which keeps the cream mound from swallowing the shell edge. The third is proportion: the head stays rounded and soft, while the front legs run longer than the back legs to create the lounging posture shown in the photo. Many makers flatten dessert animals by overstuffing the shell and underfilling the neck. In a strawberry sea turtle crochet pattern, that pushes the face downward and kills the side profile. Several live results also show simpler fruit turtles, but not this stacked dessert treatment or this shell architecture.
Project Info at a Glance
| Skill Level | Time | Finished Size | Hook | Best For |
|---|---|---|---|---|
| Intermediate | 6–8 hours | 20–24 cm | 5.0 mm | Display plush, themed gift, dessert-animal decor |
Finished size and hook align with verified bulky strawberry turtle references; the dessert-shell styling is a photo-based adaptation.
Materials and Tools
Yarn
- Pale pink plush yarn — size 6 — 1 skein — Bernat Blanket or similar
- Hot pink plush yarn — size 6 — 1 skein — for upper shell
- White plush yarn — size 6 — 1 skein — for whipped cream and shell ruffle
- Red plush or smooth yarn — size 5 or 6 — small amount — for glaze drips and topper strawberry
- Green yarn — size 5 or 6 — small amount — for leaf cap
- Cream or beige yarn — light or medium weight — scrap amount — for seed embroidery and strawberry slice centers
- Soft pink yarn — scrap amount — for cheek patches
Tools
- Hook 5.0 mm
- 12 mm safety eyes
- Polyester stuffing
- Yarn needle
- Stitch markers
- Pearl or pink beads for shell sprinkles
- Pins
- Black embroidery yarn for smile and lashes
The 5 mm hook, size-6 yarn, and 12 mm eyes match verified bulky strawberry turtle listings; mini and cotton versions also exist, but the photo scale fits the bulky range better.
Abbreviations
MR / sc / inc / dec / sl st / ch / BLO / FLO / hdc
Use invisible decrease for all closing rounds. That keeps the head and underside smoother than front-loop-only decreases and reduces pinching at the seam line.
Pattern — Step by Step
Continuous spiral unless noted. This is a photo-based adaptation built on verified strawberry turtle proportions and standard amigurumi math. Use stitch markers every round.
Head (Make 1)
Yarn: pale pink — based on verified strawberry turtle head construction and scaled to a medium plateau.
R1: 6 sc in MR (6)
R2: inc x6 (12)
R3: (sc, inc) x6 (18)
R4: (2 sc, inc) x6 (24)
R5: (3 sc, inc) x6 (30)
R6: (4 sc, inc) x6 (36)
R7: sc around (36)
R8: sc around (36)
R9: sc around (36)
R10: sc around (36)
Insert 12 mm eyes between R8 and R9, 11 sts apart. Embroider lashes before backing washers if you want the same look.
R11: (4 sc, dec) x6 (30)
R12: (3 sc, dec) x6 (24)
R13: (2 sc, dec) x6 (18)
Stuff firmly, especially the cheeks and forehead.
R14: sc around (18)
R15: (sc, dec) x6 (12)
R16: dec x6 (6)
Fasten off. Leave a 20 cm tail.
Body Underside (Make 1)
Yarn: cream — standard amigurumi math adapted for the photo’s soft base.
R1: 6 sc in MR (6)
R2: inc x6 (12)
R3: (sc, inc) x6 (18)
R4: (2 sc, inc) x6 (24)
R5: (3 sc, inc) x6 (30)
R6: (4 sc, inc) x6 (36)
R7: sc around (36)
R8: sc around (36)
R9: sc around (36)
R10: (4 sc, dec) x6 (30)
R11: (3 sc, dec) x6 (24)
Light stuffing only. The underside should stay flatter than the shell.
R12: (2 sc, dec) x6 (18)
R13: (sc, dec) x6 (12)
R14: dec x6 (6)
Fasten off. Leave a 25 cm tail.
Front Legs (Make 2)
Yarn: pale pink — longer than the back legs to match the photo pose.
R1: 6 sc in MR (6)
R2: inc x6 (12)
R3: (sc, inc) x6 (18)
R4: sc around (18)
R5: sc around (18)
R6: sc around (18)
R7: sc around (18)
R8: sc around (18)
R9: sc around (18)
R10: (sc, dec) x6 (12)
R11: sc around (12)
R12: sc around (12)
R13: sc around (12)
Stuff the first two-thirds only. Keep the shoulder end soft for sewing.
Flatten opening.
R14: sc through both layers (6)
Fasten off. Leave an 18 cm tail.
Back Legs (Make 2)
Yarn: pale pink — shorter to keep the shell visually dominant.
R1: 6 sc in MR (6)
R2: inc x6 (12)
R3: (sc, inc) x6 (18)
R4: sc around (18)
R5: sc around (18)
R6: sc around (18)
R7: (sc, dec) x6 (12)
R8: sc around (12)
R9: sc around (12)
Stuff lightly.
Flatten opening.
R10: sc through both layers (6)
Fasten off. Leave an 18 cm tail.
Cake Shell Top (Make 1)
Yarn: hot pink — shell scaled larger than the base to create a cake overhang.
R1: 6 sc in MR (6)
R2: inc x6 (12)
R3: (sc, inc) x6 (18)
R4: (2 sc, inc) x6 (24)
R5: (3 sc, inc) x6 (30)
R6: (4 sc, inc) x6 (36)
R7: (5 sc, inc) x6 (42)
R8: sc around (42)
R9: sc around (42)
R10: sc around (42)
R11: sc around (42)
R12: FLO sc around (42)
R13: sc around (42)
R14: sc around (42)
Fasten off. Leave a 35 cm tail.
Shell Ruffle (Make 1)
Yarn: white — worked into the front loops left from shell R12.
Round 1: Join white yarn in any FLO, (sc, hdc, sc) in next st, sl st in next st repeat around (42 base sts)
Fasten off. Weave in ends.
Red Drip Icing (Make 6)
Yarn: red — custom photo adaptation.
For each drip:
Ch 8
Row 1: Starting in 2nd ch from hook, sc 7 (7)
Fasten off. Leave 12 cm tail.
Make 3 drips with ch 10 instead for longer front drips. Sew them evenly under the whipped cream zone.
Whipped Cream Spiral (Make 2)
Yarn: white — accessory adaptation from the photo.
Strip A: Ch 55
Row 1: 3 hdc in each ch across
Fasten off.
Strip B: Ch 40
Row 1: 3 hdc in each ch across
Fasten off.
Roll each strip into a spiral, then stack the smaller spiral on top of the larger one. Tack through the center from bottom to top.
Top Strawberry (Make 1)
Yarn: red — strawberry topper scaled small so it does not overpower the head.
R1: 6 sc in MR (6)
R2: inc x6 (12)
R3: (sc, inc) x6 (18)
R4: sc around (18)
R5: sc around (18)
R6: (sc, dec) x6 (12)
Stuff lightly.
R7: dec x6 (6)
Fasten off. Leave a 20 cm tail.
Embroider cream seed dashes after stuffing.
Leaf Cap (Make 1)
Yarn: green — derived from verified strawberry turtle leaf construction.
R1: 5 sc in MR (5)
R2: (sl st, ch 4, sl st in 2nd ch from hook, sc, hdc, sl st in next base st) x5
Fasten off. Leave a 15 cm tail.
Strawberry Slices (Make 8)
Yarn: cream and red — accessory adaptation from the photo.
With cream yarn:
Ch 6
Round 1: Starting in 2nd ch from hook, sc 4, 3 sc in last ch, sc 3 on opposite side, 2 sc in last ch (12)
Round 2: inc, 3 sc, inc x3, 3 sc, inc x2 (18)
Fasten off. Leave a short tail.
With red yarn, surface sl st around the curved outer edge of each slice. Embroider 3 tiny cream seed lines in the red area.
Cheek Patches (Make 2)
Yarn: blush pink — flat circle.
R1: 6 sc in MR (6)
R2: inc x6 (12)
Fasten off. Leave a 10 cm tail.
Optional Pearl Sprinkles
Sew 8–12 pink or pearl beads around the whipped cream and upper shell after final assembly.
Assembly
- Sew the head to the front of the cake shell top, slightly above the midpoint so the chin clears the body.
- Attach the front legs first, 7–8 stitches back from the head seam, angled downward.
- Attach the back legs 10–12 stitches behind the front pair, slightly flatter to the table line.
- Join the cream underside to the shell top with whip stitch, stuffing the shell cavity firmly before the final third is closed.
- Add the white shell ruffle so it sits on the shell edge, not on the underside seam.
- Sew the strawberry slices around the lower shell rim with their points facing down.
- Attach the red drip icing under the whipped cream zone, using the three longest drips on the front half.
- Coil and sew the whipped cream spirals to the shell center.
- Sew the top strawberry onto the cream mound, then attach the green leaf cap.
- Add cheek patches, embroider the smile, and sew the pearl sprinkles last.
The piece is complete when the shell stays level on all four limbs and the head projects forward without tipping.
7 Technical Tips
- Mark every increase round on the shell. Missing one increase before 42 stitches shifts the whole dessert rim and the strawberry slices will not sit evenly.
- Keep the underside softer than the shell top. A hard-packed lower body makes the turtle rock instead of resting flat.
- Place eyes before the final third of head stuffing. On plush yarn, pushing washers in after full stuffing can distort the eye spacing by 1–2 stitches.
- Use invisible decreases only on the head and underside. Standard decreases leave ridges that show under chenille pile once the face is turned sideways.
- Do not fully stuff the legs. Leave at least 3 cm at the opening unstuffed so the legs can bend and support the shell angle.
- Pin the strawberry slices before sewing. Eight slices around a 42-stitch shell gives roughly one slice every 5 stitches, and that spacing keeps the rim balanced.
- Anchor the whipped cream through the center column. Edge-only stitching lets the spiral lift after handling.
- Shorten the front drips if they reach the slice band. Any overlap makes the shell look compressed.
- Tension changes fast with velvet or chenille yarn. If your round-6 shell is already cupping sharply, go up 0.5 mm on the hook before continuing.
- Weave tails back through dense plush cores. A single straight bury can slip out after the plush is compressed.
- Test the head angle before final sewing. Tilt it down by even 5 mm and the smile disappears under the shell line.
- Pin the leaf cap flat. Unpinned points tend to twist and read as petals instead of strawberry leaves.
- Sew beads after all shaping is finished. Repositioning the whipped cream after bead attachment often loosens thread tension around the topper.
- Keep cheek patches low. Too high and they compete with the eyes instead of widening the face.
Conclusion
This build turns the standard fruit-shell idea into a layered dessert plush with a wider shell cap, a separate cream mass, and a rim detailed enough to carry the strawberry slices cleanly. The result is a strawberry turtle amigurumi crochet pattern that reads clearly from the side, not only from the top. Next, test the shell and slice spacing with scrap yarn before cutting into your main plush skeins. Share the finished turtle on Pinterest and Instagram with #StrawberryShortcakeTurtle. One question remains useful for future revisions: did your whipped cream sit high enough to clear the turtle’s eye line?









