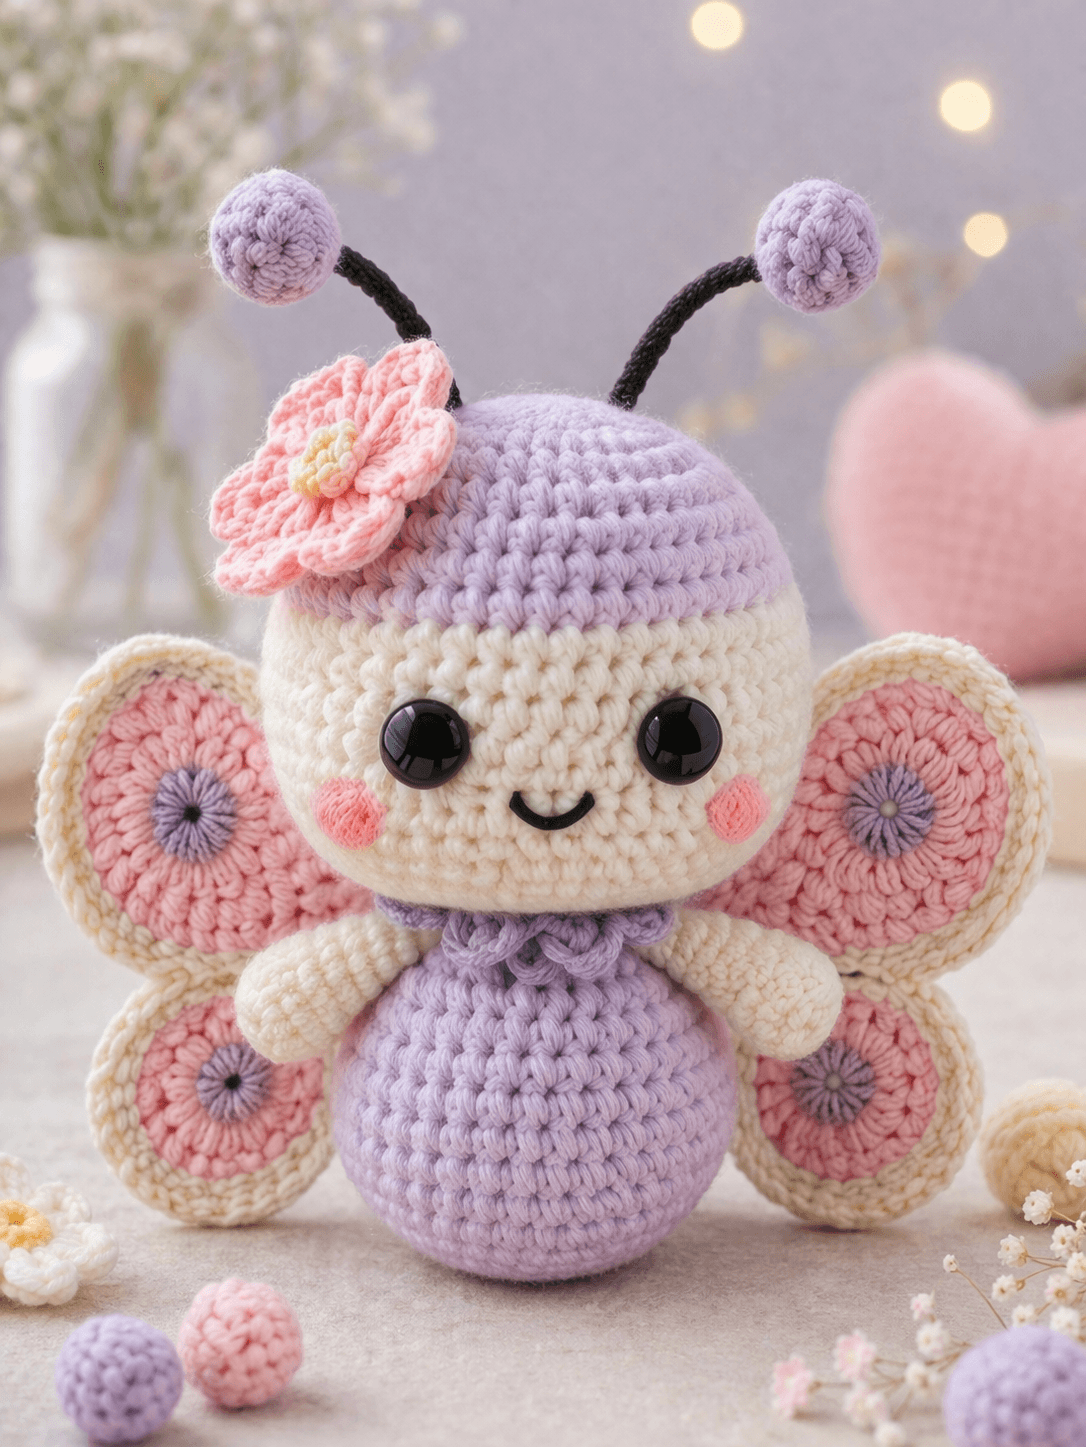
Butterfly wings create four attachment points, not two. That is the first structural problem this butterfly amigurumi crochet pattern has to solve. You will use fine-to-light yarn, a 2.5 mm hook, basic shaping, and measured wing placement to build an 18–20 cm seated doll suited to shelf decor, nursery display, or spring gift stock.
The Design: What Makes Butterfly Different
A butterfly doll needs width behind the body without turning floppy. That is why the wings here are built as four rounded circles per side, then joined into a flatter panel rather than stuffed as thick pads. The head also carries more visual weight than the body. In the photo, the doll uses a large rounded head, a smaller pear body, and short arms so the wings stay dominant from the front.
Color placement matters just as much. The split lavender-and-cream head creates a cap effect, which keeps the face clear and prevents the cheeks and eyes from sinking into a busy palette. A common mistake with any butterfly crochet doll pattern is sewing the wings too low. Another frequent error appears in pastel butterfly crochet projects: antennae placed too far apart, which widens the silhouette and weakens the insect read.
Project Info at a Glance
| Skill Level | Time | Finished Size | Hook | Best For |
|---|---|---|---|---|
| Intermediate | 6–8 hrs | 18–20 cm | 2.5 mm | Decor, gift, photo prop |
Materials and Tools
Yarn
- Lavender — fine sport to light worsted — about 35 g — YarnArt Jeans or similar
- Cream — fine sport to light worsted — about 35 g — YarnArt Jeans or similar
- Blush pink — fine sport to light worsted — about 20 g — YarnArt Jeans or similar
- Light purple — fine sport to light worsted — about 10 g — YarnArt Jeans or similar
- Black — small amount — antennae and smile
- Off-white — small amount — flower center
Tools
- Hook 2.5 mm
- Safety eyes 8 mm for a conservative fit, or size up slightly to match the photo look
- Polyester stuffing
- Tapestry needle
- Stitch markers
- Pins
Abbreviations
MR / sc / inc / dec / sl st / ch / BLO / FO
Invisible decrease is worked through the front loops of the next two stitches so the decrease line stays compact on the visible side.
Pattern — Step by Step
Continuous spiral unless noted.
This pattern is an original photo-based adaptation using standard amigurumi shaping math. Counts are verified round by round.
Head (Make 1)
Yarn: lavender, then cream
R1: 6 sc in MR (6)
R2: inc x6 (12)
R3: (sc, inc) x6 (18)
R4: (2 sc, inc) x6 (24)
R5: (3 sc, inc) x6 (30)
R6: (4 sc, inc) x6 (36)
R7: (5 sc, inc) x6 (42)
R8–R10: sc around (42)
R11–R14: sc around in lavender (42)
R15–R18: sc around in cream (42)
R19: (5 sc, dec) x6 (36)
R20: (4 sc, dec) x6 (30)
Place eyes between R16 and R17, about 8 stitches apart. Stuff firmly before the next decrease rounds.
R21: (3 sc, dec) x6 (24)
R22: (2 sc, dec) x6 (18)
R23: (sc, dec) x6 (12)
R24: dec x6 (6)
Fasten off. Leave a 15 cm tail.
Body (Make 1)
Yarn: lavender
R1: 6 sc in MR (6)
R2: inc x6 (12)
R3: (sc, inc) x6 (18)
R4: (2 sc, inc) x6 (24)
R5: (3 sc, inc) x6 (30)
R6: (4 sc, inc) x6 (36)
R7–R11: sc around (36)
R12: (4 sc, dec) x6 (30)
R13: sc around (30)
R14: (3 sc, dec) x6 (24)
R15: sc around (24)
R16: (2 sc, dec) x6 (18)
Stuff the lower body firmly. Keep the upper body slightly softer so the head sits cleanly.
R17: (sc, dec) x6 (12)
R18: sc around (12)
Fasten off. Leave a 20 cm tail.
Arms (Make 2)
Yarn: cream
R1: 6 sc in MR (6)
R2: inc x6 (12)
R3–R5: sc around (12)
R6: (4 sc, dec) x2 (10)
R7–R9: sc around (10)
Light stuffing in the hand only. Flatten top edge.
R10: sc through both sides across (5)
Fasten off. Leave a 15 cm tail.
Upper Wings (Make 2)
Yarn: cream outer, pink inner, light purple center
With light purple:
R1: 6 sc in MR (6)
Change to pink
R2: inc x6 (12)
R3: (sc, inc) x6 (18)
Change to cream
R4: (2 sc, inc) x6 (24)
Sl st to finish. Leave 20 cm tail.
Lower Wings (Make 2)
Yarn: cream outer, pink inner, light purple center
With light purple:
R1: 6 sc in MR (6)
Change to pink
R2: inc x6 (12)
R3: (sc, inc) x6 (18)
Change to cream
R4: (2 sc, inc) x6 (24)
Sl st to finish. Leave 20 cm tail.
Wing Panels (Assemble 2)
Yarn: cream
Hold one upper wing and one lower wing edge to edge with 6 stitches overlapping visually at the join. Sew or crochet them together across 6 stitches. Repeat for second side.
Pin both wing panels to the body before final sewing. The upper wings should start just below head level.
Antennae (Make 2)
Yarn: black and lavender
With lavender:
R1: 6 sc in MR (6)
R2: sc around (6)
R3: dec x3 (3)
Fasten off bobble.
With black:
Ch 10
Starting in second ch from hook: sl st in next 9
Attach black stem to bobble. Leave long tail for sewing.
Neck Ruffle (Make 1)
Yarn: light purple
Ch 24
Row 1: starting in second ch from hook, 23 sc (23)
Row 2: ch 1, (2 sc in each st) across (46)
Fasten off. Leave 20 cm tail.
Cheek Patches (Make 2)
Yarn: blush pink
R1: 6 sc in MR (6)
R2: inc x6 (12)
Sl st to close. Leave 12 cm tail.
Flower Petals (Make 1)
Yarn: blush pink
R1: 6 sc in MR (6)
R2: (ch 3, 2 dc in next st, ch 3, sl st in same st) x5 around to form 5 petals
Fasten off. Leave 15 cm tail.
Flower Center (Make 1)
Yarn: off-white
R1: 6 sc in MR (6)
Fasten off. Sew to center of flower.
Smile (Make 1)
Yarn: black
Embroider a shallow curved smile centered one round below the eyes.
Assembly
- Sew the body to the head with the body centered under the face.
- Wrap the neck ruffle around the join and stitch it closed at the back.
- Attach the safety eyes if not already inserted, then embroider the smile.
- Sew the cheek patches one round below the eyes and slightly outward from the smile.
- Pin the wing panels to the back so each upper wing sits just under the head curve.
- Sew the wings through the inner edge only, leaving the outer circles free.
- Attach the arms at the upper body sides, level with the neck join.
- Sew the antennae between the top head rounds, angled outward but not horizontal.
- Attach the flower near the left antenna base and stitch the center in place.
- Weave in all tails inside the head or body and flatten the base slightly for sitting.
The completed butterfly should sit upright with the wing panels visible from the front.
7 Technical Tips
- Mark the first stitch of every round. Missing one increase round on a 36-stitch body shifts the seam line enough to twist both arms off level.
- Stuff the head more firmly than the body. A soft head collapses around 8 mm eyes and makes the face read unevenly.
- Work invisible decreases on all visible shaping rounds. Standard decreases leave ridges that show clearly on pale cream yarn.
- Install the eyes before the head drops below 24 stitches. Trying to force washers in later can stretch the face between rounds 16 and 17.
- Keep the antenna chains tight if using cotton blends. Loose tension makes the stems bow too wide and the bobbles fall backward.
- Pin each wing in three places before sewing. One pin at the top, one at the join, and one at the lower lobe prevents the panel from rolling inward.
- Weave tails back through at least 4 cm of internal stitches. Short tail finishes inside a stuffed body can work loose at the neck seam over time.
Conclusion
This butterfly amigurumi crochet pattern works because the wing panels stay broad, the head stays dominant, and the body remains compact enough to sit without extra support. Match the photo first. Then adjust only one variable at a time: eye size, antenna angle, or wing height. Save the finished doll to a Pinterest board, post the result on Instagram, and tag the project with #ButterflyBloomDoll. One useful next step is testing the same shaping with a darker wing edge. Did you place the upper wings high enough that they still show clearly beside the cheeks?









