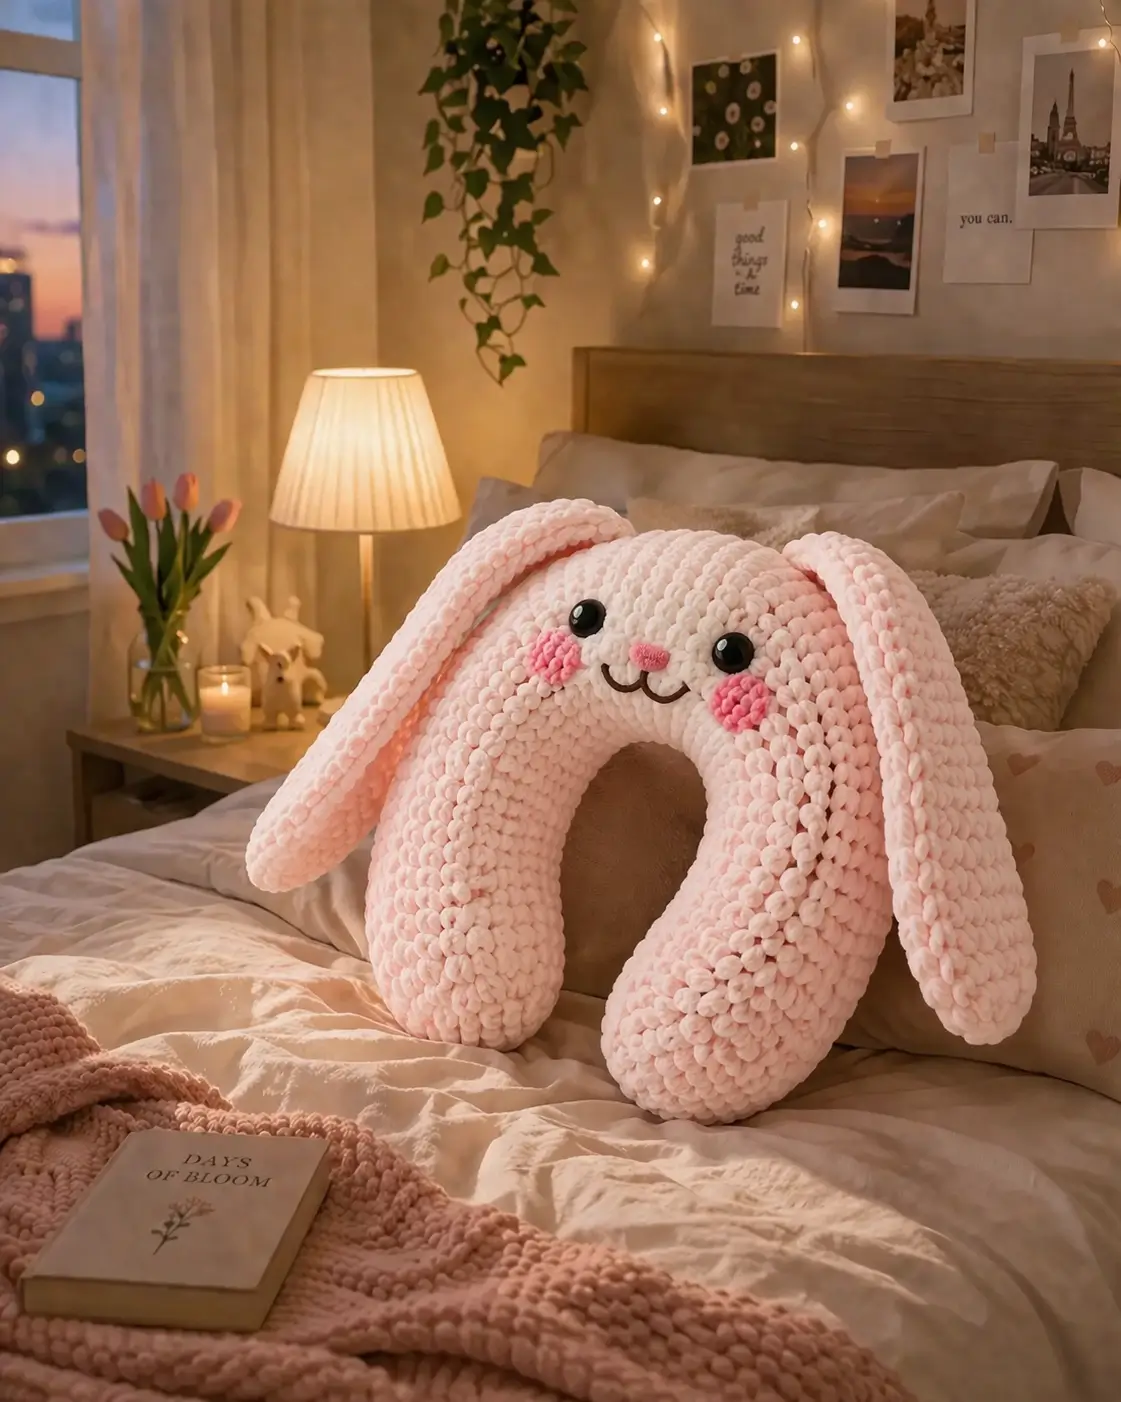
A rabbit’s ears are longer than the width of its face. On a U-shaped pillow, that changes the balance line immediately. This bunny amigurumi crochet pattern adapts that anatomy into a plush chenille neck pillow using super bulky yarn, a 5 mm hook, and large safety eyes. You make it for travel, nursery styling, or reading support. The maker gets a functional pillow, not a shelf toy.
The Design: What Makes This Bunny Different
This bunny is not built like a standard seated rabbit. The body is a stuffed U-tube, so the face sits on the top arch instead of on a separate torso. That keeps the opening large enough for neck use and stops the lower sections from collapsing inward. Long ears stay narrow and lightly filled because chenille adds weight fast; overstuffed ears pull the face forward. The white muzzle patch is also larger than on most plush rabbit patterns, which gives the curved arch a readable face from a distance. A common mistake with this character type is placing the eyes too low on the bend. On a floppy ear bunny pattern made as a pillow, that makes the expression disappear once the piece is propped upright. In chenille bunny crochet, face features need to sit slightly higher than instinct suggests.
Project Info at a Glance
| Skill Level | Time | Finished Size | Hook | Best For |
|---|---|---|---|---|
| Intermediate | 5–7 hours | Approx. 48 cm | 5.0 mm | Travel pillow, reading nook, nursery décor |
Finished-size benchmarking is based on published chenille bunny references ranging from 21 cm to 55 cm, scaled to the photographed pillow format.
Materials and Tools
Yarn
- Pale pink chenille yarn — super bulky / plush — approx. 450 g — Premier Parfait Chunky, Paintbox Chenille, or similar
- White chenille yarn — super bulky / plush — approx. 50 g — same brand family for matching loft
- Pink cotton or chenille scrap — small amount — nose
- Brown cotton scrap — small amount — mouth embroidery
Tools
- Hook 5.0 mm
- Safety eyes 16 mm
- Polyester stuffing
- Tapestry needle
- Stitch markers
- Pins
- Blush or pink yarn scrap for cheeks
Comparable bunny references use super bulky chenille with 5.0 mm hooks and 16 mm eyes for large plush builds.
Abbreviations
MR / sc / inc / dec / sl st / ch / BLO / FO
Invisible decrease matters more in chenille than in cotton. A standard front-loop pull can leave a ridge on the face and ear edges, while an invisible dec keeps the contour tighter.
Pattern — Step by Step
Continuous spiral unless noted.
Head (Make 1)
Yarn: white — Source: Standard amigurumi math
R1: 6 sc in MR (6)
R2: inc x6 (12)
R3: (sc, inc) x6 (18)
R4: (2 sc, inc) x6 (24)
R5: (3 sc, inc) x6 (30)
R6: (4 sc, inc) x6 (36)
R7: (5 sc, inc) x6 (42)
R8–R15: sc around (42)
Insert safety eyes between R11 and R12, 8 stitches apart.
R16: (5 sc, dec) x6 (36)
R17: (4 sc, dec) x6 (30)
R18: (3 sc, dec) x6 (24)
Stuff lightly; keep the back flatter than the front.
R19: (2 sc, dec) x6 (18)
R20: (sc, dec) x6 (12)
R21: dec x6 (6)
Fasten off. Leave a 35 cm tail.
Body U-Tube (Make 1)
Yarn: pale pink — Source: Standard amigurumi math
R1: 6 sc in MR (6)
R2: inc x6 (12)
R3: (sc, inc) x6 (18)
R4: (2 sc, inc) x6 (24)
R5: (3 sc, inc) x6 (30)
R6: (4 sc, inc) x6 (36)
R7: (5 sc, inc) x6 (42)
R8–R56: sc around (42)
Stuff firmly from R18 onward. Shape into a U while filling; keep the inner curve slightly softer than the outer curve.
Fasten off. Leave a 60 cm tail.
Front Leg End / Paw Cap (Make 2)
Yarn: pale pink — Source: Standard amigurumi math
R1: 6 sc in MR (6)
R2: inc x6 (12)
R3: (sc, inc) x6 (18)
R4: (2 sc, inc) x6 (24)
R5: (3 sc, inc) x6 (30)
R6: sc around in BLO (30)
R7: sc around (30)
Lightly stuff only the center.
Fasten off. Leave a 30 cm tail.
Ears (Make 2)
Yarn: pale pink — Source: Standard amigurumi math
R1: 6 sc in MR (6)
R2: inc x6 (12)
R3: (sc, inc) x6 (18)
R4: (2 sc, inc) x6 (24)
R5: (3 sc, inc) x6 (30)
R6–R18: sc around (30)
R19: (3 sc, dec) x6 (24)
R20–R24: sc around (24)
R25: (2 sc, dec) x6 (18)
R26–R30: sc around (18)
Do not overstuff. Add a narrow strip of stuffing only in the lower third if you want softer fold control.
Flatten opening with 9 sc through both layers.
Fasten off. Leave a 35 cm tail.
Snout Patch (Make 1)
Yarn: white — Source: Standard amigurumi math
R1: 6 sc in MR (6)
R2: inc x6 (12)
R3: (sc, inc) x6 (18)
R4: (2 sc, inc) x6 (24)
R5: sc around (24)
Fasten off. Leave a 25 cm tail.
Cheek Patches (Make 2)
Yarn: pink — Source: Standard amigurumi math
R1: 6 sc in MR (6)
R2: inc x6 (12)
Fasten off. Leave a 15 cm tail.
Nose (Make 1)
Yarn: darker pink — Source: Standard amigurumi math
Ch 4.
R1: Starting in second ch from hook, sc 2, 3 sc in last ch; work opposite side of chain, sc 1, inc in last st (8)
R2: inc, sc 2, inc x3, sc 2, inc x2 (14)
Fasten off. Leave a 20 cm tail.
Mouth Embroidery
Yarn: dark brown cotton — Source: Photo interpretation
Using simple backstitch, embroider a shallow “w” mouth directly below the nose.
Leave 8 cm tails on both ends and knot on the back of the head.
Assembly
- Sew the head to the outer top center of the U-tube body. Keep the head front-facing when the opening of the pillow points downward.
- Close both lower body ends with the paw caps. Match 30 stitches of each cap to the center of each tube end and ease the remaining fabric evenly.
- Shape the tube into a clean U before the final hidden stitches are tightened.
- Sew the snout patch to the lower half of the head. Add a small amount of stuffing under it only if the face needs projection.
- Attach the nose at the center of the snout patch.
- Embroider the mouth directly under the nose.
- Sew the cheek patches level with the lower edge of each eye.
- Attach the ears to the upper side edges of the head, not the exact top center; that placement gives the photo’s side-draping shape.
- Pin the ears first, then stitch the front half of each ear opening firmly and the back half more loosely so the ears fall forward.
- Weave in all tails through stuffed sections and massage the body to even out the fill.
The finished piece should sit upright with the face centered on the arch and both lower ends resting evenly.
7 Technical Tips
- Use two stitch markers on the U-tube. One marks the round start, the second marks the inner curve so stuffing does not drift and twist the pillow line.
- Do not stuff the inner curve as hard as the outer curve. If both sides are packed equally, the opening narrows and the neck-pillow function drops.
- Place eyes before the head is fully stuffed. In thick chenille, washers are harder to seat once the sphere is dense, and misalignment shows immediately on a white muzzle.
- Keep invisible decreases on the face side. A standard decrease in plush yarn can create six visible dents around the muzzle line.
- Measure ear fill, not guess it. A strip of stuffing about 2 cm wide and only in the lower third is enough; full-length stuffing turns floppy ears into rigid paddles.
- Pin every feature before sewing. On a curved arch, a cheek patch can look level from the front and still drift upward when the pillow is propped against a cushion.
- Weave tails through at least 6 cm of stuffed body. Short burying paths can work loose in chenille because the pile hides movement until a seam opens.
Conclusion
This version of a bunny amigurumi crochet pattern works because the structure serves the use case first: wide arch, readable face, low-weight ears, and dense chenille fabric. Next step: crochet the body tube first and check the neck opening against your target user before sewing on the face. Save a photo for Pinterest, post the finished piece on Instagram, and tag it with #BunnyNeckPillowPattern. One detail matters more than it seems here: did you attach the ears slightly off the crown so they fold beside the face instead of sticking up?









