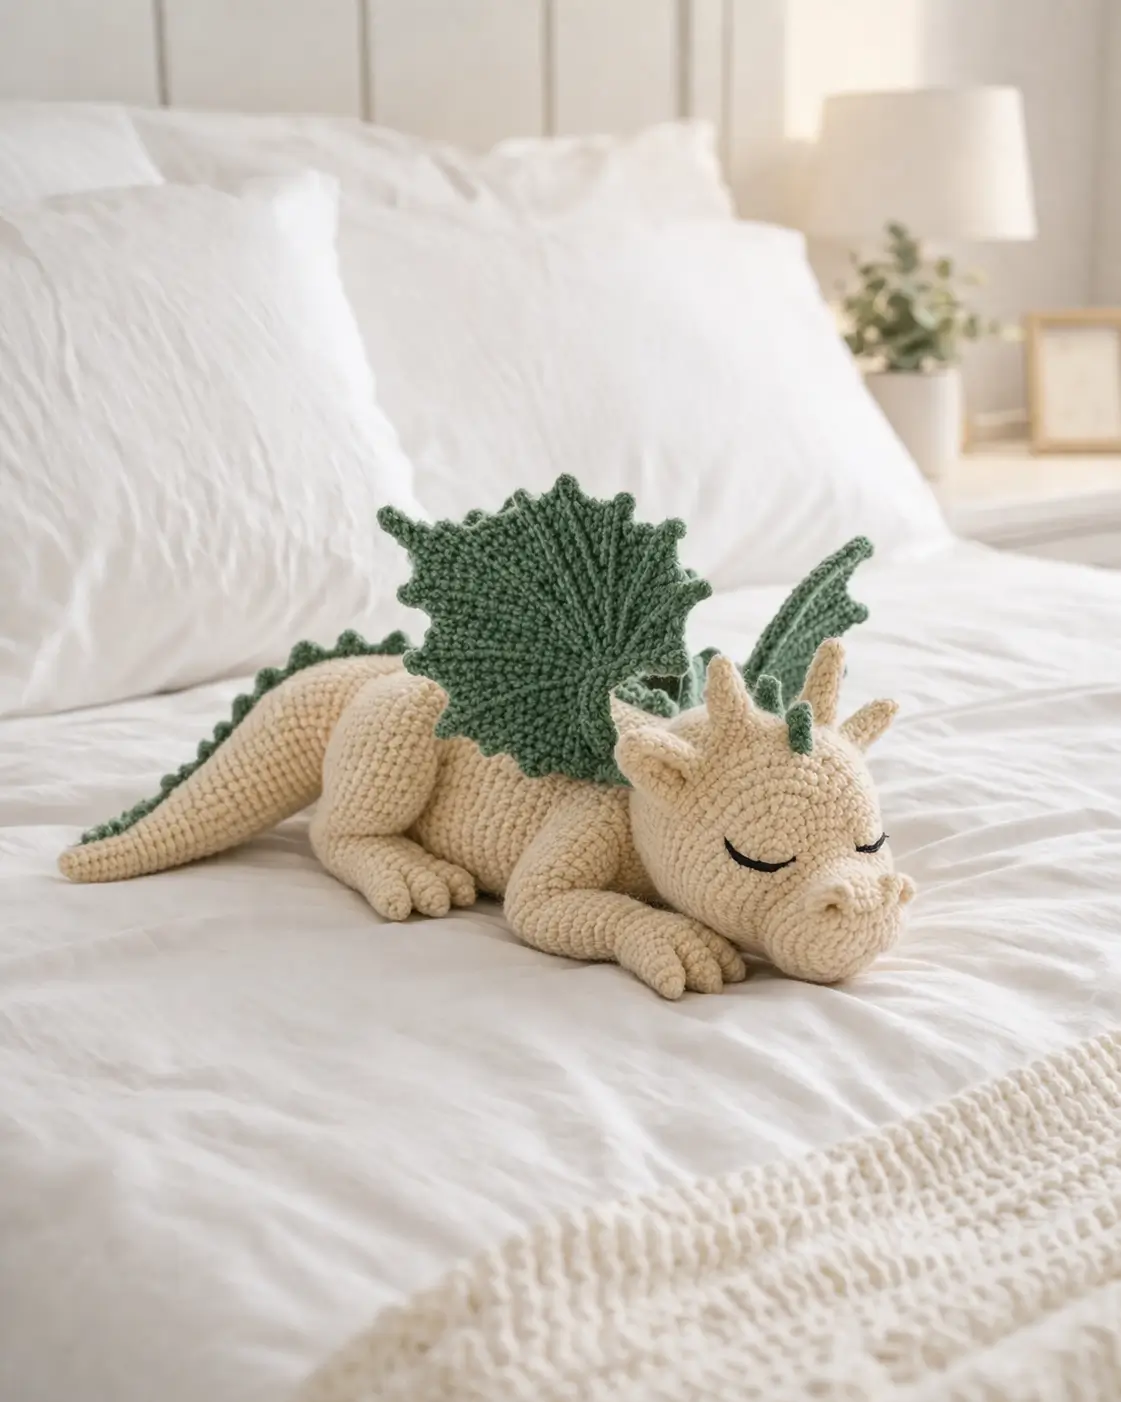
Leaf-shaped wings are the first geometry problem this sleeping dragon creates. This sleeping dragon amigurumi crochet pattern uses plush-style worsted yarn, a 4 mm hook, embroidered eyes, and a medium build that finishes at about 43 cm long in comparable sleeping dragon patterns. It suits an intermediate maker who wants a display plush that lies flat on a shelf, sofa, or nursery bench.
The Design: What Makes This Dragon Different
A resting dragon needs a low center of gravity. That is why the body here stays elongated instead of stacking under the head. The wings also matter more than usual. In many dragon plush builds, wings read as simple triangles. Here they need a leaf silhouette with a curved top line and picot-style points, because that sharper outline is what separates this laying dragon from a generic dinosaur plush. The muzzle is another structural choice. It extends forward, then rounds under, which gives the face a sleepy, heavy look instead of a chibi sphere. One common mistake in a dragon plush crochet pattern is placing the head too high on the neck; the result looks alert, not resting. In this version the head sits low, and the front legs angle forward so the chest stays grounded. That shift changes the whole profile.
Project Info at a Glance
| Skill Level | Time | Finished Size | Hook | Best For |
|---|---|---|---|---|
| Intermediate | 8–12 hours | 43 cm long | 4.0 mm | Shelf plush, nursery decor, fantasy gift |
Materials and Tools
Yarn
- Cream / ivory — worsted or plush-worsted look — 150–200 g — Yarn and Colors Epic or similar for structure; chenille-style substitute for a softer finish
- Sage green — worsted — 35–50 g — for wings and back ridge
- Dark green — worsted — 10–15 g — for small forehead ridge accents
- Black — small amount — for embroidered sleeping lashes and nostrils
Tools
- Hook 4.0 mm
- Stuffing
- Yarn needle
- Stitch markers
- Black embroidery thread or yarn
- Pins for assembly
Abbreviations
MR = magic ring, sc = single crochet, inc = increase, dec = invisible decrease, sl st = slip stitch, ch = chain, BLO = back loop only, FLO = front loop only.
Invisible decrease reduces bulk at taper points by working through front loops first, which keeps the snout and tail cleaner than a standard decrease.
Pattern — Step by Step
Continuous spiral unless noted. Pattern drafted from the photo using standard amigurumi math and image-based proportions.
Head (Make 1)
Yarn: cream
R1: 6 sc in MR (6)
R2: inc x6 (12)
R3: (sc, inc) x6 (18)
R4: (2 sc, inc) x6 (24)
R5: (3 sc, inc) x6 (30)
R6: (4 sc, inc) x6 (36)
R7–R12: sc around (36)
R13: (4 sc, dec) x6 (30)
R14: sc around (30)
R15: sc around (30)
R16: (3 sc, dec) x6 (24)
R17: sc around (24)
R18: (2 sc, dec) x6 (18)
Stuff firmly from R14 onward. Keep the lower muzzle dense so the nose does not collapse. Embroidered eyes sit later, not now.
Fasten off. Leave a 35 cm tail.
Snout (Make 1)
Yarn: cream
R1: 6 sc in MR (6)
R2: inc x6 (12)
R3: (sc, inc) x6 (18)
R4: sc around (18)
R5: sc around (18)
R6: (sc, dec) x6 (12)
R7: sc around (12)
Light stuffing only. Flatten the back edge before sewing. Embroider 2 nostrils after assembly.
Fasten off. Leave a 25 cm tail.
Body (Make 1)
Yarn: cream
R1: 6 sc in MR (6)
R2: inc x6 (12)
R3: (sc, inc) x6 (18)
R4: (2 sc, inc) x6 (24)
R5: (3 sc, inc) x6 (30)
R6: (4 sc, inc) x6 (36)
R7–R14: sc around (36)
R15: (4 sc, dec) x6 (30)
R16–R21: sc around (30)
R22: (3 sc, dec) x6 (24)
R23–R27: sc around (24)
Stuff in firm sections. Keep the belly flatter than the back by packing more on the top line than underneath.
Fasten off. Leave a 35 cm tail.
Tail (Make 1)
Yarn: cream
R1: 6 sc in MR (6)
R2: sc around (6)
R3: (2 sc, inc) x2 (8)
R4: sc around (8)
R5: (3 sc, inc) x2 (10)
R6: sc around (10)
R7: (4 sc, inc) x2 (12)
R8: sc around (12)
R9: (5 sc, inc) x2 (14)
R10: sc around (14)
Stuff lightly. The tail should taper visually even after sewing to the body.
Fasten off. Leave a 30 cm tail.
Front Legs (Make 2)
Yarn: cream
R1: 6 sc in MR (6)
R2: inc x6 (12)
R3: sc around (12)
R4: (4 sc, dec) x2 (10)
R5–R9: sc around (10)
Flatten the upper opening. Add a touch of stuffing in the paw only.
Fasten off. Leave a 25 cm tail.
Back Legs (Make 2)
Yarn: cream
R1: 6 sc in MR (6)
R2: inc x6 (12)
R3: (sc, inc) x6 (18)
R4: sc around (18)
R5: (4 sc, dec) x3 (15)
R6–R8: sc around (15)
Stuff the thigh section lightly. These sit wider than the front legs.
Fasten off. Leave a 25 cm tail.
Toes (Make 12)
Yarn: cream
R1: 6 sc in MR (6)
R2: sc around (6)
Fasten off. Leave a 12 cm tail.
Ears (Make 2)
Yarn: cream
R1: 6 sc in MR (6)
R2: (sc, inc) x3 (9)
R3: sc around (9)
R4: (2 sc, inc) x3 (12)
Flatten into a soft triangle.
Fasten off. Leave a 20 cm tail.
Horns (Make 2)
Yarn: cream
R1: 6 sc in MR (6)
R2: sc around (6)
R3: (2 sc, inc) x2 (8)
R4: sc around (8)
Do not overstuff. A pinch of stuffing at the base is enough.
Fasten off. Leave a 20 cm tail.
Wings (Make 2)
Yarn: sage green
Ch 11.
Row 1: Starting in 2nd ch from hook, 10 sc, ch 1, turn (10)
Row 2: dec, 6 sc, dec, ch 1, turn (8)
Row 3: 8 sc, ch 1, turn (8)
Row 4: dec, 4 sc, dec, ch 1, turn (6)
Row 5: 6 sc, ch 1, turn (6)
Row 6: dec, 2 sc, dec, ch 1, turn (4)
Row 7: 4 sc, ch 1, turn (4)
Row 8: dec, 2 sc, ch 1, turn (3)
Row 9: 3 sc, ch 1, turn (3)
Row 10: dec, sc, ch 1, turn (2)
Row 11: 2 sc, ch 1, turn (2)
Row 12: dec (1)
Do not fasten off. Work evenly around the wing edge: (sl st, ch 2, sl st in same edge point) at each outer point to create the leaf-like serration. Leave the inner straight edge plain for sewing.
Fasten off. Leave a 30 cm tail.
Back Ridge Spikes (Make 7)
Yarn: sage green
R1: 6 sc in MR (6)
R2: sc around (6)
R3: (2 sc, inc) x2 (8)
Flatten.
Fasten off. Leave a 12 cm tail.
Forehead Ridge (Make 1)
Yarn: dark green
Ch 5.
Row 1: Starting in 2nd ch from hook, 4 sc, ch 1, turn (4)
Row 2: dec, 2 sc (3)
Fasten off. Leave a 12 cm tail.
Cheek Patches (Make 2)
Yarn: cream, same tone as body
R1: 6 sc in MR (6)
R2: inc x6 (12)
These are structural, not high-contrast. They sit low on the muzzle to round the sleeping face.
Fasten off. Leave a 15 cm tail.
Assembly
- Sew the snout to the lower front of the head, centered.
- Add the cheek patches at the lower left and right sides of the snout seam.
- Embroider closed eyes as curved lines with a short outer lash on each side.
- Embroider two nostrils near the front tip of the snout.
- Sew the head to the front of the body at a low angle so the chin nearly meets the floor line.
- Attach the front legs just under the neck, angled slightly forward.
- Attach the back legs wider and farther back, near the start of the tail.
- Sew the tail to the rear center of the body.
- Attach the ears, then the horns, then the small dark green forehead ridge.
- Sew the wings high on the back and attach the seven back ridge spikes from forehead to tail base.
The piece is complete when the body rests flat without rocking and both wings sit at matching angles.
7 Technical Tips
- Stitch marker drift: Mark every round on the head after R6. Miss one shift and the snout seam will land off-center by several stitches.
- Stuffing firmness: Put more stuffing into the top half of the body than the belly. A fully rounded body will lift the dragon off the surface and break the sleeping pose.
- Invisible decrease bulk: Use invisible decreases on the snout and tail. Standard decreases leave visible knots that read as bumps in plush yarn.
- Eye placement timing: Embroider the eyes only after the head is sewn to the body. A sleeping face often tilts during assembly, and pre-stitched eyes can end up slanted.
- Wing pinning: Pin each wing along the straight inner edge before sewing. The top points should lean back by the same amount on both sides or the silhouette looks uneven.
- Toe spacing: Place three toes on each foot with a gap of about 2 stitches between them. Crowded toes merge into one rounded paw.
- Tail weaving: Weave the tail seam into the body for at least 4 cm before trimming. A short buried end can work loose when the tail is adjusted for display.
Conclusion
This sleeping dragon amigurumi crochet pattern works because the structure stays low, the muzzle projects forward, and the wings read as leaves rather than flat triangles. Those three decisions do most of the visual work. Keep the body flatter than the back, angle the head down, and delay the face embroidery until the seams are fixed. That sequence produces the same resting profile visible in the reference piece. Next step: test the pattern in cream and sage first, then scale the yarn up only after the proportions look right. Share the finished dragon on Pinterest and Instagram with #SleepingDragonPattern. One question remains useful during testing: did your wings sit high enough to clear the shoulders without touching the front legs?









