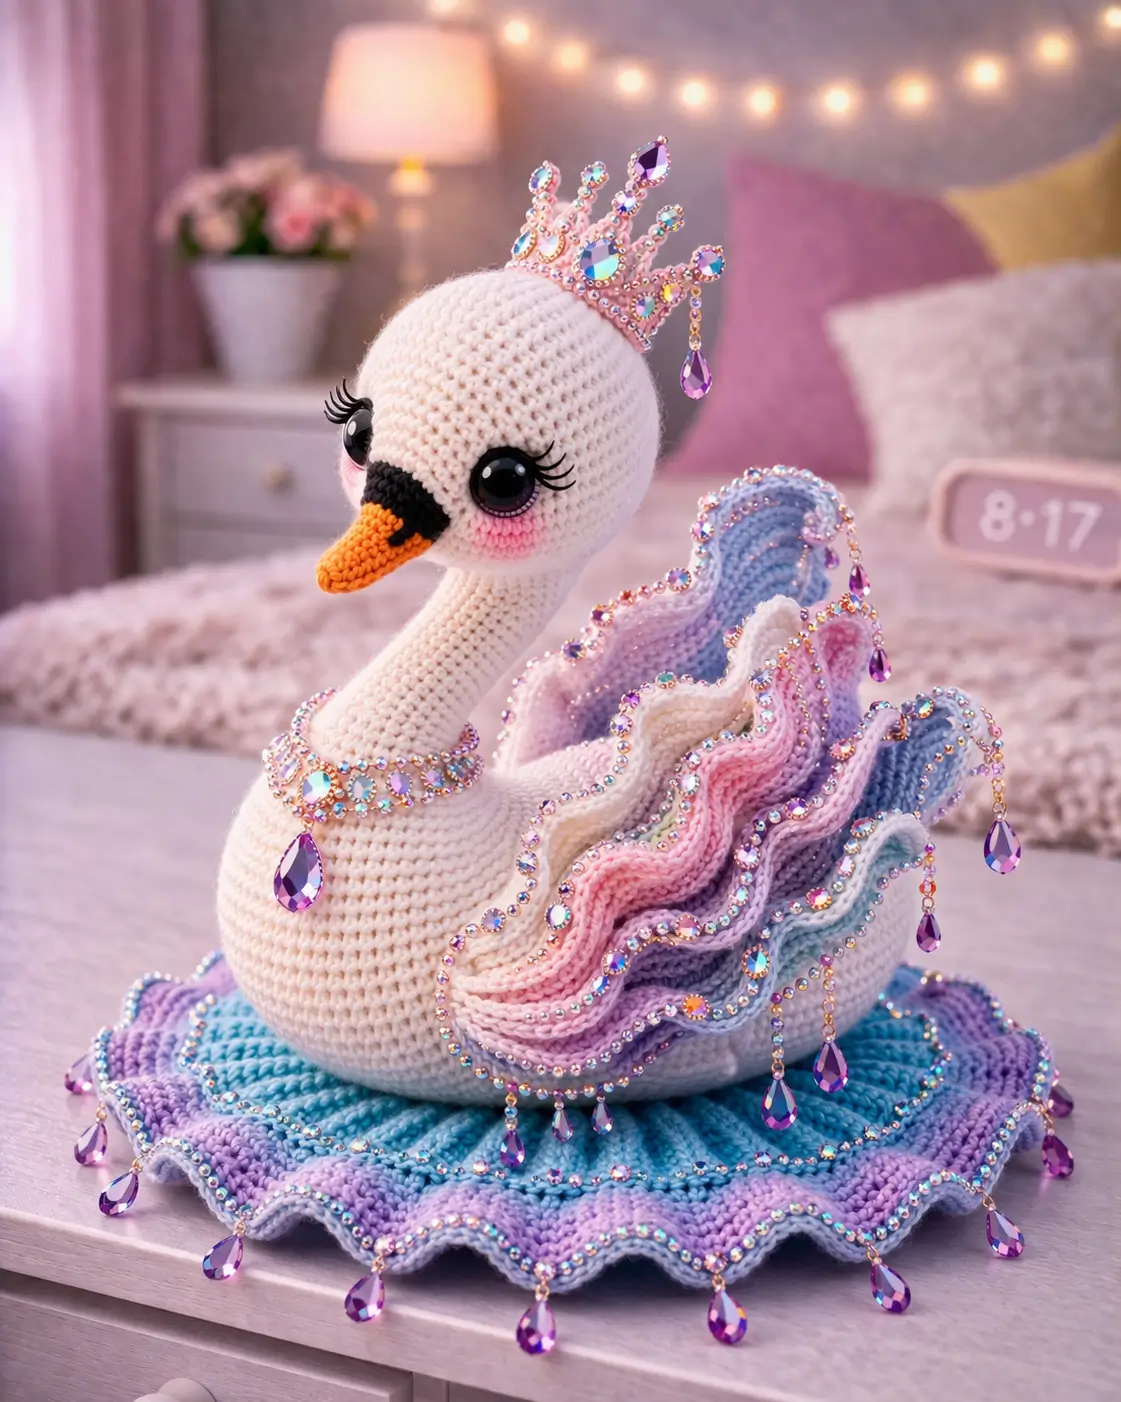
A swan’s neck is longer than its body is tall. That ratio decides the whole build. This swan amigurumi crochet pattern uses cotton or worsted yarn, a 2.5–3.5 mm hook, and an intermediate structure with a practical display purpose: it stands out as nursery decor or a shelf piece while keeping the body stable and the neck upright.
The Design: What Makes This Swan Different
A princess swan is not just a white bird with a beak. The silhouette depends on three structural calls: a low, weighted oval body; a narrow neck that widens into a rounded head; and wings that read as layered feathers instead of flat paddles. Those choices matter because swans look wrong fast when the neck is too thick or the wings sit too low. In this version, the cheeks stay flat, the beak projects with a clean wedge, and the wings are built as stacked ruffles to match the photo. One common error in a princess swan crochet build is under-stuffing the shoulder line. Then the neck bends backward. Another is attaching the eyes too high, which shortens the face and weakens the swan profile. Published swan patterns also show that larger heads often need wider stitch counts than the neck to keep proportions credible.
Project Info at a Glance
| Skill Level | Time | Finished Size | Hook | Best For |
|---|---|---|---|---|
| Intermediate | 8–12 hrs | 17–22 cm seated | 2.5–3.5 mm | Display decor, nursery shelf, gift make |
Published references show swan builds at 17 cm with 2.5 mm cotton and at 22 cm seated or larger with thicker yarn and hooks.
Materials and Tools
Yarn
- Off-white — 4-ply cotton or worsted — 90–125 g — DMC Natura Just Cotton or Lion Brand Feels Like Butta
- Orange — matching weight — 8 g — beak
- Black — matching weight — 5 g — beak mask
- Pink — matching weight — 8 g — cheeks and wing accents
- Lavender — matching weight — 12 g — wing ruffles and mat
- Pastel blue — matching weight — 12 g — wing ruffles and mat
- Mint or pale aqua — matching weight — 8 g — wing ruffles
- Pale peach — matching weight — 8 g — wing ruffles
Tools
- Hook 2.5 mm or 3.5 mm
- Safety eyes 12 mm for larger build; 5–6 mm for compact build
- Polyfill stuffing
- Tapestry needle
- Stitch markers
- Craft wire or felt strip for crown support, optional
- Decorative trim, beads, or sewn faux gems, optional
Abbreviations
MR = magic ring
sc = single crochet
inc = increase
dec = decrease
sl st = slip stitch
ch = chain
BLO = back loop only
FLO = front loop only
Invisible decrease pulls the front loops together and leaves a cleaner taper on the neck and head.
Pattern — Step by Step
Continuous spiral unless noted.
Beak (Make 1)
Yarn: orange, then black
R1: 6 sc in MR (6)
R2: inc x6 (12)
R3: sc around (12)
R4: 1 sc, inc x6 (18)
R5-R6: sc around (18)
Change to black
R7: sc around (18)
R8: 2 sc, dec x4, 2 sc, dec x2, 2 sc (12)
R9: sc around (12)
Flatten lightly. Fasten off. Leave 20 cm tail.
Head and Neck (Make 1)
Yarn: off-white
R1: 6 sc in MR (6)
R2: inc x6 (12)
R3: 1 sc, inc x6 (18)
R4: 2 sc, inc x6 (24)
R5: 3 sc, inc x6 (30)
R6: 4 sc, inc x6 (36)
R7-R12: sc around (36)
Insert safety eyes between R9 and R10, 8 sts apart for this stylized build.
R13: 4 sc, dec x6 (30)
R14: 3 sc, dec x6 (24)
R15: 2 sc, dec x6 (18)
R16-R28: sc around (18)
Stuff head firmly. Keep neck stuffing dense but not rigid. Fasten off. Leave 25 cm tail.
Body (Make 1)
Yarn: off-white
R1: 6 sc in MR (6)
R2: inc x6 (12)
R3: 1 sc, inc x6 (18)
R4: 2 sc, inc x6 (24)
R5: 3 sc, inc x6 (30)
R6: 4 sc, inc x6 (36)
R7-R12: sc around (36)
R13: 4 sc, dec x6 (30)
R14-R16: sc around (30)
R17: 3 sc, dec x6 (24)
R18-R19: sc around (24)
R20: 2 sc, dec x6 (18)
R21: sc around (18)
Stuff firmly before closing upper opening with neck assembly. Fasten off. Leave 25 cm tail.
Arms / Front Feather Supports (Make 2)
Yarn: off-white
R1: 6 sc in MR (6)
R2: inc x6 (12)
R3-R8: sc around (12)
Flatten. Fasten off. Leave 18 cm tail.
Back Legs / Lower Supports (Make 2)
Yarn: off-white
R1: 6 sc in MR (6)
R2: inc x6 (12)
R3: sc around (12)
R4: 1 sc, dec x4 (8)
R5-R7: sc around (8)
Lightly stuff tip only. Fasten off. Leave 18 cm tail.
Layered Wings (Make 2 outer bases)
Yarn: off-white
R1: 6 sc in MR (6)
R2: inc x6 (12)
R3: 1 sc, inc x6 (18)
R4: 2 sc, inc x6 (24)
R5: 3 sc, inc x6 (30)
R6-R8: sc around (30)
Flatten slightly into a curved teardrop. Fasten off. Leave 25 cm tail.
Wing Ruffle Strips (Make 6 total, 3 per wing)
Yarn: pink, lavender, pastel blue, pale peach, mint as desired
Foundation: ch 26
Row 1: starting in 2nd ch from hook, sc 25 (25)
Row 2: ch 1, turn, inc in each st across (50)
Row 3: ch 1, turn, sc across in BLO (50)
Row 4: ch 1, turn, 2 sc in next st, 1 sc in next st across to create wave (67)
Fasten off. Leave 20 cm tail. Sew three strips in graduated layers onto each wing base, smallest to largest arc.
Tail (Make 1)
Yarn: off-white
R1: 6 sc in MR (6)
R2: inc x6 (12)
R3: 1 sc, inc x6 (18)
R4: 2 sc, inc x6 (24)
R5-R6: sc around (24)
R7: 2 sc, dec x6 (18)
R8: sc around (18)
Flatten into a curved crescent. Fasten off. Leave 20 cm tail.
Cheek Patches (Make 2)
Yarn: pink
R1: 6 sc in MR (6)
R2: inc x6 (12)
Sl st to close.
Fasten off. Leave 12 cm tail.
Crown Base (Make 1)
Yarn: lavender or pink metallic thread
Ch 16, join carefully without twisting.
Round 1: sc around (16)
Round 2: ch 3, sl st in next st around to create points
Fasten off. Leave 20 cm tail. Add beads or faux gems after sewing. A felt strip inside helps it stand upright.
Collar (Make 1)
Yarn: pastel pink or lavender
Ch 24, join.
Round 1: sc around (24)
Round 2: sl st, ch 2, sl st in next st around for small points
Fasten off. Leave 20 cm tail.
Scalloped Display Mat (Make 1)
Yarn: blue, lavender, pale blue
R1: 6 sc in MR (6)
R2: inc x6 (12)
R3: 1 sc, inc x6 (18)
R4: 2 sc, inc x6 (24)
R5: 3 sc, inc x6 (30)
R6: 4 sc, inc x6 (36)
R7: 5 sc, inc x6 (42)
R8: 6 sc, inc x6 (48)
R9: 7 sc, inc x6 (54)
Change color
R10: 8 sc, inc x6 (60)
R11: 9 sc, inc x6 (66)
R12: sl st, 2 dc in next st, sl st in next st around for scallops
Fasten off. Weave in ends.
Assembly
- Sew the neck opening to the top opening of the body, centering the neck slightly forward.
- Stuff the shoulder area again through the seam gap before closing it fully.
- Attach the beak low on the head so the top line angles forward rather than upward.
- Sew the cheek patches one stitch below the eye line, slightly outside the beak corners.
- Attach the tail high on the back so it lifts the rear outline.
- Sew the front feather supports low on the body front to widen the seated silhouette.
- Sew the back supports near the underside rear to keep the body from rolling.
- Pin and sew each wing so the front edge starts near the shoulder and the layered ruffles arc toward the tail.
- Attach the collar around the neck base and secure the crown to the head crown with a few hidden stitches.
- Place the finished swan on the scalloped mat and add optional beads or faux gems last.
The swan is complete when the neck stands upright, the body sits without rocking, and both wings mirror each other in height.
7 Technical Tips
- Mark the first stitch of every round. On a long swan neck, drifting even one stitch per round skews the head and throws the beak off center.
- Pack the lower neck harder than the head. A soft neck folds backward; a dense shoulder column holds the swan line.
- Use invisible decreases on all visible tapers. Standard decreases leave bars that show clearly on white yarn, especially along the face.
- Insert eyes before the final head decreases. Trying to add them after round reduction compresses the fabric and distorts spacing.
- Pin both wings at three points before sewing. One pin at the shoulder is not enough; the rear edge will sag and hide the layered ruffles.
- Keep ruffle strips one hook size tighter if using soft yarn. Loose ruffles collapse and lose the scalloped feather effect seen in the photo.
- Weave tails back through at least 4 cm of internal stitches. Short tail weaving loosens after the crown and wings add weight to the body.
Conclusion
This swan amigurumi crochet pattern works because the neck ratio, body weight, and wing layering stay in balance. The next step is simple: build the plain swan first, then add the collar, crown, and ruffle wings after the silhouette is stable. For publishing, photograph it from the front quarter angle so the beak, lashes, and wing depth all read at once. Share the finished piece on Pinterest and Instagram with #PrincessSwanPattern. One useful question remains for this character: did you set the crown directly over the eye line, or slightly behind it to keep the swan profile clean?









