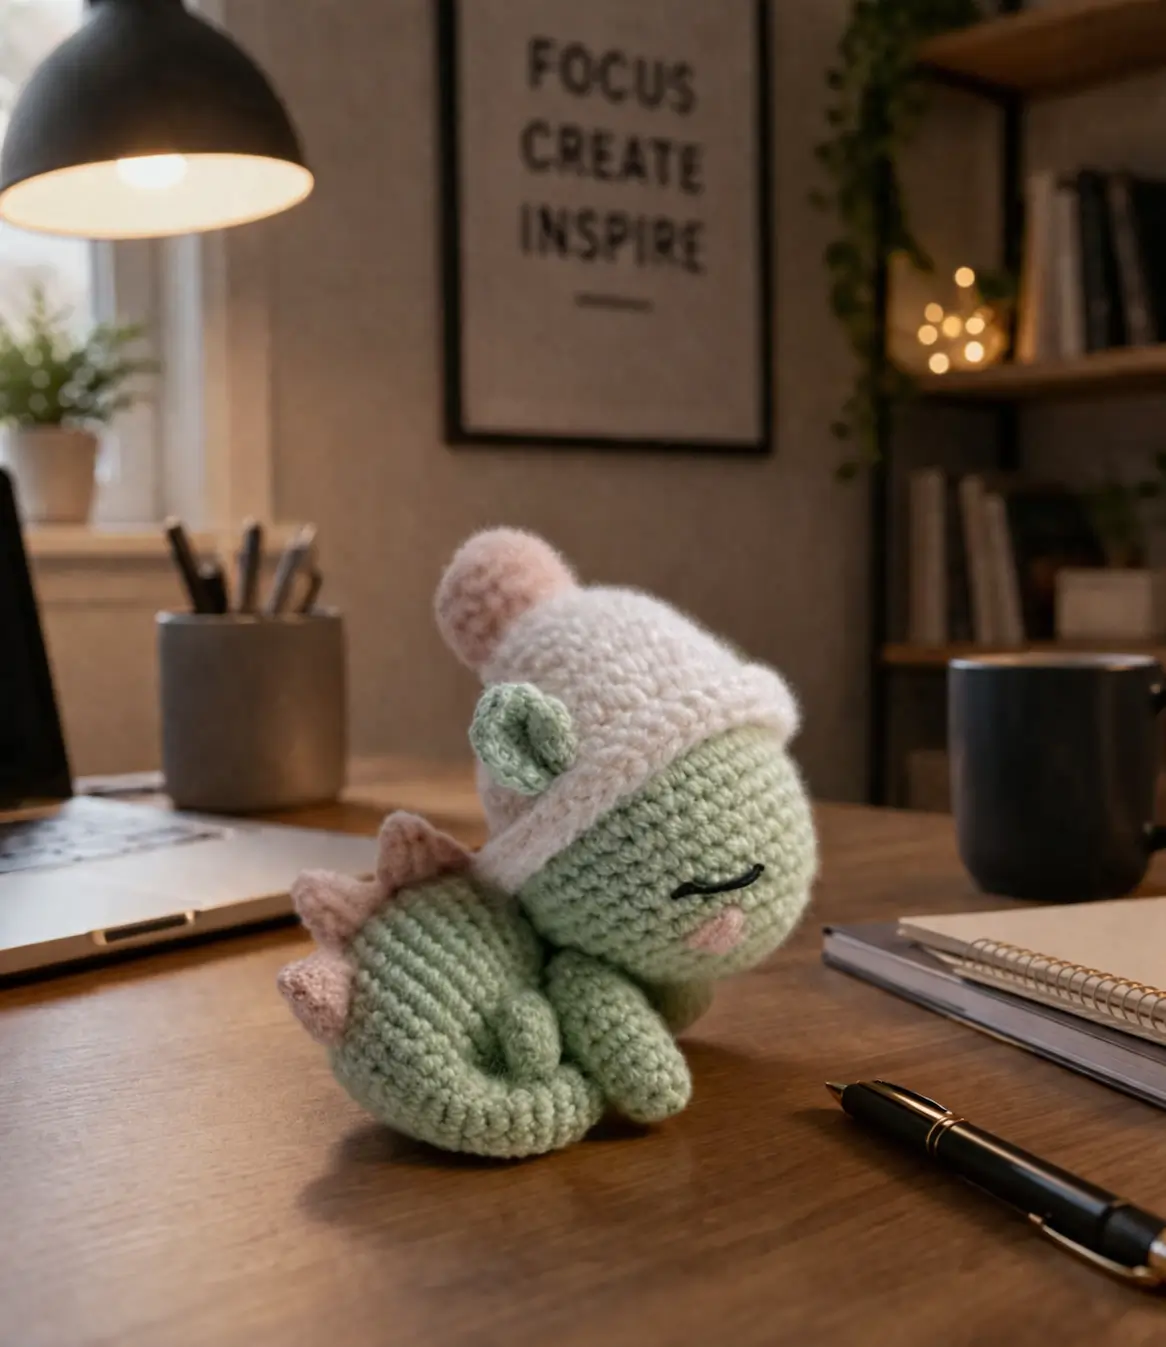
A sleeping dinosaur only reads as a dinosaur if the back plates stay visible after the belly is flattened. This sleeping dinosaur amigurumi crochet pattern builds around that problem with a compact body, four raised spikes, embroidered eyes, and a separate nightcap. The sample suits intermediate makers, uses basic amigurumi materials, finishes as a small desk display, and works well as a shelf mascot beside notebooks or a keyboard.
The Design: What Makes This Dinosaur Different
The body is not built upright. It is shaped low, widened through the middle, then pressed flat so the sleeping pose looks settled instead of collapsed. That choice matters because a standard round amigurumi body turns into a loaf once the head tilts forward. A second decision is the spike spacing. The spikes sit on the top line of the back, not the outer curve, so the silhouette still reads as dinosaur from a side angle. That is a frequent weak point in a sleepy dino crochet pattern. The third choice is the separate hat. It covers the crown, softens the profile, and adds a winter accent without hiding the snout or cheek area. In many baby dinosaur amigurumi versions, makers place limbs too low and the figure rolls. Here, the front legs stay tucked high under the chest to keep the toy stable on a flat surface. The verified sleeping-dino market also shows strong size variation by yarn choice, from about 14 cm in fine cotton up to 35 cm in plush yarn.
Project Info at a Glance
| Skill Level | Time | Finished Size | Hook | Best For |
|---|---|---|---|---|
| Intermediate | 4–6 hours | 10–12 cm photo-style sample; 14 cm verified original | 3.0 mm for this adaptation; 1.75 mm verified original | desk display, nursery shelf, gift topper |
The original sleeping baby dino pattern is listed at about 3.5 hours and 14 cm with a 1.75 mm hook in fine cotton. This photo-based version is scaled to a small worsted sample, so the working time and hook differ.
Materials and Tools
Yarn
- Mint green — worsted — about 45 g — Stylecraft Special DK or similar
- Soft pink — worsted — about 15 g — for spikes, cheeks, and pom-pom
- Cream — worsted — about 20 g — for sleep hat
- Black embroidery floss — small amount — for closed eyes
For the verified original, Adriana Gori used Círculo Anne with a 1.75 mm hook and embroidered eyes. Larger commercial versions also use chenille yarn such as Himalaya Dolphin Baby, with 100 g per ball and two skeins for the main body color in one LoveCrafts listing.
Tools
- Hook 3.0 mm
- Tapestry needle
- Fiber stuffing
- Stitch markers
- Blush or pink pastel
- Small scissors
Abbreviations
MR / sc / inc / dec / sl st / ch / BLO / hdc
Invisible decrease joins two front loops before completing the stitch, which reduces bulk and keeps the body line cleaner on a small flattened toy.
Pattern — Step by Step
Continuous spiral unless noted.
Head (Make 1)
Yarn: mint green — adapted from the verified sleeping baby dino head/body sequence and resized to match the photo.
R1: 6 sc in MR (6)
R2: inc x6 (12)
R3: (1 sc, inc) x6 (18)
R4: (2 sc, inc) x6 (24)
R5: (3 sc, inc) x6 (30)
R6: 30 sc (30)
R7: 30 sc (30)
R8: 30 sc (30)
R9: 30 sc (30)
R10: (3 sc, dec) x6 (24)
R11: 24 sc (24)
R12: (2 sc, dec) x6 (18)
Embroider the sleeping eye before final assembly. Place it across 2 stitches, slightly curved downward. Add cheek patches later.
Fasten off. Leave a 20 cm tail.
Body (Make 1)
Yarn: mint green — adapted from the verified sleeping baby dino body logic: long midsection, visible plateau, flattened belly, then reduced close.
R1: 6 sc in MR (6)
R2: inc x6 (12)
R3: (1 sc, inc) x6 (18)
R4: (2 sc, inc) x6 (24)
R5: (3 sc, inc) x6 (30)
R6: (4 sc, inc) x6 (36)
R7: 36 sc (36)
R8: 36 sc (36)
R9: 36 sc (36)
R10: 36 sc (36)
R11: 36 sc (36)
R12: (4 sc, dec) x6 (30)
R13: 30 sc (30)
R14: (3 sc, dec) x6 (24)
R15: 24 sc (24)
R16: (2 sc, dec) x6 (18)
R17: 18 sc (18)
R18: (1 sc, dec) x6 (12)
Stuff lightly. Press the lower side against the table while filling so the belly stays flat, not domed. That flattening method follows the logic of the verified sleeping baby dino source.
Fasten off. Leave a 25 cm tail.
Front Legs (Make 2)
Yarn: mint green — based on the verified front-leg proportions.
R1: 6 sc in MR (6)
R2: (2 sc, inc) x2 (8)
R3: 8 sc (8)
R4: 8 sc (8)
R5: (2 sc, dec) x2 (6)
Stuff the paw end only.
Fasten off. Leave a 15 cm tail.
Back Legs (Make 2)
Yarn: mint green — adapted from the verified back-leg shape.
R1: 6 sc in MR (6)
R2: inc x6 (12)
R3: (1 sc, inc) x6 (18)
R4: BLO 18 sc (18)
R5: 18 sc (18)
R6: (1 sc, dec) x6 (12)
R7: (4 sc, dec) x2 (10)
R8: 10 sc (10)
Stuff lightly and flatten the top edge before sewing.
Fasten off. Leave a 15 cm tail.
Ear Bumps (Make 2)
Yarn: mint green — standard amigurumi math adapted to the photo’s small rounded side bumps.
R1: 6 sc in MR (6)
R2: (2 sc, inc) x2 (8)
R3: 8 sc (8)
Do not stuff. Flatten. Fasten off. Leave a 12 cm tail.
Back Spikes (Make 4 total)
Yarn: soft pink — derived from the verified big/small spike sequence.
Big Spikes (Make 2)
R1: 6 sc in MR (6)
R2: (2 sc, inc) x2 (8)
R3: (3 sc, inc) x2 (10)
R4: (4 sc, inc) x2 (12)
R5: 12 sc (12)
Do not stuff. Fasten off. Leave a 15 cm tail.
Small Spikes (Make 2)
R1: 6 sc in MR (6)
R2: (2 sc, inc) x2 (8)
R3: (3 sc, inc) x2 (10)
R4: 10 sc (10)
Do not stuff. Fasten off. Leave a 15 cm tail.
Tail Tip Bump (Make 1)
Yarn: mint green — standard amigurumi math adapted to the curled tail visible in the photo silhouette.
R1: 6 sc in MR (6)
R2: (1 sc, inc) x3 (9)
R3: 9 sc (9)
Do not stuff. Fasten off. Leave a 10 cm tail.
Cheek Patches (Make 2)
Yarn: soft pink — flat circle for the blush ovals in the photo.
R1: 6 sc in MR (6)
R2: inc x6 (12)
Sl st to close.
Flatten into a slight oval with your fingers. Leave a 10 cm tail.
Sleep Hat (Make 1)
Yarn: cream — standard amigurumi hat math adapted to the photo.
R1: 6 sc in MR (6)
R2: inc x6 (12)
R3: (1 sc, inc) x6 (18)
R4: (2 sc, inc) x6 (24)
R5: (3 sc, inc) x6 (30)
R6: (4 sc, inc) x6 (36)
R7: 36 sc (36)
R8: 36 sc (36)
R9: 36 sc (36)
R10: 36 sc (36)
R11: 18 dec (18)
R12: 18 sc (18)
R13: (1 sc, dec) x6 (12)
R14: 12 sc (12)
R15: 6 dec (6)
Fasten off. Leave a 20 cm tail.
Hat Brim (Make 1)
Yarn: cream — worked separately for a folded edge like the photo.
Ch 31.
Row 1: starting in second ch from hook, 30 sc (30)
Row 2: 30 sc (30)
Row 3: 30 sc (30)
Fasten off. Leave a 25 cm tail.
Pom-Pom Center (Make 2)
Yarn: soft pink — small stuffed circles joined together.
R1: 6 sc in MR (6)
R2: inc x6 (12)
Make 2. Lightly stuff between the circles when sewing closed. Fasten off.
Assembly
- Sew the head to the front third of the body, angled downward so the snout points toward the table.
- Add light stuffing to the neck join only if the head droops too far.
- Sew the cheek patches low on each side of the face, just behind the snout line.
- Embroider the closed eye above the cheek patch. Keep it 2 stitches long. The verified original places embroidered eyes between rows 9 and 10.
- Sew the front legs high under the chest so the dinosaur looks tucked in rather than standing.
- Sew the back legs at the widest point of the body, slightly lower than the spike line, and flatten them outward.
- Attach the two ear bumps to the upper sides of the head where the hat opening will still leave them partly visible.
- Sew the small and big spikes along the center back in this order: small, big, big, small. The verified source also uses that graduated spike rhythm.
- Join the hat seam, sew the brim around the lower edge, add the pom-pom, then place the hat at a slight tilt over the crown.
- Stitch the tail tip bump at the rear curve and weave in every tail inside the body, not across the outer belly.
The piece is complete when it sits flat on the belly without rocking and the spike line stays visible from the side.
7 Technical Tips
- Mark the first stitch of every round. Losing the round start by even one stitch will shift the head seam and pull the snout off center.
- Stuff the body to about seventy percent firmness. Overfilling rounds 12–16 is what turns a sleeping pose into a barrel.
- Use invisible decreases on the body close. Standard decreases leave ridges that show on a small smooth dinosaur side.
- Embroider the eye before the hat goes on. Once the brim is attached, your needle angle becomes awkward and the eye line often ends up too high.
- Keep the front legs no lower than the chest join. If they drift down by even one round, the dinosaur reads as crawling instead of sleeping.
- Pin the spikes first and check the side profile. A big spike placed too far back makes the shoulder area look empty.
- Weave yarn tails vertically inside the body wall. Horizontal tail paths can print through the flattened belly and show as lumps on the desk-facing side.
Conclusion
This sleeping dinosaur amigurumi crochet pattern works because the shaping stays low, the spikes keep the dinosaur profile readable, and the hat adds character without covering the face. The next step is simple: swatch your yarn, match the body firmness to the flat pose, and test the head angle before sewing anything permanently. Share the finished piece on Pinterest and Instagram with one side-view photo and one top-view photo so the spike placement is clear. Use #SleepingDinosaurPattern when you post. One question remains useful during finishing: did your hat sit behind the second spike, or did it slide far enough back to hide the neck line?









